Unit – 1
Java Beans and Web Servers
JavaBeans is a platform-agnostic, portable model developed in the Java programming language. Beans are the components that make it up.
JavaBeans, to put it simply, are classes that encapsulate several objects into a single object. It facilitates access to these objects from a variety of locations. Constructors, Getter/Setter Methods, and other features are included in JavaBeans.
There are a few JavaBeans conventions that should be followed:
● A default constructor should be available for beans (no arguments).
● Getter and setter methods should be available in beans.
○ To read the value of a readable property, a getter method is utilized.
○ A setter method should be used to update the value.
● JavaBeans should implement java.io.serializable because it allows you to save, store, and restore the state of the JavaBean you're dealing with.
A JavaBean is a Java class that must adhere to the following rules:
● It should have a constructor that takes no arguments.
● Serializable is a must.
● It should include getter and setter methods for setting and retrieving the values of properties.
Advantages
The following are some of Java Beans benefits:
● Portable: Because JavaBeans are written entirely in Java, they can run on any platform that supports the Java Run-Time Environment. The Java Virtual Machine implements all platform-specific features, as well as JavaBeans support.
● Compact and Easy: Components made with JavaBeans are simple to design and use. The JavaBeans architecture places a strong emphasis on this area. Writing a simple Bean does not need much work. Furthermore, because a bean is light, it does not need to carry a lot of inherited baggage to maintain the bean's environment.
● Carries the Strengths of the Java Platform: There isn't any new sophisticated process for registering components with the run-time system in JavaBeans, so it's very compatible.
● Another program can access the JavaBean properties and methods.
● It makes reusing software components much easier.
Properties
A JavaBean property is a named feature that the user of the object can access. The feature can be any Java data type, and it must contain the classes you specify.
A property on a JavaBean can be read, write, read-only, or write-only. Two methods in the JavaBean's implementation class are used to access JavaBean features:
For example, if the property is called firstName, the method to read it is called getFirstName(). The accessor is the name for this procedure.
2. setPropertyName ()
For example, if the property name is firstName, the method to write that value is setFirstName(). The mutator is the name of this approach.
BDK
The JavaBeans Creation Kit (or BDK) is "designed to enable the development of JavaBeans components and to operate as a common reference base for both component developers and tool providers," according to Sun documentation. It can be used as a standalone development tool (similar to the Java2 SDK's command-line tools) or as a testing tool to ensure that your components perform as expected.
Is a JavaBean creation, configuration, and testing environment.
The following are the characteristics of the BDK environment:
● Provides a graphical user interface for creating, configuring, and testing JavaBeans.
● BDK allows you to change JavaBean properties and connect numerous JavaBeans in a single application.
● A set of sample JavaBeans is provided.
● Allows you to link predefined events to JavaBeans in a sample.
Identifying BDK Components
Execute the run.bat file of BDK to start the BDK development environment.
The following are the components of the BDK development environment:
1. ToolBox
2. BeanBox
3. Properties
4. Method Tracer
ToolBox window: The BDK example JavaBeans are listed here. The ToolBox window is depicted in the diagram below:
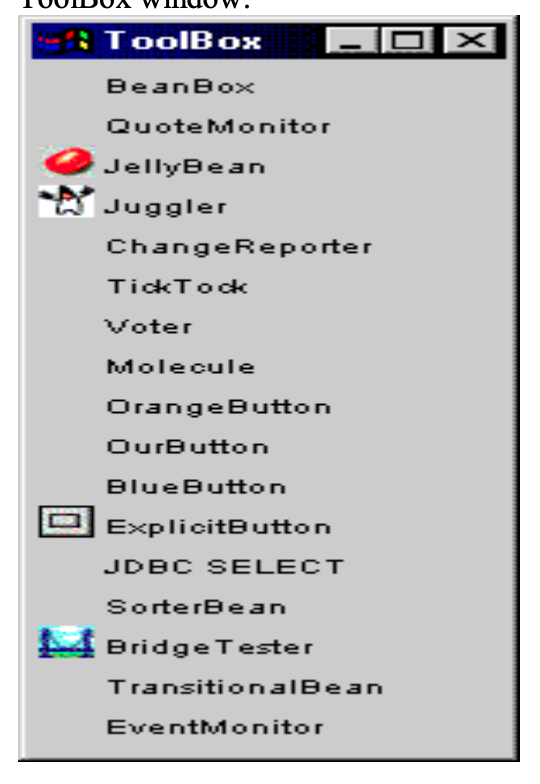
Fig 1: Toolbox window
BeanBox window: Is a workspace for laying out a JavaBean application's layout.
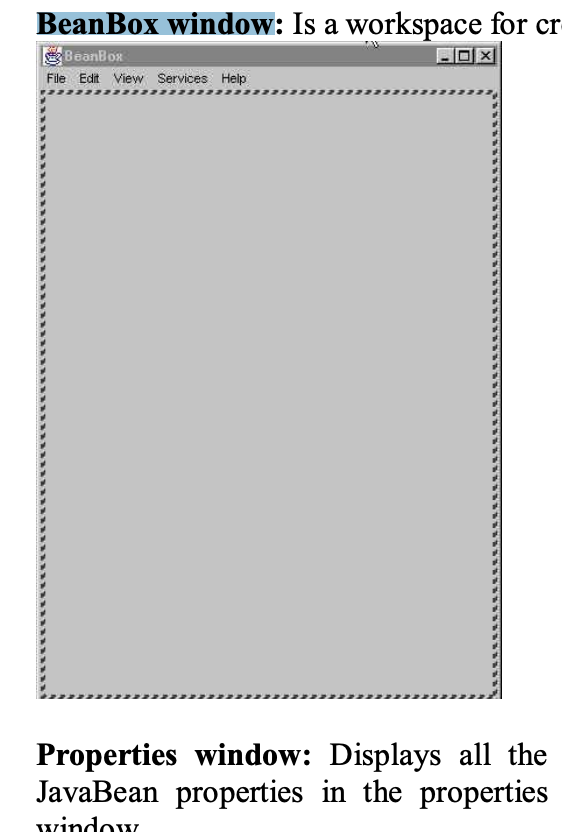
Fig 2: Beanbox window
Properties window: Displays all of a JavaBean's exposed attributes. In the properties pane, you can change JavaBean properties. The Properties window is seen in the diagram below.
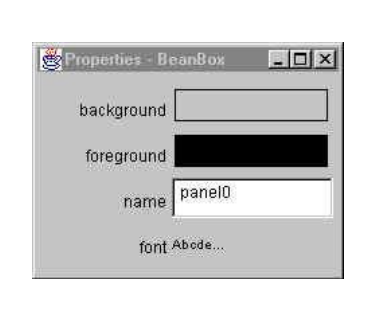
Fig 3: Properties window
Method Tracer window: A JavaBean application's debugging messages and method calls are displayed. The Method Tracer window is depicted in the diagram below:
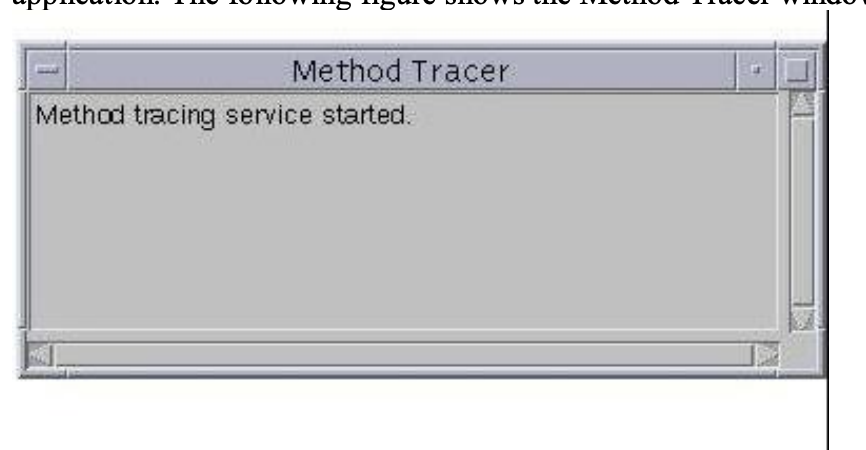
Fig 4: Method tracer window
Key takeaway
EJB stands for "Enterprise Java Beans". EJB is a component-based development paradigm that enables us to create safe, scalable, and robust applications. EJB allows you to create reusable business logic components.
The Component-Container design underpins the Java Enterprise Edition architecture. The container holds numerous components and provides them with an execution environment to let them accomplish their functions.
EJB Components (Session bean, Message-driven bean), Web Components (Servlet, JSP, JSF), and Client Components are the three forms of Java EE components (Application client component, Applet). The EJB container, which is part of the Java EE Application Server, contains the EJB components.
It is a Sun Microsystems specification for developing safe, robust, and scalable distributed applications.
RMI Tutorial is a good place to start if you want to learn more about distributed applications.
An application server (EJB Container) such as Jboss, Glassfish, Weblogic, Websphere, and others is required to run EJB applications. It accomplishes the following:
Because EJB applications are deployed on the server, they are also known as server-side components.
Key takeaway
The java.beans package contains a set of classes and interfaces that provide JavaBeans functionality.
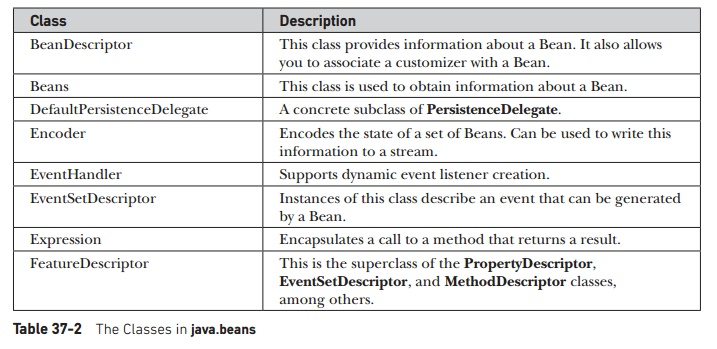
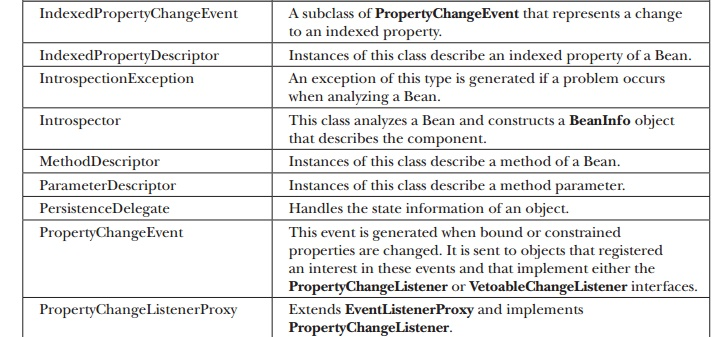
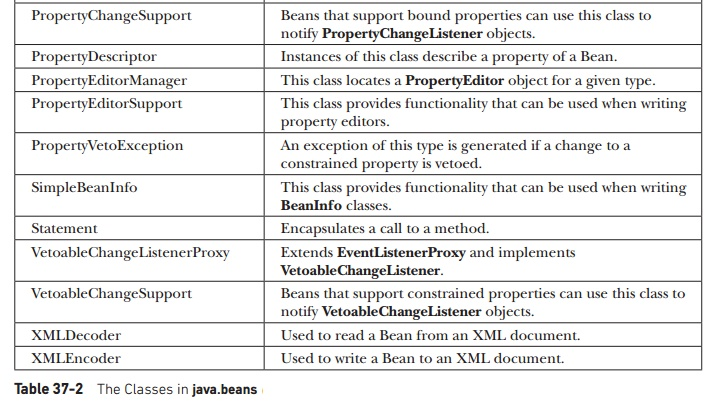
Tables 1: Classes in javabeans
Interface | Description |
AppletInitializer | This interface's methods are used to create Beans that are also applets. |
BeanInfo | The designer can use this interface to specify information about a Bean's events, methods, and properties. |
Customizer | This interface enables the designer to build a graphical user interface for configuring a bean. |
DesignMode | This interface's methods detect whether a bean is in design mode. |
ExceptionListener | A method in this interface is invoked when an exception has occurred. |
PropertyChangeListener | When a bound property is modified, a method in this interface is called. |
PropertyEditor | The designer can alter and show property values using objects that implement this interface. |
VetoableChangeListener | When a Constrained property is modified, a method in this interface is called. |
Visibility | This interface's methods enable a bean to run in environments where the GUI isn't available. |
Table 2: Interface in javabeans
A web application is built using Servlet technology (resides at the server side and generates a dynamic web page).
The Servlet API contains several interfaces and classes, such as Servlet, GenericServlet, HttpServlet, ServletRequest, ServletResponse, and so on.
Java Servlets are programs that run on a Web or Application server and function as a middle layer between requests from a Web browser or other HTTP client and the HTTP server's databases or applications.
You can use Servlets to collect user feedback through web page forms, present records from a database or another source, and dynamically construct web pages.
Depending on the background, a servlet can be represented in a variety of ways.
● A web application is created using Servlet technology.
● Servlet is an API that includes documentation as well as a variety of interfaces and classes.
● Any Servlet must have a Servlet interface that must be implemented.
● Servlet is a class that enhances the server's capabilities and responds to incoming requests. It is capable of responding to any message.
● A servlet is a server-side web component that allows you to build a dynamic web page.
Servlet Life Cycle
There are five stages in the life cycle of a servlet:
1) Loading of Servlet
2) Creating instance of Servlet
3) Invoke init() once
4) Invoke service() repeatedly for each client request
5) Invoke destroy()
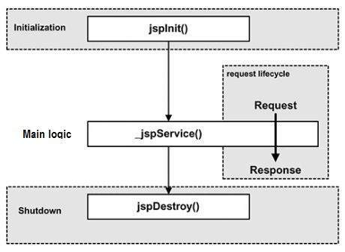
Fig 5: Servlet life cycle
Step 1: Loading of Servlet
The servlet container deploys and loads all the servlets when the web server (for example, Apache Tomcat) starts up.
Step 2: Creating instance of Servlet
The servlet container produces instances of each servlet class until all of the servlet classes have been loaded. The servlet container only generates one instance of each servlet class, and all servlet requests are handled by the same servlet instance.
Step 3: Invoke init() method
The init() method is called for each instantiated servlet until all of the servlet classes have been instantiated. The servlet is initialized with this form. In the deployment descriptor (web.xml) file, you can define those init parameters.
Syntax of init method
public void init(ServletConfig config) throws ServletException
Step 4: Invoke service() method
When a servlet request is received, the web server creates a new thread that calls the service() function. If the servlet is GenericServlet, the request is handled directly by the service() process; if the servlet is HttpServlet, the request is received and dispatched to the appropriate handler method based on the request form.
Syntax
public void service(ServletRequest request, ServletResponse response) throws ServletException, IOException
Step 5: Invoke destroy() method
When the servlet container shuts down (which normally occurs when the web server is stopped), it unloads all of the servlets and calls the destroy() method on each one that has been initialized.
Syntax
public void destroy()
JSDK
● The Java Servlet Developers Kit is also known as JSDK. This is a supplement to the standard JDK (Java Developers Kit). The JSDK contains the extra files required to compile Java servlets. A Java Servlet Runner program is included with the JSDK.
● The Servlet Runner is an application that runs on your computer and helps you test servlets without having to run a web server.
● Several Java Servlet examples are also included in the package. The Java and.class files are included for testing purposes and to assist you in understanding how the Java code is implemented. The jsdk.jar file is another key component provided. The class information required to compile the servlets is contained in this file.
Servlet API
Interfaces and classes for the servlet API are represented by the javax.servlet and javax.servlet.http packages.
The Servlet API has been in constant development and improvement since its inception.
Version 2.4 of the servlet specification is currently in use.
The servlet or web container uses numerous interfaces and classes from the javax.servlet package. These aren't tied to any particular protocol.
Interfaces and classes in the javax.servlet.http package are only responsible for http requests.
Let's look at the javax.servlet package's interfaces.
Interfaces in javax.servlet package
The javax.servlet package has a large number of interfaces. The following are the details:
Classes in javax.servlet package
The javax.servlet package has a large number of classes. The following are the details:
Key takeaway
The javax.servlet.http package includes a number of interfaces and classes that servlet developers frequently utilize.
The javax.servlet.http package contains classes that deal specifically with HTTP requests. It includes the HttpServlet class, which implements the required javax.servlet interfaces.
Its functionality makes it easy to build servlets that work with HTTP requests and responses.
Interfaces
● HttpServletRequest – HTTP-specific functionality is added to the ServletRequest interface.
● HttpServletResponse – HTTP-specific functionalities are added to the ServletResponse interface.
● HttpSession – Allows you to use the session tracking API.
Classes
● HttpServlet – An abstract class with HTTP request implementation functionality. It's worth noting that the Servlet interface's service() method now calls doGet() and doPost(), which can be used to provide Servlet behavior.
● Cookies – The cookie class is a user-interface for storing small amounts of data on a user's machine.
● HttpServletRequestWrapper and HttpServletResponseWrapper – The HttpServletResponse and HttpServletRequest interfaces are implemented here.
A web application consists of requests and responses. A user sends a request to the servlet container via a web browser in a servlet application, and the servlet container passes the request on to the servlet.
The Servlet Request object given by the servlet container as the first input to the service method represents the user request in the servlet paradigm. A Servlet Answer object, which represents the user's response, is passed as the second argument to the service method.
Key takeaway
There are four degrees or senses of the security issue to consider.
● Authentication
● Authorization
● Integrity
● Confidentiality
Security
Client wants to know she's talking to a real server (authentication) and that the information she sends is kept private. The server wants to ensure that the client is who she says she is and that the information is kept private. Both parties want to ensure that the information passes without being tampered with.
Authentication: Having the ability to confirm the parties' identities.
Integrity: Assuring that the message is only understood by the people involved.
Confidentiality: Being able to ensure that the communication's content is not altered during transmission.
Digital certificate technology connects authentication, confidentiality, and integrity. Web servers and clients can utilize advanced cryptographic techniques to handle identification and encryption in a secure manner with digital certificates. Servlets are a great foundation for creating secure online applications that leverage digital certificate technology, thanks to Java's built-in support for digital certificates.
It's also about preventing crackers from gaining access to your web server's sensitive data. Because Java was built from the ground up to be a secure, network-oriented language, you can take advantage of the built-in security features to ensure that third-party server add-ons are practically as secure as those you write yourself.
The variety of data types that a programming language offers is one of its most fundamental features. These are the kind of values that a programming language can represent and modify.
You can interact with three primitive data types in JavaScript.
● Numbers, e.g., 123, 120.50 etc.
● Strings of text e.g. "This text string" etc.
● Boolean e.g., true or false.
Null and undefined are two other simple data types defined by JavaScript, each of which has only one value. JavaScript also allows a composite data type known as object in addition to these base data types.
There is no distinction between integer and floating-point values in JavaScript. In JavaScript, all integers are represented as floating-point values. The IEEE 754 standard specifies a 64-bit floating-point representation for numbers in JavaScript.
Variables
Variables are present in JavaScript, as they are in many other programming languages. Variables are referred to as "named containers." Data can be placed in these containers, and the data can then be referred to simply by identifying the container.
A variable must be declared before it can be used in a JavaScript program. The var keyword is used to declare variables, as shown below.
<script type = "text/javascript">
<!--
var money;
var name;
//-->
</script>
You can also use the same var keyword to declare numerous variables, as shown below.
<script type = "text/javascript">
<!--
var money, name;
//-->
</script>
Variable initialization is the process of storing a value in a variable. Variable initialization can be done at the time of variable formation or at a later time when the variable is required.
You could, for example, define a variable called money and later assign the value 2000.50 to it. You can assign a value to another variable at the time of initialization, as seen below.
<script type = "text/javascript">
<!--
var name = "Ali";
var money;
money = 2000.50;
//-->
</script>
JavaScript is a typeless programming language. This means that any data type can be stored in a JavaScript variable. Unlike many other languages, you don't have to specify the type of value a variable will hold when declaring it with JavaScript.
Operators
Let's look at a simple example. The sum of 4 and 5 is 9. The operands in this case are 4 and 5, and the operator is ‘+.' The following operators are supported by JavaScript.
● Arithmetic Operators
● Comparison Operators
● Logical (or Relational) Operators
● Assignment Operators
● Conditional (or ternary) Operators
Arithmetic operator
The following arithmetic operators are supported by JavaScript:
Assume variable A has a value of 10 and variable B has a value of 20.
Ex: A + B will give 30
2. - (Subtraction) - Subtracts the second operand from the first
Ex: A - B will give -10
3. * (Multiplication) - Multiply both operands
Ex: A * B will give 200
4. / (Division) - Divide the numerator by the denominator
Ex: B / A will give 2
5. % (Modulus) - Outputs the remainder of an integer division
Ex: B % A will give 0
6. ++ (Increment) - Increases an integer value by one
Ex: A++ will give 11
7. -- (Decrement) - Decreases an integer value by one
Ex: A-- will give 9
Comparison operator
The following comparison operators are supported by JavaScript:
Assume variable A has a value of 10 and variable B has a value of 20.
Logical operator
The following logical operators are supported by JavaScript:
Assume variable A has a value of 10 and variable B has a value of 20
Bitwise operator
The following bitwise operators are supported by JavaScript:
Assume variable A has a value of 10 and variable B has a value of 20
Assignment operator
The following assignment operators are supported by JavaScript
4. *= (Multiply and Assignment) - It adds the right and left operands together and assigns the result to the left operand.
5. /= (Divide and Assignment) - The left operand is divided by the right operand, and the result is assigned to the left operand.
6. %= (Modules and Assignment) - It uses two operands to calculate modulus and assigns the result to the left operand.
Conditional statements
The conditional operator examines an expression for a true or false value before executing one of the two specified statements based on the evaluation result.
?: (Conditional )
What happens if Condition is true? If so, use value X; else, use value Y.
Array object
You can store numerous values in a single variable using the Array object. It keeps a fixed-size collection of elements of the same type in a sequential order. Although an array is used to hold data, it is often more beneficial to conceive of it as a collection of variables of the same type.
Syntax
To make an Array object, use the following syntax:
var fruits = new Array( "apple", "orange", "mango" );
A list of strings or integers is passed in as the Array parameter. The initial length of the array is specified when you use the Array constructor with a single number input. An array can have a maximum length of 4,294,967,295.
You can make an array by simply assigning values to it as seen below.
var fruits = [ "apple", "orange", "mango" ];
You can make an array by simply assigning values to it as seen below.
fruits[0] is the first element
fruits[1] is the second element
fruits[2] is the third element
Array methods
Date object
The Date object is a built-in datatype in the JavaScript programming language. The new Date( ) method is used to construct date objects, as demonstrated below.
Once you've generated a Date object, you may use a variety of methods to manipulate it. The year, month, day, hour, minute, second, and millisecond fields of the object can be retrieved and set using either local or UTC (universal, or GMT) time.
The Date object must be able to represent any date and time within 100 million days before or after 1/1/1970, to millisecond precision, according to the ECMAScript standard. JavaScript may represent date and time until the year 275755, which is a range of plus or minus 273,785 years.
Syntax
The Date() constructor can be used with any of the following syntaxes to build a Date object.
new Date( )
new Date(milliseconds)
new Date(datestring)
new Date(year,month,date[,hour,minute,second,millisecond ])
The following is a list of the parameters:
No argument - The Date() constructor takes no arguments and returns a Date object with the current date and time.
milliseconds - The internal numeric representation of the date in milliseconds, as returned by the getTime() method, is used when one numeric argument is supplied. Passing the parameter 5000, for example, sets a date that represents five seconds past midnight on January 1, 1970.
datestring - When one string parameter is given, it represents a date in the format that the Date.parse() method accepts.
7 arguments - To utilize the constructor's last form, as illustrated above. Here's a breakdown of each argument:
● Year - The year is represented by an integer value. You should always supply the year in full, rather than 98, for compatibility (and to avoid the Y2K bug).
● month - Beginning with 0 for January and ending with 11 for December, this integer value represents the month.
● date - The month's day is represented by an integer value.
● hour - The hour of the day is represented by an integer value (24-hour scale).
● minute - The minute segment of a time reading is represented as an integer value.
● second - The second segment of a time reading is represented as an integer value.
● milliseconds - A millisecond chunk of a time reading is represented as an integer value.
Date methods
String object
The String object surrounds Javascript's string primitive data type with a variety of helpful methods, allowing you to operate with a string of characters.
Because JavaScript automatically converts string primitives to String objects, you can use any of the String object's helper functions on a string primitive.
Syntax
To make a String object, use the following syntax:
var val = new String(string);
The String parameter contains a sequence of properly encoded characters.
String Method
The methods accessible in the String object are listed below.
Key takeaway
Cascading Style Sheets (CSS) dynamic positioning allows Web authors to precisely control their content and where it displays on the page. Authors can offset things from their original places in the usual flow, or remove them from the flow entirely and place them in a specific area, in addition to directly determining their size.
Using dynamic positioning instead than modifying the page's normal flow has various advantages:
● The exact location of content can be determined with pinpoint accuracy. The size of the browser window is no longer a limiting issue, yet smart design demands that it be considered.
● To fit into complex table structures, the content does not need to be deformed.
● Content can be made visible or invisible, which allows for dynamic effects that are scriptable.
● Layering content allows more than one item to appear in the same spot on a page.
These are only a handful of dynamic positioning's benefits. Dynamic positioning allows Web authors to create material that is both attractive and predictable. It also has the potential to improve usability by reducing the number of times users must click to accomplish their goal (since menu-like structures can be developed within pages).
Learning the numerous forms of content that might appear on a page, including as blocks, inline content, and floats, is necessary for understanding dynamic placement.
Block Elements
Every page is, at its core, a content block. This block also contains extra content, which could be made up of other blocks or content. There are two ways that block elements differ from other elements.
One of the most distinguishing characteristics of blocks is that they are stacked vertically on the page, with each block appearing below the block that came before it, even if there appears to be enough space on the line for the new text.
Inline Elements
Inline content is a second sort of material that always displays within a block. As long as there is room on the line, inline content items are presented next to each other. If there isn't enough area on the line, an inline item can be split into two, with the second showing on the next line.
Floats
Floats, or floated elements, combine some of the best features of both block and inline components. A floating element is first set out in accordance with the page's usual flow, but then floated to the right or left until its outer edge reaches the edge of its containing block.
Front end validation
Form validation used to be done on the server after the client had provided all of the required information and pushed the Submit button. If a client's input was inaccurate or incomplete, the server would have to send all of the information back to the client and request that the form be resubmitted with the right information. This was a time-consuming operation that put a lot of strain on the server.
Before submitting form data to the web server, JavaScript allows you to validate it on the client's machine. Validation of forms usually serves two purposes.
● Basic validation - First and foremost, the form must be double-checked to ensure that all essential fields have been completed. It would only take a loop over the form's fields to check for data.
● Data Format validation – Second, the data must be double-checked for accuracy in terms of both form and value. Appropriate logic must be included in your code to ensure that data is correct.
Example
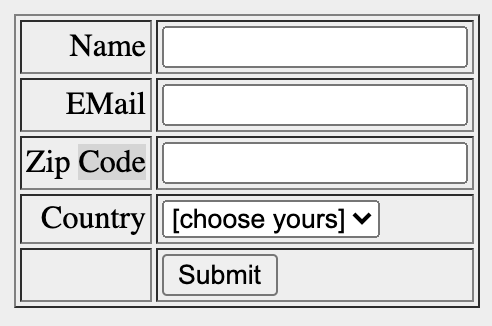
To further understand the validation process, we'll use an example. Here's a simple HTML form for you to use.
<html>
<head>
<title>Form Validation</title>
<script type = "text/javascript">
<!--
// Form validation code will come here.
//-->
</script>
</head>
<body>
<form action = "/cgi-bin/test.cgi" name = "myForm" onsubmit = "return(validate());">
<table cellspacing = "2" cellpadding = "2" border = "1">
<tr>
<td align = "right">Name</td>
<td><input type = "text" name = "Name" /></td>
</tr>
<tr>
<td align = "right">EMail</td>
<td><input type = "text" name = "EMail" /></td>
</tr>
<tr>
<td align = "right">Zip Code</td>
<td><input type = "text" name = "Zip" /></td>
</tr>
<tr>
<td align = "right">Country</td>
<td>
<select name = "Country">
<option value = "-1" selected>[choose yours]</option>
<option value = "1">USA</option>
<option value = "2">UK</option>
<option value = "3">INDIA</option>
</select>
</td>
</tr>
<tr>
<td align = "right"></td>
<td><input type = "submit" value = "Submit" /></td>
</tr>
</table>
</form>
</body>
</html>
Output
Key takeaway
Event handlers are provided by JavaScript to allow you to run your code when these events occur. In JavaScript, all event handlers begin with the word on, and each event handler deals with a specific sort of event.
The event handler for the click event is called onclick, for example.
You can use an HTML attribute with the name of the event handler to attach an event handler to an event connected with an HTML element. To execute some code when a button is pressed, for example, you can use the following:
The following is a list of all the JavaScript event handlers, along with the objects they apply to and the events that trigger them:
Event handler | Applies to | Triggered when |
onAbort | Image | The image loading has been canceled. |
onBlur | Button, Checkbox, FileUpload, Layer, Password, Radio, Reset, Select, Submit, Text, TextArea, Window | The object in question loses its sharpness (e.g. by clicking outside it or pressing the TAB key). |
onChange | FileUpload, Select, Text, TextArea | The user modifies the data in the form element. |
onClick | Button, Document, Checkbox, Link, Radio, Reset, Submit | The object has been selected. |
onDblClick | Document, Link | The object is selected by a double-click. |
onDragDrop | Window | A browser icon is dragged and dropped inside it. |
onError | Image, Window | There is a JavaScript error. |
onFocus | Button, Checkbox, FileUpload, Layer, Password, Radio, Reset, Select, Submit, Text, TextArea, Window | The object in issue is brought into sharper focus (e.g. by clicking on it or pressing the TAB key). |
onKeyDown | Document, Image, Link, TextArea | A key is pressed by the user. |
onKeyPress | Document, Image, Link, TextArea | A key is pressed or held down by the user. |
onKeyUp | Document, Image, Link, TextArea | A key is released by the user. |
onLoad | Image, Window | The entire page has now been loaded. |
onMouseDown | Button, Document, Link | A mouse button is pressed by the user. |
onMouseMove | None | The mouse is moved by the user. |
onMouseOut | Image, Link | The mouse is moved away from the object by the user. |
onMouseOver | Image, Link | The mouse is moved over the object by the user. |
onMouseUp | Button, Document, Link | A mouse button is released by the user. |
onMove | Window | The browser window or frame is moved by the user. |
onReset | Form | The user presses the Reset button on the form. |
onResize | Window | The browser window or frame is resized by the user. |
onSelect | Text, Textarea | Within the field, the user picks text. |
onSubmit | Form | The user presses the Submit button on the form. |
onUnload | Window | The user navigates away from the page. |
Key takeaway
References: