Isometric Projections
Isometric projection is a type of pictorial projection in which the three dimensions of a solid are not only shown in one view, but their actual sizes can be measured directly from it.
If a cube is placed on one of its corners on the ground with a solid diagonal perpendicular to the V.P., the front view is the isometric projection of the cube. The step-by-step construction is shown in fig.1.
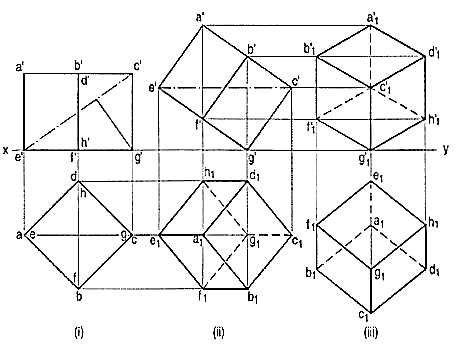
To draw the projections of a cube of 25 mm long edges resting on the ground on one of its corners with a solid diagonal perpendicular to the V.P., assume the cube to be resting on one of its faces on the ground with a solid diagonal parallel to the V.P.
(I) draw a square abed in the top view with its sides inclined at 45° to xy. The line ac representing the solid diagonals AG and CE is parallel to xy. Project the front view.
(ii) Tilt the front view about the corner g' so that the line e' c' becomes parallel to xy. Project the second top view. The solid diagonal CE is now parallel to both the H.P. and the V.P.
(iii) Reproduce the second top view so that the top view of the solid diagonal, viz. e1 c1 is perpendicular to xy. Project the required front view.
Figure shows the front view of the cube in the above position, with the corners named in capital letters. Its careful study will show that
(a) All the faces of the cube are equally inclined to the V.P. and hence, they are seen as similar and equal rhombuses instead of squares.
(b) The three lines CB, CD and CG meeting at C and representing the three edges of the solid right-angle are also equally inclined to the V.P. and are therefore, equally fore shortened. They make equal angles of 120° with each other. The line CG being vertical, the other two lines CB and CD make 30° angle each, with the horizontal.

(c) All the other lines representing the edges of the cube are parallel to one or the other of the above three lines and are also equally foreshortened.
(d) The diagonal BO of the top face is parallel to the V.P. and hence, retains its true length.
Isometric axes, lines and planes:
The three lines CB, CD and CG meeting at the point C and making 120° angles with each other are termed isometric axes. The lines parallel to these axes are called isometric lines. The planes representing the faces of the cube as well as other planes parallel to these planes are called isometric planes.
As all the edges of the cube are equally foreshortened, the square faces are rhombuses. The rhombus ABCD (fig. 2) shows the isometric projection ofthe top square face of the cube in which BO is the true length of the diagonal.
Construct a square BQDP around BO as a diagonal. Then BP shows the truelength of BA.
In triangle ABO, 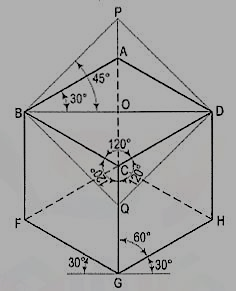
In triangle PBO, 

The ratio,  .
.
Thus, the isometric projection is reduced in the ratio  , i.e. the isometric lengths are 0.815 of the true lengths.
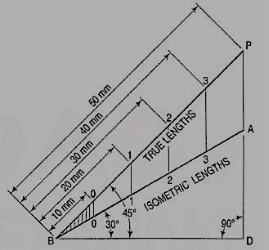
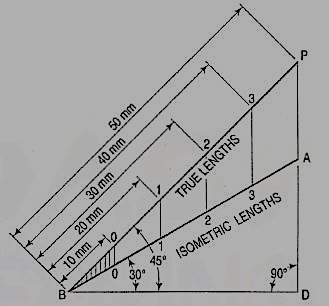
Therefore, while drawing an isometric projection, it is necessary to convert true lengths into isometric lengths for measuring and marking the sizes. This is conveniently done by constructing and making use of an isometric scale as shown below.
a) Draw a horizontal line BO of any length (fig. 3). At the end B,draw lines BA and BP, such that OBA = 30° and L OBP = 45°.Mark divisions of true lengthon the line BP and from each division-point, draw verticals toBO meeting BA at respective points. The divisions thus obtained on BAgive lengths on isometric scale.
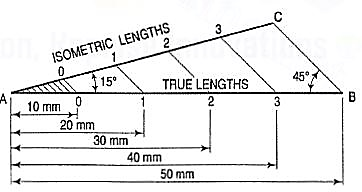
(b) The same scale may also be drawn with divisions of natural scale on a horizontal line AB (fig. 4). At the ends A and B, draw lines AC and BC making 15° and 45° angles with AB respectively, and intersecting each other at C.
From division-points of true lengths on AB, draw lines parallel to BC and meeting AC at respective points. The divisions along AC give lengths to isometric scale.
The lines BO and AC (fig. 2) represent equal diagonals of a square face of the cube, but are not equally shortened in isometric projection. BO retains its true length, while AC is considerably shortened. Thus, it is seen that lines which are not parallel to the isometric axes are not reduced according to any fixed ratio. Such lines are called non-isometric lines. The measurements should, therefore, be made on isometric axes and isometric lines only. The non-isometric lines are drawn by locating positions of their ends on isometric planes and then joining them.
Isometric drawing or Isometric view
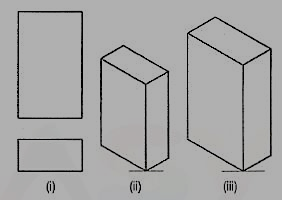
If the foreshortening of the isometric lines in an isometric projection is disregarded and instead, the true lengths are marked, the view obtained [fig. 5(iii)] will be exactly of the same shape but larger in proportion (about 22.5%) than that obtained using the isometric scale [fig. 5(ii)]. Due to the ease in construction and the advantage of measuring the dimensions directly from the drawing, it has become a general practice to use the true scale instead of the isometric scale.
To avoid confusion, the view drawn with the true scale is called isometric drawing or isometric view, while that drawn with the use of isometric scale iscalled isometric projection.
Referring again to fig., the axes BC and CD represent the sides of a right angle in horizontal position. Each of them together with the vertical axis CG, represents the right angle in vertical position. Hence, in isometric view of any rectangular solid resting on a face on the ground, each horizontal face will have its sides parallel to the two sloping axes; each vertical face will have its vertical sides parallel to the vertical axis and the other sides parallel to one of the sloping axes.
In other words, the vertical edges are shown by vertical lines, while the horizontal edges are represented by lines, making 30° angles with the horizontal. These lines are very conveniently drawn with the T-square and a 30°-60° set-square or drafter.
Isometric drawing of planes or plane figures:
Problem:
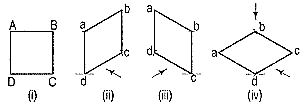
1. The front view of a square is given in fig. 7 (i). Draw its isometric view.
As the top view is a square, the surface of the square is horizontal. In isometric view, all the sides will be drawn inclined at 30° to the horizontal.
(i) From any point d [fig. 7(iv)], draw two lines da and dc inclined at 30° to the horizontal and making 120° angle between themselves.
(ii) Complete the rhombus abed which is the required isometric view.
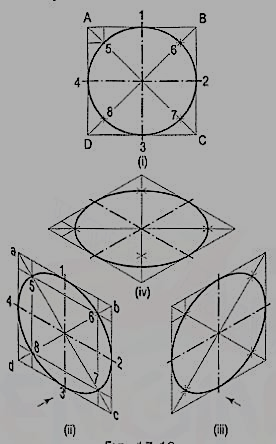
2. Fig. 8 (i) shows the front view of a circle whose surface is parallel to the V.P. Draw the isometric view of the circle.
Isometric drawings of Prisms and Pyramids:
We have seen that the isometric view of a cube is determined from its orthographic view in a position. The three edges of the solid right-angle of the cube are shown by lines parallel to the three isometric axes. A square prism or a rectangular prism also has solid right-angles. Hence, lines for its edges are also drawn parallel to the three isometric axes.
While drawing the isometric view of any solid, the following important points should be carefully noted:
(i) The isometric view should be drawn according to the given views and in such a way that maximum possible details are visible.
(ii) At every point for the corner of a solid, at least three lines for the edges must converge. Of these, at least two must be for visible edges. Lines for the hidden edges need not be shown, but it is advisable to check up every corner so that no line for a visible edge is left out.
(iii) Two lines (for visible edges) will never cross each other.
Problem:
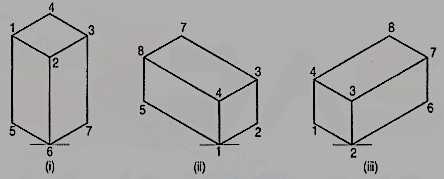
1. Draw the isometric view of a square prism, side of the base 20 mm long and the axis 40 mm long, when its axis is (i) vertical and (ii) horizontal.
(i) When the axis is vertical, the ends of the prism will be horizontal. Draw the isometric view (the rhombus 1-2-3-4) of the top end [fig. 18 (i)]. Its sides will make 30°-angles with the horizontal. The length of the prism will be drawn in the third direction, i.e. vertical. Hence, from the corners of the rhombus, draw vertical lines 1-5, 2-6 and 3-7 of length equal to the length of the axis. The line 4-8 should not be drawn, as that edge will not be visible. Draw lines 5-6 and 6-7, thus completing the required isometric view. Lines 7-8 and 8-5 also should not be drawn. Beginning may also be made by drawing lines from the point 6 on the horizontal line and then proceeding upwards.
(ii) When the axis is horizontal, the ends will be vertical. The ends can be drawn in two ways as shown in fig. 18 (ii) and fig. 18 (iii). In each case, the length is shown in the direction of the third isometric axis.
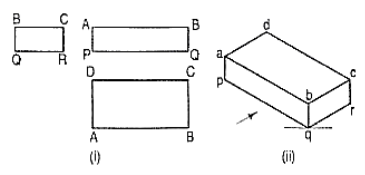
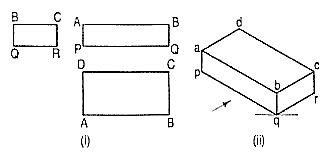
2. Three views of a block are given in fig. (i). Draw its isometric view.
The block is in the form of a rectangular prism. Its shortest edges are vertical. Lines for these edges will be drawn vertical. Lines for all other edges which are horizontal, will be drawn inclined at 30° to the horizontal in direction of the two sloping axes as shown in fig. 19 (ii).
Isometric drawing of Cylinders:
Problem:
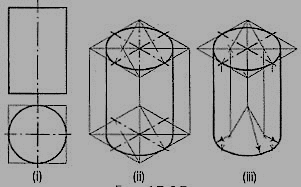
1. Draw the isometric view of the cylinder shown in fig. 23 (i).
The axis of the cylinder is vertical; hence its ends are horizontal. Enclose the cylinder in a square prism.
Method I:
Draw the isometric view of the prism [fig. 23 (ii)]. In the two rhombuses, draw the ellipses by the four-centre method. Draw two common tangents to the two ellipses. Erase the inner half of the lower ellipse and complete the required view.
Method II:
Draw the rhombus for the upper end of the prism [fig. 23 (iii)] and in it, draw the ellipse by the four-centre method. From the centres for the arcs, draw vertical lines of length equal to the length of the axis, thus determining the centres for the lower ellipse. Draw the arcs for the half ellipse. Draw common tangents, thus completing the required view.
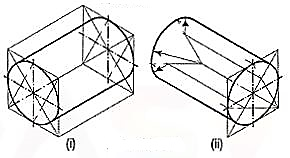
When the axis of the cylinder is horizontal, its isometric view is drawn by method I as shown in fig. (i).
Fig. (ii) shows the view drawn by method II, but the axis is shown sloping in the other direction.
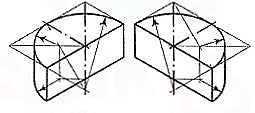
Fig. respectively show the isometric views (drawn by method II) of a half-cylindrical disc with its axis in vertical and horizontal positions.
Isometric drawing of cones:
Problem:
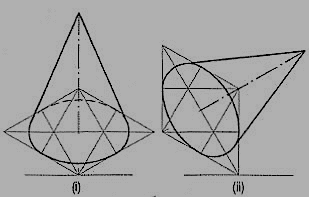
1. Draw the isometric view of a cone, base 40 mm diameter and axis 55 mm long (i) when its axis is vertical and (ii) when its axis is horizontal.
(i) Draw the ellipse for the base [fig. 27 (i)]. Determine the position of the apex by the offset method.
(ii) Draw tangents to the ellipse from the apex. Erase the part of the ellipse between the tangents and complete the view as shown.
(iii) See fig. (ii) which is self-explanatory.
2. Draw the isometric view of the frustum of a cone shown in fig. (i).
(i) Draw the ellipse for the base [fig. (ii)]. Draw the axis.
(ii) Around the top end of the axis, draw the ellipse for the top.
(iii) Draw common tangents, erase the unwanted part of the ellipse and complete the view as shown.
Isometric drawing of Sphere
The orthographic view of a sphere seen from any direction is a circle of diameter equal to the diameter of the sphere. Hence, the isometric projection of a sphere is also a circle of the same diameter as explained below.
The front view and the top view of a sphere resting on the ground are shown in fig. 29 (i). C is its centre, D is the diameter and P is the point of its contact with the ground.
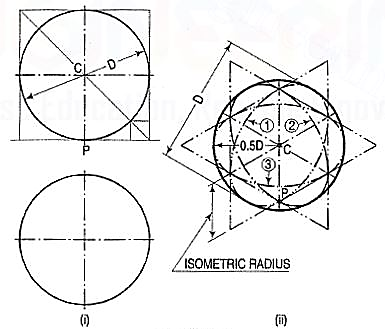
Assume a vertical section through the centre of the sphere. Its shape will be a circle of diameter D. The isometric projection of this circle is shown in fig. 29 (ii) by ellipses 1 and 2, drawn in two different vertical positions around the same centre C. The length of the major axis in each case is equal to D. The distance of the point P from the centre C is equal to the isometric radius of the sphere.
Again, assume a horizontal section through the centre of the sphere. The isometric projection of this circle is shown by the ellipse 3, drawn in a horizontal position around the same centre C. In this case also, the distance of the outermost points on the ellipse from the centre C is equal to O.5D.
Thus, in an isometric projection, the distances of all the points on the surface of a sphere from its centre, are equal to the radius of the sphere.
Hence, the isometric projection of a sphere is a circle whose diameter is equal to the true diameter of the sphere.
Also, the distance of the centre of the sphere from its point of contact with the ground is equal to the isometric radius of the sphere, viz. CP.
It is, therefore, of the utmost importance to note that, isometric scale must invariably be used, while drawing isometric projections of solids in conjunction with spheres or having spherical parts.
Problem:
Draw the isometric projection of a sphere resting centrally on the top of a square prism, the front view of which is shown in fig. 30 (i).
(i) Draw the isometric projection (using isometric scale) of the square prism and locate the centre P of its top surface [fig. (ii)].
(ii) Draw a vertical at P and mark a point C on it, such that PC = the isometric radius of the sphere.
(iii) With C as centre and radius equal to the radius of the sphere, draw a circle which will be the isometric projection of the sphere.
Introduction:
Pictorial projections are used for presenting ideas which may be easily understood by all without technical training. They show several faces of an object in one view, as it appears to the eye approximately. Among the pictorial projections, Isometric Projections are the most common.
Oblique Projection:
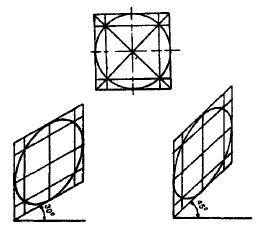
Oblique Projection of an object may be obtained by projecting the object with parallel projections that are oblique to the picture plane (Fig 9)
In oblique projection, the front face of the object appears in its true size and shape, as it is placed parallel to the picture plane. The receding lines representing the other two faces are usually drawn at 30°,45° or 60° to the horizontal, 45° being the most common practice.
As in the case of isometric projection, in oblique projection also, all lines that are parallel on the object appear parallel on the drawing and vertical lines on the object appear vertical.
Classification of Oblique projection:
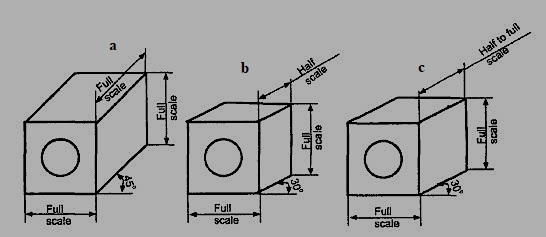
Oblique projections are classified as cavalier, cabinet and general, depending on the scale of measurement followed along the receding lines, as shown in Fig 10.1. The oblique projection shown in Fig.a presents a distorted appearance to the eye. To reduce the amount of distortion and to have a more realistic appearance, the length of the receding lines is reduced as shown, either in Fig. 9.b or as in Fig 9.c. If the receding lines are measured to the true size, the projection is known as cavalier projection. If they are reduced to one half of their true lengths, the projection is called cabinet projection. In general oblique, the measurement along the receding lines varies from half to full size.
Note: Oblique projection has the following advantages over isometric drawing:
1. Circular or irregular features on the front face appear in their true shape.
2. Distortion may be reduced by fore-shortening the measurement along the receding axis, and.
3. A greater choice is permitted in the selection of the position of the axes.
Methods of Drawing Oblique Projection:
The orthographic views of a V-block are shown in Fig. 10.a The stages in obtaining the oblique projection of the same are shown in Fig. 10.b.
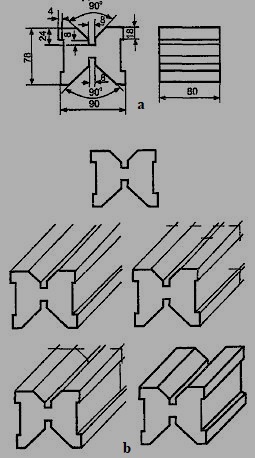
1. After studying the views carefully, select the face that is either the most irregular one or the one with circular features if any. Make that face parallel to the picture plane to minimize distortion.
2. Draw the face to its true size and shape.
3. Draw the receding lines through all the visible comers of the front face.
4. Mark the length of the object along the receding lines and join these in the order.
5. Add other features if any on the top and side faces.
Examples of Oblique Projection:
1.

2.
3.

4.
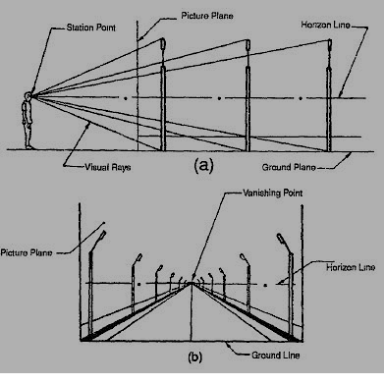
Perspective projection is a method of graphic representation of an object on a single plane called picture plane as seen by an observer stationed at a particular position relative to the object. As the object is placed behind the picture plane and the observer is stationed in front of the picture plane, visual rays from the eye of the observer to the object are cut by the picture plane. The visual rays locate the position of the object on the picture plane. This type of projection is called perspective projection. This is also known as scenographic projection or convergent projection.
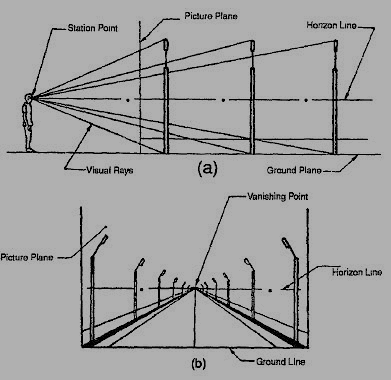
Method of preparing a perspective view differs from the various other methods of projections discussed earlier. Here, the projectors or visual rays intersect at a common point known as station point. A perspective projection of a street with posts holding lights, as viewed by an observer from a station point, is shown in Fig. 15. The observer sees the object through a transparent vertical plane called picture plane as shown in Fig.l5(a). The view obtained on the picture plane is shown in Fig. 15(b). In this view, the true shape and size of the street will not be the object is viewed from a station point to which the visual rays converge. This method of projection is theoretically very similar to the optical system in photography and is extensively employed by architects to show the appearance of a building or by artist-draftsman in the preparation of illustrations of huge machinery or equipment.
Nomenclature of Perspective Projection
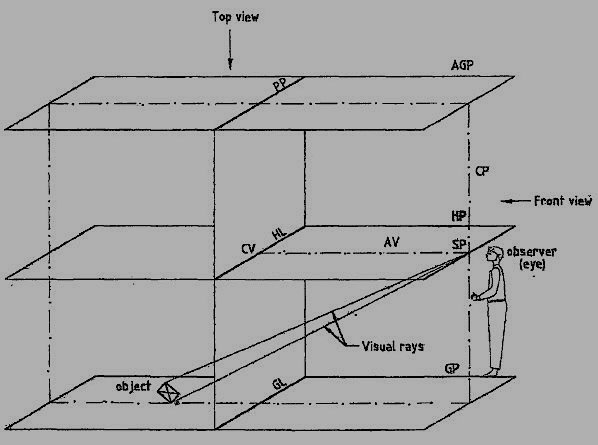
The elements of perspective projection are shown in Fig. 16. The important terms used in the perspective projections are defined below.
1. Ground Plane (GP.): s is the plane on which the object is assumed to be placed.
2. Auxiliary Ground Plane (A.GP): This is any plane parallel to the ground plane (Not shown in Fig. 16)
3. Station Point (S.P.): This is the position of the observer's eye from where the object is viewed.
4. Picture Plane (P.P.): This is the transparent vertical plane positioned in between the station point and the object to be viewed. Perspective view is formed on this vertical plane.
5. Ground Line (GL.): This is the line of intersection of the picture plane with the ground plane.
6. Auxiliary Ground Line (A.GL.): This is the line of intersection of the picture plane with the auxiliary ground plane.
7. Horizon Plane (H.P.): This is the imaginary horizontal plane perpendicular to the picture plane and passing through the station point. This plane lies at the level of the observer.
8. Horizon Line (H.L.): This is the line of intersection of the horizon plane with the picture plane. This plane is parallel to the ground line.
9. Axis of Vision (A.V.): This is the line drawn perpendicular to the picture plane and passing through the station point. The axis of vision is also called the line of sight or perpendicular axis.
10. Centre of Vision (C. V.): This is the point through which the axis of vision pierces the picture plane. This is also the point of intersection of horizon line with the axis of vision.
11. Central Plane (C.P.): This is the imaginary plane perpendicular to both the ground plane and the picture plane. It passes through the centre of vision and the station point while containing the axis of vision.
12. Visual Rays (V.R.): These are imaginary lines or projectors joining the station point to the various points on the object. These rays converge to a point.
Classification of perspective projections
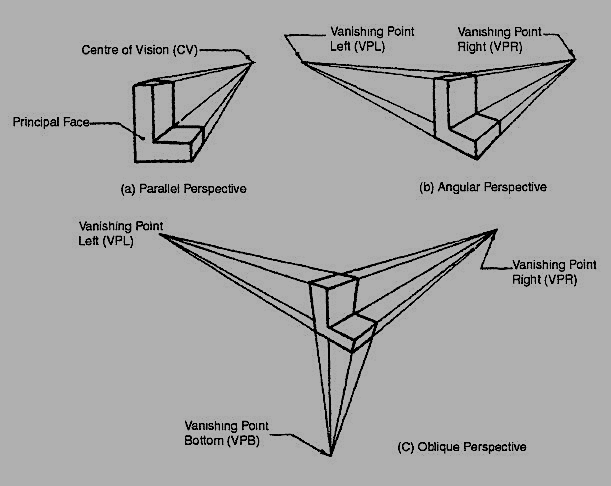
Perspective projections can be broadly classified into three categories.
I. Parallel perspective or single point perspective.
2. Angular perspective or two-point perspective.
3. Oblique perspective or three-point perspective.
Parallel perspective or single point perspective
If the principal face of the object viewed, is parallel to the picture plane, the perspective view formed is called parallel perspective. Such a perspective view is shown in Fig. 17 (a). In parallel perspective views, the horizontal lines receding the object converge to a single point called vanishing point (V.P.). But the vertical and horizontal lines on the principal face and the other faces of the object, do not converge, if these lines are parallel to the picture plane. Because the lines on the faces parallel to the picture plane do not converge to a point and the horizontal lines receding the object converge to a single vanishing point, the perspective projection obtained is called parallel or single point perspective. Single point perspective projection is generally used to present the interior details of a room, interior features of various components, etc.
Angular perspective or two-point perspective
If the two principal faces of the object viewed are inclined to the picture plane, the perspective view formed is called angular perspective. Such a perspective is shown in Fig. 17 (b). In angular perspective views, all the horizontal lines converge to two different points called vanishing point left (V.P.L.) and vanishing point right (V.P.R). But the vertical lines remain vertical. Because the two principal faces are inclined to picture plane and all the horizontal lines on the object converge to two different vanishing points, the perspective view obtained is called angular or two-point perspective. Two-point perspective projection is the most generally used to present the pictorial views of long and wide objects like buildings, structures, machines, etc.
Oblique perspective or three-point perspective
If all the three mutually perpendicular principal faces of the object viewed, are inclined to the picture plane, the perspective view formed is called oblique perspective. Such a perspective view is shown in Fig. 17(c). In oblique perspective views, all the horizontal tines converge to two different points called vanishing point left (V.P.L.) and vanishing point right (V.P.R) and all the vertical lines converge to a third vanishing point located either above or below the horizon line. Because all the three principal faces are inclined to the picture plane and all the horizontal and the vertical lines on the object converge to three different vanishing points, the perspective view obtained is called oblique or three-point perspective.
Three-point perspective projection may be used to draw pictorial views of huge and tall objects like tall buildings, towers, structures, etc. If the station point is near by the ground plane, the vertical lines will vanish at a point above the horizon line. If the station point is located above the object, all the vertical lines will vanish at a point below the horizon line. Oblique perspective projection is seldom used in practice.
Q1. Draw t1tie isometric view of a square-headed bolt 24 mm diameter and 70 mm long, with a square neck 18 mm thick and a head,40 mm square and 18 mm thick.
Bolts, Nuts and Washers, Bolted
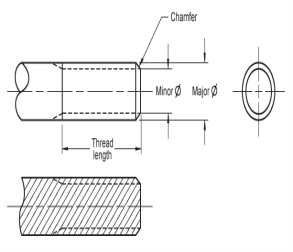
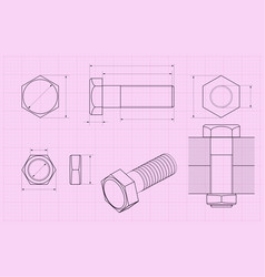
Washers
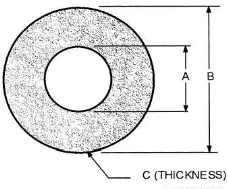
Riveted Joints
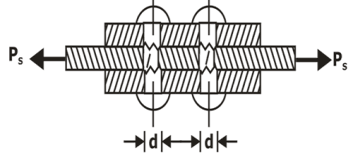
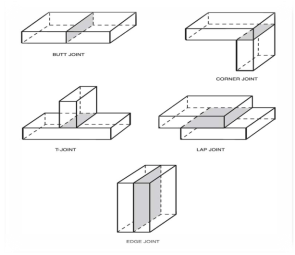
Weld Joints
References:
1. A Text Book of Engineering Drawing: RK Dhawan, S Chand & Company
2. Engineering Drawing Plane and Solid Geometry: N.D. Bhatt, Charotar Publishing House.
