Unit – 2
Stacks and Queues
What is a Stack?
A Stack is a linear data structure that follows the LIFO (Last-In-First-Out) principle. Stack has one end, whereas the Queue has two ends (front and rear). It contains only one pointer (top pointer) pointing to the topmost element of the stack. Whenever an element is added in the stack, it is added on the top of the stack, and the element can be deleted only from the stack. In other words, a stack can be defined as a container in which insertion and deletion can be done from the one end known as the top of the stack.
Some key points related to stack
● It is called as stack because it behaves like a real-world stack, piles of books, etc.
● A Stack is an abstract data type with a predefined capacity, which means that it can store the elements of a limited size.
● It is a data structure that follows some order to insert and delete the elements, and that order can be LIFO or FILO.
Abstract Data Type
The abstract data type is a special kind of datatype, whose behavior is defined by a set of values and set of operations. The keyword “Abstract” is used as we can use these data types, we can perform different operations. But how those operations are working is totally hidden from the user. The ADT is made of primitive data types, but operation logics are hidden.
Here we will see the stack ADT. These are a few operations or functions of the Stack ADT.
● isFull(), This is used to check whether stack is full or not
● isEmpty(), This is used to check whether stack is empty or not
● push(x), This is used to push x into the stack
● pop(), This is used to delete one element from top of the stack
● peek(), This is used to get the top most element of the stack
● size(), this function is used to get number of elements present into the stack
Example
#include<iostream>
#include<stack>
Using namespace std;
Main(){
Stack<int> stk;
If(stk.empty()){
Cout << "Stack is empty" << endl;
} else {
Cout << "Stack is not empty" << endl;
}
//insert elements into stack
Stk.push(10);
Stk.push(20);
Stk.push(30);
Stk.push(40);
Stk.push(50);
Cout << "Size of the stack: " << stk.size() << endl;
//pop and display elements
While(!stk.empty()){
Int item = stk.top(); // same as peek operation
Stk.pop();
Cout << item << " ";
}
}
Output
Stack is empty
Size of the stack: 5
50 40 30 20 10
Key takeaway
- The abstract data type is a special kind of datatype, whose behavior is defined by a set of values and set of operations.
- The keyword “Abstract” is used as we can use these data types, we can perform different operations.
- But how those operations are working is totally hidden from the user.
- The ADT is made of primitive data types, but operation logics are hidden.
PUSH operation
The steps involved in the PUSH operation is given below:
● Before inserting an element in a stack, we check whether the stack is full.
● If we try to insert the element in a stack, and the stack is full, then the overflow condition occurs.
● When we initialize a stack, we set the value of top as -1 to check that the stack is empty.
● When the new element is pushed in a stack, first, the value of the top gets incremented, i.e., top=top+1, and the element will be placed at the new position of the top.
● The elements will be inserted until we reach the max size of the stack.
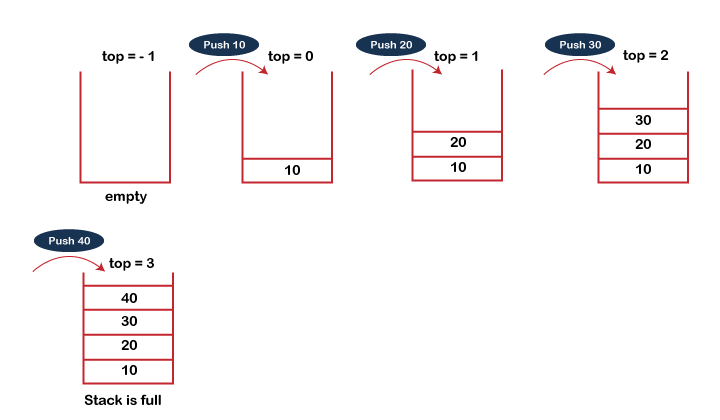
Fig 1 – Push Operation Example
POP operation
The steps involved in the POP operation is given below:
● Before deleting the element from the stack, we check whether the stack is empty.
● If we try to delete the element from the empty stack, then the underflow condition occurs.
● If the stack is not empty, we first access the element which is pointed by the top
● Once the pop operation is performed, the top is decremented by 1, i.e., top=top-1.
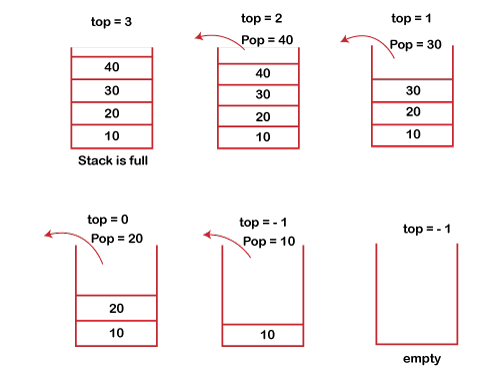
Fig 2 – Pop Operation example
The stack is created using the array in array implementation. Arrays are used to accomplish all of the operations on the stack. Let's look at how each operation can be accomplished utilizing an array data structure on the stack.
Adding an element onto the stack (push operation)
A push operation occurs when an element is added to the top of a stack. Two steps are involved in a push operation.
- Increase the value of the variable Top to allow it to refer to the next memory address.
- Add an element to the top of the incremented list. Adding a new element to the top of the stack is referred to as this.
When we try to put an element into a totally loaded stack, the stack overflows. As a result, our main function must always avoid stack overflow.
Algorithm
Begin
If top = n then stack full
Top = top + 1
Stack (top): = item;
End
Implementation in C language
Void push (int val,int n) //n is size of the stack
{
If (top == n)
Printf("\n Overflow");
Else
{
Top = top +1;
Stack[top] = val;
}
}
Deletion of an element from a stack (Pop operation)
The pop action removes an element from the top of the stack. When an item is removed from the stack, the value of the variable top is increased by one. The stack's topmost element is saved in a separate variable, and then the top is decremented by one. As a result, the operation returns the removed value that was previously saved in another variable.
When we try to delete an element from an already empty stack, we get an underflow condition.
Algorithm
Begin
If top = 0 then stack empty;
Item:= stack(top);
Top = top - 1;
End;
Implementation in C language
Int pop ()
{
If(top == -1)
{
Printf("Underflow");
Return 0;
}
Else
{
Return stack[top - - ];
}
}
Visiting each element of the stack (Peek operation)
Returning the element at the top of the stack without removing it is known as a peek operation. If we try to return the top piece from an already empty stack, we may encounter an underflow problem.
Algorithm
PEEK (STACK, TOP)
Begin
If top = -1 then stack empty
Item = stack[top]
Return item
End
Implementation in C language
Int peek()
{
If (top == -1)
{
Printf("Underflow");
Return 0;
}
Else
{
Return stack [top];
}
}
Linked list Implementation
To implement stack, we can use a linked list instead of an array. The memory is dynamically allocated with a linked list. However, the temporal complexity of all operations, such as push, pop, and peek, is the same in all scenarios.
The nodes in a linked list implementation of a stack are kept in memory in a non-contiguous manner. Each node on the stack has a pointer to its immediate successor node. If there isn't enough room in the memory heap to create a node, the stack is said to have overflown.
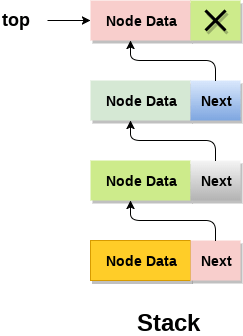
Fig 3: linked list
Adding a node to the stack (Push operation)
The address field of the topmost node in the stack is always null. Let's look at how each action is carried out in the stack's linked list implementation.
The push action is used to add a node to the stack. Pushing an element to a stack in a linked list differs from pushing an element to a stack in an array. The following procedures are required to push an element onto the stack.
- First, make a node and allocate memory to it.
2. If the list is empty, the item should be moved to the top as the list's first node. This involves giving the data component of the node a value and giving the address part of the node a null value.
3. If the list already has some nodes, we must place the new element at the beginning of the list (to not violate the property of the stack). Assign the address of the starting element to the address field of the new node for this purpose, and make the new node the list's starting node.
C Implementation
Void push ()
{
Int val;
Struct node *ptr =(struct node*)malloc(sizeof(struct node));
If(ptr == NULL)
{
Printf("not able to push the element");
}
Else
{
Printf("Enter the value");
Scanf("%d",&val);
If(head==NULL)
{
Ptr->val = val;
Ptr -> next = NULL;
Head=ptr;
}
Else
{
Ptr->val = val;
Ptr->next = head;
Head=ptr;
}
Printf("Item pushed");
}
}
Deleting a node from the stack (POP operation)
The pop operation is used to remove a node from the top of the stack. The deletion of a node from the stack's linked list implementation differs from the array implementation. To remove an element from the stack, we must first perform the following steps:
- Check for the underflow condition - When we try to pop from an already empty stack, we get an underflow problem. If the list's head pointer points to null, the stack will be empty.
2. Adjust the head pointer accordingly - Because the elements in a stack are only popped from one end, the value stored in the head pointer must be removed, and the node must be released. The head node's next node now serves as the head node.
C Implementation
Void pop()
{
Int item;
Struct node *ptr;
If (head == NULL)
{
Printf("Underflow");
}
Else
{
Item = head->val;
Ptr = head;
Head = head->next;
Free(ptr);
Printf("Item popped");
}
}
Key takeaway
- The stack is created using the array in array implementation.
- Arrays are used to accomplish all of the operations on the stack.
- To implement stack, we can use a linked list instead of an array.
- The memory is dynamically allocated with a linked list.
The following are the applications of the stack:
● Balancing of symbols: Stack is used for balancing a symbol. For example, we have the following program:
- Int main()
- {
- Cout<<"Hello";
- Coût<<"java point";
- }
As we know, each program has an opening and closing braces; when the opening braces come, we push the braces in a stack, and when the closing braces appear, we pop the opening braces from the stack. Therefore, the net value comes out to be zero. If any symbol is left in the stack, it means that some syntax occurs in a program.
● String reversal: Stack is also used for reversing a string. For example, we want to reverse a "java point" string, so we can achieve this with the help of a stack.
First, we push all the characters of the string in a stack until we reach the null character. After pushing all the characters, we start taking out the character one by one until we reach the bottom of the stack.
● UNDO/REDO: It can also be used for performing UNDO/REDO operations. For example, we have an editor in which we write 'a', then 'b', and then 'c'; therefore, the text written in an editor is abc. So, there are three states, a, ab, and abc, which are stored in a stack. There would be two stacks in which one stack shows UNDO state, and the other shows REDO state.
If we want to perform a UNDO operation, and want to achieve an 'ab' state, then we implement a pop operation.
● Recursion: The recursion means that the function is calling itself again. To maintain the previous states, the compiler creates a system stack in which all the previous records of the function are maintained.
● DFS(Depth First Search): This search is implemented on a Graph, and Graph uses the stack data structure.
● Backtracking: Suppose we have to create a path to solve a maze problem. If we are moving in a particular path, and we realize that we come on the wrong way. In order to come at the beginning of the path to create a new path, we have to use the stack data structure.
● Expression conversion: Stack can also be used for expression conversion. This is one of the most important applications of stack. The list of the expression conversion is given below:
○ Infix to prefix
○ Infix to postfix
○ Prefix to infix
○ Prefix to postfix
○ Postfix to infix
● Memory management: The stack manages the memory. The memory is assigned in the contiguous memory blocks. The memory is known as stack memory as all the variables are assigned in a function called stack memory. The memory size assigned to the program is known to the compiler. When the function is created, all its variables are assigned in the stack memory. When the function completes its execution, all the variables assigned in the stack are released.
If we wish to execute a computation, frame a condition, or do anything else in a programming language, we employ a set of symbols to do it. An expression is made up of these symbols.
The following is an example of a phrase...
A value is represented by an expression, which is made up of operators and operands.
An operator, as defined above, is a symbol that performs a certain task, such as an arithmetic operation, a logical operation, or a conditional operation.
The operands are the values that the operators can use to complete the task. The operand can be a direct value, a variable, or a memory address.
Postfix expression
The operator is used after the operands in a postfix expression. "Operator follows the Operands," as the saying goes.
The following is the general structure of a Postfix expression...
Operand1 Operand2 Operator
Example

Prefix expression
Operator comes before operands in a prefix expression. "Operands follow the Operator," as the saying goes.
The following is the general structure of a Prefix expression...
Operator Operand1 Operand2
Example
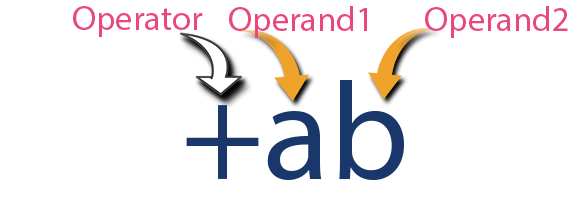
Key takeaway
- If we wish to execute a computation, frame a condition, or do anything else in a programming language, we employ a set of symbols to do it.
- An expression is made up of these symbols.
- The operator is used after the operands in a postfix expression. "Operator follows the Operands," as the saying goes.
- Operator comes before operands in a prefix expression. "Operands follow the Operator," as the saying goes.
The compiler prefers to evaluate an expression in its postfix form in Infix To Postfix Conversion Using Stack. The advantages of the postfix form include the deletion of parentheses, which indicate evaluation priority, as well as the elimination of the requirement to follow hierarchy, precedence, and associativity rules when evaluating the expression.
Because Postfix expressions have no parenthesis and may be evaluated as two operands and an operator at a time, the compiler and computer can handle them more easily.
A Postfix Expression's evaluation rule is as follows:
- While reading the expression from left to right, push the element in the stack if it is an operand.
- Pop the two operands from the stack, if the element is an operator and then evaluate it.
- Push back the result of the evaluation. Repeat it till the end of the expression.
Algorithm
1) Add ) to postfix expression.
2) Read postfix expression Left to Right until ) encountered
3) If operand is encountered, push it onto Stack
[End If]
4) If operator is encountered, Pop two elements
i) A -> Top element
Ii) B-> Next to Top element
Iii) Evaluate B operator A
Push B operator A onto Stack
5) Set result = pop
6) END
Example
Expression: 456*+
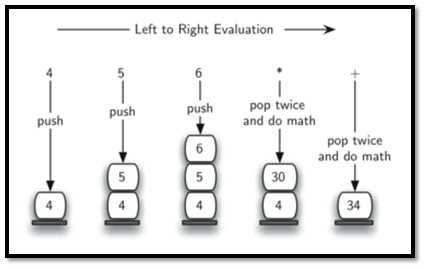
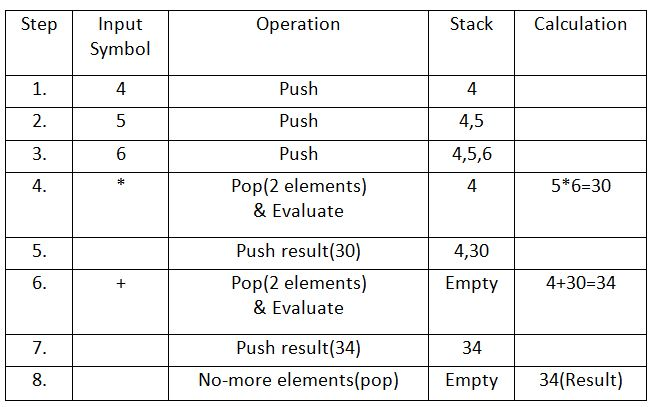
Result: 34
Key takeaway
- The compiler prefers to evaluate an expression in its postfix form in Infix To Postfix Conversion Using Stack.
- The advantages of the postfix form include the deletion of parentheses, which indicate evaluation priority, as well as the elimination of the requirement to follow hierarchy, precedence, and associativity rules when evaluating the expression.
The process through which a function calls itself is known as recursion. We utilize recursion to break down larger issues into smaller ones. One thing to keep in mind is that the recursive technique can only be used if each sub-problem follows the same patterns.
There are two pieces to a recursive function. The recursive case and the base case. The basic case is utilized to finish the repeating task. If the base case isn't specified, the function will repeat indefinitely.
When we call a function in a computer program, the value of the program counter is saved in the internal stack before we jump into the function area. It pulls out the address and assigns it to the program counter after completing the operation, then resumes the task. It will save the address several times throughout a recursive call and then jump to the next function call statement. If one of the base cases isn't declared, it will repeat over and over, storing the address in the stack. If the stack runs out of space, it will throw an error called "Internal Stack Overflow."
Finding the factorial of a number is an example of a recursive call. The factorial of an integer n = n! is the same as n * (n-1)!, as we can see. , which is same to n * (n - 1) * (n - 2)! So, if factorial is a function, it will be run repeatedly, but the parameter will be reduced by one. It will return 1 if the parameter is 1 or 0. This could be the recursion's starting point.
Example
#include<iostream>
Using namespace std;
Long fact(long n){
If(n <= 1)
Return 1;
Return n * fact(n-1);
}
Main(){
Cout << "Factorial of 6: " << fact(6);
}
Output
Factorial of 6: 720
Key takeaway
- The process through which a function calls itself is known as recursion. We utilize recursion to break down larger issues into smaller ones.
- One thing to keep in mind is that the recursive technique can only be used if each sub-problem follows the same patterns.
- There are two pieces to a recursive function. The recursive case and the base case.
- The basic case is utilized to finish the repeating task.
The recursive function is used as the function's last statement in the tail recursion. Tail recursion occurs when there is nothing left to do after returning from a recursive call. One example of tail recursion will be shown.
Example
#include <iostream>
Using namespace std;
Void printN(int n){
If(n < 0){
Return;
}
Cout << n << " ";
PrintN(n - 1);
}
Int main() {
PrintN(10);
}
Output
10 9 8 7 6 5 4 3 2 1 0
Non-tail recursion is preferable to tail recursion. Because there is no job remaining after the recursive call, the compiler will have an easier time optimizing the code. When a function is called, the address of that function is saved in the stack. So, if it's a tail recursion, there's no need to save addresses in the stack.
Recursion can be used to use factorials, however the function is not tail recursive. The fact(n-1) value is utilized within the fact (n).
Long fact(int n){
If(n <= 1)
Return 1;
n * fact(n-1);
}
We can make it tail recursive, by adding some other parameters. This is like below −
Long fact(long n, long a){
If(n == 0)
Return a;
Return fact(n-1, a*n);
}
Key takeaway
- The recursive function is used as the function's last statement in the tail recursion.
- Tail recursion occurs when there is nothing left to do after returning from a recursive call.
A recursive function is one that calls itself (in the function body) over and over again. As long as the condition is met, this function will call itself.
There are two approaches to get rid of the recursion:
● Through Iteration
● Through Stack
Removal of recursion through iteration
A simple program of factorial through recursion
#include<stdio.h>
Main()
{
Int n, value;
Printf(“Enter the number”);
Scanf(“%d”,&n);
If(n<0)
Printf(“No factorial of negative number”);
Else
If(n==0)
Printf(“Factorial of zero is 1”);
Else
{
Value=factorial(n); /*function for factorial of number*/
Printf(“Factorial of %d= %d”,n,value);
}
}
Factorial (int k)
{
Int fact=1;
Ifk>1)
Fact=k*factorial(k-1); /*recursive function call*/
Return (fact);
Removal through stack
Let's pretend that P is a recursive procedure. The following is how recursive procedure P is transformed into a non-recursive procedure:
To begin, one must create: 1. A stack STPAR for each parameter PAR.
2. Each local variable VAR has its own stack STVAR.
3. A return address stack STADD and a local variable ADD
Following is the algorithm for converting the recursive procedure P to a non-recursive procedure. It is divided into three sections:
1. Preparation
2. Translating each recursive call P in procedure P.
3. Translating each return in procedure P.
- Preparation
(a) For each parameter PAR, create a stack STPAR, a stack STVAR for each local variable VAR, and a local variable ADD and a stack STADD to hold the return address.
(b) Make TOP NULL.
2. Translation of “step K.call P.”
(a) Push the current values of the parameters and local variable to the proper stacks, and STADD with the new return address [step] K+1.
(b) Using the new argument values, reset the parameters.
(c) return to the first step. [Procedure P's first step]
3. Translation of “Step J.return”
(a) Return if STADD is not empty. [Control is transferred back to the main application].
(b) Restore the stacks' top values.
That is, set the top values on the stacks for the parameters and local variables, and the top value on the STADD for ADD.
(c) Go to the ADD step.
4. Return to Step L.
By adding two prior numbers, the Fibonacci series yields the next number. The Fibonacci sequence begins with two numbers, F0 and F1. F0 and F1 can be set to 0, 1 or 1, 1 as their initial settings.
The Fibonacci sequence meets the following criteria:
Fn = Fn-1 + Fn-2
As a result, a Fibonacci sequence can appear like this.
F8 = 0 1 1 2 3 5 8 13
Or, this −
F8 = 1 1 2 3 5 8 13 21
Fibonacci Iterative Algorithm
We begin by attempting to draft a Fibonacci series iterative algorithm.
Procedure Fibonacci(n)
Declare f0, f1, fib, loop
Set f0 to 0
Set f1 to 1
Display f0, f1
For loop ← 1 to n
Fib ← f0 + f1
f0 ← f1
f1 ← fib
Display fib
End for
End procedure
Fibonacci Recursive Algorithm
Let's look at how to make a Fibonacci sequence recursive algorithm. The fundamentals of recursion
START
Procedure Fibonacci(n)
Declare f0, f1, fib, loop
Set f0 to 0
Set f1 to 1
Display f0, f1
For loop ← 1 to n
Fib ← f0 + f1
f0 ← f1
f1 ← fib
Display fib
End for
END
Hanoi towers
Rules
The goal is to transport all of the disks to another tower without disrupting the arranging sequence. The following are some Tower of Hanoi regulations to follow:
- At any given time, only one disk can be transported between the towers.
- The "top" disk is the only one that can be removed.
- A large disk cannot be stacked on top of a small disk.
Algorithm
To design an algorithm for Tower of Hanoi, we must first discover how to solve the problem with fewer disks, such as one or two. Name, source, destination, and aux are all written on three towers (only to help moving the disks). If we simply have one disk, we can easily move it from the source to the destination peg.
If there are two disks,
● First, we move the smaller (top) disk to aux peg.
● Then, we move the larger (bottom) disk to destination peg.
● And finally, we move the smaller disk from aux to destination peg.
A recursive algorithm for Tower of Hanoi can be driven as follows −
START
Procedure Hanoi(disk, source, dest, aux)
IF disk == 1, THEN
Move disk from source to dest
ELSE
Hanoi(disk - 1, source, aux, dest) // Step 1
Move disk from source to dest // Step 2
Hanoi(disk - 1, aux, dest, source) // Step 3
END IF
END Procedure
STOP
Recursion
- Selection structure is used in recursion.
- If the recursion step does not reduce the problem in a way that converges on some condition (base case), infinite recursion occurs, and infinite recursion might cause the system to fail.
- When a base case is found, the recursion ends.
- Due to the overhead of maintaining the stack, recursion is frequently slower than iteration.
- Iteration utilizes less memory than recursion.
- Recursion reduces the size of the code.
Example
Public class RecursionExample {
Public static void main(String args[]) {
RecursionExample re = new RecursionExample();
Int result = re.factorial(4);
System.out.println("Result:" + result);
}
Public int factorial(int n) {
If (n==0) {
Return 1;
}
Else {
Return n*factorial(n-1);
}
}
}
Result - 24
Iteration
- Iteration employs a structure of repetition.
- Iteration creates an infinite loop if the loop condition test never fails, and unlimited looping consumes CPU cycles repeatedly.
- When the loop condition fails, the iteration ends.
- Iteration is faster than recursion since it does not use the stack.
- It takes up less memory to iterate.
- Iteration lengthens the code.
Example
Public class IterationExample {
Public static void main(String args[]) {
For(int i = 1; i <= 5; i++) {
System.out.println(i + " ");
}
}
}
Output
1
2
3
4
5
Comparison table
Recursion | Iteration |
It makes use of Stack. | It doesn't make use of Stack. |
A Single Line of Code | A Long Line of Code |
Iteration can be used to address the not-all-recursive problem. | Any iterative issue is recursively solved. |
Each step of recursion replicates itself on a lesser scale, until all of them are merged to solve the problem. | Iteration ensures that each step, like stepping stones across a river, clearly leads to the next. |
Recursion is the equivalent of heaping all of those steps on top of one another and then squashing them all into the answer. | Iteration is the process of converting a problem into a series of stages that are completed one by one. |
Performance is slow. | Performance that is quick. |
A queue is an ordered list that allows insert operations to be done at one end (REAR) and delete operations to be performed at the other end (FRONT). The First In First Out list is referred to as a queue.
For example, create a queue, People in line for a train ticket.

Fig 4: queue
Operation on queue
Add (Enqueue) - The enqueue action is used to add the element to the queue's backend. It gives a void result.
Delete (Dequeue) - The dequeue operation is used to remove items from the queue's front end. It also returns the front-end element that has been removed. It gives you an integer value as a result. It's also possible to make the dequeue operation void.
Full (queue overflow) - When the Queue is totally full, the overflow condition appears.
Empty (queue underflow) - The underflow condition is thrown when the Queue is empty, that is, when there are no elements in the Queue.
Key takeaway
- A queue is an ordered list that allows insert operations to be done at one end (REAR) and delete operations to be performed at the other end (FRONT).
- The First In First Out list is referred to as a queue.
Why was the concept of the circular queue introduced?
There was one limitation in the array implementation of Queue. If the rear reaches to the end position of the Queue, then there might be the possibility that some vacant spaces are left in the beginning which cannot be utilized. So, to overcome such limitations, the concept of the circular queue was introduced.
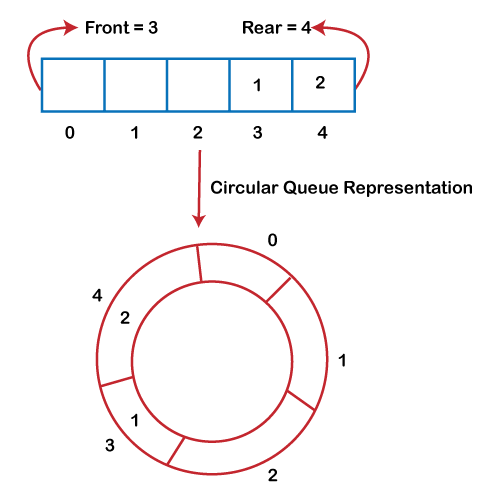
Fig 5 – Circular queue
As we can see in the above image, the rear is at the last position of the Queue and the front is pointing somewhere rather than the 0th position. In the above array, there are only two elements and the other three positions are empty. The rear is at the last position of the Queue; if we try to insert the element then it will show that there are no empty spaces in the Queue. There is one solution to avoid such wastage of memory space by shifting both the elements at the left and adjust the front and rear end accordingly. It is not a practically good approach because shifting all the elements will consume lots of time. The efficient approach to avoid the wastage of the memory is to use the circular queue data structure.
What is a Circular Queue?
A circular queue is similar to a linear queue as it is also based on the FIFO (First In First Out) principle except that the last position is connected to the first position in a circular queue that forms a circle. It is also known as a Ring Buffer.
Operations on Circular Queue
The following are the operations that can be performed on a circular queue:
● Front: It is used to get the front element from the Queue.
● Rear: It is used to get the rear element from the Queue.
● enQueue(value): This function is used to insert the new value in the Queue. The new element is always inserted from the rear end.
● deQueue(): This function deletes an element from the Queue. The deletion in a Queue always takes place from the front end.
Applications of Circular Queue
The circular Queue can be used in the following scenarios:
● Memory management: The circular queue provides memory management. As we have already seen in the linear queue, the memory is not managed very efficiently. But in case of a circular queue, the memory is managed efficiently by placing the elements in a location which is unused.
● CPU Scheduling: The operating system also uses the circular queue to insert the processes and then execute them.
● Traffic system: In a computer-control traffic system, traffic lights are one of the best examples of the circular queue. Each traffic light gets ON one by one after every interval of time. Like red light gets ON for one minute then yellow light for one minute and then green light. After the green light, the red light gets ON.
Key takeaway
- A circular queue is similar to a linear queue as it is also based on the FIFO (First In First Out) principle except that the last position is connected to the first position in a circular queue that forms a circle.
- It is also known as a Ring Buffer.
Using linear arrays, we can easily describe a queue. In the case of every queue, there are two variables to consider: front and back. In a queue, the front and back variables indicate the location from which insertions and deletions are made. The initial value of front and queue is -1, which indicates that the queue is empty. The next figure shows an array representation of a queue with 5 elements and their respective front and rear values.
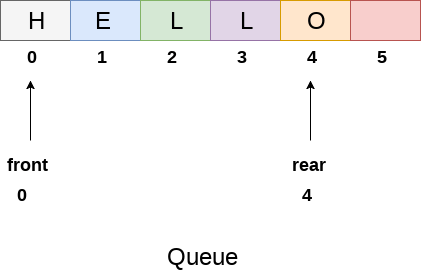
Fig 6: queue
The line of characters that make up the English word "HELLO" is depicted in the diagram above. Because no deletions have been made in the queue to date, the value of front remains -1. When an insertion is performed in the queue, however, the value of rear increases by one. After entering one element into the queue depicted in the above picture, the queue will appear as follows. The value of the rear will increase to 5, while the value of the front will remain unchanged.
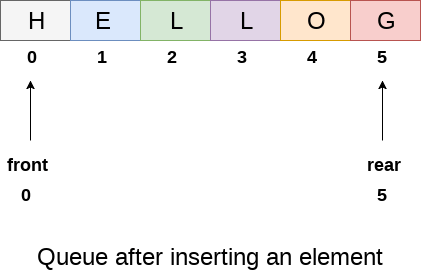
Fig 7: queue after inserting element
The value of front will grow from -1 to 0 if an element is deleted. The queue, on the other hand, will resemble the following.
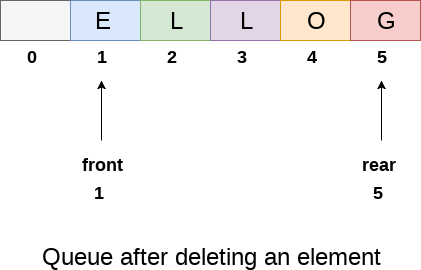
Fig 8: queue after deleting element
Algorithm to insert any element in a queue
Compare rear to max - 1 to see if the queue is already full. If this is the case, an overflow error will be returned.
If the item is to be inserted as the first element in the list, set the front and back values to 0 and insert the item at the back end.
Otherwise, keep increasing the value of rear and inserting each element with rear as the index one by one.
Algorithm
Step 1: IF REAR = MAX - 1
Write OVERFLOW
Go to step
[END OF IF]
Step 2: IF FRONT = -1 and REAR = -1
SET FRONT = REAR = 0
ELSE
SET REAR = REAR + 1
[END OF IF]
Step 3: Set QUEUE[REAR] = NUM
Step 4: EXIT
C function
Void insert (int queue[], int max, int front, int rear, int item)
{
If (rear + 1 == max)
{
Printf("overflow");
}
Else
{
If(front == -1 && rear == -1)
{
Front = 0;
Rear = 0;
}
Else
{
Rear = rear + 1;
}
Queue[rear]=item;
}
}
Algorithm to delete an element from the queue
Write an underflow message and leave if the value of front is -1 or greater than the value of rear.
Otherwise, keep increasing the front's value and returning the item at the front of the queue each time.
Algorithm
● Step 1: IF FRONT = -1 or FRONT > REAR
Write UNDERFLOW
ELSE
SET VAL = QUEUE[FRONT]
SET FRONT = FRONT + 1
[END OF IF]
● Step 2: EXIT
C function
Int delete (int queue[], int max, int front, int rear)
{
Int y;
If (front == -1 || front > rear)
{
Printf("underflow");
}
Else
{
y = queue[front];
If(front == rear)
{
Front = rear = -1;
Else
Front = front + 1;
}
Return y;
}
}
Linked list Implementation
The array method cannot be used for large scale applications when queues are established due to the limitations. The linked list version of queue is one of the alternatives to array implementation.
Each node of a linked queue is made up of two parts: the data part and the link part.
In the memory of the linked queue, there are two pointers: front pointer and rear pointer. The front pointer contains the location of the queue's first element, while the back pointer contains the address of the queue's last member.
The linked depiction of the queue is depicted in the diagram below.

Fig 9: linked queue
Insertion operation
By adding an element to the end of the queue, the insert operation appends it. The new element will be the queue's last element.
To begin, use the following line to allocate memory for the new node ptr.
Ptr = (struct node *) malloc (sizeof(struct node));
There are two possible scenarios for adding this new node ptr to the connected queue.
We inject an element into an empty queue in the first scenario. The condition front = NULL gets true in this scenario.
The queue in the second scenario has more than one element. The condition front = NULL is no longer true. We need to change the end pointer rear in this case such that the next pointer of rear points to the new node ptr. Because this is a linked queue, the rear pointer must also point to the newly inserted node ptr. We must additionally set the rear pointer's next pointer to NULL.
Algorithm
● Step 1: Allocate the space for the new node PTR
● Step 2: SET PTR -> DATA = VAL
● Step 3: IF FRONT = NULL
SET FRONT = REAR = PTR
SET FRONT -> NEXT = REAR -> NEXT = NULL
ELSE
SET REAR -> NEXT = PTR
SET REAR = PTR
SET REAR -> NEXT = NULL
[END OF IF]
● Step 4: END
C function
Void insert(struct node *ptr, int item; )
{
Ptr = (struct node *) malloc (sizeof(struct node));
If(ptr == NULL)
{
Printf("\nOVERFLOW\n");
Return;
}
Else
{
Ptr -> data = item;
If(front == NULL)
{
Front = ptr;
Rear = ptr;
Front -> next = NULL;
Rear -> next = NULL;
}
Else
{
Rear -> next = ptr;
Rear = ptr;
Rear->next = NULL;
}
}
}
Deletion
The deletion action removes the initial inserted element from all queue elements. To begin, we must determine whether the list is empty or not. If the list is empty, the condition front == NULL becomes true; in this case, we simply write underflow on the console and quit.
Otherwise, the element pointed by the pointer front will be deleted. Copy the node pointed by the front pointer into the pointer ptr for this purpose. Shift the front pointer to the next node and release the node referenced by node ptr. The following statements are used to do this.
Algorithm
● Step 1: IF FRONT = NULL
Write " Underflow "
Go to Step 5
[END OF IF]
● Step 2: SET PTR = FRONT
● Step 3: SET FRONT = FRONT -> NEXT
● Step 4: FREE PTR
● Step 5: END
C function
Void delete (struct node *ptr)
{
If(front == NULL)
{
Printf("\nUNDERFLOW\n");
Return;
}
Else
{
Ptr = front;
Front = front -> next;
Free(ptr);
}
}
Key takeaway
- Using linear arrays, we can easily describe a queue. In the case of every queue, there are two variables to consider: front and back.
- In a queue, the front and back variables indicate the location from which insertions and deletions are made.
- The array method cannot be used for large scale applications when queues are established due to the limitations.
- The linked list version of queue is one of the alternatives to array implementation.
Dequeue
The dequeue stands for Double Ended Queue. In the queue, the insertion takes place from one end while the deletion takes place from another end. The end at which the insertion occurs is known as the rear end whereas the end at which the deletion occurs is known as the front end.

Fig 10: dequeue
Deque is a linear data structure in which the insertion and deletion operations are performed from both ends. We can say that deque is a generalized version of the queue.
Let's look at some properties of deque
● Deque can be used both as stack and queue as it allows the insertion and deletion operations on both ends.
● In deque, the insertion and deletion operation can be performed from one side. The stack follows the LIFO rule in which both the insertion and deletion can be performed only from one end; therefore, we conclude that deque can be considered as a stack.
● In deque, the insertion can be performed on one end, and the deletion can be done on another end. The queue follows the FIFO rule in which the element is inserted on one end and deleted from another end. Therefore, we conclude that the deque can also be considered as the queue.
There are two types of Queues, Input-restricted queue, and output-restricted queue.
- Input-restricted queue: The input-restricted queue means that some restrictions are applied to the insertion. In input-restricted queue, the insertion is applied to one end while the deletion is applied from both the ends.

2. Output-restricted queue: The output-restricted queue means that some restrictions are applied to the deletion operation. In an output-restricted queue, the deletion can be applied only from one end, whereas the insertion is possible from both ends.

Operations on Deque
The following are the operations applied on deque:
● Insert at front
● Delete from end
● insert at rear
● delete from rear
Other than insertion and deletion, we can also perform peek operation in deque. Through peek operation, we can get the front and the rear element of the dequeue.
We can perform two more operations on dequeue:
● isFull(): This function returns a true value if the stack is full; otherwise, it returns a false value.
● isEmpty(): This function returns a true value if the stack is empty; otherwise it returns a false value.
Priority Queue
What is a priority queue?
A priority queue is an abstract data type that behaves similarly to the normal queue except that each element has some priority, i.e., the element with the highest priority would come first in a priority queue. The priority of the elements in a priority queue will determine the order in which elements are removed from the priority queue.
The priority queue supports only comparable elements, which means that the elements are either arranged in an ascending or descending order.
For example, suppose we have some values like 1, 3, 4, 8, 14, 22 inserted in a priority queue with an ordering imposed on the values from least to the greatest. Therefore, the 1 number would be having the highest priority while 22 will be having the lowest priority.
Characteristics of a Priority queue
A priority queue is an extension of a queue that contains the following characteristics:
● Every element in a priority queue has some priority associated with it.
● An element with the higher priority will be deleted before the deletion of the lesser priority.
● If two elements in a priority queue have the same priority, they will be arranged using the FIFO principle.
Let's understand the priority queue through an example.
We have a priority queue that contains the following values:
1, 3, 4, 8, 14, 22
All the values are arranged in ascending order. Now, we will observe how the priority queue will look after performing the following operations:
● poll(): This function will remove the highest priority element from the priority queue. In the above priority queue, the '1' element has the highest priority, so it will be removed from the priority queue.
● add(2): This function will insert the '2' element in a priority queue. As 2 is the smallest element among all the numbers so it will obtain the highest priority.
● poll(): It will remove the '2' element from the priority queue as it has the highest priority queue.
● add(5): It will insert 5 elements after 4 as 5 is larger than 4 and lesser than 8, so it will obtain the third highest priority in a priority queue.
Types of Priority Queue
There are two types of priority queue:
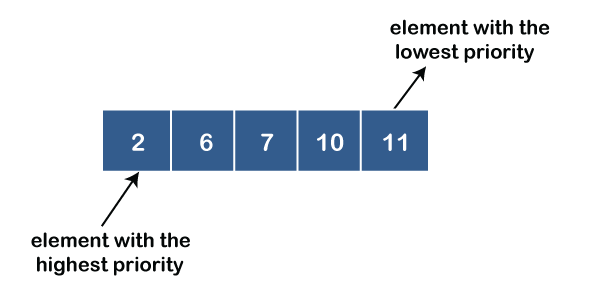
● Ascending order priority queue: In ascending order priority queue, a lower priority number is given as a higher priority in a priority. For example, we take the numbers from 1 to 5 arranged in an ascending order like 1,2,3,4,5; therefore, the smallest number, i.e., 1 is given as the highest priority in a priority queue.
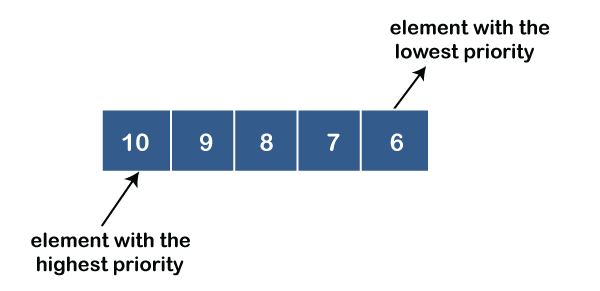
● Descending order priority queue: In descending order priority queue, a higher priority number is given as a higher priority in a priority. For example, we take the numbers from 1 to 5 arranged in descending order like 5, 4, 3, 2, 1; therefore, the largest number, i.e., 5 is given as the highest priority in a priority queue.
Representation of priority queue
Now, we will see how to represent the priority queue through a one-way list.
We will create the priority queue by using the list given below in which INFO list contains the data elements, PRN list contains the priority numbers of each data element available in the INFO list, and LINK basically contains the address of the next node.
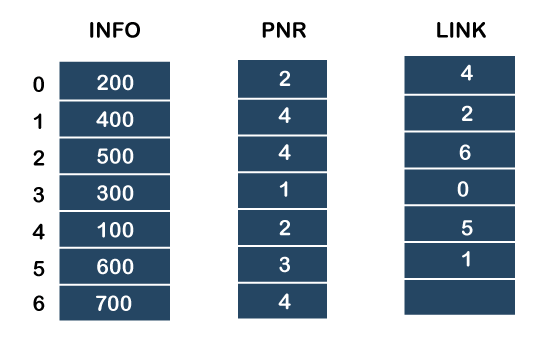
Let's create the priority queue step by step.
In the case of priority queue, lower priority number is considered the higher priority, i.e., lower priority number = higher priority.
Step 1: In the list, lower priority number is 1, whose data value is 333, so it will be inserted in the list as shown in the below diagram:
Step 2: After inserting 333, priority number 2 is having a higher priority, and data values associated with this priority are 222 and 111. So, this data will be inserted based on the FIFO principle; therefore 222 will be added first and then 111.
Step 3: After inserting the elements of priority 2, the next higher priority number is 4 and data elements associated with 4 priority numbers are 444, 555, 777. In this case, elements would be inserted based on the FIFO principle; therefore, 444 will be added first, then 555, and then 777.
Step 4: After inserting the elements of priority 4, the next higher priority number is 5, and the value associated with priority 5 is 666, so it will be inserted at the end of the queue.

Implementation of Priority Queue
The priority queue can be implemented in four ways that include arrays, linked list, heap data structure and binary search tree. The heap data structure is the most efficient way of implementing the priority queue, so we will implement the priority queue using a heap data structure in this topic. Now, first we understand the reason why heap is the most efficient way among all the other data structures.
Key takeaway
- The dequeue stands for Double Ended Queue.
- In the queue, the insertion takes place from one end while the deletion takes place from another end.
- The input-restricted queue means that some restrictions are applied to the insertion.
- The output-restricted queue means that some restrictions are applied to the deletion operation.
References:
1. Aaron M. Tenenbaum, Yedidyah Langsam and Moshe J. Augenstein, “Data Structures Using C and C++”, PHI Learning Private Limited, Delhi India
2. Horowitz and Sahani, “Fundamentals of Data Structures”, Galgotia Publications Pvt Ltd Delhi India.
3. Lipschutz, “Data Structures” Schaum’s Outline Series, Tata McGraw-hill Education (India) Pvt. Ltd.
4. Thareja, “Data Structure Using C” Oxford Higher Education.
5. AK Sharma, “Data Structure Using C”, Pearson Education India.