UNIT 3
Projection of Solid
A solid has three dimensions, viz. length, breadth and thickness. To represent a solid on a flat surface having only length and breadth, at least two orthographic views are necessary. Sometimes, additional views projected on auxiliary planes become necessary to make the description of a solid complete.
- Projections of solids in simple positions
A solid in simple position may have its axis perpendicular to one reference plane or parallel to both. When the axis is perpendicular to one reference plane, it is parallel to the other. Also, when the axis of a solid is perpendicular to a plane, its base will be parallel to that plane. when a plane is parallel to a reference plane, its projection on that plane shows its true shape and size.
Therefore, the projection of a solid on the plane to which its axis is perpendicular, will show the true shape and size of its base.
Hence, when the axis is perpendicular to the ground, i.e. to the H.P., the top view should be drawn first, and the front view projected from it.
When the axis is perpendicular to the V.P., beginning should be made with the front view. The top view should then be projected from it.
When the axis is parallel to both the H.P. and the V.P., neither the top view nor the front view will show the actual shape of the base. In this case, the projection of the solid on an auxiliary plane perpendicular to both the planes, viz. the side view must be drawn first. The front view and the top view are then projected from the side view. The projections in such cases may also be drawn in two stages.
Axis perpendicular to the H.P.:
Problems:
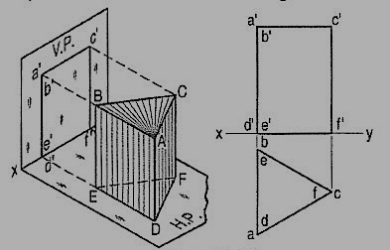
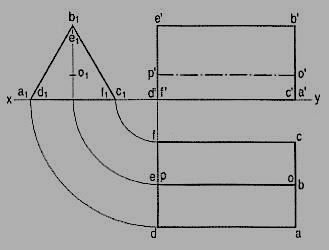
1. Draw the projections of a triangular prism, base 40 mm side and axis 50 mm long, resting on one of its bases on the H.P. with a vertical face perpendicular to the V.P.
|
(i) As the axis is perpendicular to the ground i.e. the H.P. begin with the top view. It will be an equilateral triangle of sides 40 mm long, with one of its sides perpendicular to xy. Name the corners as shown, thus completing the top view. The corners d, e and fare hidden and coincide with the top corners a, b and c respectively
(ii) Project the front view, which will be a rectangle. Name the corners. The line b'e' coincides with a'd'.
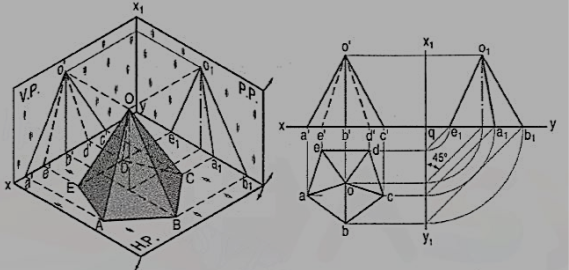
2. Draw the projections of a pentagonal pyramid, base 30 mm edge and axis 50 mm long, having its base on the H.P. and an edge of the base parallel to the V.P. Also draw its side view.
|
(i) Assume the side DE which is nearer the V.P., to be parallel to the V.P. as shown in the pictorial view.
(ii) In the top view, draw a regular pentagon abcde with ed parallel to and nearer xy. Locate its centre o and join it with the corners to indicate the slant edges.
(iii) Through o, project the axis in the front view and mark the apex o', 50 mm above xy. Project all the corners of the base on xy. Draw lines o'a', o'b' and o'c' to show the visible edges. Show o'd' and o'e' for the hidden edges as dashed lines.
(iv) For the side view looking from the left, draw a new reference line x1y1 perpendicular to xy and to the right of the front view. Project the side view on it, horizontally from the front view as shown. The respective distances of all the points in the side view from x1y1, should be equal to their distances in the top view from xy. This is done systematically as explained below:
(v) From each point in the top view, draw horizontal lines up to x1y1. Then draw lines inclined at 45° to x1y1 (or xy) as shown. Or, with q, the point of intersection between xy and x1y1 as centre, draw quarter circles. Project up all the points to intersect the corresponding horizontal lines from the front view and complete the side view as shown in the figure. Lines o1d1 and o1c1 coincide with o1e1 and o1a1 respectively.
Axis perpendicular to the V.P.:
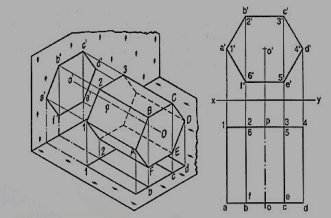
A hexagonal prism (fig. 14) has one of its rectangular faces parallel to the H.P. Its axis is perpendicular to the V.P. and 3.5 cm above the ground. Draw its projections when the nearer end is 2 cm in front of the V.P. Side of base 2.5 cm long; axis 5 cm long.
|
(i) Begin with the front view. Construct a regular hexagon of 2.5 cm long sides with its centre 3.5 cm above xy and one side parallel to it.
(ii) Project down the top view, keeping the line for nearer end, viz. 1-4, 2 cm below xy.
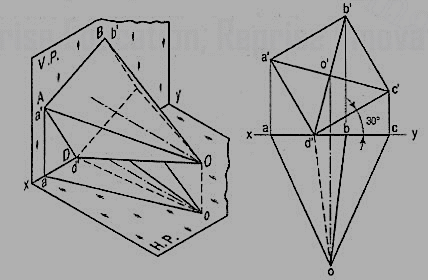
2. A square pyramid fig. 15, base 40 mm side and axis 65 mm long, has its base in the V.P. One edge of the base is inclined at 30° to the H.P. and a corner contained by that edge is on the H.P. Draw its projections.
(i) Draw a square in the front view with the corner d' in xy and the side d'c' inclined at 30° to it. Locate the centre o' and join it with the corners of the square.
(ii) Project down all the corners in xy (because the base is in the V.P.). Mark the apex o on a projector through o'. Draw lines for the slant edges and complete the top view.
|
Axis parallel to both H.P. and the V.P.
A triangular prism1 base 40 mm side and height 65 mm is resting on the H.P. on one of its rectangular faces with the axis parallel to the V.P. Draw its projections.
As the axis is parallel to both the planes, begin with the side view.
(i) Draw an equilateral triangle representing the side view, with one side in xy.
(ii) Project the front view horizontally from this triangle.
(iii) Project down the top view from the front view and the side view, as shown.
|
Problems:
Draw the projections of the following solids, situated in their respective positions, taking a side of the base 40 mm long or the diameter of the base 50 mm long and the axis 65 mm long.
1. A hexagonal pyramid, base on the H.P. and a side of the base parallel to and 25 mm in front of the V.P.
2. A square prism, base on the H.P., a side of the base inclined at 30° to the V.P. and the axis 50 mm in front of the V.P.
3. A triangular pyramid, base on the H.P. and an edge of the base inclined at 45° to the V.P.; the apex 40 mm in front of the V.P.
Projections of solids with axis inclined to one of the reference planes and parallel to the other:
When a solid has its axis inclined to one plane and parallel to the other, its projections are drawn in two stages.
(1) In the initial stage, the solid is assumed to be in simple position, i.e. its axis perpendicular to one of the planes.
If the axis is to be inclined to the ground, i.e. the H.P., it is assumed to be perpendicular to the H.P. in the initial stage. Similarly, if the axis is to be inclined to the V.P., it is kept perpendicular to the V.P. in the initial stage.
Moreover
(i) if the solid has an edge of its base parallel to the H.P. or in the H.P. or on the ground, that edge should be kept perpendicular to the V.P.; if the edge of the base is parallel to the V.P. or in the V.P., it should be kept perpendicular to the H.P.
(ii) If the solid has a corner of its base in the H.P. or on the ground, the sides of the base containing that corner should be kept equally inclined to the V.P.; if the corner is in the V.P., they should be kept equally inclined to the H.P.
Axis inclined to the VP and parallel to the HP:
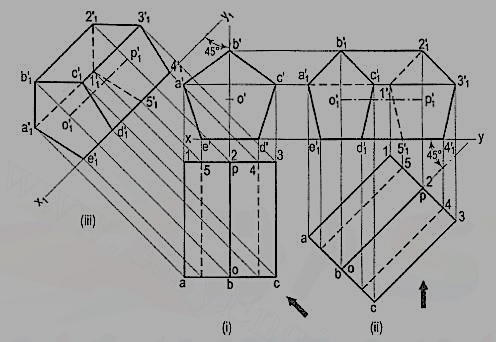
1. Draw the projections of a pentagonal prism, base 25 mm side and axis 50 mm long, resting on one of its faces on the H.P., with the axis inclined at 45° to the V.P.
In the simple position, assume the prism to be on one of its faces on the ground with the axis perpendicular to the V.P.
Draw the pentagon in the front view with one side in xy and project the top view [fig. 17].
The shape and size of the figure in the top view will not change, so long as the prism has its face on the H.P. The respective distances of all the corners in the front view from xy will also remain constant.
|
Method I:
(i) Alter the position of the top view, i.e. reproduce it so that the axis is inclined at 45° to xy. Project all the points upwards from this top view and horizontally from the first front view, e.g. a vertical from a intersecting a horizontal from a' at a point a'1.
(ii) Complete the pentagon a'1b'1c'1d'1e'1 for the fully visible end of the prism. Next, draw the lines for the longer edges and finally, draw the lines for the edges of the other end. Note carefully that the lines a'1 1'1, 1'12'1 and 1'15'1 are dashed lines. e'1 5'1 is also hidden but it coincides with other visible lines.
Method II:
(i) Draw a new reference line x1y1, making 45° angle with the top view of the axis, to represent an auxiliary vertical plane.
(ii) Draw projectors from all the points in the top view perpendicular to x1y1 and on them, mark points keeping the distance of each point from x1y1 equal to its distance from xy in the front view. Join the points as already explained. The auxiliary front view and the top view are the required projections.
Axis inclined to the H.P. and parallel to the V.P.
Problems:
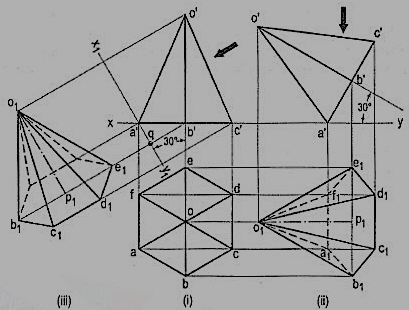
1. A hexagonal pyramid, base 25 mm side and axis 50 mm long, has an edge of its base on the ground. Its axis is inclined at 30° to the ground and parallel to the V.P. Draw its projections. In the initial position assume the axis to be perpendicular to the H.P.
Draw the projections with the base in xy and its one edge perpendicular to the V.P. fig. 18 (i)
|
If the pyramid is now tilted about the edge AF (or CD) the axis will become inclined to the H.P. but will remain parallel to the V.P. The distances of all the corners from the V.P. will remain constant.
The front view will not be affected except in its position in relation to xy. The new top view will have its corners at same distances from xy, as before.
Method I: [fig. 18 (ii)]:
(i) Reproduce the front view so that the axis makes 30° angle with xy and the point a' remains in xy.
(ii) Project all the points vertically from this front view and horizontally from the first top view. Complete the new top view by drawing (a) lines joining the apex o'1 with the corners of the base and (b) lines for the edges of the base.
The base will be partly hidden as shown by dashed line a1b1, e1f1 and f1a1. Similarly, o1f1 and o1a1 are also dashed lines.
Method II:
(i) Through a' draw a new reference line x1y1 inclined at 30° to the axis, to represent an auxiliary inclined plane.
(ii) From the front view project, the required top view on x1y1, keeping the distance of each point from x1y1 equal to the distance of its first top view from xy, viz. e1q = eb' etc.
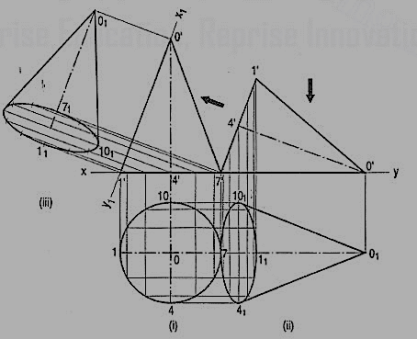
2. Draw the projections of a cone, base 75 mm diameter and axis 100 mm long, lying on the H.P. on one of its generators with the axis parallel to the V.P.
(i) Assuming the cone to be resting on its base on the ground, draw its projections.
(ii) Re-draw the front view so that the line o'7' (or o'1 ') is in xy. Project the required top view as shown. The lines from o1 should be tangents to the ellipse.
|
The top view obtained by auxiliary-plane method is shown in fig. 13-24(ii). The new reference line x1y1 is so drawn as to contain the generator o'1' instead of o'7' (for sake of convenience). The cone is thus lying on the generator o'1 '. Note that 1 '1 1 = 1 '1, o'o1 = 4'o etc. Also note that the base is fully visible in both the methods.
Projections of the solids with axis inclined to both the H.P. and the V.P.
The projections of a solid with its axis inclined to both the planes are drawn in three stages:
(i) Simple position
(ii) Axis inclined to one plane and parallel to the other
(iii) Final position.
The second and final positions may be obtained either by the alteration of the positions of the solid, i.e. the views, or by the alteration of reference lines.
Problem:
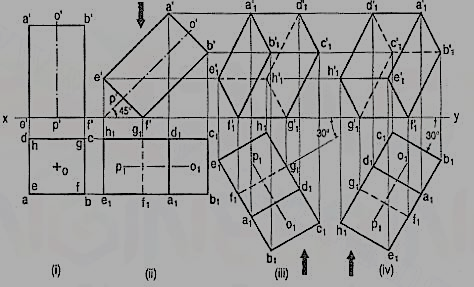
1. A square prism, base 40 mm side and height 65 mm, has its axis inclined at 45° to the H.P. and has an edge of its base, on the H.P and inclined at 30° to the V.P. Draw its projections.
i) Assuming the prism to be resting on its base on the ground with an edge of the base perpendicular to the V.P., draw its projections. Assume the prism to be tilted about the edge which is perpendicular to the V.P., so that the axis makes 45° angle with the H.P.
(ii) Hence, change the position of the front view so that the axis is inclined at 45° to xy and f' (or e') is in xy. Project the second top view. Again, assume the prism to be turned so that the edge on which it rests, makes an angle of 30° with the V.P., keeping the inclination of the axis with the ground constant. The shape and size of the second top view will remain the same; only its position will change. In the front view, the distances of all the corners from xy will remain the same as in the second front view.
(iii) Therefore, reproduce the second top view making f1g1 inclined at 30° to xy. Project the final front view upwards from this top view and horizontally from the second front view, e.g. a vertical from a1 and a horizontal from a' intersecting at a'1. As the top end is further away from xy in the top view it will be fully visible in the front view. Complete the front view showing the hidden edges by dashed lines.
(iv) The second top view may be turned in the opposite direction as shown. In this position, the lower end of the prism, viz. e'lf'1g'1h'1 will be fully visible in the front view.
|
Method II:
(i) Draw the top view and front view in simple position.
(ii) Through f', draw a new reference line x1y1 making 45° angle with the axis. On it, project the auxiliary top view.
(iii) Draw another reference line x2y2 inclined at 30° to the line fig 1. From the auxiliary top view, project the required front view, keeping the distance of each point from x2y2, equal to its distance (in the first front view) from x1y1 i.e. a'1q1 = a'q etc.
The following are the principal methods of development:
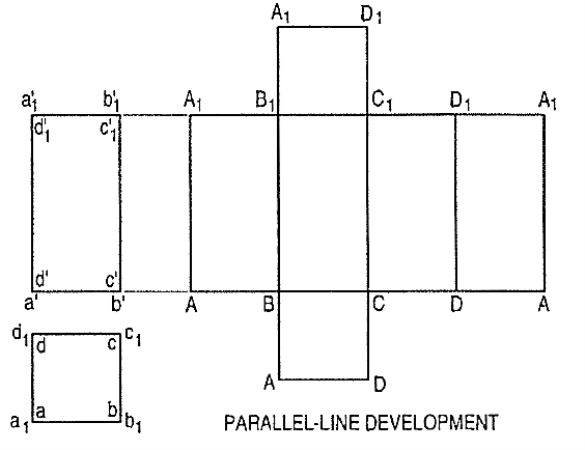
1. Parallel-line development:
It is employed in case of prisms and cylinders in which stretch-out-line principle is used. Lines A-A and A1-A1in fig.2 are called the stretch-out Iines.
2. Radial-line development:
Itis used for pyramids and cones in which the true length of the slant edge or the generator is used as radius.
|
3. Triangulation development:
This is used to develop transition pieces. This is simply a method of dividing a surface into many triangles and transferring them into the development.
4. Approximate method:
It is used to develop objects of double curved or warped surfaces as sphere, paraboloid, ellipsoid, hyperboloid and helicoid.
Developments of lateral surfaces of right solids:
The methods of drawing developments of surfaces of various solids are explained by means of the following typical problems. Only the lateral surfaces of the solids (except the cube) have been developed. The ends or bases have been omitted. They can be easily incorporated if required.
The development of the surface of a cube consists of six equal squares, the length of the side of the squares being equal to the length of the edge of the cube.
Problem:
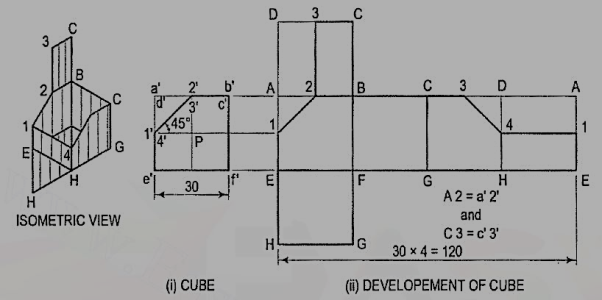
1. Draw the development of the surface of the part P of the cube, the front view of which is shown in fig. 3(i).Name all the corners of the cube and the points at which the edges are cut.
(i) Draw the stretch-out lines A-A and E-E directly in line with the front view, and assuming the cube to be whole, draw four squares for the vertical faces, one square for the top and another for the bottom as shown in fig. 3(ii).
|
(ii) Name all the corners. Draw a horizontal line through 1' to cut AE at 1 and DH at 4. a' b' is the true length of the edge. Hence, mark a point 2 on AB and 3 on CD such that A 2 = a' 2' and C 3 = c' 3'. Mark the point3 on CD in the top square also.
(iii) Draw lines 1-2, 2-3, 3-4 and 4-1, and complete the development as shown. Keep lines for the removed portion, viz. A1, A2, 3D, D4 and DA thin and fainter.
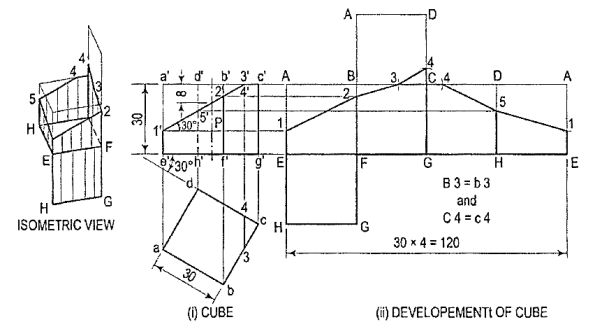
2. Draw the development of the surface of the part P of the cube shown in two views in fig. 4(i).
|
(i) Draw horizontal lines through points 1 ', 2' and 5' to cut AE in 1, BF in 2and DH in 5 respectively. Lines b'c' and c'd' do not show the true lengths of the edges. The sides of the square in the top view show the true length. Therefore, mark points 3 in BC and 4 in CD such that 83 = b3 and C4 = c4.
(ii) Draw lines joining 1, 2, 3 etc. in correct sequence and complete the required development. Keep the lines for the removed part fainter.
Development of the lateral surface of a prism consists of the same number of rectangles in contact as the number of the sides of the base of the prism. Onside of the rectangle is equal to the length of the axis and the other side equal to the length of the side of the base.
Problem:
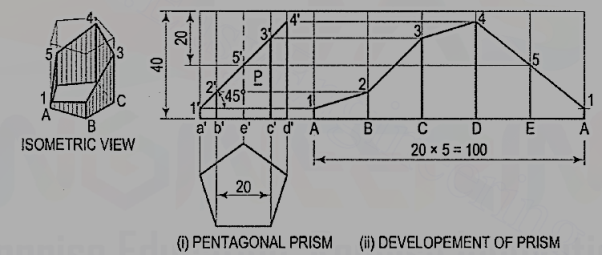
3. Draw the development of the lateral surface of the part P of the pentagonal prism shown in fig. 3 (i).
|
Name the corners of the prism and the points at which the edges are cut.
(i) Draw the development assuming the prism to be whole [fig. 5(ii)].It is made up of five equal rectangles.
(ii) Draw horizontal lines through points 1’, 2’ etc. to cut the lines for the corresponding edges in the development at points 1, 2 etc.
(iii)Draw lines joining these points and complete the development as shown.
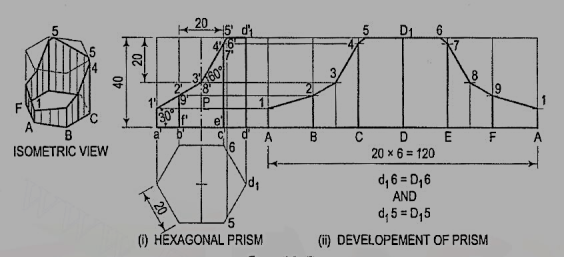
4. Draw the development of the lateral surface of the part P of the hexagonal prism shown in fig. 6 (i).
Name the points at which the edges are cut and draw the development assuming the prism to be whole [fig. 6(ii)].
|
(i) Obtain all the points except 5 and 6 by drawing horizontal lines. Note that points 3 and 8 lie on vertical lines drawn through the mid-points of BC and EF.
(ii) Mark points 5 and 6 such that SD1 = 5d1 and D16 = d16.
(iii) Draw lines joining points 1, 2, 3 etc. in correct sequence and complete the required development as shown.
The development of the lateral surface of a cylinder is a rectangle having one side equal to the circumference of its base-circle and the other equal to its length.
Problem
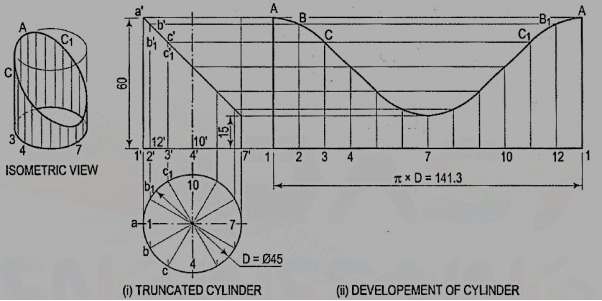
1. Develop the lateral surface of the truncated cylinder shown in fig. 7(i).
|
(i) Divide the circle in the top view into twelve equal parts. Project the division points to the front view and draw the generators. Mark points a', b' andb'1, c' and c'1 etc. in which the generators are cut.
(ii) Draw the development of the lateral surface of the whole cylinder along with the generators [fig. 7(ii)]. The length of the line 1-1 is equal to π x D (circumference of the circle). This length can also be marked approximately by stepping off with a bow divider, twelve divisions, each equal to the chord-length ab. (The length thus obtained is about 1 %shorter than the exact length; but this is permitted in drawing work.)
(iii) Draw horizontal lines through points a', b' and b'1 etc. to cut the corresponding generators in points A, B and B1 etc. Draw a smooth curve through the points thus obtained. The figure 1-A-A-1 is the required development.
The development of the lateral surface of a pyramid consists of many equal isosceles triangles in contact. The base and the sides of each triangle are respectively equal to the edge of the base and the slant edge of the pyramid.
Method of drawing the development of the lateral surface of a pyramid:
(I) With any point O as centre and radius equal to the true length of the slant edge of the pyramid, draw an arc of the circle. With radius equal to the true length of the side of the base, step-off (on this arc) the same number of divisions as the number of sides of the base.
(ii) Draw lines joining the division-points with each other in correct sequence and with the centre for the arc. The figure thus formed (excluding the arc) is the development of the lateral surface of the pyramid.
Problem:
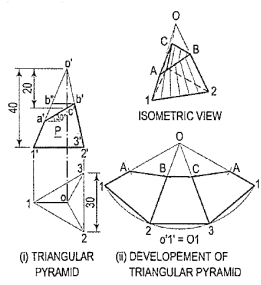
1. Draw the development of the lateral surface of the part P of the triangular pyramid shown in fig. 8 (i). The line o'1' in the front view is the true length of the slant edge because it is parallel to xy in the lop view. The true length of the side of the base is seen in the top view.
(i) Draw the development of the lateral surface of the whole pyramid [fig. 8(ii)]as explained above. On 01 mark a point A such that OA = o'a'. o'2' (with which o'3' coincides) is not the true length of the slant edge.
(ii) Hence, through b', draw a line parallel to the base and cutting o' a' at b".o'b" is the true length of o'b' as well as o'c'. Mark a point B in 02 and C in 03 such that OB = OC = o'b".
(iii) Draw lines AB, BC and CA and complete the required development as shown. Keep the arc and the lines for the removed part fainter.
|
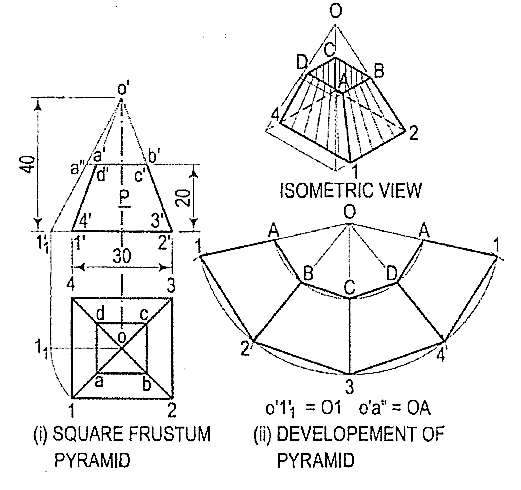
2. Draw the development of the lateral surface of the frustum of the square pyramid shown in fig. 9 (i).
(i) Determine the position of the apex. None of the lines in the front view shows the true length of the slant edge. Therefore, draw the top view and make any one line (for the slant edge) horizontal, i.e. parallel to xy and determine the true length o'1 '1. Through a', draw a line parallel to the baseand obtain the true length o'a".
(ii) With O as centre and radius o'1 '1, draw an arc and obtain the development of the lateral surface of the whole pyramid [fig. 9(ii)].
(iii) With centre O and radius o' a", draw an arc cutting O1, O2 etc. at points, B etc. respectively.
(iv) Draw lines AB, BC, CD and DA and complete the required development. Note that these lines are respectively parallel to lines 1-2, 2-3 etc.
|
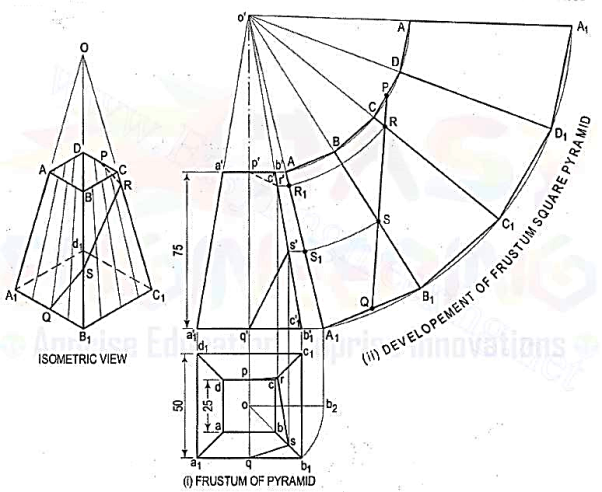
3.A frustum of a square pyramid has its base 50 mm side; top 25 mm side and height 75 mm. Draw the development of its lateral surface.
|
(i) Mark the mid-point P of CD and Q of A1B1. Draw a line joining P and Q and cutting CC1 at R and BB1 at S. Transfer these points to the front view and the top view. For example, with o' as centre and radius o'R, draw an arc cutting o' A1 at R1. Through R1, draw a line parallel to the base and cutting c'c'1 at r'. Project r' to r on cc1 in the top view. r' and r are the projections of R.
(ii) Similarly, obtain s' and s on b'b'1 and bb1 respectively. Draw lines pr, rs and sq which will show the top view of the line PQ. p'r's'q' will be the path of the line PQ in the front view.
The development of the curved surface of a cone is a sector of a circle, the radius and the length of the arc of which are respectively equal to the slant height and the circumference of the base-circle of the cone.
Problem:
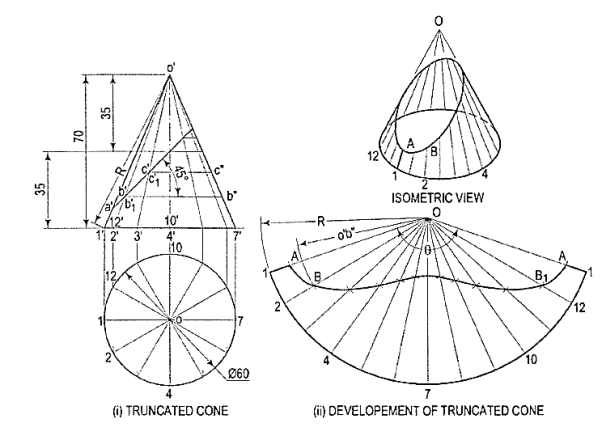
1. Draw the development of the lateral surface of the truncated cone shown in fig. 11 (i).
|
Assuming the cone to be whole, let us draw its development.
(i) Draw the base-circle in the top view and divide it into twelve equal parts.
(ii) With any point O as centre and radius equal to o'1' or o'7', draw an arc of the circle [fig. 15-24(ii)]. The length of this arc should be equal to the circumference of the base circle. This can be determined in two ways.
(iii) Calculate the subtended angle θ by the formula,

Cut-off the arc so that it subtends the angle θ at the center and divide it into twelve equal parts.
(iv) Step-off with a bow-divider, twelve equal divisions on the arc, each equal to one of the divisions of the base-circle.
(This will give an approximate length of the circumference. Note that the base-circle should not be divided into less than twelve equal parts.)
(v) Join the division-points with 0, thus completing the development of the whole cone with twelve generators shown in it [fig. ,11(ii)].
(vi) The truncated portion of the cone may be deducted from this development by marking the positions of points at which generators are cut and then drawing a curve through them. For example, generators o'2' and o'12' in the front view are cut at points b' and b'1 which coincide with each other. The true length ofo' b' may be obtained by drawing a line through b', parallel to the base and cutting o'7' at b". Then o'b" is the true length of o'b'.
(vii) Mark points B and 81 on generators 02 and 0-12 respectively, such that OB = 0B1 = o' b". Locate all points in the same way and draw a smooth curve through them. The figure enclosed this curve and the arc is the development of the truncated cone.
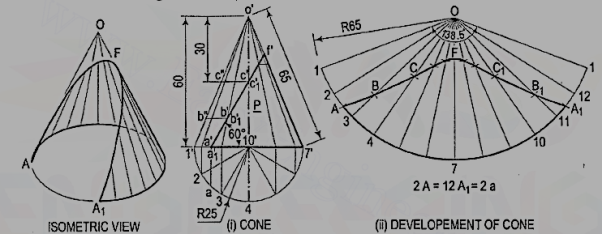
2. Draw the development of the lateral surface of the part P of the cone shown in fig. 12
|
Draw the development as explained in problem [fig. 12 (ii)]. For the points at which the base of the cone is cut, mark points A and A1 on the arcs2-3 and 11-12 respectively, such that A2 = A1 12 = a2. Draw the curve passing through the points A, B, C etc. The figure enclosed between this curve and the arcA-A1 is the required development.
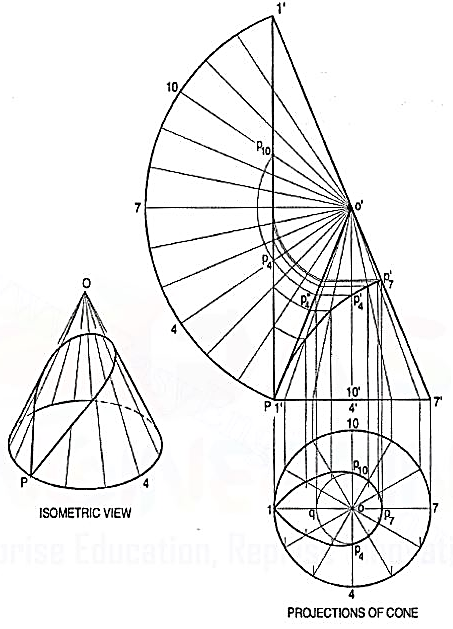
3. Draw the projections of a cone resting on the ground on its base and show on them, the shortest path by which a point P, starting from a point on the circumference of the base and moving around the cone will return to the same point. Base of cone 61 mm diameter; axis 75 mm long.
|
(i) Draw the projections and the development of the surface of the cone showing all twelve generators (fig. 13). The development may be drawn attached to o'1 '.
(ii) Assume that P starts from the point 1 (i.e. point 1' in the front view).Draw a straight line 1 '1' on the development. This line shows the required shortest path. Let us take a point P4 at which the path cuts the generator o’4. Mark a point P"4 on o'1' such that o'P"4 = o'P4. This can be done by drawing an arc with o' as centre and radius equal to o'P 4 cutting o11'at P"4. Through P"4, draw a line parallel to the base cutting o'4' at P'4.Then p'4 is the position of the point p4 in the front view. Similarly, transfer all the points to the front view and draw the required curve through them. The curve at the back will coincide with the front curve.
(iii) Project these points to the top view on the respective generators. p'4 andp'10 cannot be projected directly. Hence, project p"4 to a point q on o1.With o as centre and radius equal to oq, draw an arc cutting o4 at p4 ando-10 at p10. Thus op4 = op10 = oq. A curve drawn through the points thus obtained will show the path in the top view.
