Unit 1
Introduction
Non-destructive testing refers to a method of detecting internal flaws in engineering materials without breaking them.
It can be also be defined as the use of the non-invasive technique to determine the integrity of a material component or structure or quantitatively measuring some characteristics of an object.
NDT is aimed at extracting information on the physical, chemical, mechanical or metallurgical state of material or structures without damaging its intended utility value.
Key Take away points:
It is aimed at extracting information on the physical, chemical, mechanical or metallurgical state of materials or structures without damaging their utility value.
1. Scope of NDT:
- In mechanical or optical-strain distribution, surface flaws, cracks, gagging, dimensions, etc.
- In Automotive-engine parts, frames, and other accessories.
- Aviation field-space and airframe.
- New big sector power plant-propeller, engines, gas turbines, heat exchangers, etc.
- Railways for rail/wheel/corrosion inspection.
- Construction of bridges, structures.
- Manufacturing of machine parts, casting, forging, etc.
- Medical applications.
- Submarines and Naval ships.
2. Advantages of NDT:
- It ensures the integrity and reliability of a product.
- Time and money-saving, because these are fast methods.
- Higher customer satisfaction and preventing accidents and saving lives.
- Production, inspection, and labour costs are reduced.
- Maintain a uniform quality level; NDT can help to establish a quality level.
- Products demand increased.
- Easy material handling and one-way process control.
- Alloy identification, degree of cure, corrosion, etc. are detected by NDT.
- NDT plays a very important part in the designing of lighter, stronger, and less costly reliable parts.
S.No | NDT | Destructive testing |
1. | The use of non-invasive technique is to determine the integrity of a material or component. | Destructive testing includes measuring various mechanical or chemical properties such as tensile strength or chemical composition. |
2. | NDT mostly deals in modern technologies to identify the specimen. | Destructive testing deals in physical testing. |
3. | After testing, NDT will allow the parts to be used for its intended purpose. | Destructive testing will render the part unusable for its intended purpose. |
4. | NDT can be performed on the component which is in service. | Generally performed when component or material sample can no longer be used in service or is readily replaceable. |
5. | Result interpretation is difficult. | Easy in result interpretation. |
6. | Skilled personnel required | Can be performed by without very skilled personnel. |
7. | Some methods involve environmental hazard and expensive equipments | Non-environmental hazards associated and equipments are less costly. |
Various NDT methods have been used for a long time. Some of them are mentioned below:
- Visual and Optical testing:
It may be performed manually by an inspector or by a special automated technique like magnifying glasses, mirrors, or boroscope to gain access and more closely inspect the component.
2. Penetrate testing:
In this method, the test specimen is coated with a liquid of fluorescent dye solution. Then excess penetrant is removed very carefully and developers are applied.
These developers act as a blotter and draw out the trapped penetrant from the defect to the open surface. These penetrants are now easily visible because of colour contrast between penetrant and developer with fluorescent dyes. Ultraviolet lights are used which make the bleed out penetrant readily seen.
3. Magnetic particle Testing:
This method employs the role of the magnetic field which may be produced by any of the magnetizing techniques. Then a powdered magnet or liquid magnet called magnetic ink is spread over the surface to be inspected.
Surface or near-surface defects cuts the magnetic flux line, which generates a new magnetic pole, at the defect point. This concentrates the iron particles near imperfection or defect giving a clear visualization of the defect.
The basic terminologies which are used in NDT are:
- Discontinuity:
It is a lack of continuity or cohesion; an intentional or an unintentional interruption in the physical structure of a component.
2. Indication:
The indication is the response or evidence from a non-destructive examination.
3. Interpretation:
It is the determination of the result whether indications are relevant or non-relevant.
4. Evaluation:
It the determination of whether a relevant indication is a cause to accept or reject material or component.
Key Take away points:
Discontinuity, Indication, Interpretation, evaluation, are the important terminology of Nondestructive Testing.
1. Flaws:
Any discontinuity in the normal physical composition of the part which does not have any major effect on the performance of that part is said to be a flaw.
Example: Poles, scratches, cracks, etc.
2. Defects:
Any interruptions in the normal physical composition of parts, that is, rejectable known as a defect.
These interruptions may occur in the base metal, weld materials, or HAZ discontinuities, which do not meet the requirements of the codes or specifications used to invoke and control an inspection, which is referred to as defects.
Classifications of defects:
- Cracks:
A crack is a fissure produced in metal by tearing action.
2. Surface defects:
These defects are intergranular. These defects are due to improper temperature, friction, corrosion, rust, dirt, etc.
3. Blowholes, porosity, slag, flakes, solid inclusion.
4. Pockmarks and rough surfaces:
Spatter occurs in arc or gas welding as metal particles that are expelled during welding. These particles do not form part of the actual weld.
5. Buldge formation, wavy edges, zipper cracks, etc.
6. Distortions, sub-surfaces cracks
Key Take away points:
Any discontinuity in the part which does not affect the service performance part is known as a flaw.
The defect is a discontinuity in the part along with the rough surface, pockmarks; rough surfaces, etc. are classifications of defects.
Visual inspection is commonly defined as the examination of material, component, or product for conditions of non-conformance using light and eyes, alone or in conjunction with various aids.
The visual inspection often also involves, shaking, listening, feeling, and sometimes even smelling the component being inspected.
It consists of major two processes:
- The first is the search process.
- The second process is of combining relevant knowledge, sensory input, and the pertinent logical process to provide identification that some anomaly or pattern represents a flow that possesses a risk to the performance of the part.
It can be performed by direct or indirect methods during various stages of manufacturing or after the component has been placed in service.
It can be done manually or with the help of digital detectors and computer technology which is known as a visual inspection.
Types of visual inspection:
- Manual inspection:
- It is a method of inspection in which eyes and light are used either with or without any help of optical aids.
- It is used in very small production systems.
- It is a lesser reliable method of inspection but at a low cost. So it is useful for small industries.
b. Automated vision inspection:
It is the technology and method which uses an imaging system and a computer to analyze an image and provide imaging-based automatic inspection and analysis for automatic inspection, process control, and other industries.
The machine can eliminate human effort. It also allows process equipment to be utilized twenty-four hours a day.

Key Take away points:
Visual inspection is commonly defined as the examination of material, component, or product for conditions of non-conformance using light and eyes.
The types of equipment required for visual inspection are:
- Borescope
- Magnifying microscope
- Optical microscope
- C.C.T.V. (Closed Circuit Television)
- Flexiscope
- Endoscope
- Holography
- Rulers
- Optical comparators
- Micrometers
- Borescope:
- The borescope is designed to enable the inspector to inspect the inside portion of a bore or narrow tube, a chamber, etc.
- It is a high precision optical system, which consists of complex arrangements of lenses, light sources, prisms through which light is passed.
- It is a long tubular, optical device that illuminates and allows the inspection of surfaces inside narrow tubes or difficult to reach chambers.
- The source is located in front of the object lens to give illumination for the test piece being examined.
- As the length of the Borescope is increased the image becomes less brilliant because of light losses.
- The generally observed visual area is 25 mm diameter at a 25 mm distance.
- This test is based on the principle of interpretation of sound.
- In this test, the object is ringed to get the sound from the object, with the interpretation of which, the soundness of the object is judged.
- The working principle of this test is based on the difference between the pitch and sound quality of sound emanating from a healthy and unhealthy casting.
The procedure for the ringing test is conducted in the following manner:
- The casting is suspended in the air, clear from all sides and floor.
- The casting is then struck gently with a hammer at different locations of the casting.
- The action will produce a ringing sound from the casting. The sound is carefully noted either by ear or with the help of an electronic device.
- The presence of a defect in the casting will produce a sound that will be different from the sound produced by a healthy one. Thus, the healthiness of a casting can be judge by the quality of the ringing sound produced by it.
- This test is effective only when large defects are present in the casting.
- It is not suitable to detect small defects as it will be very difficult to differentiate between the sound qualities produced by healthy casting from the sound produced from a casting having very small defects.
Uses of this test:
- Blacksmiths for checking the utensils of iron.
- Swords smith for swords.
- Bell makers for bells
- To test the structural welds
Limitations:
- Hammer test is effective only when there are large defects in the casting.
Key Take away points:
In this test method, the object is ringed to get the sound from the object, with the interpretation of which the soundness of the object is judged.
- Oil whitening inspection can be said at the earliest application of penetrant based inspections.
- In an earlier time, this technique was used for the inspection of railroad axles, wheels couplers, and locomotive parts.
- The methods involved the use of oil usually made of dark lubrication oil to find surface defects.
- The oil whitening test can be summarized as follows:
- Dark heavy oil is diluted with kerosene stored in large tanks and the part to be inspected is submerged in the oil bath.
- Appropriate dwell time is permitted to allow the mixture to enter the defects.
- After that, the part is removed from the oil bath and the surface is cleaned properly to remove the excess oil.
- Surfaces of the part are now coated with a fine coating of chalk powder. A fine suspension of chalk powder in alcohol or kerosene is used for this purpose.
- Evaporation of the kerosene leaves a very fine thin, white powder coating showing the presence of discontinuities in the parts.
- The oil and whitening technique was continued until around 1940. After that, it was slowly replaced by magnetic for testing of ferromagnetic parts.
S. No. | Figure | Indication | Interpretation |
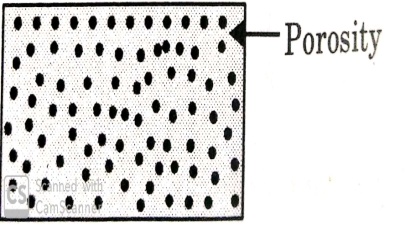
 | Small size holes in the cluster | It is termed as porosity. It arises due to a reduction in the solubility of gases during solidification. | |
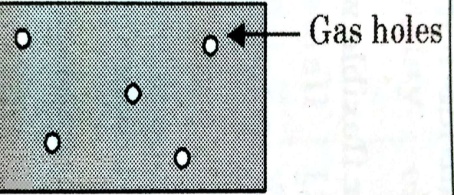
2. |  | Small size holes but greater than as in porosity. They do not appear in the cluster. | It is the gas hole effect. It arises due to entrapped gases. |
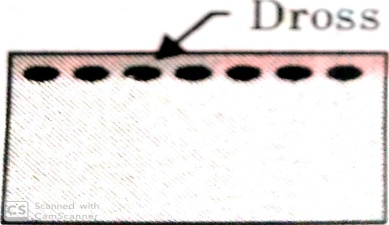
3. |  | Black coloured dots of irregular size on the top surface | Termed as dross due to lighter density of the impurities. |
4. |  | Black coloured dot-like formation in the weldment | It is known as slag inclusion, which occurs when compounds such as oxides and electrode coating material are trapped in the weld zone. |
5. |  | Light passes that remain between and the parts to be welded. | Known as incomplete fusion, occurs when the depth of welded joints is insufficient. |
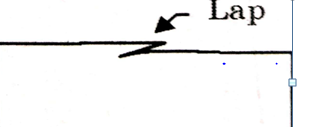
6. |  | Discontinuous irregular contours. | Known as laps, these are the discontinuities caused by the folding of metal in a thin plate on the surface of the forged product. |
1. Advantages:
a. Less costly
b. It can be automated easily
c. Results of inspection can be stored
d. Applicable to almost all material inspection, and
e. Operation is quick and simple.
2. Limitations:
- Inspections are limited to some surfaces
- The skilled inspector is required
- Health and eyesight of inspector is also an important issue, and
- Indirect inspection is difficult to achieve.
References:
- Dr. D Vijay Kumar, A textbook on Non- destructive testing.
- Google websites.
- Palash Awasthi, notes on NDT