2.1.1 I/O port structure with programming:
- 8051 microcontrollers have 4 I/O ports each of 8-bit, which can be configured as input or output.
- Hence, total 32 input/output pins allow the microcontroller to be connected with the peripheral devices.
- Pin configuration, i.e. the pin can be configured as 1 for input and 0 for output as per the logic state.
Input/Output (I/O) pin − All the circuits within the microcontroller must be connected to one of its pins except P0 port because it does not have pull-up resistors built-in.
Input pin − Logic 1 is applied to a bit of the P register. The output FE transistor is turned off and the other pin remains connected to the power supply voltage over a pull-up resistor of high resistance.
Port 0 − The P0 (zero) port is characterized by two functions −
- When the external memory is used then the lower address byte (addresses A0A7) is applied on it, else all bits of this port are configured as input/output.
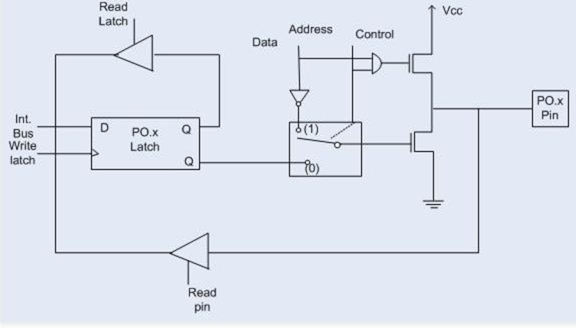
- Port-0 can be used as a normal bidirectional I/O port or it can be used for address/data interfacing for accessing external memory. When control is ‘1’, the port is used for address/data interfacing. When the control is ‘0’, the port can be used as a bidirectional I/O port.
- When P0 port is configured as an output then other ports consisting of pins with built-in pull-up resistor connected by its end to 5V power supply, the pins of this port have this resistor left out.
|
Fig.1 Port 0
- Input Configuration
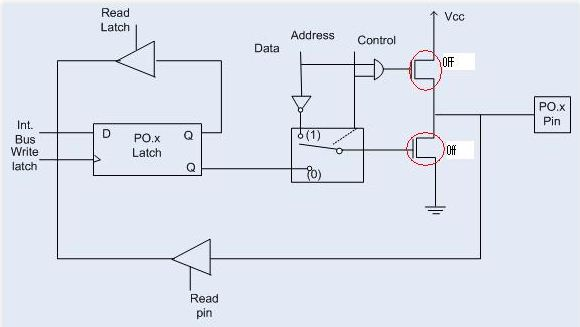
If any pin of this port is configured as an input, then it acts as if it “floats”, i.e. the input has unlimited input resistance and in-determined potential.
|
Fig. 2 Port-0 input configuration
2. Output Configuration
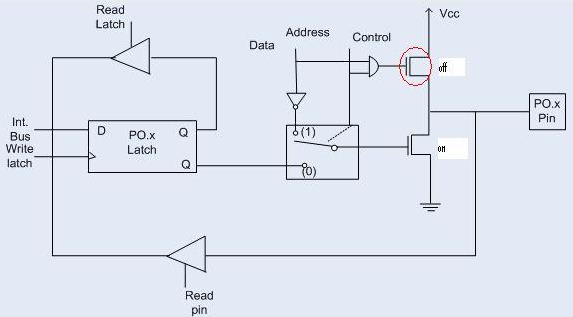
i)When the pin is configured as an output, then it acts as an “open drain”.By applying logic 0 to a port bit, the appropriate pin will be connected to ground (0V), and applying logic 1, the external output will keep on “floating”.In order to apply logic 1 (5V) on this output pin, it is necessary to build an external pullup resistor.
ii)Suppose we want to write 1 on pin of Port 0, a ‘1’ written to the latch which turns ‘off’ the lower FET while due to ‘0’ control signal upper FET also turns off as shown in fig. above.
iii)Here we wants logic ‘1’ on pin but we getting floating value so to convert that floating value into logic ‘1’ we need to connect the pull up resistor parallel to upper FET .
iv)This is the reason why we needed to connect pull up resistor to port 0 when we want to initialize port 0 as an output port .
|
Fig. 3 Port 0 output configuration
Port 1
- P1 is a true I/O port as it doesn’t have any alternative functions as in P0, but this port can be configured as general I/O only.
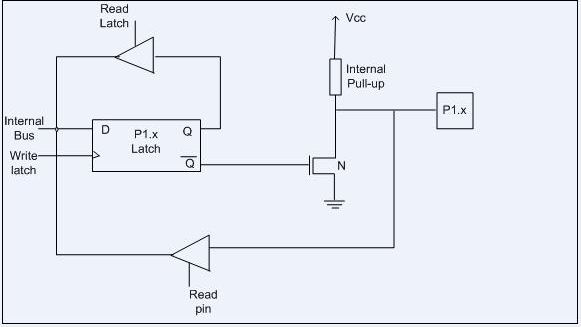
- It has a built-in pull-up resistor and is completely compatible with TTL circuits.
|
Fig. 4 Port 1
- When Port 1 is functioning in the capacity of an input port, a digital ‘1’ (FFH) is written to the latch at 90H. This turns off the transistor, and the pin floats in a high impedance state. Consequently, it connects to the input buffer.
- When Port 1 is functioning in the capacity of an output port, the latch is given a ‘LOW’ signal (00H). This turns the FER (Field Effect Transistor) o. The pull-up resistor is OFF, and the port is used as an output port.
Port 2
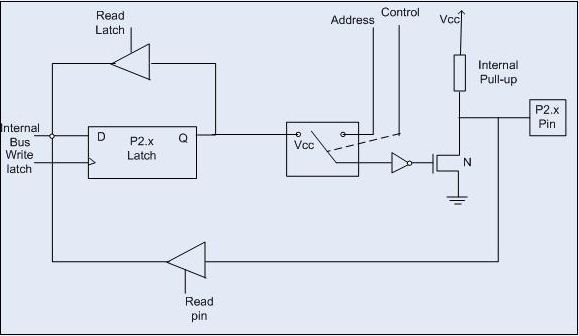
- P2 is similar to P0 when the external memory is used. Pins of this port occupy addresses intended for the external memory chip.
- This port can be used for higher address byte with addresses A8-A15. When no memory is added then this port can be used as a general input/output port similar to Port 1.
|
Fig. 5 Port 2
- Address is 10H
- Construction: Port 2 has a D type latch, 1 FET, an internal pull-up resistor, two unidirectional buffers, and a Control Logic block.
- Its main functions are kind of similar to those of Port 0. It can be used as an input-output port. And can access external memory in conjunction with Port 0.
Port 3
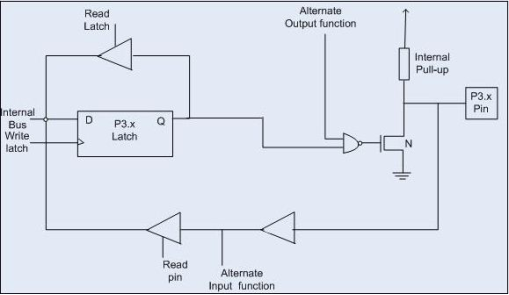
- In this port, functions are similar to other ports except that the logic 1 must be applied to appropriate bit of the P3 register.
|
Fig. 6 Port 3
- Address is B0H.
- Construction: The third Port of 8051 has a D-type latch. In addition to that, it has three unidirectional buffers. A FET with an internal pull-up resistor. Additionally, it also has a NAND gate connected to the FET.
- Just like Port 2, Port 3 can function as an input-output port.
Limitations:
- When pins are configured as an output (i.e. logic 0), then the single port pins can receive a current of 10mA.
- When these pins are configured as inputs (i.e. logic 1), then built-in pull-up resistors provide very weak current, but can activate up to 4 TTL inputs of LS series.
- If all 8 bits of a port are active, then the total current must be limited to 15mA (port P0: 26mA).
- If all ports (32 bits) are active, then the total maximum current must be limited to 71mA.
2.1.2 I/O bit manipulation programming
- Bit manipulation is the act of algorithmically manipulating bits or other pieces of data shorter than a word.
- Computer programming tasks that require bit manipulation include low-level device control, error detection and correction algorithms, data compression, encryption algorithms, and optimization.
- For most other tasks, modern programming languages allow the programmer to work directly with abstractions instead of bits that represent those abstractions.
- Sometimes we need to access only 1 or 2 bits of the port instead of the entire 8 bits.
- Source code that does bit manipulation makes use of the bitwise operations: AND, OR, XOR, NOT, and possibly other operations analogous to the boolean operator.
- A powerful feature of 8051 I/O ports is their capability to access individual bits of the port without altering the rest of the bits in that port. Of the four 8051 ports, we can access either the entire 8 bits or any single bit without altering the rest.
- When accessing a port in single-bit manner, we use the syntax “SETB X. Y” where X is the port number 0, 1,2. or 3, and Y is the desired bit number from 0 to 7 for data bits DO to D7.
- For example, “SETB PI. 5″ sets high bit 5 of port 1.
Key Takeaway:
- 8051 microcontrollers have 4 I/O ports each of 8-bit, which can be configured as input or output.
- P0 port is configured as an output then other ports consisting of pins with built-in pull-up resistor connected by its end to 5V power supply, the pins of this port have this resistor left out.
- In this port, functions are similar to other ports except that the logic 1 must be applied to appropriate bit of the P3 register.
- A powerful feature of 8051 I/O ports is their capability to access individual bits of the port without altering the rest of the bits in that port.
Timer:
- A timer is a specialized type of clock which is used to measure time intervals.
- A timer that counts from zero upwards for measuring time elapsed is often called a stopwatch.
- It is a device that counts down from a specified time interval and used to generate a time delay, for example, an hourglass is a timer.
- The register incremented for every machine cycle.
- Maximum count rate is 1/12 of the oscillator frequency.
- The timer module has 3 modes which must be configured correctly for the specific application
- Up mode: timer will start with a value of zero and increment until a software defined value
- Continuous mode: timer will start at zero and increment until it rolls over at 0xFFFF
- Up/Down mode: timer will start at zero, increment until a defined value, and the start decrementing back to zero
- A timer uses the frequency of the internal clock, and generates delay.
- It is important to note that whenever modifying timer registers, it is recommended to halt the timer first using the TACLR bit, and then reset the register with the required parameters.
- This ensures that the timer does not expire unexpectedly and cause an interrupt or some other unintended consequence.
- Timer is fully depending upon the oscillator that attached externally to the microcontroller because it uses the frequency of oscillator to run.
- When we trigger timer it starts from initial value and run up to decided value stored by user in special function registers. When it reach its maximum value, it overflows and a certain bit is decided to show over flow in SFR(special function register).
- Some timers also used prescalar technique to enhance its limits. AT89C51 contain two timer/counter T0 and T1 and which can be used in different mode like 8bit ,13bit and 16 bit.
- Maximum value that can be achieved by timer is depending upon its size. Suppose a timer is of 16 bit so it can have achieved up to = 65536
Counter:
- A counter is a device that stores (and sometimes displays) the number of times a particular event or process occurred, with respect to a clock signal.
- It is used to count the events happening outside the microcontroller. The register is incremented considering 1 to 0 transition at its corresponding to an external input pin (T0, T1).
- Maximum count rate is 1/24 of the oscillator frequency.
- A counter uses an external signal to count pulses.
- Counters, as the name suggests, are hardware mechanisms for counting some form of event.
- At the heart of the counter is a special purpose register that stores the current value of the counter.
- The type of event that causes this increment is typically configurable through other special purpose registers.
2.2.1 Registers used for timer/counter operations:
- The 8051 has two timers, Timer 0 and Timer 1. They can be used as timers or as event counters. Both Timer 0 and Timer 1 are 16-bit wide.
- Since the 8051 follows an 8-bit architecture, each 16 bit is accessed as two separate registers of low-byte and high-byte.
- Counters and Timers in 8051 microcontroller contain two special function registers: TMOD (Timer Mode Register) and TCON (Timer Control Register), which are used for activating and configuring timers and counters.
Timer Mode Control (TMOD):
- TMOD is an 8-bit register used for selecting timer or counter and mode of timers. Lower 4-bits are used for control operation of timer 0 or counter0, and remaining 4-bits are used for control operation of timer1 or counter1.
Timer 0 Register
- The 16-bit register of Timer 0 is accessed as low- and high-byte. The low-byte register is called TL0 (Timer 0 low byte) and the high-byte register is called TH0 (Timer 0 high byte).
- These registers can be accessed like any other register. For example, the instruction MOV TL0, #4H moves the value into the low-byte of Timer #0.
Timer 1 Register
- The 16-bit register of Timer 1 is accessed as low- and high-byte. The low-byte register is called TL1 (Timer 1 low byte) and the high-byte register is called TH1 (Timer 1 high byte).
- These registers can be accessed like any other register. For example, the instruction MOV TL1, #4H moves the value into the low-byte of Timer.
2.2.2 Delay calculations:
- A timer can be generalized as a multi-bit counter which increments/decrements itself on receiving a clock signal and produces an interrupt signal up on roll over.
- When the counter is running on the processor’s clock , it is called a “Timer”, which counts a predefined number of processor clock pulses and generates a programmable delay.
- When the counter is running on an external clock source (may be a periodic or aperiodic external signal) it is called a “Counter” itself and it can be used for counting external events.
- Delay calculation is the term used in integrated circuit design for the calculation of the gate delay of a single logic gate and the wires attached to it.
- By contrast, static timing analysis computes the delays of entire paths, using delay calculation to determine the delay of each gate and wire.
- There are many methods used for delay calculation for the gate itself. The choice depends primarily on the speed and accuracy required
- Circuit simulators such as SPICE may be used. This is the most accurate, but slowest, method.
- Two dimensional tables[1] are commonly used in applications such as logic synthesis, placement and routing. These tables take an output load and input slope, and generate a circuit delay and output slope.
- A very simple model called the K-factor model is sometimes used. This approximates the delay as a constant plus k times the load capacitance.
- A more complex model called Delay Calculation Language,[2] or DCL, calls a user-defined program whenever a delay value is required. This allows arbitrarily complex models to be represented, but raises significant software engineering issues.
- Logical effort provides a simple delay calculation that accounts for gate sizing and is analytically tractable.
Procedure:
- First we have to load the TMOD register value for ‘Timer0’ and ‘Timer1’in different modes. For example, if we want to operate timer1 in mode1 it must be configured as “TMOD=0x10”.
- Whenever we operate the timer in mode 1, timer takes the maximum pulses of 65535. Then the calculated time-delay pulses must be subtracted from the maximum pulses, and afterwards converted to hexadecimal value.
- This value has to be loaded in timer1 higher bit and lower bits. This timer operation is programmed using embedded C in a microcontroller.
- Example: 500us time delay
500us/1.080806us 461pulses P=65535-461 P=65074 65074 converted by hexa decimal =FE32 TH1=0xFE; TL1=0x32; |
- Start the timer1 “TR1=1;”
- Monitor the flag bit “while(TF1==1)”
- Clear the flag bit “TF1=0”
- Cleat the timer “TR1=0”
- Example.
Let the required delay be 1000uS (ie; 1mS).
That means X = 1000
65536 – X = 65536 – 1000 = 64536.
64536 is considered in decimal and converting it t0 hexadecimal gives FC18
That means THTL = FC18
2.2.3. Programming of timers using embedded C
- The programming of 8051 Timers can be done by using either polling method or by using interrupt. In polling, the microcontroller keeps monitoring the status of Timer flag.
- Polling Method: Polling is mostly used for time delay generation and interrupt method is more useful when waveforms are to be generated or some action has to be repeated in fixed delays.
- The polling method involves the following algorithm:
1. Configure the Timer mode by passing a hex value into the TMOD register. This will tell the controller about which Timer is be used; the mode of Timer; operation (to be used as timer or counter); and whether external interrupt is required to start Timer.
2. Load the initial values in the Timer low TLx and high THx byte. (x = 0/1)
3. Start the Timer by setting TRx bit.
4. Wait while the Timer flag TFx is raised.
5. Clear the Timer flag. The Timer flag is raised when Timer rolls over from FFFFH to 0000H. If the Timer is not stopped, it will start updating from 0000H in case of modes 0 & 1 while with initial value in case of mode 2. If TFx is not cleared, controller will not be able to detect next rollover.
6. Stop the Timer by clearing TRx bit. If TRx bit is not cleared the Timer will restart updating from 0000H after the rollover in case of modes 0 and 1 while with initial value in case of mode 2.
- Interrupt Method: The interrupt method makes use of a register called Interrupt Enable (IE) register. An 8051 microcontroller has 6 hardware interrupts.
- The interrupts refer to a notification, communicated to the controller, by a hardware device or software, on receipt of which controller skips temporarily whatsoever it was doing and responds to the interrupt.
- The controller starts the execution of an Interrupt Service Routine (ISR) or Interrupt Handler which is a piece of code that tells the processor or controller what to do on receipt of an interrupt.
- After the execution of ISR, controller returns to whatever it was doing earlier (before the interrupt was received).
- The programming of 8051 Timers can be done by using either polling method or by using interrupt. In polling, the microcontroller keeps monitoring the status of Timer flag.
- While doing so, it does no other operation and consumes all its processing time in checking the Timer flag until it is raised on a rollover.
- In interrupt method controller responds to only when the Timer flag is raised.
- The interrupt method prevents the wastage of controller’s processing time unlike polling method.
- Polling is mostly used for time delay generation and interrupt method is more useful when waveforms are to be generated or some action has to be repeated in fixed delays.
Key Takeaway
- A timer is a specialized type of clock which is used to measure time intervals.
- A timer that counts from zero upwards for measuring time elapsed is often called a stopwatch.
- counter is a device that stores (and sometimes displays) the number of times a particular event or process occurred, with respect to a clock signal.
- A timer can be generalized as a multi-bit counter which increments/decrements itself on receiving a clock signal and produces an interrupt signal up on roll over.
- The programming of 8051 Timers can be done by using either polling method or by using interrupt. In polling, the microcontroller keeps monitoring the status of Timer flag.
Reference:
1.Ramesh Gaonkar, “Fundamentals of Microcontrollers and Applications In Embedded Systems(with the PIC18 Microcontroller Family)”Thomson/Delmar Learning; 1 edition (January 8, 2007), ISBN:978-1401879143
2.Microchip’s PIC18FXXX Data Sheet
3.Muhammad Ali Mazidi, SarmadNaimi,“ARM Assembly Language Programming & Architecture”
