Unit – 8
Word Processing
Follow one of the following procedures to save a newly opened/existing document:
1. On the navigation bar, click the Save button.
2. On the keyboard, press CTRL+S.
If the document has already been identified and saved, it will just save it. If the file is a new document, however, it will prompt you to save it by opening the Save As dialog box. In the Save In: box, select the folder where you want to save your document, type the document's name in the File Name: box, and then click OK. You may also save a new document by pressing CTRL+A and then selecting the above options in the Save As dialog box.
Closing
Close the current document by selecting Office ButtonClose from the menu bar, or by clicking the Close button on the Standard toolbar if it is present.
Opening an existing document
To open an existing document, click the Office 2007 button in the top left corner of your screen and select one of the options:
1. On the navigation bar, click the Open File button.
2. On the keyboard, press CTRL+O.
3. The Open dialog box will appear in each of the methods listed above. Select the file you want to open and click the Open button.
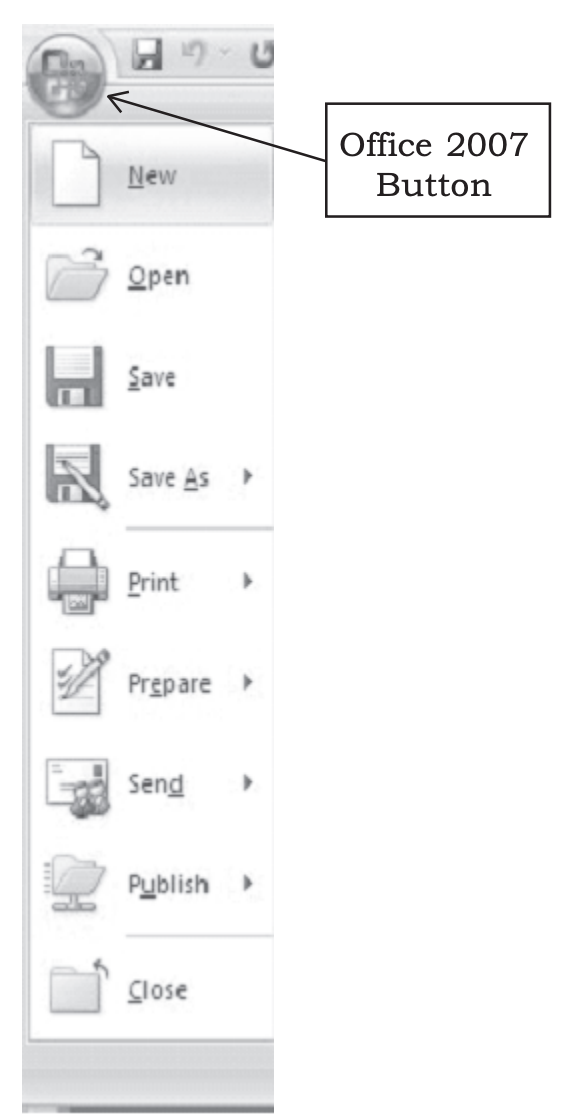
Fig: Opening, save and close the document
It is frequently necessary to select text before conducting operations on it (e.g., removing, altering font size, etc.). When you pick text, it will be highlighted on the screen. Text can be selected by clicking and dragging with the mouse, or by utilizing the following methods.
To select a word - Click twice on the word.
To select a line - Click at the beginning of the line in the left hand margin (the pointer turns to a northeast pointing arrow ).
To select a paragraph - Double-click beside the paragraph in the left margin, or triple-click anywhere within the paragraph.
Editing text
Cut
● The Cut procedure copies the selected text from the active document to the clipboard.
● Select the text in the document that will be clipped.
● To cut the text, go to the Edit menu and select Cut, or click the cut icon in the toolbar or use the shortcut key combination Ctrl+X.
Copy
● The selection is copied to the clipboard.
● Choose the text you want to copy into the document.
● To copy the selected text, go to the Edit menu and select Copy, or click the copy icon in the toolbar or use the shortcut key combination Ctrl+C.
Paste
● Paste select the contents of the clipboard at the cursor's insertion location (or anywhere else is selected).
● To begin, go to the location where you want the chopped text to appear.
● Select Paste from the Edit menu, or click the paste symbol in the toolbar, or hit the shortcut key Ctrl+V.
Finding and replacing text
● Find does a text search in the current document.
● To find a specific text in a document, go to the Edit menu and select Find, or click the find icon on the toolbar, or use the Ctrl+F shortcut key combination.
● The dialog window for Find and Replace will appear.
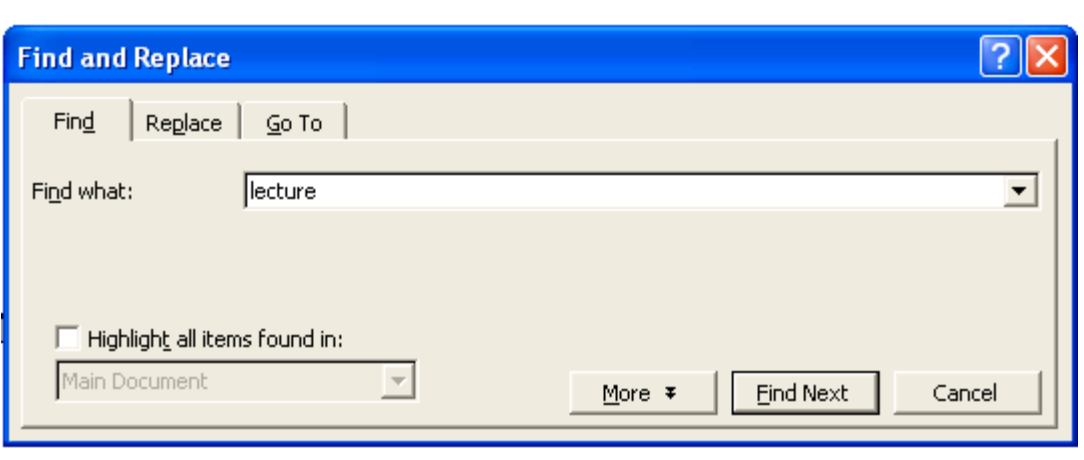
Fig: Dialog box for find and replace
● In the Find what tab, type the text to be searched.
● The requested text will be located in the document once you click the Find Next button.
● Replace is a command that looks for and replaces specific text.
● To replace, go to the Edit menu and choose Replace, or click the Replace icon in the toolbar, or use the Ctrl+H shortcut key combination.
● The Find and Replace dialog box will appear.
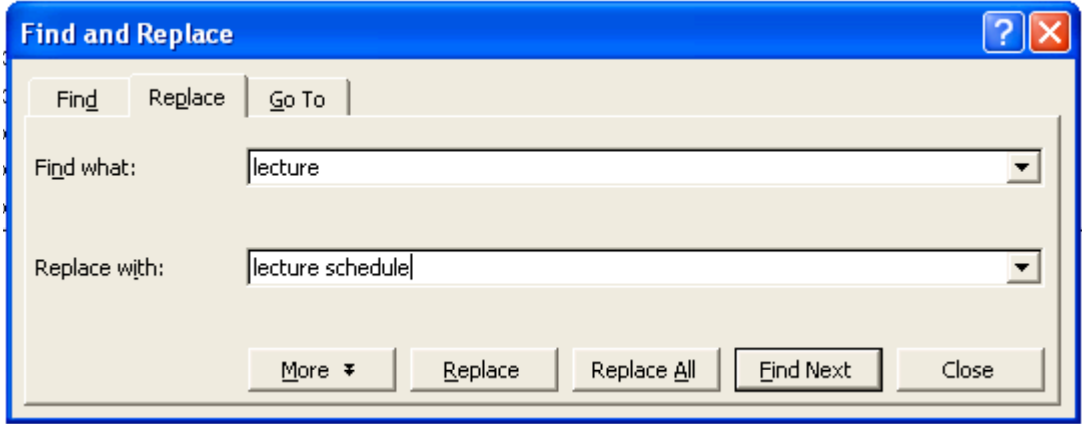
● The given text will be replaced by clicking the Find Next and Replace buttons.
● In the Find and Replace window, click the Replace All button to replace all instances of the text lecture with the text lecture schedule.
● The text lecture schedule will then replace every instance of the text lecture in the document.
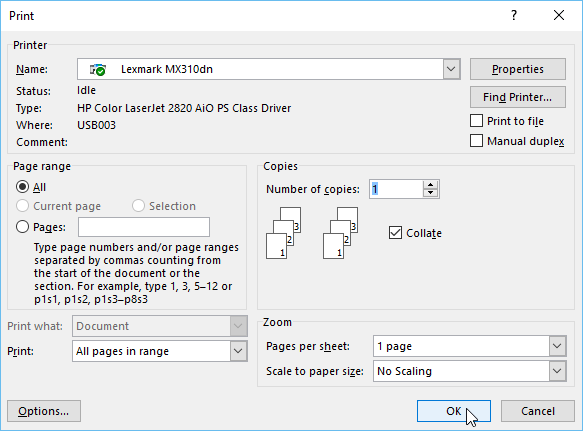
In the Print dialog box, you have the following options when printing a document:
1. The printer's name (if you have more than one printers).
2. Press the Properties button to select the paper size, orientations, and resolution, among other options.
3. Print the entire document, just the current page, or a selection of pages.
4. Print a draft copy that is devoid of images to speed up printing.
5. The number of copies that will be printed, and so on.
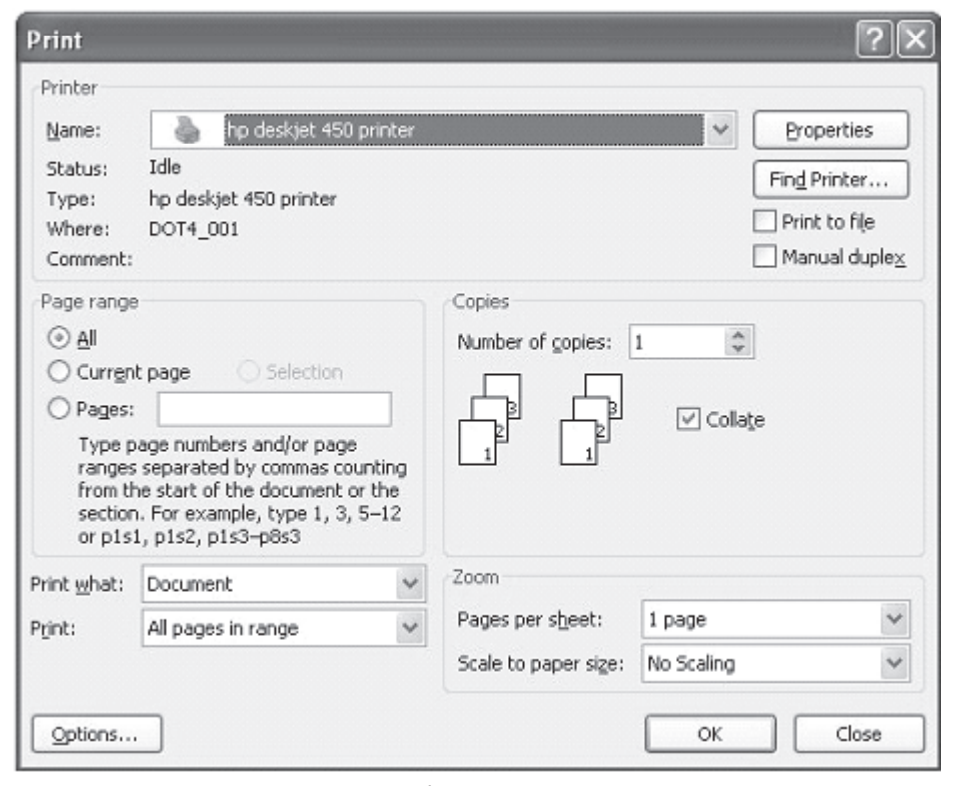
Fig: Print dialog box
Character formatting is a type of formatting that can be applied to a single character or a group of characters.
It comes with the following features:
Font - Our characters' look is determined by this.
Font style - Characters can be bolded, italicized, or both to make them stand out.
Size - This changes the size of the characters, which is measured in points (72 points equals 1 inch).
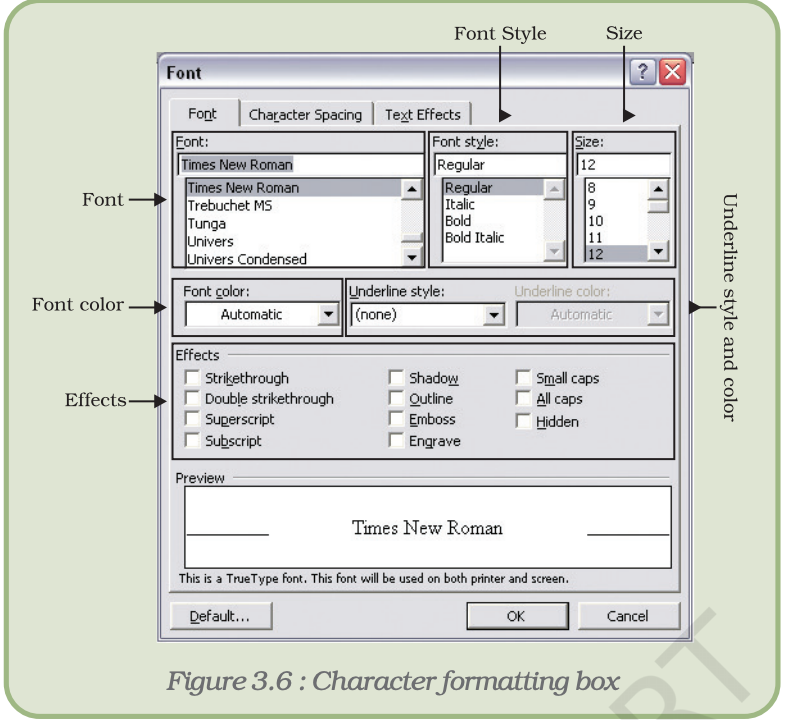
Fig: Character formatting box
Font color - For printing the final document, we can colorize the characters.
Underline - By emphasizing a section of text, we can call attention to it.
Effects - Our text can also have effects applied to it. Superscript and Subscript are the two most frequent. It's a superscript if there's a 2 in 32. To make a character superscript, click the box next to Superscript and pick only that character. Similarly, 1 is a subscript in T1.
Paragraph formatting
Some formatting options apply to a full paragraph or paragraphs, but not to a single character or a group of characters. Paragraph formatting is a term used to denote such formatting elements.
It gives you the following choices:
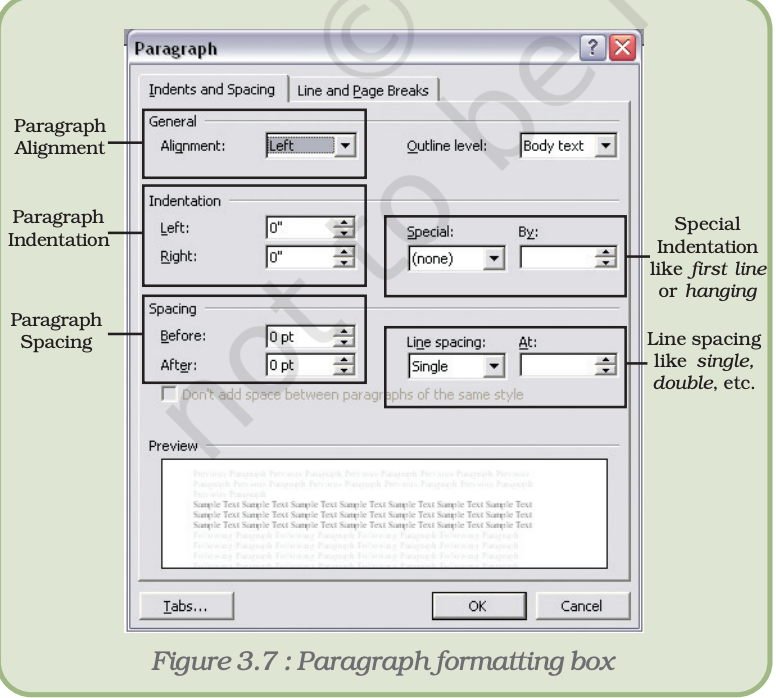
Fig: Paragraph formatting box
Alignment - A paragraph can be aligned to the left, center, right, or justify, as shown in Table.
Alignment | Description |
Left alignment | The paragraph's lines will all be aligned to the left. |
Right alignment | The paragraph's lines will all be aligned to the right. |
Center alignment | The paragraph's lines will all be aligned to the center. |
Justify alignment | Except for the last line, the paragraph will be aligned on both the left and right sides. |
Indentation - The left and right limits of selected paragraphs inside a document are known as indents. When separate paragraphs have varying left and right bounds, this may be necessary. Indentation can be seen in poems, for example. In most word processors, the indentation options are Left and Right. Aside from this, specific indentations in the form of First Line and Hanging can be used.
Spacing - This option gives us some breathing room before and after a paragraph or a set of paragraphs. We can choose the paragraph(s) and write in the correct value against the relevant choice – Before or After – by selecting or typing it in. These numbers are expressed in points.
There is also a Line spacing option, which determines the spacing between paragraph lines. In most cases, we will use the value Single. However, if we want greater space between the lines, we can choose 1.5 lines or Double.
Word has a number of page layout and formatting choices that impact the appearance of material on the page. Depending on how you want your document to look, you can change the page orientation, paper size, and page margins.
Page orientation
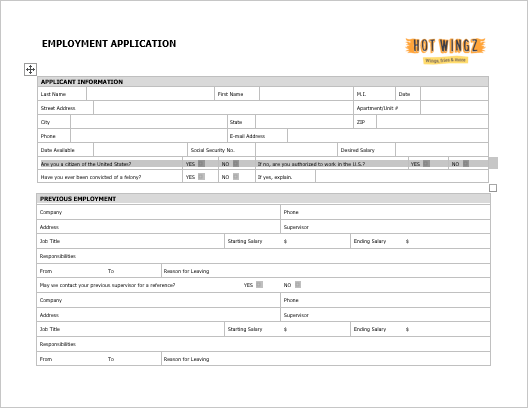
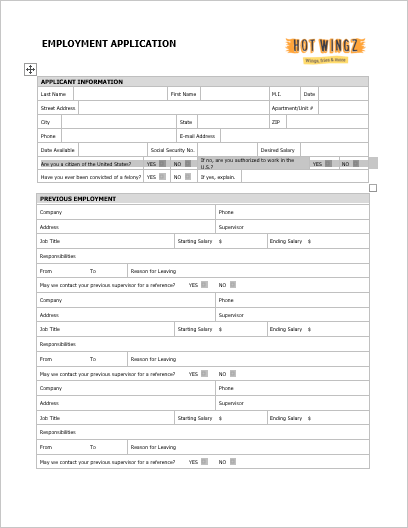
Landscape and portrait page orientations are available in Word. Consider the sample below to observe how text and image space and appearance are affected by orientation.
● The term "landscape" refers to a page that is horizontally orientated.
● The website is arranged vertically in portrait mode.
To change page orientation:
● Select the Layout tab from the drop-down menu.
● In the Page Setup group, select the Orientation command.

● There will be a drop-down menu. To change the page orientation, click either Portrait or Landscape.

● The document's page orientation will be modified.
Page margins
A new document's page size is set to 8.5 inches by 11 inches by default. You may need to change the page size of your document depending on your project. It's vital to keep in mind that before changing the default page size, you should see what page sizes your printer can handle.
To format page margins:
Word includes a number of default page sizes from which to choose.
● Click the Size command after selecting the Layout tab.

● There will be a drop-down menu. Select the desired margin size from the drop-down menu.
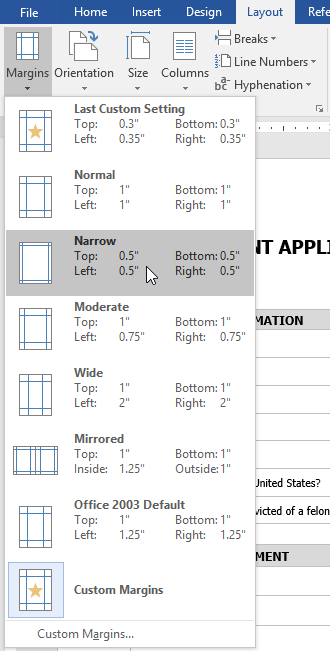
● The document's margins will be adjusted.
To use custom margins:
In the Page Setup dialog box, you can also change the size of your margins.
● Select Margins from the Layout tab. From the drop-down menu, choose Custom Margins.
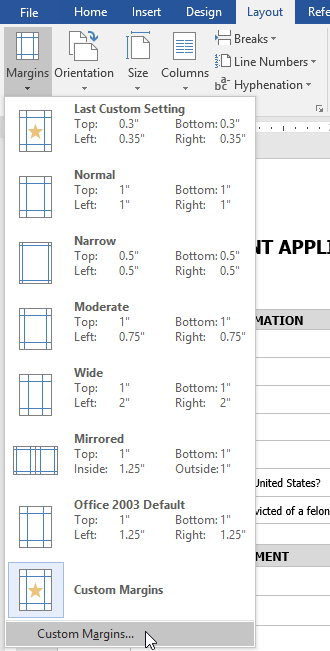
● A dialog box called Page Setup will display.
● After you've adjusted the values for each margin, click OK.
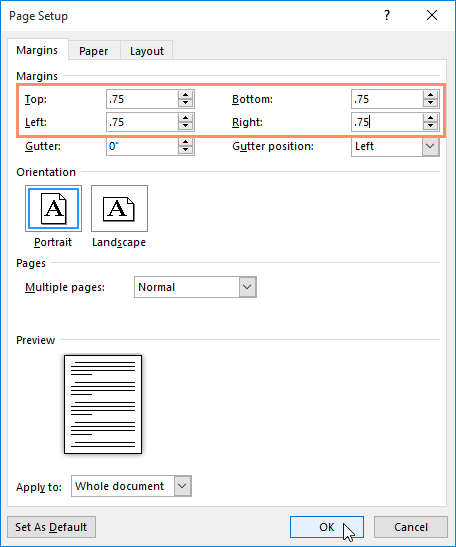
● The document's margins will be adjusted.
Navigate to the Layout tab and click the little arrow in the bottom-right corner of the Page Setup group to open the Page Setup dialog box.
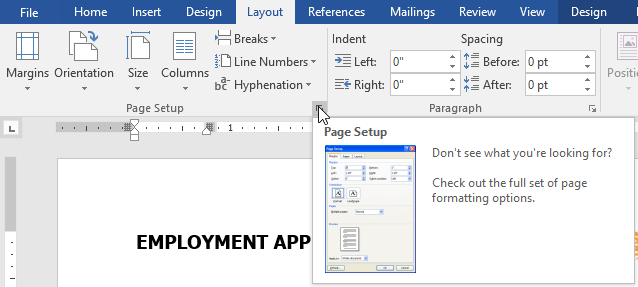
It's a good idea to double-check spelling and grammar in a document after we've finished typing and modifying it. We may check for any errors and then double-check each repair. The spell checker in Microsoft Word can be launched by selecting the Spelling and Grammar option from the Tools menu.
When the spell checker detects a misspelling, a dialog box or task pane (Fig) appears, and the first misspelled word detected by the spell checker is selected.
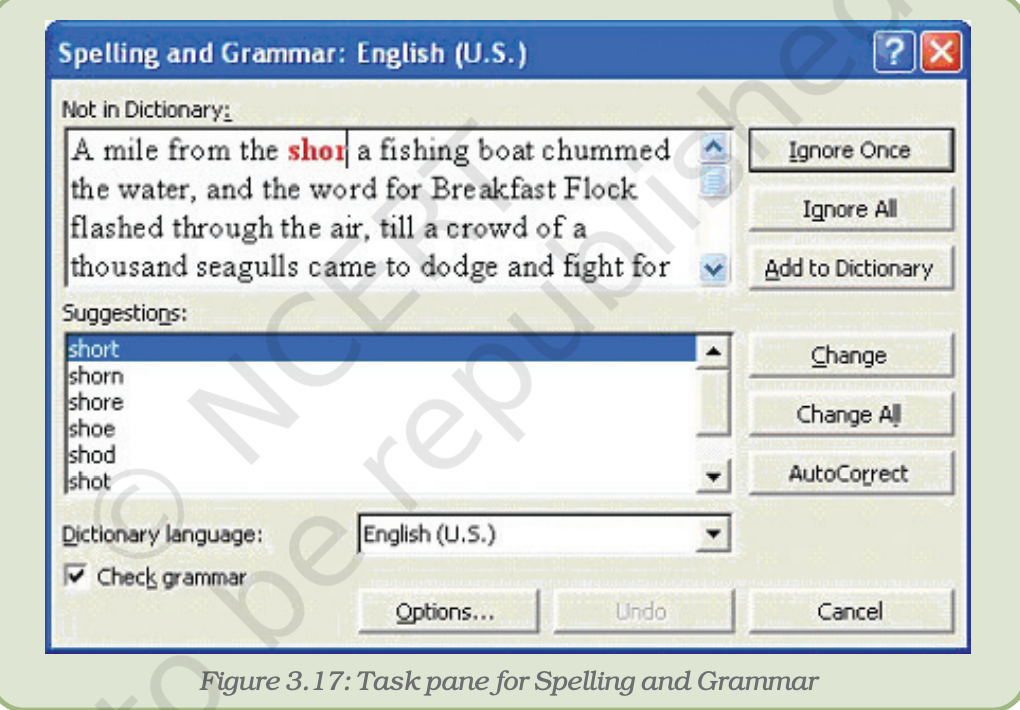
Fig: Task pane for spelling and grammar
We can deal with each error that the software uncovers in a variety of ways:
● We can select one of the word processor's suggestions and click Change.
● It's possible that we'll have to modify the word ourselves. Edit the word by clicking it on the document (not in the Spelling and Grammar dialog box). After you've fixed the problem, click Resume.
● The given word may be correct, but it is not in the Dictionary; for example, Shillong is the name of the town. Click Add to dictionary to add the word to the word processor's lexicon. If we want to ignore it, we can do so by clicking Ignore once. Click Disregard All if we wish to ignore all instances of such circumstances in the document.
The word processor identifies the next misspelled word after we resolve each misspelled word so that we may decide what to do.
After the computer has finished flagging the spelling errors, it will begin displaying the grammatical errors. We can proceed in a similar manner to repair these as well.
Alternatively, we can have our spelling checked for us as we type. In that situation, we may be more confident that when we're ready to deliver our document, we won't have to repair a lot of spelling errors. Word flags misspelled words by highlighting them with a wavy red line, making them easy to see. On the resulting shortcut menu, we may right-click the misspelled word to see potential repairs.
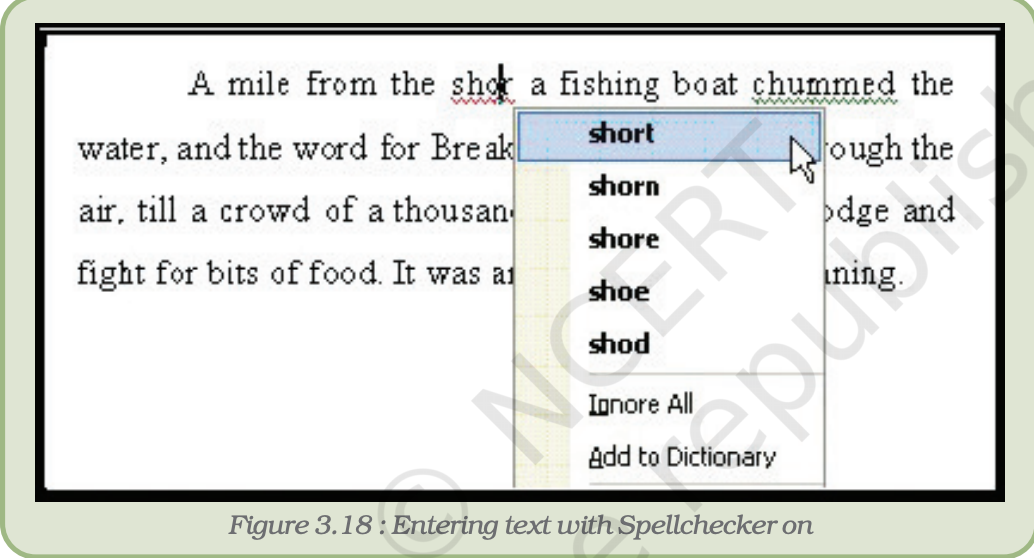
Fig: Entering text with spell checker on
You can use a variety of graphics to beautify your Microsoft Word documents.
Adding picture in document
The steps below will show you how to insert an existing image into a Word document. Before you add a photo to your Word document, it is expected that you already have one on your computer.
● Click on your document where you want to add a picture.
● Click the Insert tab and then click the Picture option available in illustrations group, which will display the Insert Picture dialog box.
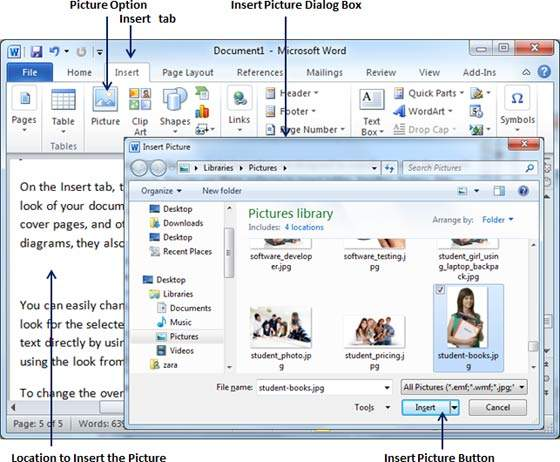
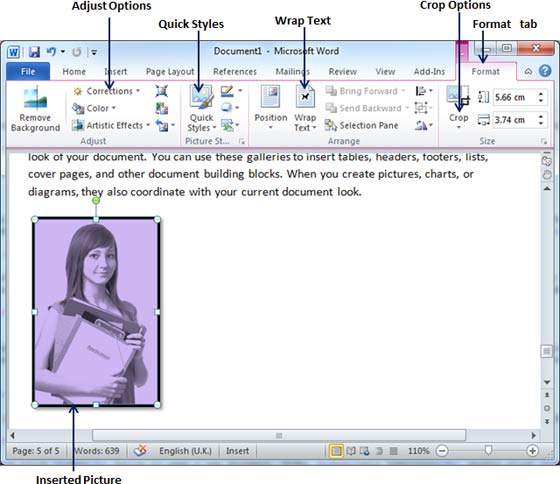
● The Insert Picture dialog box allows you to choose a required image. The selected picture will be put into your document when you click the Insert button. You can experiment with your imported image in a variety of ways, such as applying quick styles to it, resizing it, or changing its color. To try it, just -lick your inserted image and Word will give you numerous options available under the Format tab to format your inserted graphics.
Adding WordArt in Document
WordArt allows you to insert fancy words into your Word document. You have several options for documenting your text. The methods below will show you how to insert WordArt into your document.
● Click in your document where you want to add WordArt.
● Click the Insert tab and then click the WordArt option available in the Text group; this will display a gallery of WordArt.
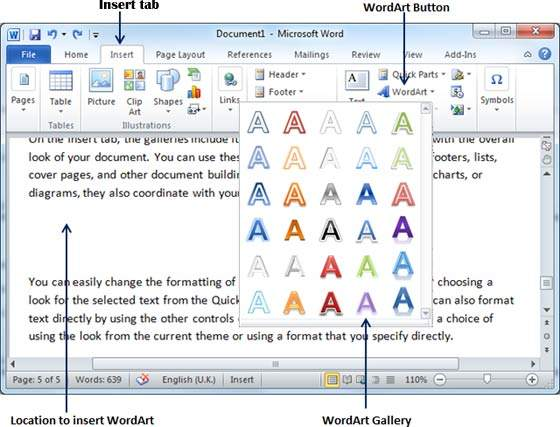
● By clicking on any of the WordArt styles in the presented collection, you can choose one. You may now change the added text to suit your needs and make it even more stunning by using the various choices offered. To try it out, simply double-click your inserted WordArt, and Word will present you with a variety of formatting options from the Format tab. Shape Styles and WordArt Styles are the most commonly utilized alternatives.
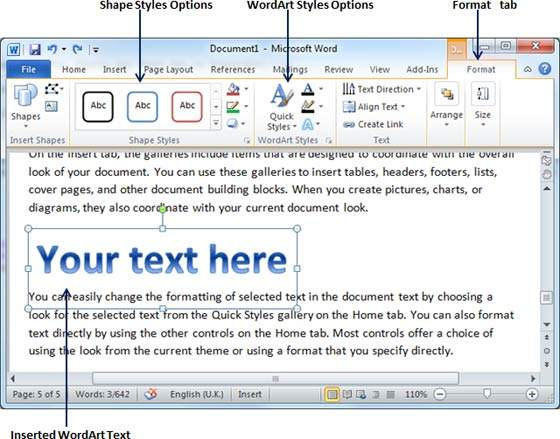
You can experiment with many settings on the added WordArt by changing its shape, styles, colors, and WordArt Styles, for example.
Tables show complex information in vertical columns and horizontal rows of cells in a logical manner. Text (a single paragraph or numerous paragraphs) or visuals can be placed in each cell.
To create a table, follow these steps:
● Select Table from the resultant menu by clicking on Insert in the Table menu. (Fig.).
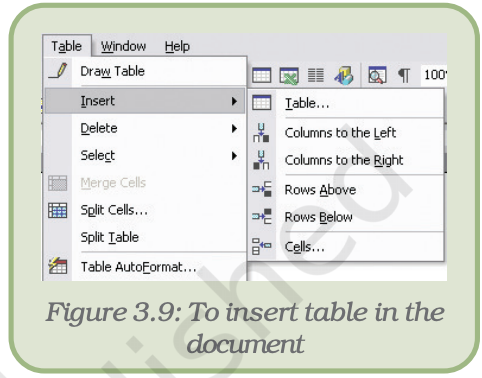
Fig: To insert table in the document
● The Insert Table dialog box appears (Fig). Enter a number for the number of columns and rows... Let's use the numbers 5 and 4 as examples.
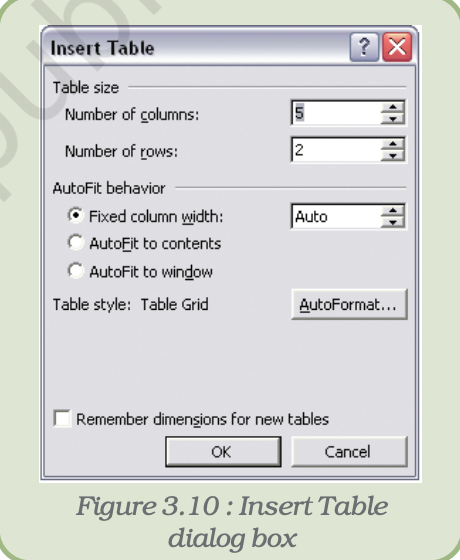
Fig: Insert table dialog box
● This table (Fig) now appears on the page, with 5 columns and 4 rows.

Fig: Blank table created
● It's time to start typing! By clicking the mouse on the target cell, we may move the insertion point from one cell to the next.
● When a table is created, all columns and rows have the same width and height. Move the mouse pointer to the line separating the rows or columns to modify their size. If the mouse is over a column separator, it will change to; if the mouse is over a line separating two rows, it will change to. To adjust the size of the column or row, drag the mouse. When a cell is selected, the size of that cell is changed rather than the full column or row.
Creating charts
Not only can you create text-based documents and incorporate photographs into them with Microsoft Word, but you can also add visual richness to your documents by creating a chart or graph.
In Microsoft Word, you have two options for making a chart or graph. For more information on how to utilize each option, click the link below.
Create chart or graph directly in Microsoft Word
Microsoft Word, like Microsoft Excel, allows you to create a chart or graph and add it to your document. Follow the steps below to create and insert a chart or graph straight in Microsoft Word.
- Launch the Microsoft Word application.
- Select the Insert tab from the Ribbon bar at the top.
- Select the Chart option from the Illustrations section.

4. Select the sort of chart or graph you wish to make in the Insert Chart window, then click the OK button.
5. The page is updated with a basic version of the specified chart or graph type, complete with sample data. A Chart in Microsoft Word window, which appears to be a Microsoft Excel spreadsheet, also appears. Add, subtract, or alter the columns and rows of data in the spreadsheet window to include the data points and values you wish to see in your chart.
6. The chart or graph in Microsoft Word automatically updates and displays the new or altered data as you edit the columns, rows, and values in the spreadsheet window.
7. Close the spreadsheet window once you've finished editing the chart.
You can reopen the spreadsheet window by right-clicking on the chart and selecting the Edit Data option if you need to edit the chart data after closing it.
Create chart or graph in Microsoft Excel and copy to Microsoft Word
When constructing a chart or graph, Microsoft Excel has more functionality and data processing capabilities than Microsoft Word. Follow the instructions below to use Excel's enhanced features to generate a chart or graph, which you can then embed in a Microsoft Word document.
- Open the Microsoft Excel and Microsoft Word programs.
- Create the chart or graph in Microsoft Excel.
- After the chart or graph is created and ready to be placed in the Word document, select the entire chart in Excel.
- Right-click the chart or graph and select the Copy option. You can also press Ctrl+C on your keyboard to copy the chart or graph.
- In the Word document, place your mouse cursor where you want to add the chart or graph.
- Right-click and select the Paste option to place the chart or graph in the document. You can also press Ctrl+V on your keyboard to paste the chart or graph.
You may save a lot of time by using Microsoft Word templates and wizards. Assume your employer has assigned you the responsibility of overseeing all internal corporate correspondence. Sending a weekly reminder to all employees, faxing updates to other departments, and publishing a monthly newsletter are among your new job responsibilities.
You can utilize a template instead of having to recreate the layout and design for each memo or newsletter you make, or even having to retype typical information each time you write a letter or fax. A template is a document that has text, styles, and other formatting built in and may be used to create new documents with the same basic formatting.
You can create a customized template by modifying an existing document. When you've previously spent time adding text, character and paragraph formatting, pictures, or styles to a document and want to utilize the same or comparable formatting for multiple projects, creating a customized template is appropriate. You can avoid having to apply similar formatting to other papers by generating a template from an existing document. The document is saved as a custom template, which you can change for future use.
A wizard is also used to construct a document. A wizard asks you questions one at a time and then generates a prepared page depending on your responses.
You will need to utilize a file named Contoso January 03 Flyer 03 from the Lesson03 folder in the Word Processing Practice folder on your hard disk to complete the tasks in this lesson. This file will be used to create and save a custom template.
Using templates
A template is the foundation of every Word document. The document's basic attributes, such as margins and layout, are determined by the template (how text is displayed on paper). The text's attributes, such as font, font size, and font style, are likewise defined by the template. The majority of documents are created using the Normal template, which is a general template. In Word, the Normal template is the default option. A new blank document based on the Normal template is created when you click the New Blank Document button on the Standard toolbar.
Word comes with a plethora of built-in templates, each of which is organized by type. You can use these templates to make fax sheets, notes, resumes, and letters, among other things. Preformatted text and placeholder text are both included in templates. Headings and other entries that you don't need to edit are included in preformatted text. A memo template, for example, might have the title Memorandum presented in a specific font, font size, and font style. To:, From:, and Re: are some of the other preformatted memo text options. Because you'll either delete it or replace it with your own text, placeholder text is just temporary.
In most cases, placeholder text includes a brief description of what you can input to replace it. A memo template, for example, may have the placeholder text [Your name here], indicating that you should replace the placeholder text with your name.
To make a fax sheet, you utilize a pre-made Word template, insert content, and save the new document.
1 On the File menu, click New.
The New Document task pane appears.
2 Click General Templates in the New from template section.
The Templates dialog box appears
3 Select the Letters & Faxes tab.
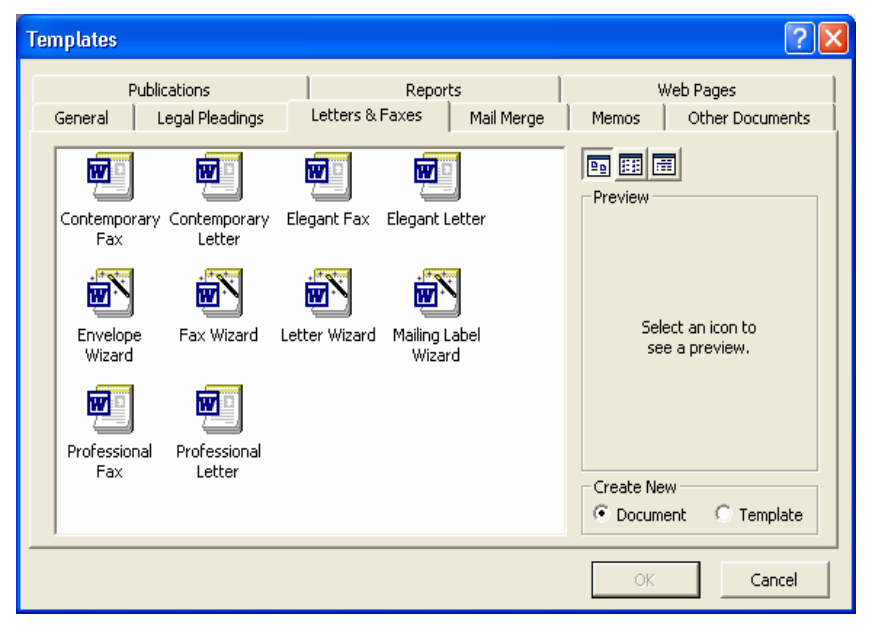
4 Double-click the Contemporary Fax icon.
The Contemporary Fax template appears.
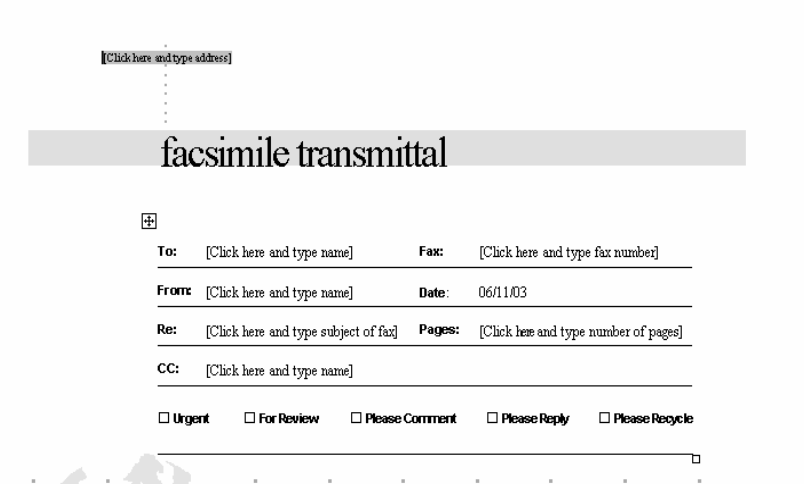
5 In the upper-left corner of the document, click the placeholder text
For the address.
The placeholder text is selected and you can begin typing.
6 Type Contoso, Ltd., and press Enter.
7 Type 4567 Main Street, and press Enter.
8 Type Charlotte, VT 80227, and press Enter.
9 Click the placeholder text to the right of the word To:.
The placeholder text is selected and ready for your entry.
10 Type Mr. And Mrs. Berg.
11 Replace the rest of the placeholder text as follows:
Fax: 303-555-0100
From: Lisa Jacobson
Re: Services provided by Contoso, Ltd
Pages: 2
CC: Jay Adams
12 Double-click the box to the left of the words For Review.
A check mark is inserted in the box.
13 Scroll down, if necessary, and select the paragraph to the right of the word Notes:. 14 Type the following:
Please see the attached letter for a summary of our services.
Please feel free to contact me for more information.
15 On the Standard toolbar, click the Save button.
The Save As dialog box appears.
16 In the File name box, type Contoso Fax 03.
17 If necessary, click the Save in down arrow, and navigate to the
Lesson03 folder in the Word Processing Practice folder on your hard disk.
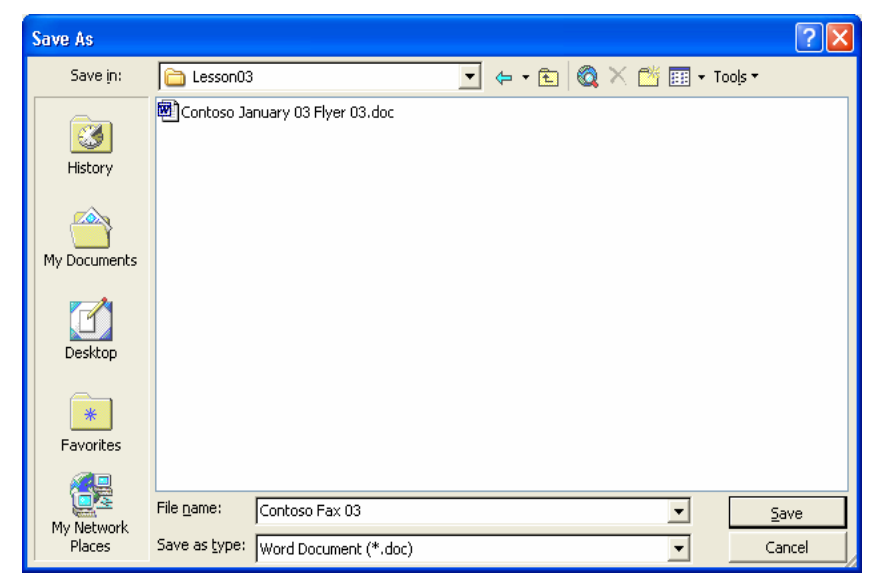
18 Click the Save button. Word saves the document.
19 On the File menu, click Close to close the template. If you are
Prompted to save changes, click No.
Using Wizards
You can also use one of Word's many wizards to automate the construction of a document. Wizards can help you generate memos, letters, faxes, and a variety of other business documents. A wizard differs from a template in that it guides you through text entry for many areas of a document, whereas a template just displays placeholder text that you must edit on your own. You'll still need to replace some placeholder content after using a wizard to create a document. However, there will be far less placeholder text than if you used a template to construct the identical document.
In this activity, you use the Memo Wizard to create a document, which you then change and save.
1 On the File menu, click New.
The New Document task pane appears.
2 Click General Templates in the New from templates section of the task pane.
The Templates dialog box appears, as shown in the illustration on the following page.
3 Click the Memos tab.
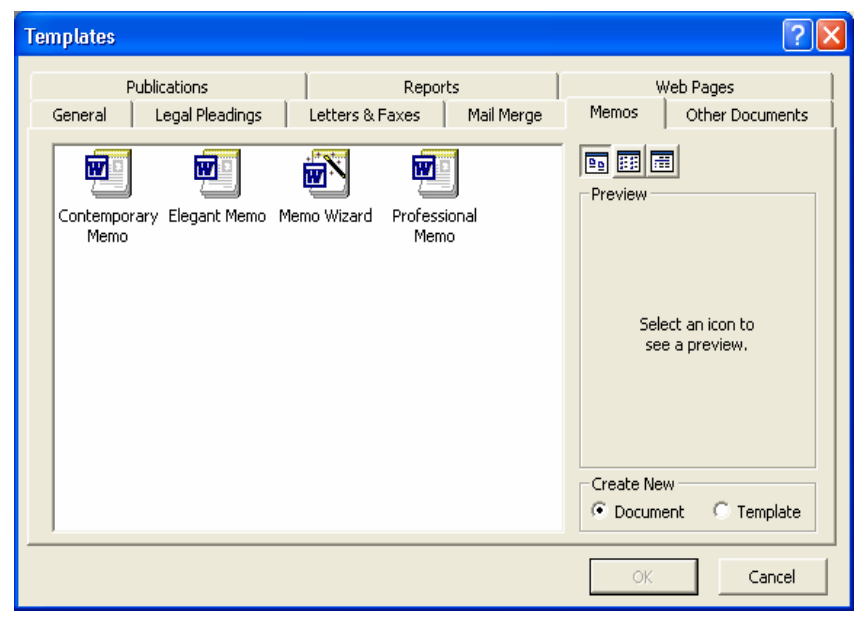
4 Double-click the Memo Wizard icon.
A new blank document opens and the first (Start) Memo Wizard dialog box appears.
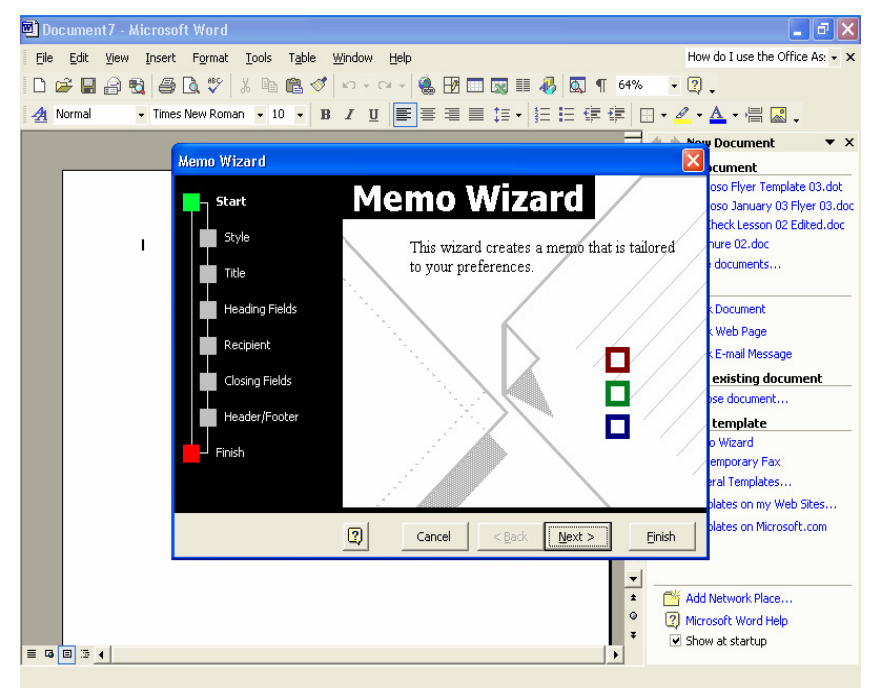
5 Click the Next button.
The next wizard dialog box appears, asking which style of memo that you would like to use.
6 Click the Elegant option, and then click Next.
The Style wizard dialog box appears.
The Yes. Use this text option is already selected.
7 Type Contoso Memo 03 in the Title text box, and click Next.
The Heading Fields wizard dialog box appears.
8 In the From box, select the default text, and type Lisa Jacobson.
9 In the Subject box, type Expense Report Reminders.
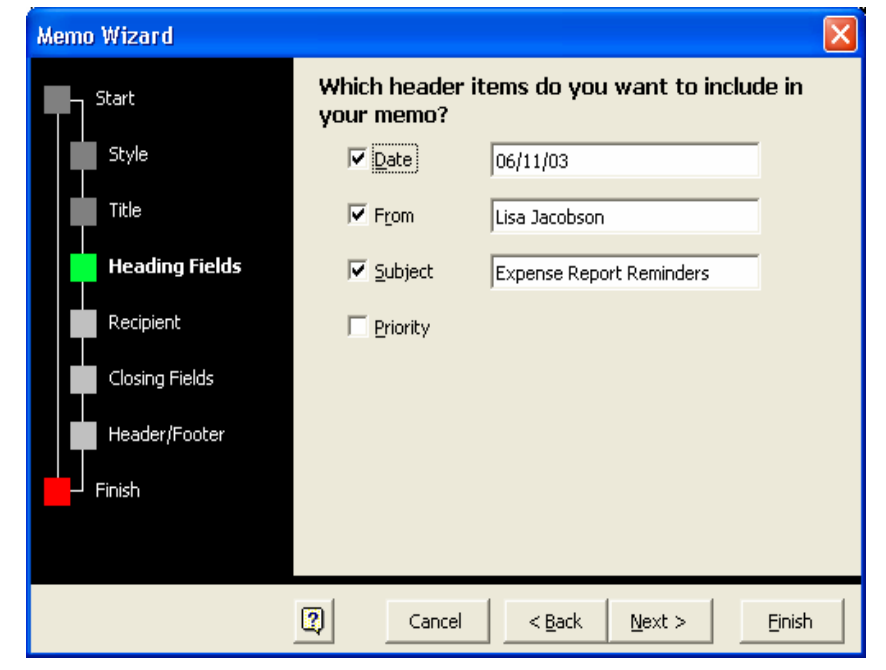
10 Click Next.
The Recipient wizard dialog box appears.
11 In the To box, type All employees, and click Next.
The Closing Fields wizard dialog box appears.
12 Select the Writer’s Initials check box, and type LJ in the text box.
13 Click Next.
The Header/Footer wizard dialog box appears.
14 Clear the Confidential check box, and click Next.
The Finish wizard dialog box appears.
15 Click Finish.
The Memo Wizard closes.
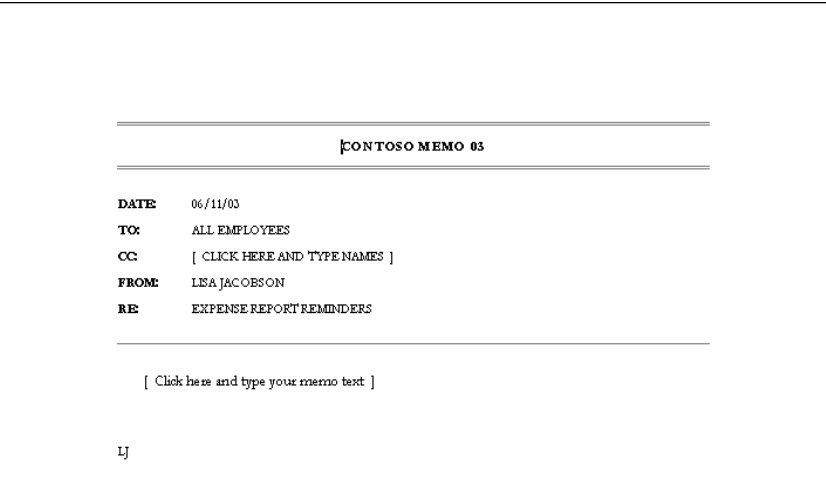
16 Click the placeholder text next to the CC: line.
17 Press Delete.
The unwanted line is deleted.
18 Click the placeholder text in the body of the memo and type: When filing your expense reports, be sure to attach your original receipts.
Mail Merge is a helpful application that allows you to create many letters, labels, envelopes, name tags, and other documents using data from a list, database, or spreadsheet. You'll need a Word document (you can start with an existing one or build a new one) and a recipient list, which is often an Excel file, to do a Mail Merge.
Use mail merge
● Create a new Word document or open an existing one.
● Select Step-by-Step Mail Merge Wizard from the drop-down menu when using the Start Mail Merge command from the Mailings tab.
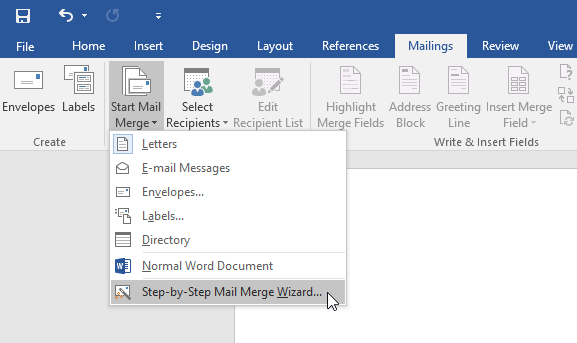
The Mail Merge pane will open, guiding you through the six basic processes of merging your emails. The example below shows how to generate a form letter and merge it with a list of recipients.
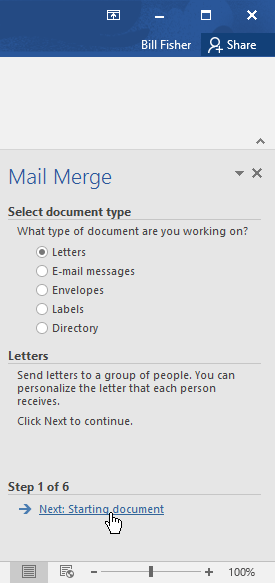
Step 1
● Choose the sort of document you wish to create from the Mail Merge task pane on the right side of the Word window. We'll use Letters as an example. Then press Next: To go to Step 2, start a new document.
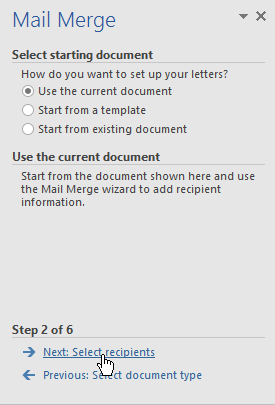
Step 2
● Select Use the current document, then move on to the next step: To go to Step 3, choose recipients.
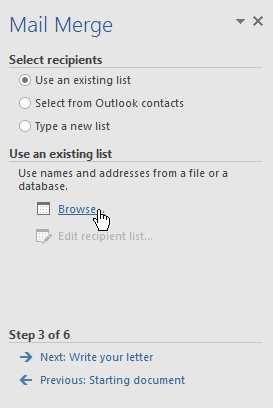
Step 3
● Now you'll need an address list so Word can insert each address into the text automatically. You can type a new address list from within the Mail Merge Wizard or use an existing file, such as an Excel workbook.
○ Select a file from an existing list by clicking Browse.
○ Click Open after you've found your file.
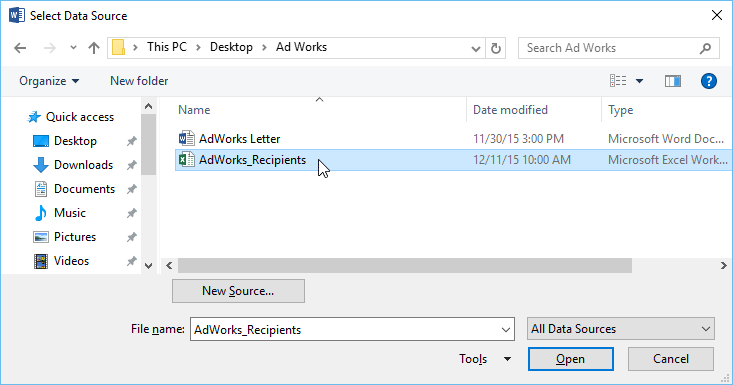
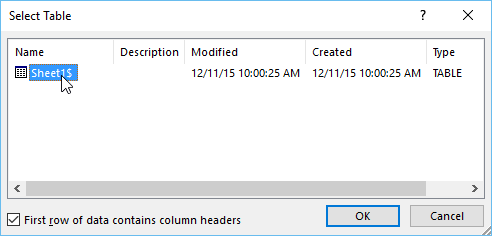
○ If the address list is in an Excel workbook, click OK after selecting the worksheet that contains the list.
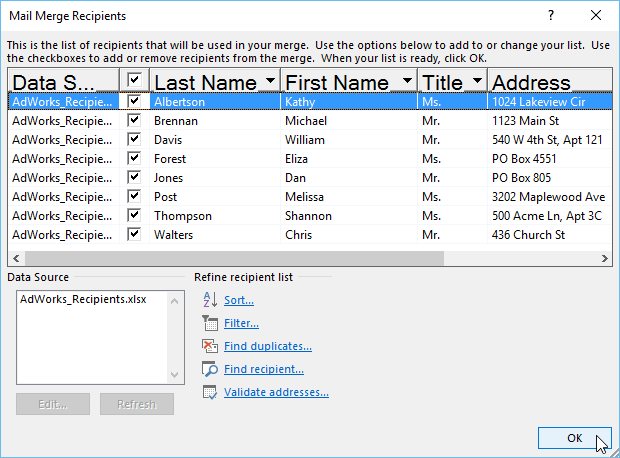
○ You can check or uncheck each box in the Mail Merge Recipients dialog box to select which recipients are included in the merge. All receivers should be selected by default. Click OK when you're finished.
○ Move on to the next step: To go to Step 4, write your letter.
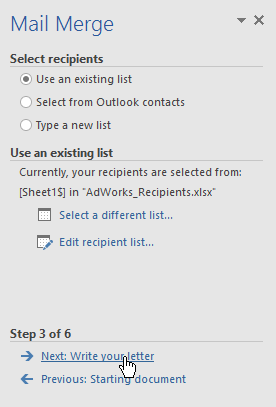
If you don't already have an address list, click the Type a new list button, then Create, then manually type your address list.
Step 4
● You're now ready to start writing your letter. Each copy of the letter will be nearly identical when printed, with the exception of recipient data (such as name and address). You'll need to provide placeholders for the recipient info so that Mail Merge understands where to put it.
To insert recipient data:
- Insert the insertion point where you wish the information to appear in the document.
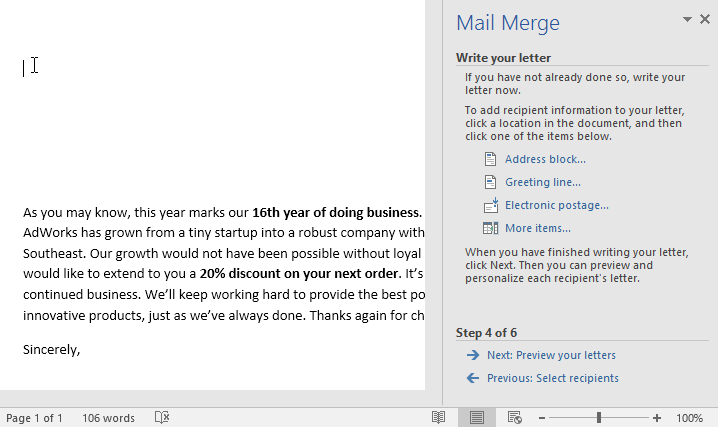
2. Select a placeholder choice from the drop-down menu. We'll use the Address block as an example.
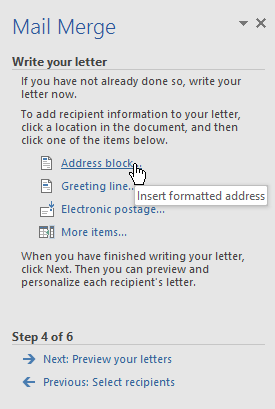
3. A dialog window with several customization options may display depending on your choice. After selecting the desired choices, click OK.
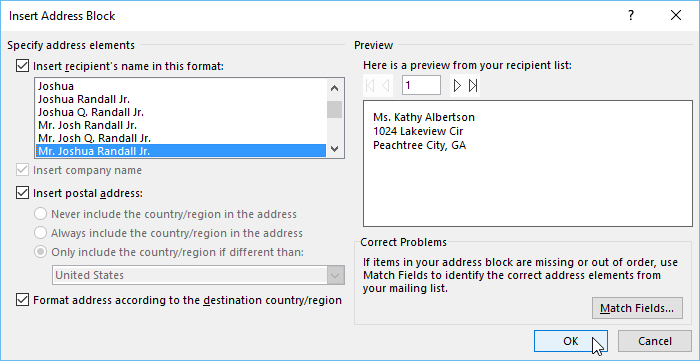
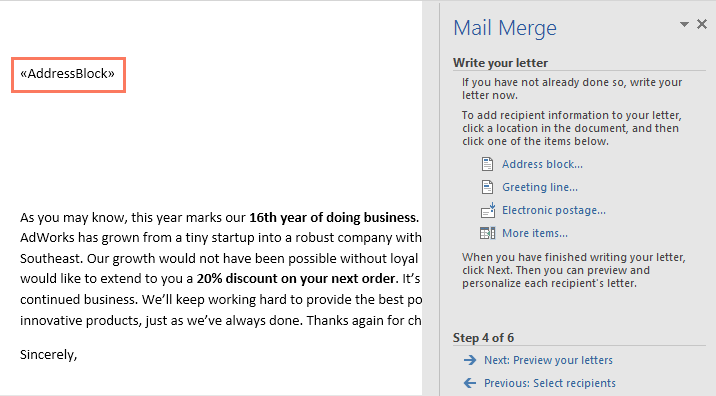
4. In your document, a placeholder (for example, «AddressBlock») will appear.
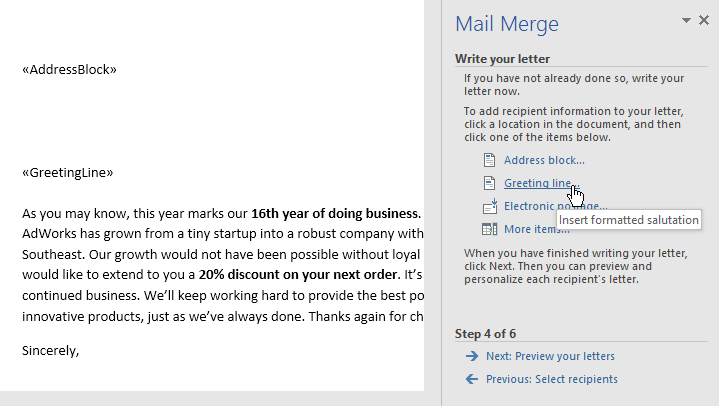
5. Add any more placeholders you'd like. We'll add a Greeting line placeholder directly above the body of the letter in our example.
6. When you're finished, move on to the next step: To proceed to Step 5, review your letters.
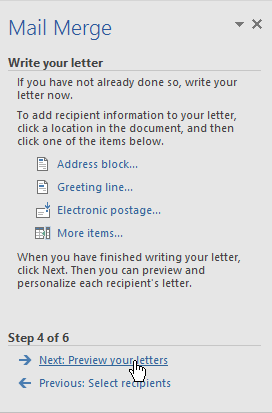
You may simply need to include an Address block and a Greeting line to certain letters. However, you can customise the letter by adding more placeholders (such as recipients' names or addresses) in the body.
Step 5
● Make sure the information from the recipient list displays accurately in the letter by previewing it. To view each version of the document, use the left and right scroll arrows.
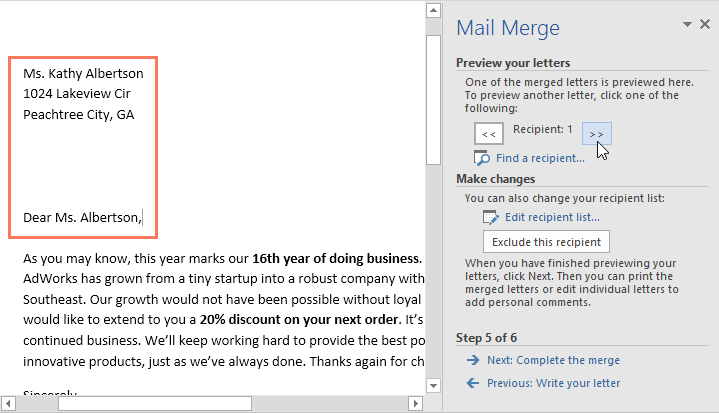
● If everything appears to be in order, click Next: To proceed to Step 6, complete the merging.
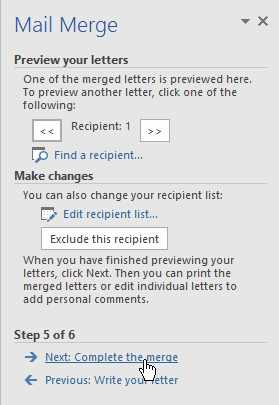
Step 6
● To print the letters, click Print.
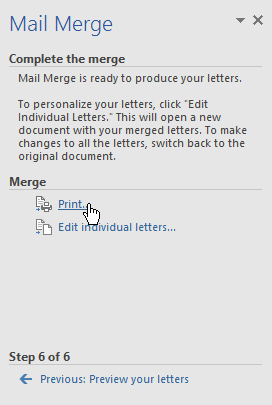
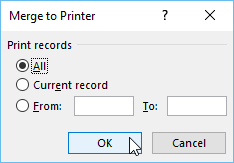
● There will be a dialog box appear. Select whether you wish to print all of the letters, the current document (record), or only a subset of the letters, and then click OK. We'll print all of the letters in our example.
● This will bring up the Print dialog box. If necessary, change the print settings, then click OK. The letters are going to be printed.
Macros
A macro is a sequence of commands that is recorded and then played again (performed) later. Macros are wonderful for cutting down on the amount of work you have to do on a sequence of steps that you do on a regular basis. In Microsoft Word, here's how to make and test a macro.
Create a macro
In Word, there are over 950 commands, the most of which are found on menus and toolbars and have shortcut keys associated with them. However, some of these instructions aren't automatically allocated to menus or toolbars. Check to determine if a Word macro already exists and can be assigned to a toolbar before creating your own.
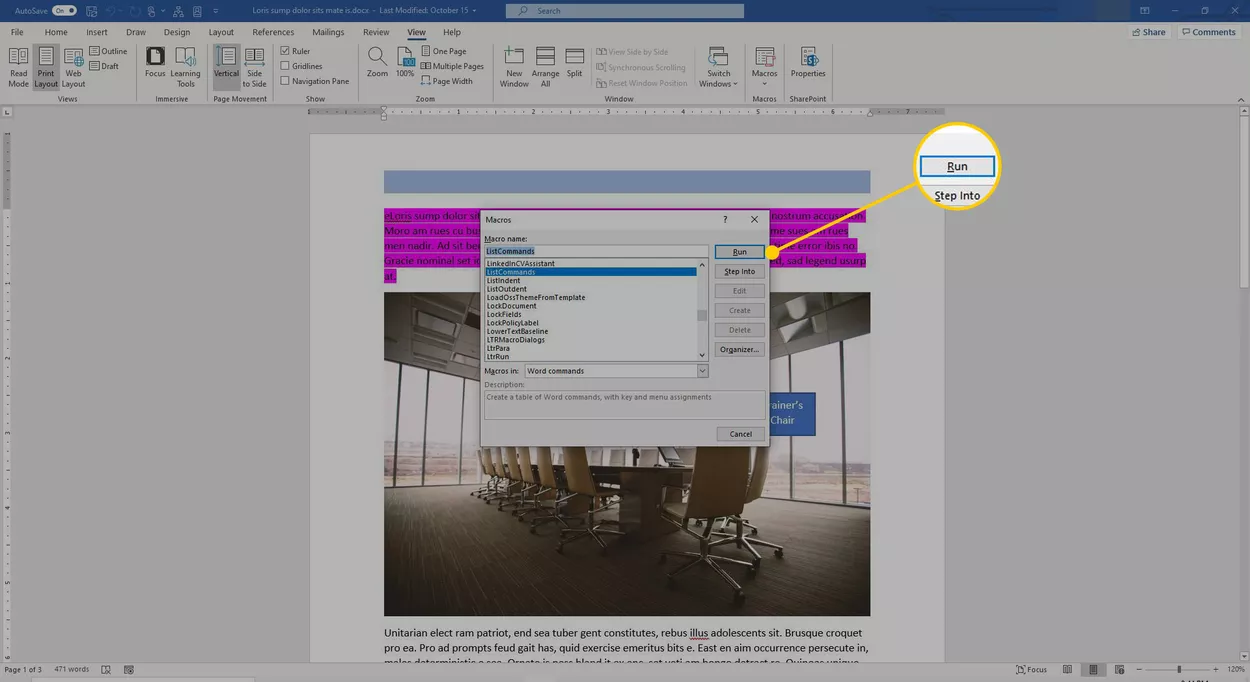
Follow these steps to see the commands available in Word:
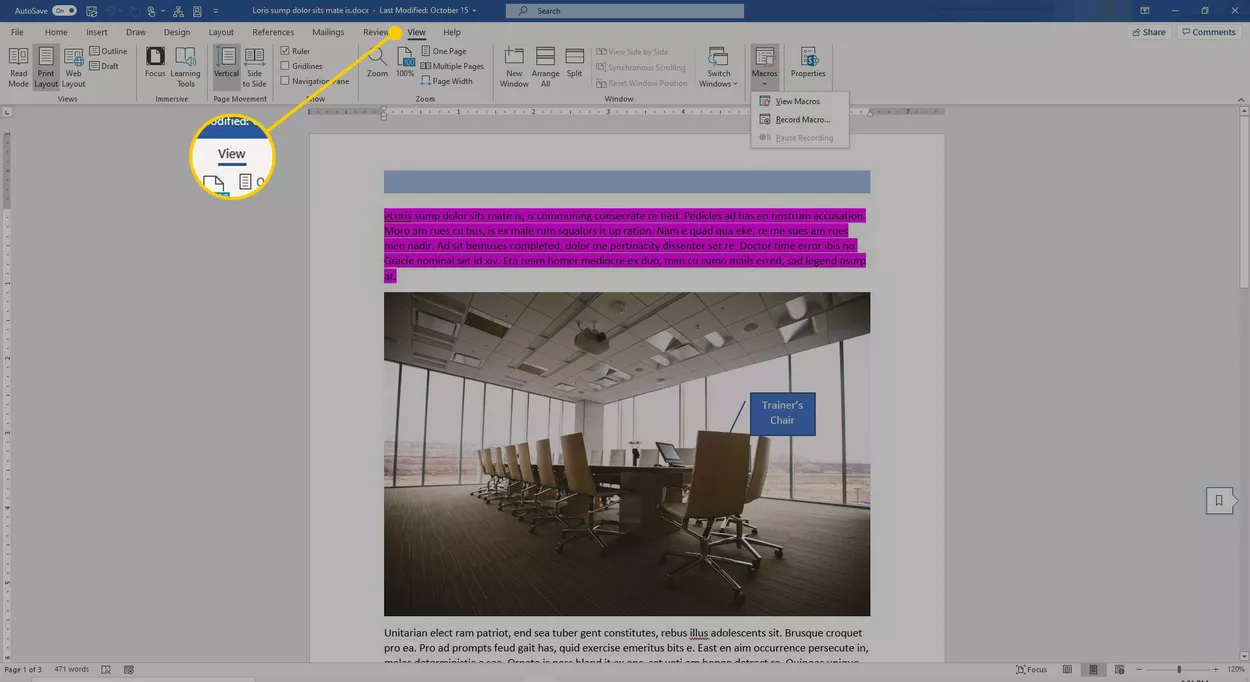
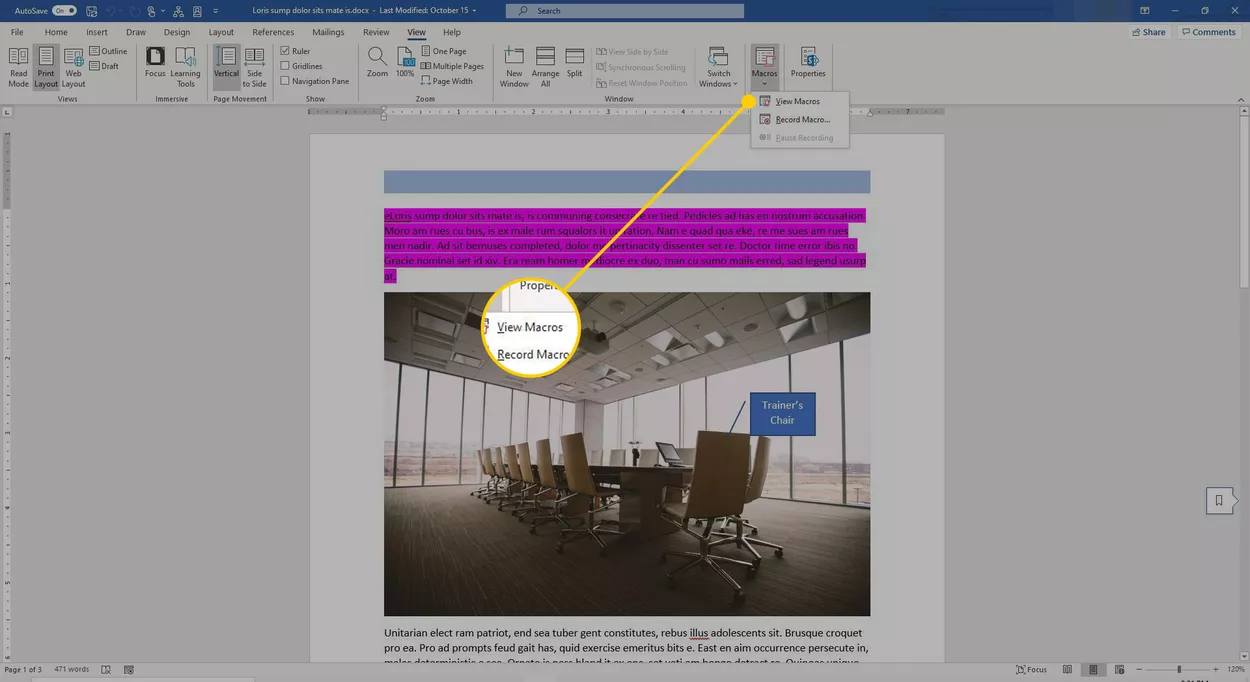
- The View tab should be selected.
2. Select Macros.
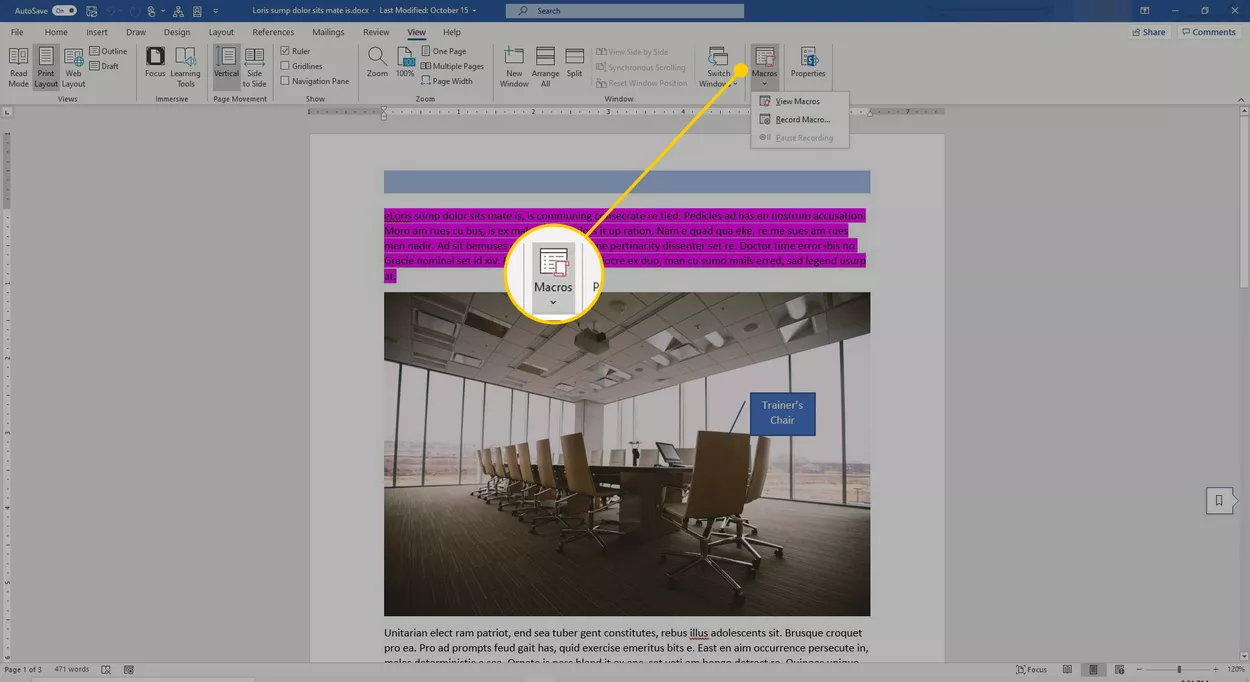
3. Select View Macros from the menu.
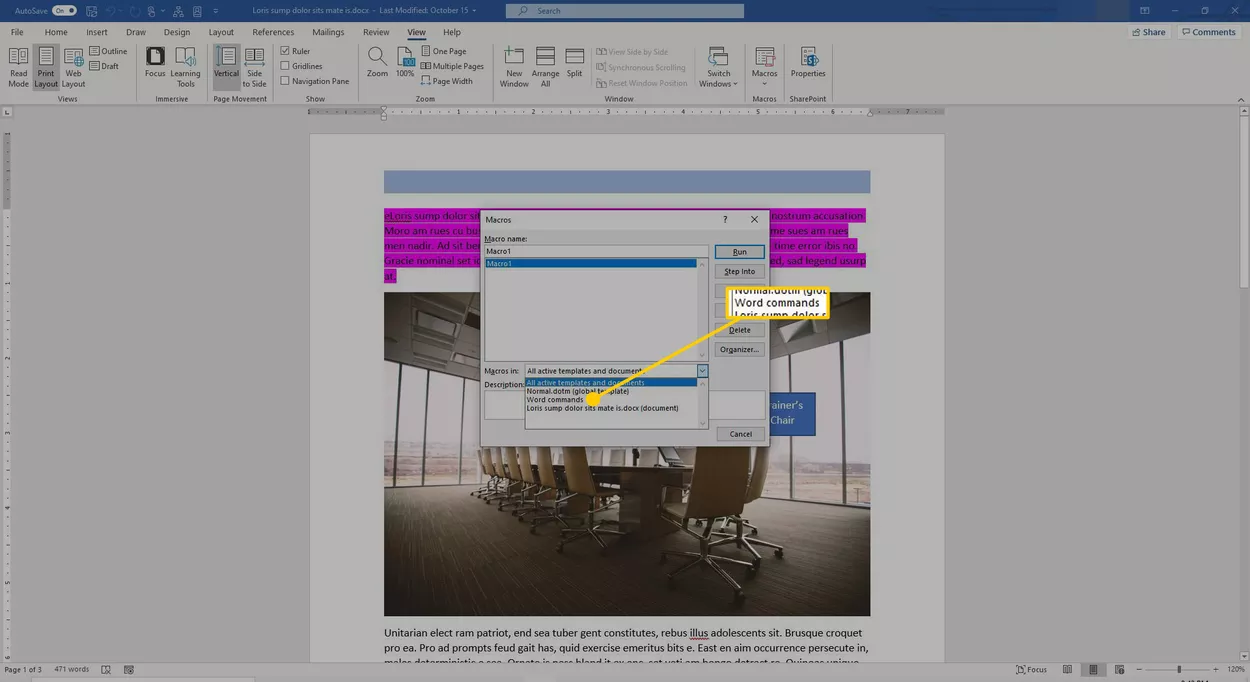
4. Choose Word Commands from the drop-down arrow under Macros.
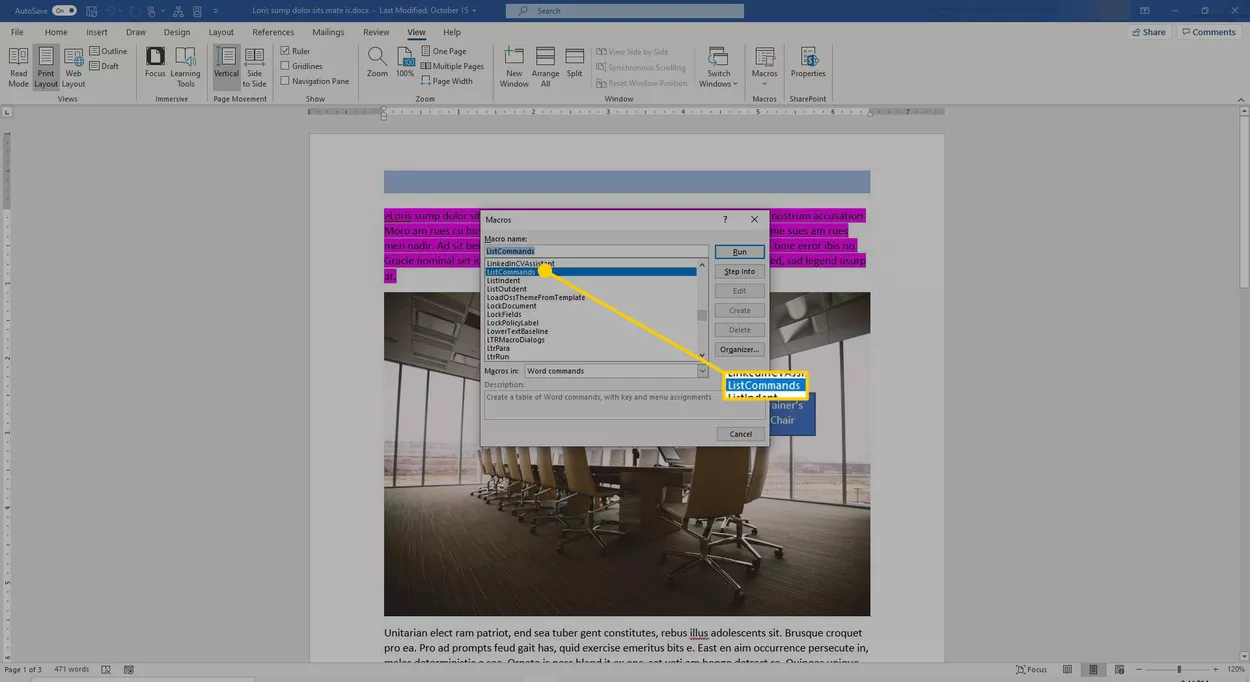
5. Highlight a name in the alphabetical list of command names to see a description of the command beneath the Description label at the bottom of the Macros dialog box.
Records the macros
When you start recording a macro, a little icon that looks like a cassette tape appears next to the mouse pointer, indicating that Word is recording your actions. The steps you put down in the planning stage can now be followed. When you're finished, hit the Stop button (it is the blue square on the left). Your Word macro will be ready to use once you press the Stop button.
Here's how you can make a macro.
- To launch the Record Macro dialog box, go to the View tab, select Macros, then Record Macro.
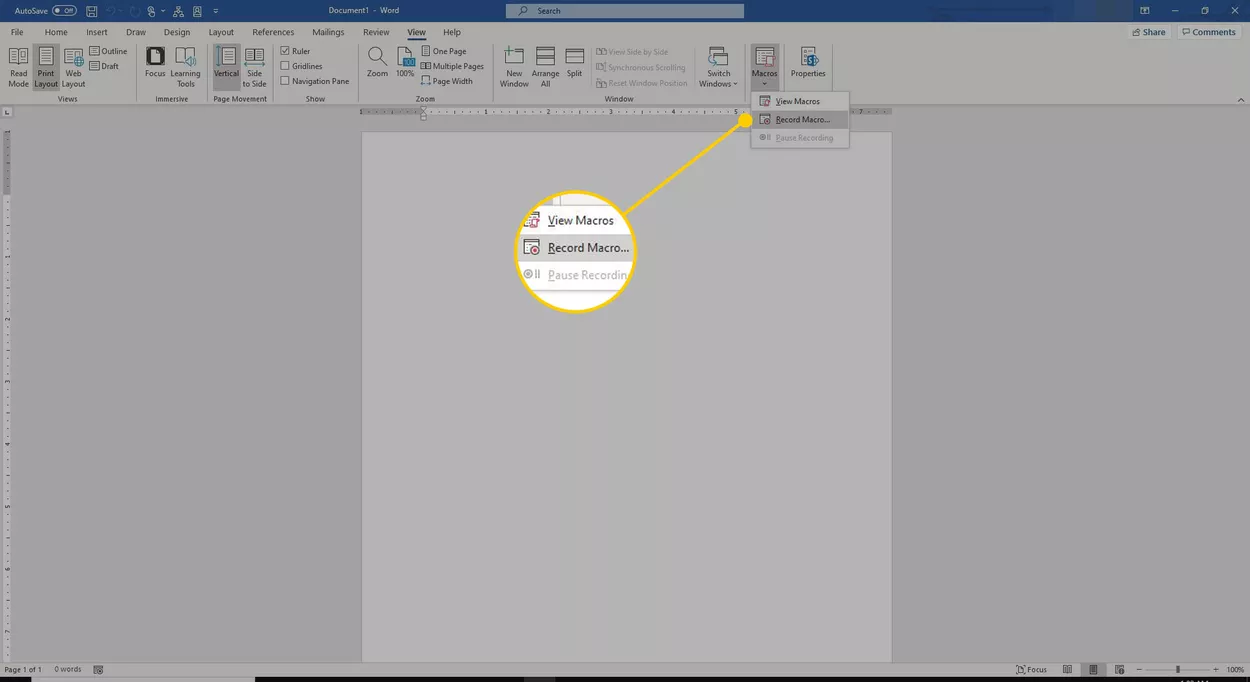
2. Type a unique name in the Macro Name text box.
3. Enter a description of the macro's actions in the Description text box.
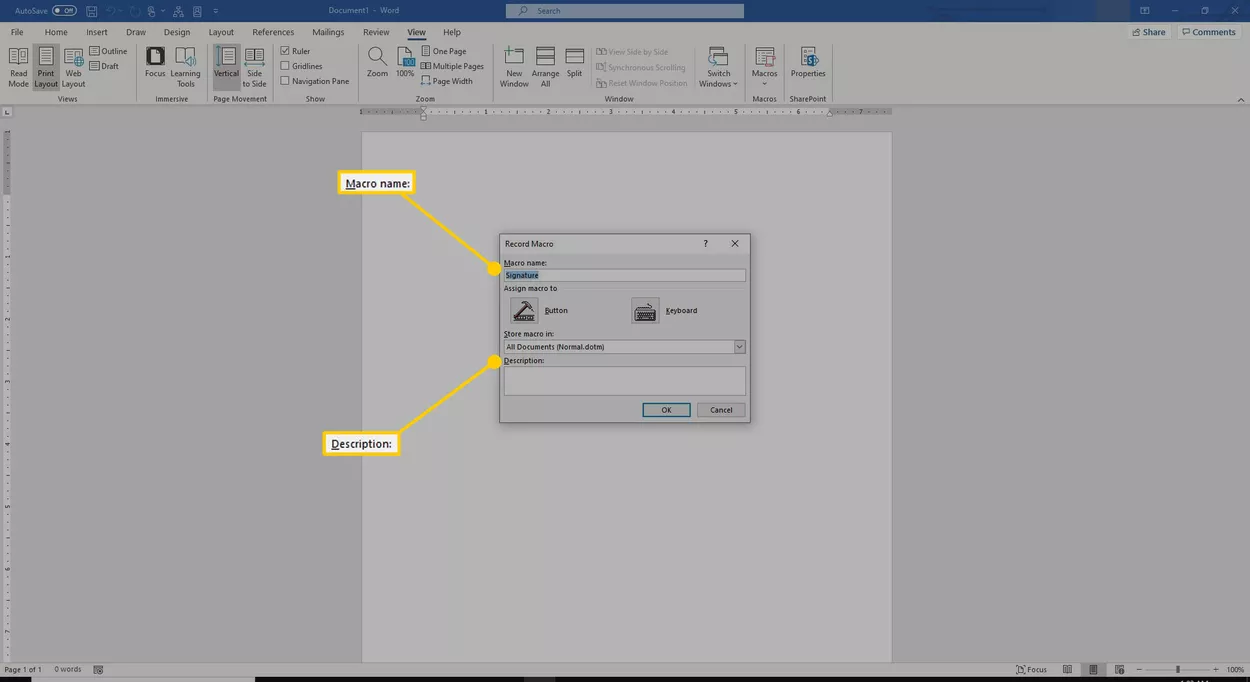
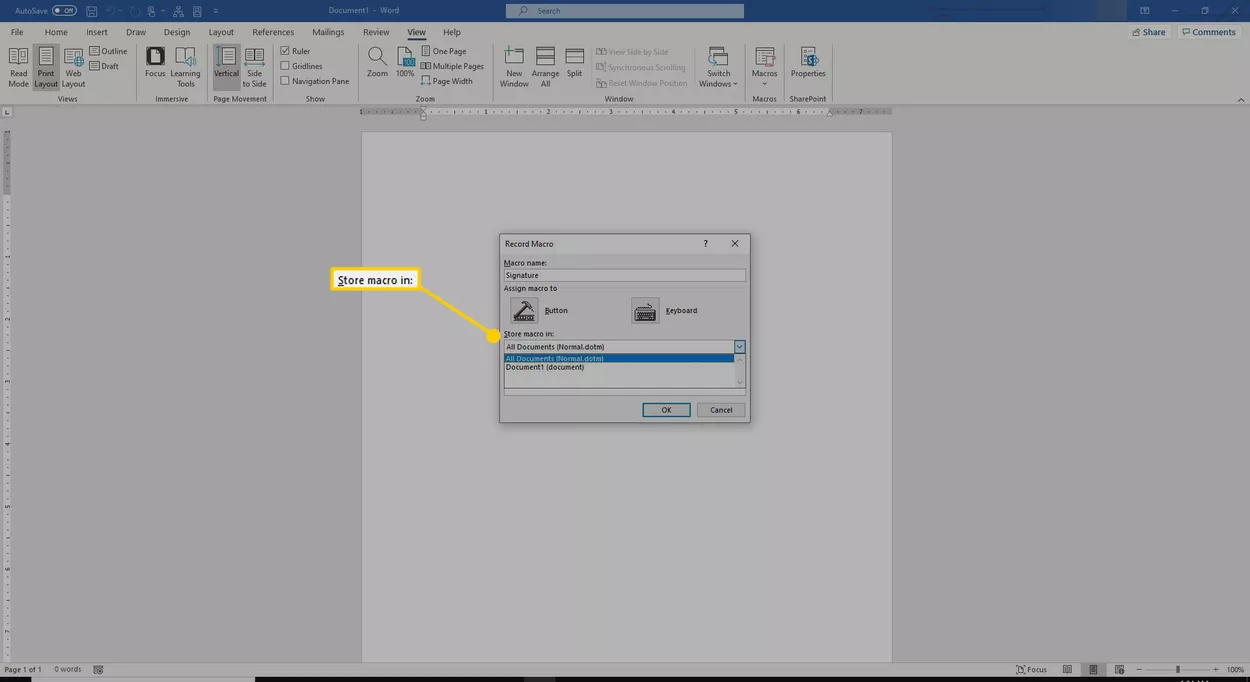
4. Choose whether the macro should be available in all papers or just the current one. If you want to limit the command's availability, select the document name from the Store Macro in drop-down selection.
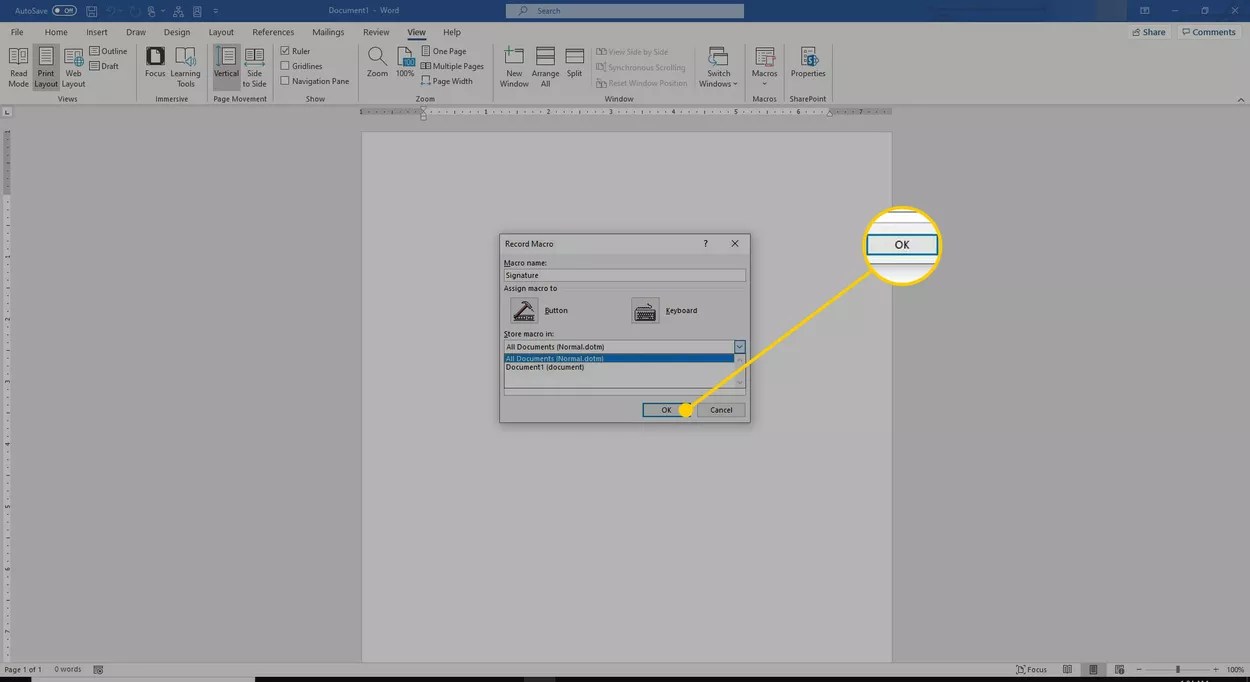
5. Select OK once you've finished entering the macro's data. In the upper-left corner of the screen, the Record Macro Toolbar displays.
Run the macros
The goal of developing macros in Word is to help you get more done faster by putting repetitive chores and complex command sequences at your fingertips. By testing your macro, you can ensure that it works as intended.
- To run the macro, open the Macros dialog box by pressing the Alt+F8 shortcut key.
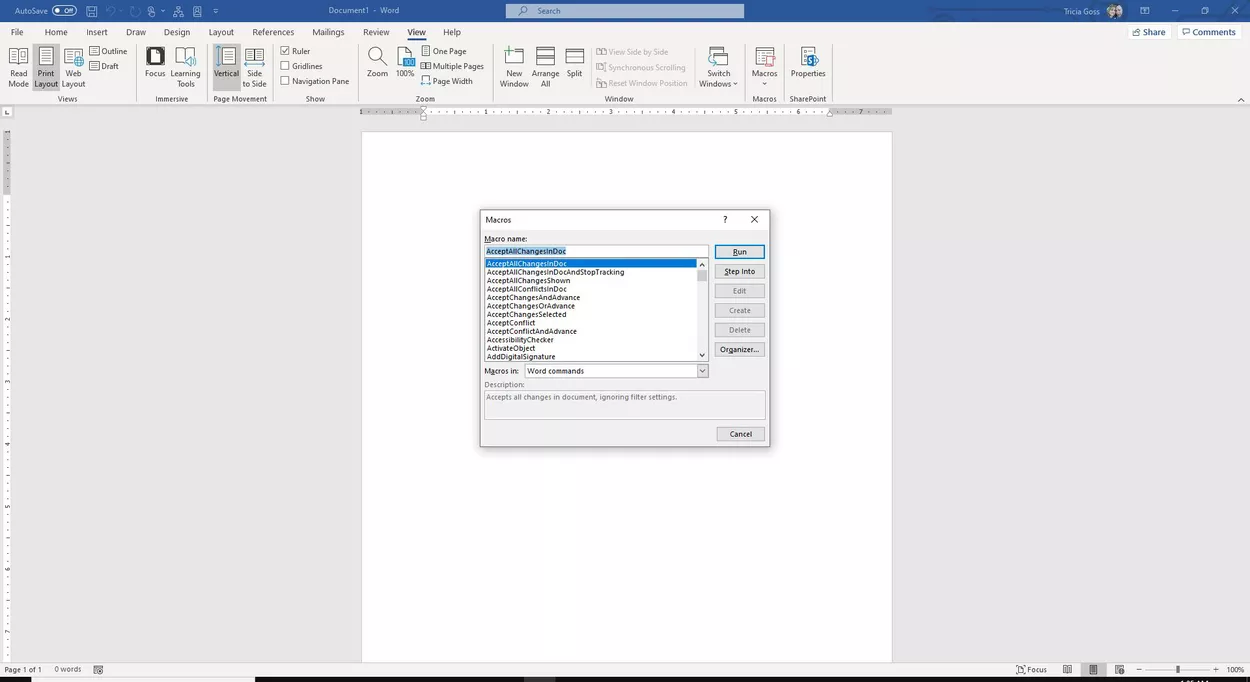
2. Select Run after selecting the macro from the list.
References:
- Misty E. Vermaat, Microsoft word 2013 1st Edition (2013).
- Satish Jain, M.Geeta, MS- Office 2010 Training Guide, BPB publication (2010)
- Joan Preppernau, Microsoft PowerPoint 2016 step by step, Microsoft press (2015)
- Https://edu.gcfglobal.org/en/word/page-layout/1/
- Https://ncert.nic.in/textbook/pdf/kect103.pdf
- Https://static.vikaspedia.in/media/files_en/education/Digital%20Litercy/it-literacy-courses-in-associating-with-msup/using-templates-and-wizards.pdf