Unit - 1
Java Basics
Java is a platform as well as a programming language. Java is a high-level programming language that is also robust, object-oriented, and secure.
Java was created in 1995 by Sun Microsystems (which is now a division of Oracle). The founder of Java, James Gosling, is recognized as the "Father of Java." It was known as Oak before Java. Because Oak was already a recognized business, James Gosling and his team decided to alter the name to Java.
Platform - A platform is any hardware or software environment in which a program runs. Java is referred to as a platform because it has a runtime environment (JRE) and API.
First Java Program
Java is an object oriented programming language, so the complete program must be written inside a class.
Let’s consider an example
Class FirstProgram
{
Public static void main(String[] args)
{
System.out.println(“My first program”);
}
}
Save the above file as FirstProgram.java
Application
Java is installed on 3 billion devices, according to Sun. Java is being utilized on a wide range of devices. The following are a few of them:
● Desktop Applications such as acrobat reader, media player, antivirus, etc.
● Enterprise Applications such as banking applications.
● Mobile
● Embedded System
● Smart Card
● Robotics
● Games, etc.
Java Programming Environment
Java is a sophisticated general-purpose programming language that was first released in 1996 and has been around for almost 23 years. The Java programming environment is made up of the following components:
● Java language - programmers use to create the application
● Java virtual machine - The application's execution is controlled by this variable.
● Java ecosystem - delivers added value to programmers who use the programming language.
Java Language
● It's a human-readable language that's quite simple to understand and write (albeit a bit verbose at times).
● It's a class-based, object-oriented system.
● Java is meant to be simple to understand and teach.
● There are numerous distinct Java implementations, both proprietary and open source, available.
● The Java Language Specification (JLS) specifies how a Java application shall behave when it confirms.
Features of Java
● Object Oriented: Java is a complete object oriented language. This means that everything in Java revolves around the use of Objects.
● Secure: Java is a very secure language; one of the main reasons is the lack of pointers. Virus free software’s can be developed using Java programming constructs.
● Robust: Java is a very robust language because of features like automatic garbage collection, memory management, exception handling, etc.
● Portable: One of the very important features of Java is that can be used on any platform without any problems. This means that it allows you to run the Java Bytecode on any platform.
● Simple: Java is a simple language because of its ease of use and less complicated features.
● Platform Independent: Java is a ‘write’ once, ‘run’ anywhere language, which means that once written, it has the capability to be executed on any machine that has Java Runtime Environment (JRE).
Key takeaway
Java is a platform as well as a programming language.
Java is a high-level programming language that is also robust, object-oriented, and secure.
Java is a sophisticated general-purpose programming language that was first released in 1996 and has been around for almost 23 years.
Concept of Objects and Classes
Objects have states and behaviors that they exhibit. A dog, for example, has states such as color, name, and breed, as well as behaviors such as waving the tail, barking, and eating. A class's instance is an object.
Let's take a closer look at what objects are. Many objects, such as vehicles, pets, humans, and other living things, can be found in the actual world. There is a state and a behavior for each of these things.
If we consider a dog, its state includes its name, breed, and color, as well as its activity, which includes barking, wagging the tail, and running.
When you compare a software object to a real-world thing, you'll see that they have a lot in common.
Object and Class Example: main within the class
We've developed a Student class in this example, which has two data members: id and name. The object of the Student class is created using the new keyword, and the object's value is printed.
Inside the class, we're going to create a main() method.
//Java Program to illustrate how to define a class and fields
//Defining a Student class.
Class Student{
//defining fields
Int id;//field or data member or instance variable
String name;
//creating main method inside the Student class
Public static void main(String args[]){
//Creating an object or instance
Student s1=new Student();//creating an object of Student
//Printing values of the object
System.out.println(s1.id);//accessing member through reference variable
System.out.println(s1.name);
}
}
Output
0
Null
Classes
A class is a template/blueprint that outlines the behavior/state that objects of that kind support.
Individual objects are formed from a blueprint called a class.
Here's an example of a class.
Public class Dog {
String breed;
Int age;
String color;
Void barking() {
}
Void hungry() {
}
Void sleeping() {
}
}
Any of the following variable kinds can be found in a class.
Local variables – Local variables are variables specified within methods, constructors, or blocks. The variable will be declared and initialized within the method, and then removed once the method is finished.
Instance variables – Instance variables are variables that exist within a class but are not associated with any methods. When the class is created, these variables are set to their default values. Instance variables can be accessed from within any of the class's methods, constructors, or blocks.
Class variables – Class variables are variables declared with the static keyword within a class, outside of any methods.
A class can have as many methods as it wants to retrieve the value of different types of methods. Barking(), hungry(), and sleeping() are methods in the sample above.
Constructor
Constructors perform the job of initializing an object. It resembles a method in Java, but a constructor is not a method and it doesn’t have any return type.
Properties of a constructor:
1. Name of the constructor is the same as its class name.
2. A default constructor is always present in a class implicitly.
3. There are three main types of constructors namely default, parameterized and copy constructors.
4. A constructor in Java can not be abstract, final, static and Synchronized.
Public class NewClass{
//This is the constructor
NewClass(){
}}
The new keyword here creates the object of class NewClass and invokes the constructor to initialize this newly created object.
Default constructor:
A default constructor is a constructor that is created implicitly by the JVM.
Program to demonstrate default constructors:
Class student
{
Int id;
String name;
Student()
{
System.out.println("Student id is 20 and name is Amruta");
}
Public static void main(String args[])
{
Student s = new student();
}
}
Parameterized constructor:
It is a constructor that has to be created explicitly by the programmer. This constructor has parameters that can be passed when a constructor is called at the time of object creation.
Program:
Class Student4
{
Int id;
String name;
Student4(int i,String n)
{
Id = i;
Name = n;
}
Void display()
{
System.out.println(id+" "+name);
}
Public static void main(String args[])
{
Student4 s1 = new Student4(20,"Rema");
Student4 s2 = new Student4(23,"Sadhna");
s1.display();
s2.display();
}
}
Copy constructor:
A content of one constructor can be copied into another constructor using the objects created. Such a constructor is called as a copy constructor.
Program:
Class Student6
{
Int id;
String name;
Student6(int i,String n)
{
Id = i;
Name = n;
}
Student6(Student6 s)
{
Id = s.id;
Name =s.name;
}
Void display()
{
System.out.println(id+" "+name);
}
Public static void main(String args[])
{
Student6 s1 = new Student6(20,"AMRUTA");
Student6 s2 = new Student6(s1);
s1.display();
s2.display();
}
}
Output:

Difference between constructor and method in Java
There are many differences between constructors and methods. They are given below.
Java Constructor | Java Method |
A constructor is used to initialize the state of an object. | A method is used to expose the behavior of an object. |
A constructor must not have a return type. | A method must have a return type. |
The constructor is invoked implicitly. | The method is invoked explicitly. |
The Java compiler provides a default constructor if you don't have any constructor in a class. | The method is not provided by the compiler in any case. |
The constructor name must be same as the class name. | The method name may or may not be same as the class name. |
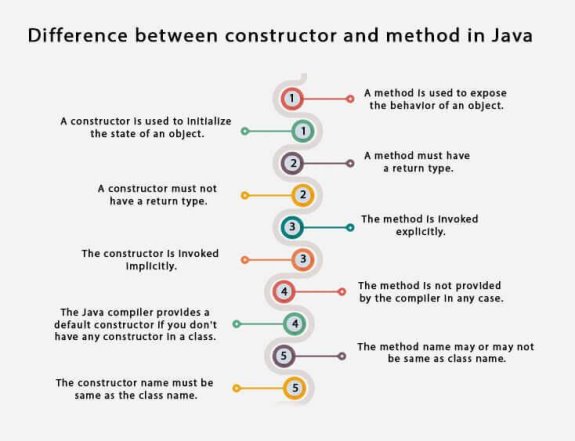
Fig 1: Difference between constructor and method
Key takeaway
In Java, a constructor is a block of codes similar to the method. It is called when an instance of the class is created. At the time of calling constructor, memory for the object is allocated in the memory.
It calls a default constructor if there is no constructor available in the class. In such case, Java compiler provides a default constructor by default.
There are two types of constructors in Java: no-arg constructor, and parameterized constructor.
Basically, there are two types of modifiers in Java, access modifiers and non-access modifiers.
In Java there are four types of access modifiers according to the level of access required for classes, variable, methods and constructors. Access modifiers like public, private, protected and default.
Default Access Modifier
In this access modifier we do not specify any modifier for a class, variable, method and constructor.
Such types of variables or method can be used by any other class. There are no restrictions in this access modifier.
There is no syntax for default modifier as declare the variables and methods without any modifier keyword.
Example-
String name = “Disha”;
Boolean processName() {
Return true;
}
Private Access Modifier
This access modifier uses the private keyword. By using this access modifier the methods, variable and constructors become private and can only be accessed by the member of that same class.
It is the most restrict access specifier. Class and interface cannot be declared using the private keyword.
By using private keyword we can implement the concept of encapsulation, which hides data from the outside world.
Example of private access modifier
Public class ExampleAcces {
Private String ID;
Public String getID() {
Return this.ID;
}
Public void setID(String ID) {
This.ID = ID;
}
}
In the above example the ID variable of the ExampleAccess class is private, so no other class can retrieve or set its value easily.
So, to access this variable for use in the outside world, we defined two public methods: getID(), which returns the value of ID, and setID(String), which sets its value.
Public Access Modifier
As the name suggest a public access modifier can be easily accessed by any other class or methods.
Whenever we specify public keyword to a class, method, constructor etc, then they can be accessed from any other class in the same package. Outside package we have to import that class for access because of the concept of inheritance.
In the below example, function uses public access modifier:
Public static void main(String[] arguments) {
// ...
}
It is necessary to declare the main method as public, else Java interpreter will not be able to called it to run the class.
Protected Access Modifier
In this access modifier, in a superclass if variables, methods and constructors are declared as protected then only the subclass in other package or any class within the same package can access it.
It cannot be assigned to class and interfaces. In general method’s fields can be declared as protected: however methods and fields of interface cannot be defined as protected.
It cannot be defined on the class.
An example of protected access modifier is shown below:
Class Person {
Protected int ID(ID pid) {
// implementation details
}
}
Class Employee extends Person {
Int ID(ID pid) {
// implementation details
}
}
Tips for Access Modifier
- A public method declared in a superclass, must also be public in all subclasses.
- In a superclass if a method is declared as protected, then in subclass it should be either protected or public, they cannot be private.
- Private methods cannot be inherited.
Key takeaway
Basically, there are two types of modifiers in Java, access modifiers and non-access modifiers.
Now a day’s Java is one such language which is used worldwide including internet, mobiles, games, e-commerce etc.
Let’s have a look at the history of Java and see how it comes so far:
- In June 1991, the first project written in Java is initiated by a team of three members having James Gosling, Mike Sheridan and Patrick Naughton. This team of sun engineers become famous as Green Team.
- The initial purpose of using Java was for small, embedded systems such as TV set-top boxes.
- At first it was referred as Green talk by James Gosling and the file extension for it was decided is .gt.
- Then James Gosling referred it as Oak which was developed as a part of Green project.
- Since Oak was already a trademark used by Oak Technologies, so in 1995 it was renamed as Java.
- Before selecting the name Java the team had huge discussion among names suggested like dynamic, revolutionary, silk, jolt, DNA etc. Team wants to select such a name which reflects the nature of technology. So finally the team members preferred Java over other names.
- The first public implementation of Java was made in 1995 as Java 1.0 by Sun. It is based on the concept of Write once and Run Anywhere on any platforms.
- In 2006, Sun finally released Java’s some code as free and open source software Under GNU General Public License (GPL).
- And finally, in 2007 Sun declared Java’s all core code free and open source so that anyone can use it without any restrictions.
JVM (Java Virtual Machine) is a program that gives us the flexibility to execute Java programs. It provides a runtime environment to execute the Java code or applications.
This is the reason why Java is said to platform independent language as it requires JVM on the system it runs its Java code.
JVM is also used to execute programs of other languages that are compiled to Bytecode.
JVM can also be describe as:
- A specification where JVM working is pre defined.
- An implementation like JRE (Java Runtime Environment) is required.
- Runtime Instance means wherever a program is run on command prompt using java command, an instance of JVM is created.
Significance of JVM
JVM is used for two primary functions
- It allows Java programs to use the concept of “Write Once and Run Anywhere”.
- It is utilized to manage and optimize memory usage for programs.
Architecture of JVM
Java applications require a run-time engine which is provided by JVM. The main method of Java program is called by JVM. JVM is a subsystem of JRE (Java Runtime Environment).
Let’s see the internal architecture of JVM as shown in the figure below:
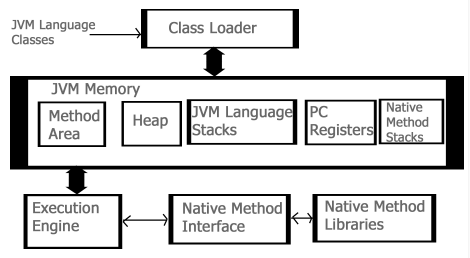
Fig 2: JVM architecture
- Class Loader: This part is used to load class files. There are three major functions of class loader as Loading, Linking and Initialization.
- Method Area: Structure of class like metadata, the constant runtime pool, and the code for methods are stored method area.
- Heap: Heap is the memory where all the objects, instance variables and arrays are stored. This is a shared memory which is accessed by multiple threads.
- JVM Language Stacks: These hold the local data variables and their results. Each thread has their own JVM stack used to store data.
- PC Registers: The currently running IVM instructions are stored in PC Registers. In Java, every thread has its their own PC register.
- Native Method Stacks: It hold the instruction of native code depending on their native library.
- Execution Engine: This engine is used to test the software, hardware or complete system. It doesn’t contain any information about the tested product.
- Native Method Interface: It is a programming interface. It allows Java code to call by libraries and native applications.
- Native Method Libraries: It consists of native libraries which are required by execution engine.
The different sizes and values that can be stored in the variable are defined by data types. In Java, there are two types of data types:
● Primitive data types - Boolean, char, byte, short, int, long, float, and double are examples of primitive data types.
● Non - primitives data types - Classes, Interfaces, and Arrays are examples of non-primitive data types.
Primitive data types
Primitive data types are the building blocks of data manipulation in the Java programming language. These are the most basic data types in the Java programming language.
Let's take a closer look at each of the eight primitive data types.
Boolean
Only two potential values are stored in the Boolean data type: true and false. Simple flags that track true/false circumstances are stored in this data type.
The Boolean data type specifies a single bit of data, but its "size" cannot be precisely defined.
Byte
The primitive data type byte is an example of this. It's an 8-bit two-s complement signed integer. It has a value range of -128 to 127. (inclusive). It has a minimum of -128 and a high of 127. It has a value of 0 by default.
The byte data type is used to preserve memory in huge arrays where space is at a premium. Because a byte is four times smaller than an integer, it saves space. It can also be used in place of "int" data type.
Short
A 16-bit signed two's complement integer is the short data type. It has a value range of -32,768 to 32,767. (inclusive). It has a minimum of -32,768 and a maximum of 32,767. It has a value of 0 by default.
The short data type, like the byte data type, can be used to save memory. A short data type is twice the size of an integer.
Int
A 32-bit signed two's complement integer is represented by the int data type. Its range of values is - 2,147,483,648 (-231 -1) to 2,147,483,647 (231 -1). (inclusive). It has a minimum of 2,147,483,648 and a maximum of 2,147,483,647. It has a value of 0 by default.
Unless there is a memory constraint, the int data type is usually chosen as the default data type for integral values.
Long
A 64-bit two's complement integer is the long data type. It has a value range of -9,223,372,036,854,775,808(-263 -1) to 9,223,372,036,854,775,807(263 -1). (inclusive).
Its lowest and maximum values are 9,223,372,036,854,775,808 and 9,223,372,036,854,775,807. It has a value of 0 by default. When you need a larger range of values than int can supply, you should utilize the long data type.
Float
The float data type is a 32-bit IEEE 754 floating point with single precision. It has an infinite value range. If you need to preserve memory in big arrays of floating point integers, use a float (rather than a double). For precise numbers, such as currency, the float data type should never be used. 0.0F is the default value.
Double
A double data type is a 64-bit IEEE 754 floating point with double precision. It has an infinite value range. Like float, the double data type is commonly used for decimal values. For precise values, such as currency, the double data type should never be utilized. 0.0d is the default value.
Key takeaway
The different sizes and values that can be stored in the variable are defined by data types.
A variable is a container that holds the value during the execution of a Java program. A data type is assigned to a variable.
The term "variable" refers to the name of a memory region. Local, instance, and static variables are the three types of variables in Java.
A variable is the name of a memory-allocated reserved space. In other words, it is a name of the memory location. It's made out of the words "vary + ability," which signifies that its value can be modified.
Types of variables
There are three types of variables in Java:
Local variable
A local variable is a variable declared within the method's body. This variable can only be used within that method, and the other methods in the class are unaware that it exists.
The keyword "static" cannot be used to declare a local variable.
Instance variable
An instance variable is a variable declared inside the class but outside the method body. It hasn't been declared static.
Because its value is instance-specific and not shared across instances, it's called an instance variable.
Static variable
A static variable is one that has been declared as static. It's not possible for it to be local. You can make a single duplicate of the static variable and share it across all of the class's instances. Static variables are only allocated memory once, when the class is loaded into memory.
Example
Public class A
{
Static int m=100;//static variable
Void method()
{
Int n=90;//local variable
}
Public static void main(String args[])
{
Int data=50;//instance variable
}
}//end of class
Key takeaway
A variable is a container that holds the value during the execution of a Java program. A data type is assigned to a variable.
The array is a Java data structure that contains a fixed-size sequential collection of elements of the same type in a fixed-size sequential order. Although an array is used to hold data, it is often more beneficial to conceive of it as a collection of variables of the same type.
An array in Java is an object that includes components of the same data type. Furthermore, the items of an array are kept in a single memory address. It's a data structure where we save items that are comparable. In a Java array, we can only store a fixed number of elements.
Instead of declaring individual variables like number0, number1,..., and number99, you declare a single array variable called numbers and use numbers[0], numbers[1],..., numbers[99] to represent individual variables.
The first element of an array is stored at the 0th index, the second element is stored at the 1st index, and so on.
Declaring array variable
To use an array in a program, you must first define a variable that will refer to the array, as well as the kind of array that the variable can refer to. The syntax for declaring an array variable is as follows:
DataType[] arrayRefVar; // preferred way.
Or
DataType arrayRefVar[]; // works but not preferred way.
Java has a large number of operators for manipulating variables. All Java operators can be divided into the following categories:
● Arithmetic Operators
● Relational Operators
● Bitwise Operators
● Logical Operators
● Assignment Operators
● Misc Operators
Arithmetic operators
In the same way as algebraic operators are used in mathematical expressions, arithmetic operators are employed in mathematical expressions. The arithmetic operators are listed in the table below.
Assume integer variable A has a value of 10 and variable B has a value of 20.
Operator | Description | Example |
+ (Addition) | Values are added on both sides of the operator. | A + B will give 30 |
- (Subtraction) | The right-hand operand is subtracted from the left-hand operand. | A - B will give -10 |
* (Multiplication) | Values on both sides of the operator are multiplied. | A * B will give 200 |
/ (Division) | Right-hand operand is divided by left-hand operand. | B / A will give 2 |
% (Modulus) | Returns the remainder after dividing the left-hand operand by the right-hand operand. | B % A will give 0 |
++ (Increment) | Increases the operand's value by one. | B++ gives 21 |
-- (Decrement) | Reduces the operand's value by one.. | B-- gives 19 |
Relational Operators
The Java language supports the following relational operators.
Assume variable A has a value of 10 and variable B has a value of 20.
Operator | Description | Example |
== (equal to) | Checks whether the values of two operands are equal, and if they are, the condition is true. | (A == B) is not true. |
!= (not equal to) | Checks whether the values of two operands are equivalent; if they aren't, the condition is true. | (A != B) is true. |
> (greater than) | If the left operand's value is greater than the right operand's value, then the condition is true. | (A > B) is not true. |
< (less than) | Checks if the left operand's value is less than the right operand's value; if it is, the condition is true. | (A < B) is true. |
>= (greater than or equal to) | If the left operand's value is larger than or equal to the right operand's value, then the condition is true. | (A >= B) is not true. |
<= (less than or equal to) | If the left operand's value is less than or equal to the right operand's value, then the condition is true. | (A <= B) is true. |
Bitwise operators
Long, int, short, char, and byte are all integer types that can be used with Java's bitwise operators.
The bitwise operator works with bits and performs operations bit by bit. Assume a = 60 and b = 13; in binary format, they will look like this:
a = 0011 1100
b = 0000 1101
a&b = 0000 1100
a|b = 0011 1101
a^b = 0011 0001
~a = 1100 0011
Assume integer variable A has a value of 60 and variable B has a value of 13.
Operator | Description | Example |
& (bitwise and) | If a bit exists in both operands, the binary AND operator duplicates it to the result. | (A & B) will give 12 which is 0000 1100 |
| (bitwise or) | If a bit exists in both operands, the binary OR operator copies it. | (A | B) will give 61 which is 0011 1101 |
^ (bitwise XOR) | If a bit is set in one operand but not both, the binary XOR operator replicates it. | (A ^ B) will give 49 which is 0011 0001 |
~ (bitwise compliment) | The Binary Ones Complement Operator is a unary operator that 'flips' bits. | (~A ) will give -61 which is 1100 0011 in 2's complement form due to a signed binary number. |
<< (left shift) | Left Shift Operator in Binary. The value of the left operand is shifted to the left by the number of bits given by the right operand. | A << 2 will give 240 which is 1111 0000 |
>> (right shift) | Right Shift Operator in Binary. The value of the left operand is advanced by the number of bits supplied by the right operand. | A >> 2 will give 15 which is 1111 |
>>> (zero fill right shift) | Zero fill operator with a right shift. The value of the left operand is shifted right by the number of bits supplied in the right operand, and the shifted values are filled with zeros. | A >>>2 will give 15 which is 0000 1111 |
Logical operators
The logical operators are listed in the table below.
Assume that Boolean variable A is true and variable B is false.
Operator | Description | Example |
&& (logical and) | The logical AND operator is what it's called. If both operands are non-zero, the condition is satisfied. | (A && B) is false |
|| (logical or) | The logical OR operator is what it's called. The condition becomes true if any of the two operands is non-zero. | (A || B) is true |
! (logical not) | It's known as the Logical NOT Operator. Its operand's logical state is reversed when it is used. If one of the conditions is true, the Logical NOT operator returns false. | !(A && B) is true |
Assignment operators
The assignment operators supported by the Java language are listed below.
Operator | Description | Example |
= | This is a straightforward assignment operator. Values from the right side operands are assigned to the left side operand. | C = A + B will assign value of A + B into C |
+= | The AND assignment operator is used to combine two variables. It adds the right and left operands together and assigns the result to the left operand. | C += A is equivalent to C = C + A |
-= | Subtract AND assignment operator. It subtracts right operand from the left operand and assign the result to left operand. | C -= A is equivalent to C = C – A |
*= | The AND operator multiplies and assigns. It adds the right and left operands together and assigns the result to the left operand. | C *= A is equivalent to C = C * A |
/= | The AND operator divides and assigns. It multiplies the left and right operands and assigns the result to the left operand. | C /= A is equivalent to C = C / A |
%= | Modulus AND assignment operator. It takes modulus using two operands and assign the result to left operand. | C %= A is equivalent to C = C % A |
<<= | Left shift AND assignment operator. | C <<= 2 is same as C = C << 2 |
>>= | Right shift AND assignment operator. | C >>= 2 is same as C = C >> 2 |
&= | Bitwise AND assignment operator. | C &= 2 is same as C = C & 2 |
^= | Bitwise exclusive OR and assignment operator. | C ^= 2 is same as C = C ^ 2 |
|= | Bitwise inclusive OR and assignment operator. | C |= 2 is same as C = C | 2 |
Miscellaneous Operators
Only a few more operators are supported by the Java programming language.
Conditional Operator ( ? : )
The ternary operator is another name for the conditional operator. This operator is used to evaluate Boolean expressions and has three operands. The operator's objective is to determine which value should be assigned to a variable. The operator is denoted by the symbol.
Variable x = (expression) ? value if true : value if false
Instance of Operator
Only object reference variables are used with this operator. The operator determines whether or not the item is of a specific type (class type or interface type).
The instance of operator is denoted by the symbol.
(Object reference variable) instance of (class/interface type)
The result will be true if the object referred to by the variable on the left side of the operator passes the IS-A check for the class/interface type on the right side.
Key takeaway
The order in which terms in an expression are grouped is determined by operator precedence. This has an impact on how an expression is judged.
The highest-priority operators appear at the top of the table, while the lowest-priority operators appear at the bottom.
Java provides us three types of control statements:
● Conditional statements: These are used when we want to choose among two or more paths. Conditional statements are of three types in java: if/else/else if, ternary operator and switch.
● Loop/Iterators: Loops are used when we want to repeatedly run some part of the code. Java provides three types of loop: for, while and do while.
● Branching statements: These statements are used to alter the flow of control in loops. Branching statements are of two types: break and continue.
Conditional Statements
Conditional statements are used to choose the path for execution. These are of three types: if/else/else if, ternary and switch.
If statement
The if statement in Java is used to test the condition. If the condition is true, the if block is executed.
Syntax
If(condition){
//code to be executed
}
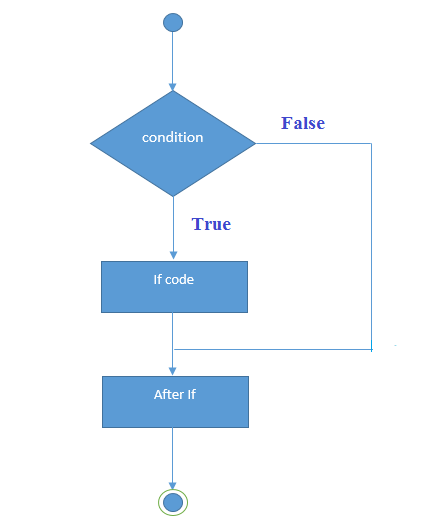
Fig 3: Flowchart of if statements
Example
//Java Program to demonstrate the use of if statement.
Public class IfExample {
Public static void main(String[] args) {
//defining an 'age' variable
Int age=20;
//checking the age
If(age>18){
System.out.print("Age is greater than 18");
}
}
}
Output
Age is greater than 18
If-else statement
An extended version of if statement, which use a second block of code which is known as else block in the situation when if condition fails.
Syntax of if else statement:
If(Boolean condition)
{
Line 1; // it will execute only when if statement holds true
}
Else
{
Line 2; // it will execute only when if statement holds false
}
Example
Public class Program {
Public static void main(String[] args)
{
Int a = 5;
Int b = 15;
If(a+b>=20)
{
System.out.println(“if condition is true”);
}
Else
{
System.out.println(“if condition is false”);
}
}
}
Output:
If condition is true
If-else-if ladder or Nested if-else condition
In nested if-else condition first if condition is followed by many else-if conditions. In other way we can define it as a decision tree of if-else-if statement where we have to make multiple choices based on combination of conditions.
Syntax of nested if-else condition:
If(Boolean condition 1) {
Statement 1; //it will executes when condition 1 is true
}
Else if(Boolean condition 2) {
Statement 2; // it will executes when condition 2 is true
}
Else {
Statement 2; //it will executes when all the conditions are false
}
Example:
Public class Example {
Public static void main(String[] args) {
Int a = 15;
If(a < 10) {
System.out.println("a is less than 10");
}else if (a = 12) {
System.out.println("a is equal to 12");
}else if(a > 10) {
System.out.println("a is greater than 10");
}else {
System.out.println(a);
}
}
}
Output:
a is greater than 10
Ternary Condition
Ternary condition is an enhancement or shorthand to the if-else condition. The working of ternary and if-else condition is same.
Consider an example of if-else:
If (a > 2) {
System.out.println("a is higher than 2");
} else {
System.out.println("a is lower or equal to 2");
}
Now see the same code in ternary condition
System.out.println(a > 2 ? "a is higher than 2" : "a is lower or equal to 2");
Switch
The Java switch statement combines numerous conditions into a single statement. It's similar to an if-else-if conditional statement. The switch statement compares various values to see if they are equal.
● For a switch expression, there can be one or N case values.
● Only switch expressions can be used as case values. The case value must be constant or literal. Variables are not permitted.
● The case values must be one-of-a-kind. It causes a compile-time error if a value is duplicated.
● The byte, short, int, long (with its Wrapper type), enums, and string types must all be present in the Java switch statement.
● A break statement can be included in each case statement, although it is not required. The control jumps after the switch expression when it reaches the break statement. If no break statement is discovered, the next case is executed.
● Optionally, the case value can have a default label.
Syntax
Switch(expression){
Case value1:
//code to be executed;
Break; //optional
Case value2:
//code to be executed;
Break; //optional
......
Default:
Code to be executed if all cases are not matched;
}
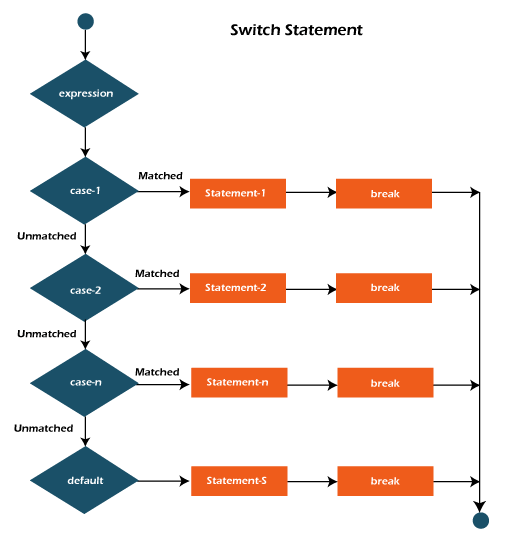
Fig 4: Flow chart
Example
Public class SwitchExample {
Public static void main(String[] args) {
//Declaring a variable for switch expression
Int number=20;
//Switch expression
Switch(number){
//Case statements
Case 10: System.out.println("10");
Break;
Case 20: System.out.println("20");
Break;
Case 30: System.out.println("30");
Break;
//Default case statement
Default:System.out.println("Not in 10, 20 or 30");
}
}
}
Output
20
First Java Program
Java is an object oriented programming language, so the complete program must be written inside a class.
Let’s consider an example
Class FirstProgram
{
Public static void main(String[] args)
{
System.out.println(“My first program”);
}
}
Save the above file as FirstProgram.java
Prerequisites Before start writing a java program
Before writing java program one must make sure that following software or applications are properly installed.
- First of all, download JDK and install it.
- Set path of the jdk/bin directory.
- Create the Java program.
- Compile and run the program.
Besides this learning Java is easy doesn’t require any previous knowledge of other programming language but required some logics for writing programs.
The syntax of writing a Java program is similar to that of C, so if you know C language little bit then it will be easy for you to write Java Program.
Also, if you have any idea of C++ then it will easy to understand the concept of object oriented programming which in turn helps to understand Java better.
Writing the program
To write a program, first of all open the notepad by following the sequence start menu -> All Programs -> Accessories -> Notepad and then write the below code.
Class FirstProgram
{
Public static void main(String[] args)
{
System.out.println(“My first program”);
}
}
After writing the code save the file as FirstProgram.java.
Different ways to write a Java program
- Sequence of the modifiers doesn’t matter, prototype of method will be same.
Static public void main(String args[])
2. The string array can be written in many ways all have the same meaning.
Public static void main(String[] args)
Public static void main(String []args)
Public static void main(String args[])
3. By using three ellipses we can provide var-args to the main().
Public static void main(String...args)
4. Placing a semicolon at the end of class is not necessary its optional.
Class FirstProgram
{
Static public void main(String...args)
{
System.out.println(“My first program”);
}
};
Compiling the program
Compiling a Java program is easy. Given are the steps to compile and run a program.
Step 1: To compile a Java program you need to open command prompt by following steps start menu -> All Programs -> Accessories -> command prompt.
Step 2: Next set the directory path where you saved your Java program. Let us consider my current directory is c:\dis. Following needs to be done to change the directory.
C:\> cd dis (press enter key)
Step 3: Compile the program by running following command.
C:\dis> javac FirstProgram.java (press enter key)
This step will inform the compiler to compile the program. The compiler will look for any error, if there is no error it will tell you to perform next step.
After successful compilation the system will generate a FirstProgram.class file in the same directory.
How Java program compiles?
After successful compilation, the Java compiler will convert the java source code into machine independent code known as bytecode.
This bytecode file will be stored with the extension .class in the same directory where your program is saved.

Executing the program
Now to run the program as shown below
C:\dis> java FirstProgram
You will be able to see the desired output on the command prompt.
How Java program executes?
The compiler will generate the class files which are machine independent or OS, which allows them to execute or run on any system.
At the time of execution, the main class file is passed to JVM (Java Virtual Machine) which the goes through following stages:
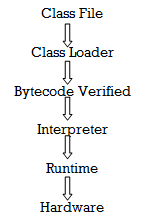
● Class loader: It is a sub part of JVM which is used to load class files.
● Bytecode Verifier: It checks part of code which contain access verifier to see any illegal access to the code.
● Interpreter: It read the Bytecode in stream and then run the instructions.
The if statement in Java is used to test the condition. If the condition is true, the if block is executed.
Syntax
If(condition){
//code to be executed
}
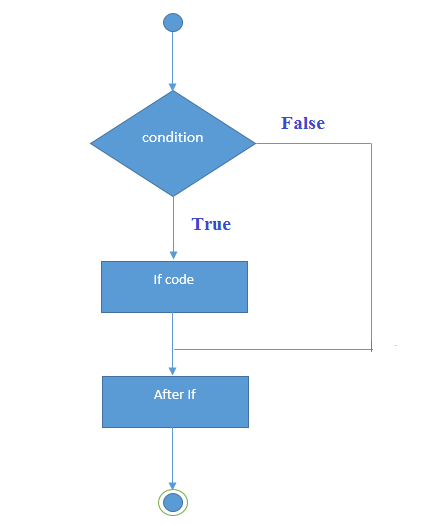
Fig 5: Flow chart of if statements
Example
//Java Program to demonstrate the use of if statement.
Public class IfExample {
Public static void main(String[] args) {
//defining an 'age' variable
Int age=20;
//checking the age
If(age>18){
System.out.print("Age is greater than 18");
}
}
}
Output
Age is greater than 18
Switch
The Java switch statement combines numerous conditions into a single statement. It's similar to an if-else-if conditional statement. The switch statement compares various values to see if they are equal.
● For a switch expression, there can be one or N case values.
● Only switch expressions can be used as case values. The case value must be constant or literal. Variables are not permitted.
● The case values must be one-of-a-kind. It causes a compile-time error if a value is duplicated.
● The byte, short, int, long (with its Wrapper type), enums, and string types must all be present in the Java switch statement.
● A break statement can be included in each case statement, although it is not required. The control jumps after the switch expression when it reaches the break statement. If no break statement is discovered, the next case is executed.
● Optionally, the case value can have a default label.
Syntax
Switch(expression){
Case value1:
//code to be executed;
Break; //optional
Case value2:
//code to be executed;
Break; //optional
......
Default:
Code to be executed if all cases are not matched;
}
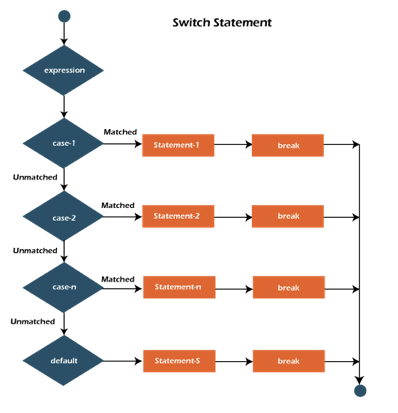
Fig 6: Flow chart
Example
Public class SwitchExample {
Public static void main(String[] args) {
//Declaring a variable for switch expression
Int number=20;
//Switch expression
Switch(number){
//Case statements
Case 10: System.out.println("10");
Break;
Case 20: System.out.println("20");
Break;
Case 30: System.out.println("30");
Break;
//Default case statement
Default:System.out.println("Not in 10, 20 or 30");
}
}
}
Output
20
Statements
Break statements
When a break statement is reached within a loop, the loop is instantly ended, and program control is resumed at the next statement after the loop.
To break a loop or switch statement in Java, use the break statement. At the stated situation, it interrupts the program's current flow. It only breaks the inner loop in the case of the inner loop.
The Java break statement can be used in all forms of loops, including for loops, while loops, and do-while loops.
Syntax
Break;
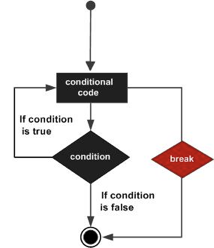
Fig 7: Flow diagram
Example
Public class Test {
Public static void main(String args[]) {
Int [] numbers = {10, 20, 30, 40, 50};
For(int x : numbers ) {
If( x == 30 ) {
Break;
}
System.out.print( x );
System.out.print("\n");
}
}
}
Output
10
20
Continue statements
When you need to jump to the next iteration of the loop right away, you utilize the continue statement in the loop control structure. It can be used in conjunction with a for loop or a while loop.
The loop is continued using the Java continue command. It continues the program's current flow while skipping the remaining code at the specified circumstance. It only continues the inner loop in the case of an inner loop.
The continue statement in Java can be used in all forms of loops, including for loops, while loops, and do-while loops.
Syntax
Continue;
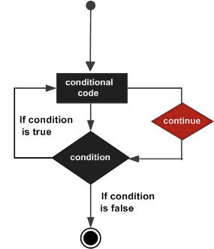
Fig 8: Flow diagram
Example
Public class Test {
Public static void main(String args[]) {
Int [] numbers = {10, 20, 30, 40, 50};
For(int x : numbers ) {
If( x == 30 ) {
Continue;
}
System.out.print( x );
System.out.print("\n");
}
}
}
Output
10
20
40
50
While
The while loop in Java is used to execute a section of code until the provided Boolean condition is true. The loop comes to an end as soon as the Boolean condition is false.
The while loop is a type of if statement that repeats itself. The while loop is recommended if the number of iterations is not fixed.
Syntax
While(Boolean_expression) {
// Statements
}
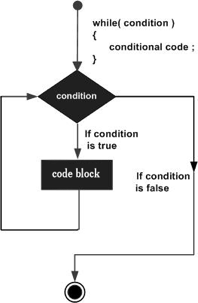
Fig 9: Flow diagram
The while loop's main feature is that it may or may not ever run. The loop body will be skipped and the first statement after the while loop will be executed when the expression is tested and the result is false.
Example
Public class Test {
Public static void main(String args[]) {
Int x = 10;
While( x < 20 ) {
System.out.print("value of x : " + x );
x++;
System.out.print("\n");
}
}
}
Output
Value of x : 10
Value of x : 11
Value of x : 12
Value of x : 13
Value of x : 14
Value of x : 15
Value of x : 16
Value of x : 17
Value of x : 18
Value of x : 19
Do While
The Java do-while loop is used to repeatedly iterate a section of a program until the specified condition is met. A do-while loop is recommended if the number of iterations is not fixed and the loop must be executed at least once.
An exit control loop is a Java do-while loop. In contrast to while and for loops, the do-while loop checks the condition at the end of the loop body. Because the condition is tested after the loop body, the Java do-while loop is executed at least once.
Syntax
Do{
//code to be executed / loop body
//update statement
}while (condition);
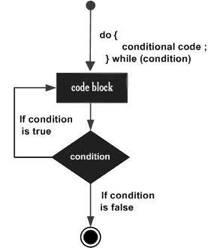
Fig 10: Flow chart
Example
Public class DoWhileExample {
Public static void main(String[] args) {
Int i=1;
Do{
System.out.println(i);
i++;
}while(i<=10);
}
}
Output
1
2
3
4
5
6
7
8
9
10
For
A for loop is a repetition control structure that allows you to design a loop that must be repeated a certain number of times quickly.
When you know how many times a task will be repeated, a for loop comes in handy.
● Initialize - When the loop begins, it executes the starting condition only once. We can either initialize the variable or use one that has already been initialized. It's a condition that can be turned off.
● Condition - It's the second condition that's run every time the loop's condition is tested. It keeps running until the condition is false. It must return either true or false as a boolean value. It's a condition that can be turned off.
● Increment / decrement - It increases or decreases the value of the variable. It's a condition that can be turned off.
● Statements - The loop's statement is performed every time the second condition is false.
Syntax
For(initialization; condition; increment/decrement){
//statement or code to be executed
}
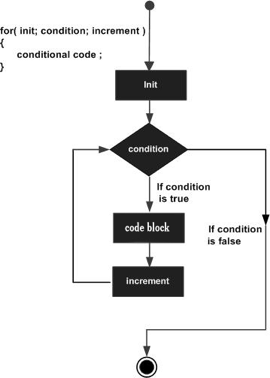
Fig 11: Flow diagram
Example
Public class Test {
Public static void main(String args[]) {
For(int x = 10; x < 20; x = x + 1) {
System.out.print("value of x : " + x );
System.out.print("\n");
}
}
}
Output
Value of x : 10
Value of x : 11
Value of x : 12
Value of x : 13
Value of x : 14
Value of x : 15
Value of x : 16
Value of x : 17
Value of x : 18
Value of x : 19
Nested loops
The term "nested for loop" refers to a for loop that is contained within another loop. When the outer loop executes, the inner loop completes.
Example
Public class NestedForExample {
Public static void main(String[] args) {
//loop of i
For(int i=1;i<=3;i++){
//loop of j
For(int j=1;j<=3;j++){
System.out.println(i+" "+j);
}//end of i
}//end of j
}
}
Output
1 1
1 2
1 3
2 1
2 2
2 3
3 1
3 2
3 3
In programming, there are certain situations when we want our code to execute some instructions repeatedly until the desired condition is met.
The above given situation can be implemented using the concept of loop. Loops are used to repeat the same instruction many times in succession.
Java provides us three types of looping statements as:
- For loop,
- While loop and
- Do-while loop.
1. For loop
Just like C and C++, for loop in Java is also same. A for loop is used to execute a set of code several times.
For loop consists of three parts. First part is used to initialize the loop variable, second part contains the condition and the third part increment/decrement the variable. For loop is defined in a single line.
Syntax of for loop:
For(initialization, condition, increment or decrement)
{
//block of statements to be executed
}
Example
Class Example
{
Public static void main(String[] args)
{
Int s = 1;
For(int i = 1; i<=5; i++) {
s = s + i;
}
System.out.println("The sum = " + s);
}
}
Output:
The sum = 6
2. While loop
The while loop statement is also used to repeat the execution of code multiple times.
While loops are preferable to use when we don’t know the exact number of iterations to be done in advance.
Here the initialization of variable and increment/decrement is done outside the loop statement.
In while loop the condition is checked first, if the condition is true then only execution will be done inside the loop; otherwise outside loop statements will be executed.
While loops are also know as entry controlled loop.
Syntax of while loop
While(condition){
//looping statements
}
Example
Class Example {
Public static void main(String[] args) {
Int a = 1;
System.out.println("The list of first 5 numbers \n");
While(a<=5) {
System.out.println(a);
a = a+ 1;
}
}
}
Output:
The list of first 5 even numbers
1
2
3
4
5
3. Do-while loop
In do-while loop statements are executed first then the condition is evaluated at the end of the loop.
It can we use on those places where we want to execute the statements at least once.
The do-while loops are also known as the exit controlled loop.
Syntax of do-while loop:
Do
{
Statements
} while (condition);
Example
Class Example {
Public static void main(String[] args) {
Int a = 1;
System.out.println("The list of first 5 numbers \n");
Do {
System.out.println(a);
a = a+ 1;
} while(a<=5)
}
}
For-each
Since J2SE 5.0, the Java for-each loop, sometimes known as the extended for loop, has been available. It offers a different way to traverse an array or collection in Java. It is mostly used to traverse the items of an array or collection. The for-each loop has the advantage of removing the potential of problems and making the code more readable. The for-each loop gets its name from the fact that it goes over each element one by one.
The improved for loop has the disadvantage of not being able to explore the components in reverse order. Because it does not work on an index basis, you do not have the option to skip any element. Furthermore, you can't just go through the odd or even elements.
However, for traversing the items of an array or collection, the Java for-each loop is preferable since it makes the code more understandable.
Advantages
● It improves the readability of the code.
● It eliminates the risk of programming mistakes.
Syntax
The data type with the variable is followed by a colon (:), then array or collection in the Java for-each loop syntax.
For(data_type variable : array | collection){
//body of for-each loop
}
In general, a method is a manner of accomplishing a goal. In Java, a method is a collection of instructions that accomplishes a specified goal. It ensures that code can be reused. Methods can also be used to easily alter code. We'll study what a method is in Java, the different sorts of methods, how to declare a method, and how to invoke a method in Java in this part.
What is a method in Java?
A method is a collection of statements or a series of statements organised together to conduct a specific task or action. It's a technique for making code more reusable. We create a method once and then use it repeatedly. We don't have to write code over and over again.
It also allows for easy code modification and readability by simply adding or removing code chunks. Only when we call or invoke the method is it executed.
Method Declaration
Method properties such as visibility, return-type, name, and parameters are all stated in the method declaration. As seen in the following diagram, it consists of six components known as method headers.
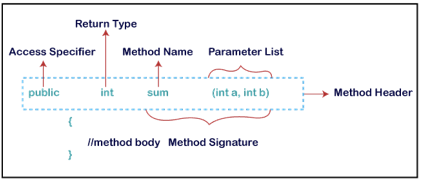
Fig 12: Method declaration
Method Signature: A method signature is a description of a method. It's included in the method declaration. It contains the method name as well as a list of parameters.
Access Specifier: The method's access specifier or modifier is the method's access type. It specifies the method's visibility. There are four different types of access specifiers in Java:
● public - When we utilise the public specifier in our application, all classes can access the method.
● private - The method is only accessible in the classes in which it is declared when we use a private access specifier.
● protected - The method is accessible within the same package or subclasses in a different package when we use the protected access specifier.
● default - When no access specifier is specified in the method declaration, Java uses the default access specifier. It is visible only from the same package only.
Return Type: The data type that the method returns is known as the return type. It could be a primitive data type, an object, a collection, or void, for example. The void keyword is used when a method does not return anything.
Method Name: It's a one-of-a-kind moniker that's used to specify a method's name. It must be appropriate for the method's functionality. If we're making a method for subtracting two numbers, the name of the method must be subtraction (). The name of a method is used to call it.
Parameter List: It consists of a list of parameters separated by a comma and contained in parentheses. It specifies the data type as well as the name of the variable. Leave the parenthesis blank if the method has no parameters.
Method Body: It's included in the method declaration. It contains all of the actions that must be completed. It is protected by a pair of curly braces.
Types of Method
There are two types of methods in Java:
● Predefined Method
● User-defined Method
Predefined Method
Predefined methods in Java are methods that are previously defined in the Java class libraries. It's also known as the built-in method or the standard library approach. We can use these methods directly by calling them at any time in the application. Length(), equals(), compareTo(), sqrt(), and other predefined methods are examples. When we call any of the predefined methods in our software, a set of codes relevant to that method run in the background, which are already saved in the library.
Every predefined method is contained within a class. The java.io.PrintStream class, for example, defines the print() function. It outputs the statement we typed into the method. For example, print("Java"), it prints Java on the console.
Example
Demo.java
Public class Demo
{
Public static void main(String[] args)
{
// using the max() method of Math class
System.out.print("The maximum number is: " + Math.max(9,7));
}
}
Output
The maximum number is: 9
We utilized three predefined methods in the preceding example: main(), print(), and max() (). Because these methods are predefined, we have utilised them without declaring them. The PrintStream class has a print() function that prints the result to the console. The greater of two numbers is returned by the max() function of the Math class.
User-defined Method
A user-defined method is a method that is written by the user or programmer. These strategies are tweaked to meet the needs of the situation.
How to Create a User-defined Method
Let's build a user-defined mechanism for determining whether an integer is even or odd. We'll start by defining the method.
//user defined method
Public static void findEvenOdd(int num)
{
//method body
If(num%2==0)
System.out.println(num+" is even");
Else
System.out.println(num+" is odd");
}
The following method, entitled find even odd, has been defined (). It has an int-type parameter called num. We used void because the method does not return any value. The procedures to determine whether a number is even or odd are contained in the method body. If the number is even, it will be printed as such; otherwise, it will be printed as odd.
Key takeaway
In general, a method is a manner of accomplishing a goal. In Java, a method is a collection of instructions that accomplishes a specified goal. It ensures that code can be reused. Methods can also be used to easily alter code.
Constructor Overloading
Like method overloading we can also do constructor overloading. Overloaded constructors in Java can be implemented in the same way as method overloading. We can have more than one constructor with different parameter list with same name. Each constructor performs a different task.
Compiler differentiates between each constructor on the basis of their parameter list.
Example of constructor loading is given below:
Class Add {
Int x;
Int y;
// Overloaded constructor takes two int parameters
Add(int a, int b)
{
x = a;
y = b;
}
// Overloaded constructor single int parameters
Add(int a)
{
x = y = a;
}
// Overloaded constructor takes no parameters
Add()
{
x = 6;
y = 5;
}
Int sum() {
Return x + y;
}
}
Class OverloadAdd{
Public static void main(String args[])
{
// create objects using the various constructors
Add cons1 = new Add(23, 1);
Add cons2 = new Add(8);
Add cons3 = new Add();
Int s;
s = cons1.sum()
System.out.println(“Sum of constructor1 =” + s);
s = cons2.sum()
System.out.println(“Sum of constructor2 =” + s);
s = cons3.sum()
System.out.println(“Sum of constructor3 =” + s);
}
}
Output
Sum of constructor1 = 24
Sum of constructor2 = 16
Sum of constructor3 = 11
Method Overloading
If a class has multiple methods having same name but different in parameters, it is known as Method Overloading.
If we have to perform only one operation, having same name of the methods increases the readability of the program.
Suppose you have to perform addition of the given numbers but there can be any number of arguments, if you write the method such as a(int,int) for two parameters, and b(int,int,int) for three parameters then it may be difficult for you as well as other programmers to understand the behavior of the method because its name differs.
So, we perform method overloading to figure out the program quickly.
Advantage of method overloading
Method overloading increases the readability of the program.
Different ways to overload the method
There are two ways to overload the method in java
- By changing number of arguments
- By changing the data type
In Java, Method Overloading is not possible by changing the return type of the method only.
1) Method Overloading: changing no. Of arguments
In this example, we have created two methods, first add() method performs addition of two numbers and second add method performs addition of three numbers.
In this example, we are creating static methods so that we don't need to create instance for calling methods.
- Class Adder{
- Static int add(int a,int b){return a+b;}
- Static int add(int a,int b,int c){return a+b+c;}
- }
- Class TestOverloading1{
- Public static void main(String[] args){
- System.out.println(Adder.add(11,11));
- System.out.println(Adder.add(11,11,11));
- }}
Output:
22
33
2) Method Overloading: changing data type of arguments
In this example, we have created two methods that differs in data type. The first add method receives two integer arguments and second add method receives two double arguments.
- Class Adder{
- Static int add(int a, int b){return a+b;}
- Static double add(double a, double b){return a+b;}
- }
- Class TestOverloading2{
- Public static void main(String[] args){
- System.out.println(Adder.add(11,11));
- System.out.println(Adder.add(12.3,12.6));
- }}
Output:
22
24.9
Q) Why Method Overloading is not possible by changing the return type of method only?
In java, method overloading is not possible by changing the return type of the method only because of ambiguity. Let's see how ambiguity may occur:
- Class Adder{
- Static int add(int a,int b){return a+b;}
- Static double add(int a,int b){return a+b;}
- }
- Class TestOverloading3{
- Public static void main(String[] args){
- System.out.println(Adder.add(11,11));//ambiguity
- }}
Output:
Compile Time Error: method add(int,int) is already defined in class Adder
System.out.println(Adder.add(11,11)); //Here, how can java determine which sum() method should be called?
Note: Compile Time Error is better than Run Time Error. So, java compiler renders compiler time error if you declare the same method having same parameters.
Can we overload java main() method?
Yes, by method overloading. You can have any number of main methods in a class by method overloading. But JVM calls main() method which receives string array as arguments only. Let's see the simple example:
- Class TestOverloading4{
- Public static void main(String[] args){System.out.println("main with String[]");}
- Public static void main(String args){System.out.println("main with String");}
- Public static void main(){System.out.println("main without args");}
- }
Output:
Main with String[]
Key takeaway
Like method overloading we can also do constructor overloading. Overloaded constructors in Java can be implemented in the same way as method overloading. We can have more than one constructor with different parameter list with same name. Each constructor performs a different task.
If a class has multiple methods having same name but different in parameters, it is known as Method Overloading.
If we have to perform only one operation, having same name of the methods increases the readability of the program.
The Java Math class contains a number of methods for performing math calculations, including min(), max(), avg(), sin(), cos(), tan(), round(), ceil(), floor(), abs(), and so on.
Unlike several of the StrictMath class's numeric methods, all implementations of the Math class's equivalent function cannot be defined to produce the same results bit-for-bit. This flexibility allows for greater performance in situations when tight repeatability is not necessary.
The methods addExact(), subtractExact(), multiplyExact(), and toIntExact() throw an ArithmeticException if the size is int or long and the results exceed the range of value.
Overflow occurs only with a particular minimum or maximum value for other mathematical operations like increment, decrement, division, absolute value, and negation. It should be compared to the maximum and minimum values as needed.
Example
Public class JavaMathExample
{
Public static void main(String[] args)
{
Double x = 28;
Double y = 4;
// return the maximum of two numbers
System.out.println("Maximum number of x and y is: " +Math.max(x, y));
// return the square root of y
System.out.println("Square root of y is: " + Math.sqrt(y));
//returns 28 power of 4 i.e. 28*28*28*28
System.out.println("Power of x and y is: " + Math.pow(x, y));
// return the logarithm of given value
System.out.println("Logarithm of x is: " + Math.log(x));
System.out.println("Logarithm of y is: " + Math.log(y));
// return the logarithm of given value when base is 10
System.out.println("log10 of x is: " + Math.log10(x));
System.out.println("log10 of y is: " + Math.log10(y));
// return the log of x + 1
System.out.println("log1p of x is: " +Math.log1p(x));
// return a power of 2
System.out.println("exp of a is: " +Math.exp(x));
// return (a power of 2)-1
System.out.println("expm1 of a is: " +Math.expm1(x));
}
}
Output
Maximum number of x and y is: 28.0
Square root of y is: 2.0
Power of x and y is: 614656.0
Logarithm of x is: 3.332204510175204
Logarithm of y is: 1.3862943611198906
Log10 of x is: 1.4471580313422192
Log10 of y is: 0.6020599913279624
Log1p of x is: 3.367295829986474
Exp of a is: 1.446257064291475E12
Expm1 of a is: 1.446257064290475E12
Normally, an array is a collection of similar type of elements which has contiguous memory location.
Java array is an object which contains elements of a similar data type. Additionally, The elements of an array are stored in a contiguous memory location. It is a data structure where we store similar elements. We can store only a fixed set of elements in a Java array.
Array in Java is index-based, the first element of the array is stored at the 0th index, 2nd element is stored on 1st index and so on.
Unlike C/C++, we can get the length of the array using the length member. In C/C++, we need to use the sizeof operator.
In Java, array is an object of a dynamically generated class. Java array inherits the Object class, and implements the Serializable as well as Cloneable interfaces. We can store primitive values or objects in an array in Java. Like C/C++, we can also create single dimensional or multidimensional arrays in Java.
Moreover, Java provides the feature of anonymous arrays which is not available in C/C++.
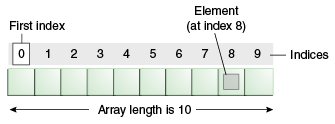
Fig 13: Example
Advantages
● Code Optimization: It makes the code optimized, we can retrieve or sort the data efficiently.
● Random access: We can get any data located at an index position.
Disadvantages
● Size Limit: We can store only the fixed size of elements in the array. It doesn't grow its size at runtime. To solve this problem, collection framework is used in Java which grows automatically.
Types of Array in java
There are two types of array.
● Single Dimensional Array
● Multidimensional Array
Single Dimensional Array in Java
Syntax to Declare an Array in Java
- DataType[] arr; (or)
- DataType []arr; (or)
- DataType arr[];
Instantiation of an Array in Java
ArrayRefVar=new datatype[size];
Example of Java Array
Let's see the simple example of java array, where we are going to declare, instantiate, initialize and traverse an array.
- //Java Program to illustrate how to declare, instantiate, initialize
- //and traverse the Java array.
- Class Testarray{
- Public static void main(String args[]){
- Int a[]=new int[5];//declaration and instantiation
- a[0]=10;//initialization
- a[1]=20;
- a[2]=70;
- a[3]=40;
- a[4]=50;
- //traversing array
- For(int i=0;i<a.length;i++)//length is the property of array
- System.out.println(a[i]);
- }}
Output:
10
20
70
40
50
Declaration, Instantiation and Initialization of Java Array
We can declare, instantiate and initialize the java array together by:
- Int a[]={33,3,4,5};//declaration, instantiation and initialization
Let's see the simple example to print this array.
- //Java Program to illustrate the use of declaration, instantiation
- //and initialization of Java array in a single line
- Class Testarray1{
- Public static void main(String args[]){
- Int a[]={33,3,4,5};//declaration, instantiation and initialization
- //printing array
- For(int i=0;i<a.length;i++)//length is the property of array
- System.out.println(a[i]);
- }}
Output:
33
3
4
5
Passing Array to a Method in Java
We can pass the java array to method so that we can reuse the same logic on any array.
Let's see the simple example to get the minimum number of an array using a method.
- //Java Program to demonstrate the way of passing an array
- //to method.
- Class Testarray2{
- //creating a method which receives an array as a parameter
- Static void min(int arr[]){
- Int min=arr[0];
- For(int i=1;i<arr.length;i++)
- If(min>arr[i])
- Min=arr[i];
- System.out.println(min);
- }
- Public static void main(String args[]){
- Int a[]={33,3,4,5};//declaring and initializing an array
- Min(a);//passing array to method
- }}
Output:
3
Returning Array from the Method
We can also return an array from the method in Java.
- //Java Program to return an array from the method
- Class TestReturnArray{
- //creating method which returns an array
- Static int[] get(){
- Return new int[]{10,30,50,90,60};
- }
- Public static void main(String args[]){
- //calling method which returns an array
- Int arr[]=get();
- //printing the values of an array
- For(int i=0;i<arr.length;i++)
- System.out.println(arr[i]);
- }}
Output:
10
30
50
90
60
Multidimensional Array in Java
In such case, data is stored in row and column based index (also known as matrix form).
Syntax to Declare Multidimensional Array in Java
- DataType[][] arrayRefVar; (or)
- DataType [][]arrayRefVar; (or)
- DataType arrayRefVar[][]; (or)
- DataType []arrayRefVar[];
Example to instantiate Multidimensional Array in Java
- Int[][] arr=new int[3][3];//3 row and 3 column
Example to initialize Multidimensional Array in Java
- Arr[0][0]=1;
- Arr[0][1]=2;
- Arr[0][2]=3;
- Arr[1][0]=4;
- Arr[1][1]=5;
- Arr[1][2]=6;
- Arr[2][0]=7;
- Arr[2][1]=8;
- Arr[2][2]=9;
Example of Multidimensional Java Array
Let's see the simple example to declare, instantiate, initialize and print the 2Dimensional array.
- //Java Program to illustrate the use of multidimensional array
- Class Testarray3{
- Public static void main(String args[]){
- //declaring and initializing 2D array
- Int arr[][]={{1,2,3},{2,4,5},{4,4,5}};
- //printing 2D array
- For(int i=0;i<3;i++){
- For(int j=0;j<3;j++){
- System.out.print(arr[i][j]+" ");
- }
- System.out.println();
- }
- }}
Output:
1 2 3
2 4 5
4 4 5
Multiplication of 2 Matrices in Java
In the case of matrix multiplication, a one-row element of the first matrix is multiplied by all the columns of the second matrix which can be understood by the image given below.
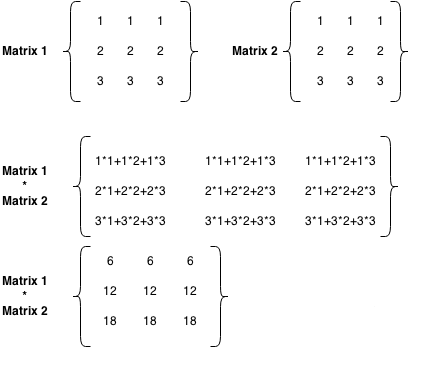
Fig 14: Matrix example
Let's see a simple example to multiply two matrices of 3 rows and 3 columns.
- //Java Program to multiply two matrices
- Public class MatrixMultiplicationExample{
- Public static void main(String args[]){
- //creating two matrices
- Int a[][]={{1,1,1},{2,2,2},{3,3,3}};
- Int b[][]={{1,1,1},{2,2,2},{3,3,3}};
- //creating another matrix to store the multiplication of two matrices
- Int c[][]=new int[3][3]; //3 rows and 3 columns
- //multiplying and printing multiplication of 2 matrices
- For(int i=0;i<3;i++){
- For(int j=0;j<3;j++){
- c[i][j]=0;
- For(int k=0;k<3;k++)
- {
- c[i][j]+=a[i][k]*b[k][j];
- }//end of k loop
- System.out.print(c[i][j]+" "); //printing matrix element
- }//end of j loop
- System.out.println();//new line
- }
- }}
Output:
6 6 6
12 12 12
18 18 18
Key takeaway
Java array is an object which contains elements of a similar data type. Additionally, the elements of an array are stored in a contiguous memory location. It is a data structure where we store similar elements. We can store only a fixed set of elements in a Java array.
Array in Java is index-based, the first element of the array is stored at the 0th index, 2nd element is stored on 1st index and so on.
Unlike C/C++, we can get the length of the array using the length member. In C/C++, we need to use the sizeof operator.
References:
1. T. Budd (2009), An Introduction to Object Oriented Programming, 3rd edition, Pearson Education, India.
2. J. Nino, F. A. Hosch (2002), An Introduction to programming and OO design using Java, John Wiley & sons, New Jersey.
3. Y. Daniel Liang (2010), Introduction to Java programming, 7th edition, Pearson education, India.
4. Object Oriented Programming with C++ by E Balagurusamy, Fifth Edition, TMH.
References:
- T. Budd (2009), An Introduction to Object Oriented Programming, 3rd edition, Pearson Education, India.
- J. Nino, F. A. Hosch (2002), An Introduction to programming and OO design using Java, John Wiley & sons, New Jersey.
- Y. Daniel Liang (2010), Introduction to Java programming, 7th edition, Pearson education, India.
- Object Oriented Programming with C++ by E Balagurusamy, Fifth Edition, TMH.
5.Introduction to Java Programming: Liang, Pearson Education, 7th Edition.