Unit - 3
Interfaces and Packages
In Java, an interface is a reference type. It's comparable to a class. It consists of a set of abstract methods. When a class implements an interface, it inherits the interface's abstract methods.
An interface may also have constants, default methods, static methods, and nested types in addition to abstract methods. Method bodies are only available for default and static methods.
The process of creating an interface is identical to that of creating a class. A class, on the other hand, describes an object's features and behaviors. An interface, on the other hand, contains the behaviors that a class implements.
Unless the interface's implementation class is abstract, all of the interface's methods must be declared in the class.
In the following ways, an interface is analogous to a class:
● Any number of methods can be included in an interface.
● An interface is written in a file with the extension.java, with the interface's name matching the file's name.
● A.class file contains the byte code for an interface.
● Packages have interfaces, and the bytecode file for each must be in the same directory structure as the package name.
Why do we use interfaces?
There are three primary reasons to utilize an interface. Below is a list of them.
● It's a technique for achieving abstraction.
● We can offer various inheritance functionality via an interface.
● It's useful for achieving loose coupling.
Declaration
The interface keyword is used to declare an interface. All methods in an interface are declared with an empty body, and all fields are public, static, and final by default. A class that implements an interface is required to implement all of the interface's functions.
Syntax
Interface <interface_name>{
// declare constant fields
// declare methods that abstract
// by default.
}
Key takeaway
In Java, an interface is a reference type.
An interface may also have constants, default methods, static methods, and nested types in addition to abstract methods.
When a class implements an interface, it's like the class signing a contract, agreeing to perform the interface's defined actions. If a class doesn't perform all of the interface's actions, it must declare itself abstract.
To implement an interface, a class utilizes the implements keyword. Following the extends component of the declaration, the implements keyword appears in the class declaration.
Example
/* File name : MammalInt.java */
Public class MammalInt implements Animal {
Public void eat() {
System.out.println("Mammal eats");
}
Public void travel() {
System.out.println("Mammal travels");
}
Public int noOfLegs() {
Return 0;
}
Public static void main(String args[]) {
MammalInt m = new MammalInt();
m.eat();
m.travel();
}
}
Output
Mammal eats
Mammal travels
There are a few principles to follow when overriding methods specified in interfaces.
● Checked exceptions should not be declared on implementation methods other than those specified by the interface method or their subclasses.
● When overriding the methods, keep the signature of the interface method and the same return type or subtype.
● Interface methods do not need to be implemented if the implementation class is abstract.
When it comes to implementing interfaces, there are a few guidelines to follow.
● At any given time, a class can implement multiple interfaces.
● A class can only extend one other class while implementing several interfaces.
● In the same manner that a class can extend another class, an interface can extend another interface.
Variables can be declared as object references that use an interface instead of a class.
Such a variable can refer to any instance that implements the stated interface.
When you use one of these references to invoke a method, the right version is used based on the actual instance of the interface being referred to.
This is one of the most important characteristics of interfaces. The method to be executed is dynamically looked up at runtime, allowing classes to be built after the code that calls methods on them.
This is analogous to accessing a subclass object using a superclass reference.
The callback() function is invoked in the following example using an interface reference variable:
Interface Callback {
Void callback(int param);
}
Class Client implements Callback {
// Implement Callback's interface
Public void callback(int p) {
System.out.println("callback called with " + p);
}
Void aa() {
System.out.println("hi.");
}
}
Public class Main{
Public static void main(String args[]) {
Callback c = new Client();
c.callback(42);
}
}
The following is the program's output:
Despite the fact that the variable c is of the interface type Callback, it has been assigned an instance of Client.
The callback() method can be used using c, but it cannot access any other members of the Client class.
Only the methods declared by the interface declaration are known to an interface reference variable.
As a result, because aa() is defined by Client but not Callback, c could not be used to access it.
Key takeaway
Variables can be declared as object references that use an interface instead of a class type.
In the same manner that a class can extend another class, an interface can extend another interface. When you use the extends keyword to extend an interface, the new interface inherits the parent interface's methods.
Hockey and Football interfaces are added to the Sports interface below.
Example
// Filename: Sports.java
Public interface Sports {
Public void setHomeTeam(String name);
Public void setVisitingTeam(String name);
}
// Filename: Football.java
Public interface Football extends Sports {
Public void homeTeamScored(int points);
Public void visitingTeamScored(int points);
Public void endOfQuarter(int quarter);
}
// Filename: Hockey.java
Public interface Hockey extends Sports {
Public void homeGoalScored();
Public void visitingGoalScored();
Public void endOfPeriod(int period);
Public void overtimePeriod(int ot);
}
Hockey has four methods, but it inherits two from Sports; as a result, a class that implements Hockey must implement all six methods. Similarly, a class that implements Football must specify the three Football methods as well as the two Sports methods.
A java package is a group of similar types of classes, interfaces and sub-packages.
Package in java can be categorized in two form, built-in package and user-defined package.
There are many built-in packages such as java, lang, awt, javax, swing, net, io, util, sql etc.
Advantage of Java Package
1) Java package is used to categorize the classes and interfaces so that they can be easily maintained.
2) Java package provides access protection.
3) Java package removes naming collision.
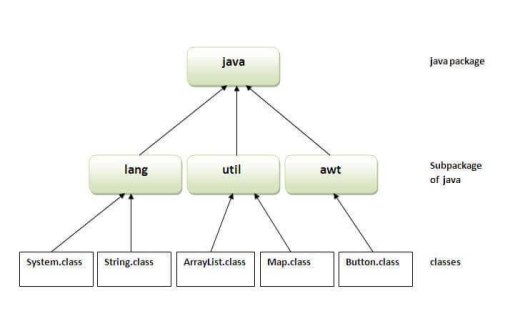
Fig 1 - Package
Simple example of java package
The package keyword is used to create a package in java.
- //save as Simple.java
- Package mypack;
- Public class Simple{
- Public static void main(String args[]){
- System.out.println("Welcome to package");
- }
- }
How to compile java package
If you are not using any IDE, you need to follow the syntax given below:
- Javac -d directory javafilename
For example
Javac -d . Simple.java
The -d switch specifies the destination where to put the generated class file. You can use any directory name like /home (in case of Linux), d:/abc (in case of windows) etc. If you want to keep the package within the same directory, you can use . (dot).
How to run java package program
You need to use fully qualified name e.g. Mypack.Simple etc to run the class.
To Compile: javac -d . Simple.java
To Run: java mypack.Simple
Output: Welcome to package
The -d is a switch that tells the compiler where to put the class file i.e. it represents destination. The . Represents the current folder.
How to access package from another package?
There are three ways to access the package from outside the package.
- Import package.*;
- Import package.classname;
- Fully qualified name.
1) Using packagename.*
If you use package.* then all the classes and interfaces of this package will be accessible but not subpackages.
The import keyword is used to make the classes and interface of another package accessible to the current package.
Example of package that import the packagename.*
- //save by A.java
- Package pack;
- Public class A{
- Public void msg(){System.out.println("Hello");}
- }
- //save by B.java
- Package mypack;
- Import pack.*;
- Class B{
- Public static void main(String args[]){
- A obj = new A();
- Obj.msg();
- }
- }
Output: Hello
2) Using packagename.classname
If you import package.classname then only declared class of this package will be accessible.
Example of package by import package.classname
- //save by A.java
- Package pack;
- Public class A{
- Public void msg(){System.out.println("Hello");}
- }
- //save by B.java
- Package mypack;
- Import pack.A;
- Class B{
- Public static void main(String args[]){
- A obj = new A();
- Obj.msg();
- }
- }
Output: Hello
3) Using fully qualified name
If you use fully qualified name then only declared class of this package will be accessible. Now there is no need to import. But you need to use fully qualified name every time when you are accessing the class or interface.
It is generally used when two packages have same class name e.g. Java.util and java.sql packages contain Date class.
Example of package by import fully qualified name
- //save by A.java
- Package pack;
- Public class A{
- Public void msg(){System.out.println("Hello");}
- }
- //save by B.java
- Package mypack;
- Class B{
- Public static void main(String args[]){
- Pack.A obj = new pack.A();//using fully qualified name
- Obj.msg();
- }
- }
Output: Hello
Note: If you import a package, subpackages will not be imported.
If you import a package, all the classes and interface of that package will be imported excluding the classes and interfaces of the subpackages. Hence, you need to import the subpackage as well.
Note: Sequence of the program must be package then import then class.
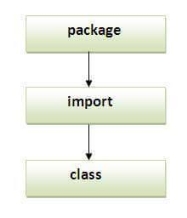
Fig 2 - Sequence
Subpackage in java
Package inside the package is called the subpackage. It should be created to categorize the package further.
Let's take an example, Sun Microsystem has defined a package named java that contains many classes like System, String, Reader, Writer, Socket etc. These classes represent a particular group e.g. Reader and Writer classes are for Input/Output operation, Socket and ServerSocket classes are for networking etc and so on. So, Sun has subcategorized the java package into subpackages such as lang, net, io etc. and put the Input/Output related classes in io package, Server and ServerSocket classes in net packages and so on.
The standard of defining a package is domain.company.package e.g. Com.javatpoint.bean or org.sssit.dao.
Example of Subpackage
- Package com.javatpoint.core;
- Class Simple{
- Public static void main(String args[]){
- System.out.println("Hello subpackage");
- }
- }
To Compile: javac -d . Simple.java
To Run: java com.javatpoint.core.Simple
Output: Hello subpackage
How to send the class file to another directory or drive?
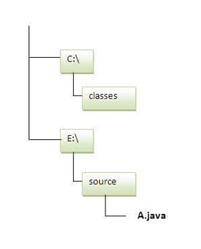
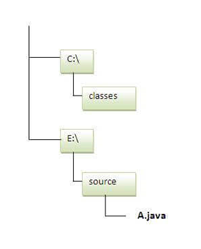
There is a scenario, I want to put the class file of A.java source file in classes folder of c: drive. For example:
- //save as Simple.java
- Package mypack;
- Public class Simple{
- Public static void main(String args[]){
- System.out.println("Welcome to package");
- }
- }
To Compile:
e:\sources> javac -d c:\classes Simple.java
To Run:
To run this program from e:\source directory, you need to set classpath of the directory where the class file resides.
e:\sources> set classpath=c:\classes;.;
e:\sources> java mypack.Simple
Another way to run this program by -classpath switch of java:
The -classpath switch can be used with javac and java tool.
To run this program from e:\source directory, you can use -classpath switch of java that tells where to look for class file. For example:
e:\sources> java -classpath c:\classes mypack.Simple
Output:Welcome to package
Ways to load the class files or jar files
There are two ways to load the class files temporary and permanent.
● Temporary
- By setting the classpath in the command prompt
- By -classpath switch
● Permanent
- By setting the classpath in the environment variables
- By creating the jar file, that contains all the class files, and copying the jar file in the jre/lib/ext folder.
Rule: There can be only one public class in a java source file and it must be saved by the public class name.
- //save as C.java otherwise Compile Time Error
- Class A{}
- Class B{}
- Public class C{}
How to put two public classes in a package?
If you want to put two public classes in a package, have two java source files containing one public class, but keep the package name same. For example:
- //save as A.java
- Package javatpoint;
- Public class A{}
- //save as B.java
- Package javatpoint;
- Public class B{}
Advantages
1) The Java package is used to organize the classes and interfaces in order to make them easier to maintain.
2) Access control is provided via the Java package.
3) The Java package eliminates naming conflicts.
Access protection
The scope of the class and its members is defined by access modifiers (data and methods). Private members, for example, can be accessed by other members of the same class (methods). Java has several degrees of security that allow members (variables and methods) within classes, subclasses, and packages to be visible.
Packages are used to encapsulate information and act as containers for classes and subpackages. Data and methods are contained in classes. When it comes to the visibility of class members between classes and packages, Java offers four options:
● Subclasses in the same package
● Non-subclasses in the same package
● Subclasses in different packages
● Classes that are neither in the same package nor subclasses
These categories require a variety of access methods, which are provided by the three main access modifiers private, public, and protected.
Simply remember that private can only be seen within its class, public can be seen from anyone, and protected can only be accessed in subclasses within the hierarchy.
There are just two access modifiers that a class can have: default and public. If a class has default access, it can only be accessed by other code inside the same package. However, if the class is public, it can be accessed from anywhere by any code.
Key takeaway
A java package is a group of similar types of classes, interfaces and sub-packages.
Package in java can be categorized in two form, built-in package and user-defined package.
There are many built-in packages such as java, lang, awt, javax, swing, net, io, util, sql etc.
CLASSPATH: CLASSPATH is an environment variable which is used by Application ClassLoader to locate and load the .class files. The CLASSPATH defines the path, to find third-party and user-defined classes that are not extensions or part of Java platform. Include all the directories which contain .class files and JAR files when setting the CLASSPATH.
You need to set the CLASSPATH if:
● You need to load a class that is not present in the current directory or any sub-directories.
● You need to load a class that is not in a location specified by the extensions mechanism.
The CLASSPATH depends on what you are setting the CLASSPATH. The CLASSPATH has a directory name or file name at the end. The following points describe what should be the end of the CLASSPATH.
● If a JAR or zip, the file contains class files, the CLASSPATH end with the name of the zip or JAR file.
● If class files placed in an unnamed package, the CLASSPATH ends with the directory that contains the class files.
● If class files placed in a named package, the CLASSPATH ends with the directory that contains the root package in the full package name, that is the first package in the full package name.
The default value of CLASSPATH is a dot (.). It means the only current directory searched. The default value of CLASSPATH overrides when you set the CLASSPATH variable or using the -classpath command (for short -cp). Put a dot (.) in the new setting if you want to include the current directory in the search path.
If CLASSPATH finds a class file which is present in the current directory, then it will load the class and use it, irrespective of the same name class presents in another directory which is also included in the CLASSPATH.
If you want to set multiple classpaths, then you need to separate each CLASSPATH by a semicolon (;).
The third-party applications (MySQL and Oracle) that use the JVM can modify the CLASSPATH environment variable to include the libraries they use. The classes can be stored in directories or archives files. The classes of the Java platform are stored in rt.jar.
There are two ways to ways to set CLASSPATH: through Command Prompt or by setting Environment Variable.
Let's see how to set CLASSPATH of MySQL database:
Step 1: Click on the Windows button and choose Control Panel. Select System.

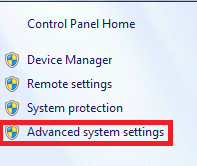
Step 2: Click on Advanced System Settings.
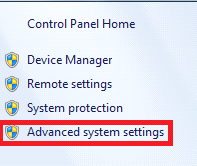
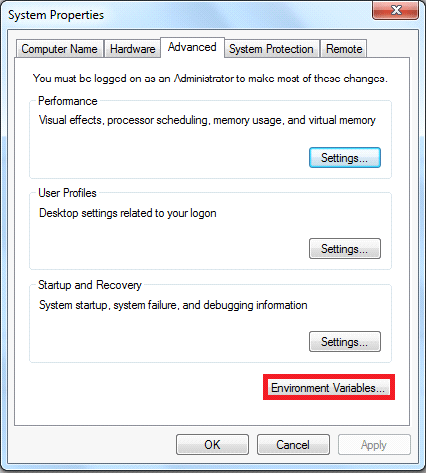
Step 3: A dialog box will open. Click on Environment Variables.
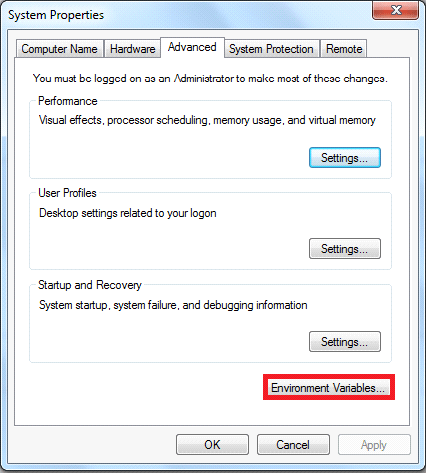
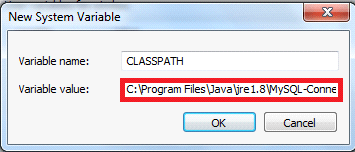
Step 4: If the CLASSPATH already exists in System Variables, click on the Edit button then put a semicolon (;) at the end. Paste the Path of MySQL-Connector Java.jar file.
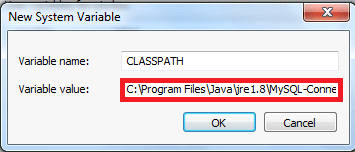
If the CLASSPATH doesn't exist in System Variables, then click on the New button and type Variable name as CLASSPATH and Variable value as C:\Program Files\Java\jre1.8\MySQL-Connector Java.jar;.;
Remember: Put ;.; at the end of the CLASSPATH.
Difference between PATH and CLASSPATH
PATH | CLASSPATH |
PATH is an environment variable. | CLASSPATH is also an environment variable. |
It is used by the operating system to find the executable files (.exe). | It is used by Application ClassLoader to locate the .class file. |
You are required to include the directory which contains .exe files. | You are required to include all the directories which contain .class and JAR files. |
PATH environment variable once set, cannot be overridden. | The CLASSPATH environment variable can be overridden by using the command line option -cp or -CLASSPATH to both javac and java command. |
How to Set CLASSPATH in Windows Using Command Prompt
Type the following command in your Command Prompt and press enter.
Set CLASSPATH=%CLASSPATH%;C:\Program Files\Java\jre1.8\rt.jar;
In the above command, The set is an internal DOS command that allows the user to change the variable value. CLASSPATH is a variable name. The variable enclosed in percentage sign (%) is an existing environment variable. The semicolon is a separator, and after the (;) there is the PATH of rt.jar file.
How ext folder works in Java
The ext directory works a bit like the CLASSPATH. Ext directory is the part of the class loading mechanism. The classes which are available within JARs in the ext directory are available to Java applications.
The following table demonstrates the key difference between the CLASSPATH and Extension Mechanism:
Characteristics | CLASSPATH | Extension Mechanism |
Class loading order | CLASSPATH loads after bootstrap and extension loading. | Ext loads after bootstrap loading but before CLASSPATH loading. |
Scope | It is an application specific. All JREs on the host is the CLASSPATH environment variable. | All JVMs are running in specific JRE java.ext.dirs. |
Package name | Java.class.path is used to find the directories and JAR archives containing class files. | Java.ext.dirs is used to specify where the extension mechanism loads classes. |
Specification | It is specified by name including the extension.jar and directory containing .class files. | All JAR files in specified directories are loaded. |
The mechanism will pick up all .jar files from the extension directory even if the file does not have the .jar extension. The implementation of this is that if one can change the name of a jar placed in a classpath directory to have an extension other than .jar. The wildcard (*) does not pick it up. This technique will not work with the extension directory.
Let's understand the execution process through an example.
A.java
- Public class A
- {
- Public String toString()
- {
- Return "hello";
- }
- }
B.java
- Public class B
- {
- Public static void main(final String[] args)
- {
- System.out.println(new A());
- }
- }
Compile the A.java file. We will archive the compiled A.class file into A.jar. Place this JAR file into another directory than the compiled B.class file.
To demonstrate the use of the classpath, we place the A.jar file in a directory C:\JavaPrograms and will access that JAR through wildcard (*) for B to use.
We found that B can still load the A.class while we had deleted it from the current directory. The Java launcher was explicitly looked for C:\JavaProgram. It is also possible to have the class loaded without its presence in the same directory and explicit classpath specification.
It is often referred to as a benefit of Using the extension mechanism because all applications which are using that JRE can see the same classes without the need to specify them on the classpath explicitly.
What happens if we change the name of A.jar into A.backup in the same CLASSPATH-referenced directory. NoClassDefFoundError is encountered when we do the same because the CLASSPATH-reference does not have the .jar extension.
Key takeaway
CLASSPATH is an environment variable which is used by Application ClassLoader to locate and load the .class files. The CLASSPATH defines the path, to find third-party and user-defined classes that are not extensions or part of Java platform. Include all the directories which contain .class files and JAR files when setting the CLASSPATH.
Java Packages & API
A package in Java is used to group related classes. Think of it as a folder in a file directory. We use packages to avoid name conflicts, and to write a better maintainable code. Packages are divided into two categories:
● Built-in Packages (packages from the Java API)
● User-defined Packages (create your own packages)
Built-in Packages
The Java API is a library of prewritten classes, that are free to use, included in the Java Development Environment.
The library contains components for managing input, database programming, and much more.
The library is divided into packages and classes. Meaning you can either import a single class (along with its methods and attributes), or a whole package that contain all the classes that belong to the specified package.
To use a class or a package from the library, you need to use the import keyword:
Syntax
Import package.name.Class; // Import a single class
Import package.name.*; // Import the whole package
Import a Class
If you find a class you want to use, for example, the Scanner class, which is used to get user input, write the following code:
Example
Import java.util.Scanner;
In the example above, java.util is a package, while Scanner is a class of the java.util package.
To use the Scanner class, create an object of the class and use any of the available methods found in the Scanner class documentation. In our example, we will use the nextLine() method, which is used to read a complete line:
Example
Using the Scanner class to get user input:
Import java.util.Scanner;
Class MyClass {
Public static void main(String[] args) {
Scanner myObj = new Scanner(System.in);
System.out.println("Enter username");
String userName = myObj.nextLine();
System.out.println("Username is: " + userName);
}
}
Import a Package
There are many packages to choose from. In the previous example, we used the Scanner class from the java.util package. This package also contains date and time facilities, random-number generator and other utility classes.
To import a whole package, end the sentence with an asterisk sign (*). The following example will import ALL the classes in the java.util package:
Example
Import java.util.*;
User-defined Packages
To create your own package, you need to understand that Java uses a file system directory to store them. Just like folders on your computer:
Example
└── root
└── mypack
└── MyPackageClass.java
To create a package, use the package keyword:
MyPackageClass.java
Package mypack;
Class MyPackageClass {
Public static void main(String[] args) {
System.out.println("This is my package!");
}
}
Save the file as MyPackageClass.java, and compile it:
C:\Users\Your Name>javac MyPackageClass.java
Then compile the package:
C:\Users\Your Name>javac -d . MyPackageClass.java
This forces the compiler to create the "mypack" package.
The -d keyword specifies the destination for where to save the class file. You can use any directory name, like c:/user (windows), or, if you want to keep the package within the same directory, you can use the dot sign ".", like in the example above.
Note: The package name should be written in lower case to avoid conflict with class names.
When we compiled the package in the example above, a new folder was created, called "mypack".
To run the MyPackageClass.java file, write the following:
C:\Users\Your Name>java mypack.MyPackageClass
The output will be:
This is my package!
Key takeaway
A package in Java is used to group related classes. Think of it as a folder in a file directory. We use packages to avoid name conflicts, and to write a better maintainable code. Packages are divided into two categories:
● Built-in Packages (packages from the Java API)
● User-defined Packages (create your own packages)
References:
1. T. Budd (2009), An Introduction to Object Oriented Programming, 3rd edition, Pearson Education, India.
2. J. Nino, F. A. Hosch (2002), An Introduction to programming and OO design using Java, John Wiley & sons, New Jersey.
3. Y. Daniel Liang (2010), Introduction to Java programming, 7th edition, Pearson education, India.
4. Object Oriented Programming with C++ by E Balagurusamy, Fifth Edition, TMH.
Unit - 3
Interfaces and Packages
In Java, an interface is a reference type. It's comparable to a class. It consists of a set of abstract methods. When a class implements an interface, it inherits the interface's abstract methods.
An interface may also have constants, default methods, static methods, and nested types in addition to abstract methods. Method bodies are only available for default and static methods.
The process of creating an interface is identical to that of creating a class. A class, on the other hand, describes an object's features and behaviors. An interface, on the other hand, contains the behaviors that a class implements.
Unless the interface's implementation class is abstract, all of the interface's methods must be declared in the class.
In the following ways, an interface is analogous to a class:
● Any number of methods can be included in an interface.
● An interface is written in a file with the extension.java, with the interface's name matching the file's name.
● A.class file contains the byte code for an interface.
● Packages have interfaces, and the bytecode file for each must be in the same directory structure as the package name.
Why do we use interfaces?
There are three primary reasons to utilize an interface. Below is a list of them.
● It's a technique for achieving abstraction.
● We can offer various inheritance functionality via an interface.
● It's useful for achieving loose coupling.
Declaration
The interface keyword is used to declare an interface. All methods in an interface are declared with an empty body, and all fields are public, static, and final by default. A class that implements an interface is required to implement all of the interface's functions.
Syntax
Interface <interface_name>{
// declare constant fields
// declare methods that abstract
// by default.
}
Key takeaway
In Java, an interface is a reference type.
An interface may also have constants, default methods, static methods, and nested types in addition to abstract methods.
When a class implements an interface, it's like the class signing a contract, agreeing to perform the interface's defined actions. If a class doesn't perform all of the interface's actions, it must declare itself abstract.
To implement an interface, a class utilizes the implements keyword. Following the extends component of the declaration, the implements keyword appears in the class declaration.
Example
/* File name : MammalInt.java */
Public class MammalInt implements Animal {
Public void eat() {
System.out.println("Mammal eats");
}
Public void travel() {
System.out.println("Mammal travels");
}
Public int noOfLegs() {
Return 0;
}
Public static void main(String args[]) {
MammalInt m = new MammalInt();
m.eat();
m.travel();
}
}
Output
Mammal eats
Mammal travels
There are a few principles to follow when overriding methods specified in interfaces.
● Checked exceptions should not be declared on implementation methods other than those specified by the interface method or their subclasses.
● When overriding the methods, keep the signature of the interface method and the same return type or subtype.
● Interface methods do not need to be implemented if the implementation class is abstract.
When it comes to implementing interfaces, there are a few guidelines to follow.
● At any given time, a class can implement multiple interfaces.
● A class can only extend one other class while implementing several interfaces.
● In the same manner that a class can extend another class, an interface can extend another interface.
Variables can be declared as object references that use an interface instead of a class.
Such a variable can refer to any instance that implements the stated interface.
When you use one of these references to invoke a method, the right version is used based on the actual instance of the interface being referred to.
This is one of the most important characteristics of interfaces. The method to be executed is dynamically looked up at runtime, allowing classes to be built after the code that calls methods on them.
This is analogous to accessing a subclass object using a superclass reference.
The callback() function is invoked in the following example using an interface reference variable:
Interface Callback {
Void callback(int param);
}
Class Client implements Callback {
// Implement Callback's interface
Public void callback(int p) {
System.out.println("callback called with " + p);
}
Void aa() {
System.out.println("hi.");
}
}
Public class Main{
Public static void main(String args[]) {
Callback c = new Client();
c.callback(42);
}
}
The following is the program's output:
Despite the fact that the variable c is of the interface type Callback, it has been assigned an instance of Client.
The callback() method can be used using c, but it cannot access any other members of the Client class.
Only the methods declared by the interface declaration are known to an interface reference variable.
As a result, because aa() is defined by Client but not Callback, c could not be used to access it.
Key takeaway
Variables can be declared as object references that use an interface instead of a class type.
In the same manner that a class can extend another class, an interface can extend another interface. When you use the extends keyword to extend an interface, the new interface inherits the parent interface's methods.
Hockey and Football interfaces are added to the Sports interface below.
Example
// Filename: Sports.java
Public interface Sports {
Public void setHomeTeam(String name);
Public void setVisitingTeam(String name);
}
// Filename: Football.java
Public interface Football extends Sports {
Public void homeTeamScored(int points);
Public void visitingTeamScored(int points);
Public void endOfQuarter(int quarter);
}
// Filename: Hockey.java
Public interface Hockey extends Sports {
Public void homeGoalScored();
Public void visitingGoalScored();
Public void endOfPeriod(int period);
Public void overtimePeriod(int ot);
}
Hockey has four methods, but it inherits two from Sports; as a result, a class that implements Hockey must implement all six methods. Similarly, a class that implements Football must specify the three Football methods as well as the two Sports methods.
A java package is a group of similar types of classes, interfaces and sub-packages.
Package in java can be categorized in two form, built-in package and user-defined package.
There are many built-in packages such as java, lang, awt, javax, swing, net, io, util, sql etc.
Advantage of Java Package
1) Java package is used to categorize the classes and interfaces so that they can be easily maintained.
2) Java package provides access protection.
3) Java package removes naming collision.
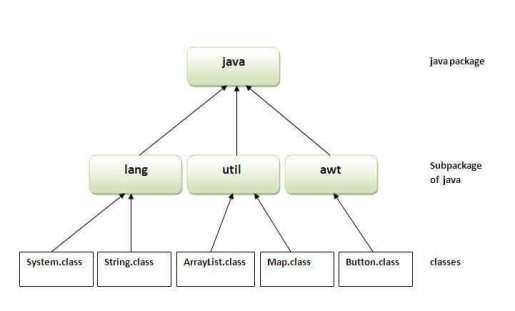
Fig 1 - Package
Simple example of java package
The package keyword is used to create a package in java.
- //save as Simple.java
- Package mypack;
- Public class Simple{
- Public static void main(String args[]){
- System.out.println("Welcome to package");
- }
- }
How to compile java package
If you are not using any IDE, you need to follow the syntax given below:
- Javac -d directory javafilename
For example
Javac -d . Simple.java
The -d switch specifies the destination where to put the generated class file. You can use any directory name like /home (in case of Linux), d:/abc (in case of windows) etc. If you want to keep the package within the same directory, you can use . (dot).
How to run java package program
You need to use fully qualified name e.g. Mypack.Simple etc to run the class.
To Compile: javac -d . Simple.java
To Run: java mypack.Simple
Output: Welcome to package
The -d is a switch that tells the compiler where to put the class file i.e. it represents destination. The . Represents the current folder.
How to access package from another package?
There are three ways to access the package from outside the package.
- Import package.*;
- Import package.classname;
- Fully qualified name.
1) Using packagename.*
If you use package.* then all the classes and interfaces of this package will be accessible but not subpackages.
The import keyword is used to make the classes and interface of another package accessible to the current package.
Example of package that import the packagename.*
- //save by A.java
- Package pack;
- Public class A{
- Public void msg(){System.out.println("Hello");}
- }
- //save by B.java
- Package mypack;
- Import pack.*;
- Class B{
- Public static void main(String args[]){
- A obj = new A();
- Obj.msg();
- }
- }
Output: Hello
2) Using packagename.classname
If you import package.classname then only declared class of this package will be accessible.
Example of package by import package.classname
- //save by A.java
- Package pack;
- Public class A{
- Public void msg(){System.out.println("Hello");}
- }
- //save by B.java
- Package mypack;
- Import pack.A;
- Class B{
- Public static void main(String args[]){
- A obj = new A();
- Obj.msg();
- }
- }
Output: Hello
3) Using fully qualified name
If you use fully qualified name then only declared class of this package will be accessible. Now there is no need to import. But you need to use fully qualified name every time when you are accessing the class or interface.
It is generally used when two packages have same class name e.g. Java.util and java.sql packages contain Date class.
Example of package by import fully qualified name
- //save by A.java
- Package pack;
- Public class A{
- Public void msg(){System.out.println("Hello");}
- }
- //save by B.java
- Package mypack;
- Class B{
- Public static void main(String args[]){
- Pack.A obj = new pack.A();//using fully qualified name
- Obj.msg();
- }
- }
Output: Hello
Note: If you import a package, subpackages will not be imported.
If you import a package, all the classes and interface of that package will be imported excluding the classes and interfaces of the subpackages. Hence, you need to import the subpackage as well.
Note: Sequence of the program must be package then import then class.
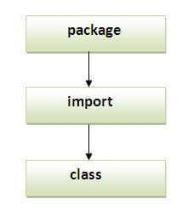
Fig 2 - Sequence
Subpackage in java
Package inside the package is called the subpackage. It should be created to categorize the package further.
Let's take an example, Sun Microsystem has defined a package named java that contains many classes like System, String, Reader, Writer, Socket etc. These classes represent a particular group e.g. Reader and Writer classes are for Input/Output operation, Socket and ServerSocket classes are for networking etc and so on. So, Sun has subcategorized the java package into subpackages such as lang, net, io etc. and put the Input/Output related classes in io package, Server and ServerSocket classes in net packages and so on.
The standard of defining a package is domain.company.package e.g. Com.javatpoint.bean or org.sssit.dao.
Example of Subpackage
- Package com.javatpoint.core;
- Class Simple{
- Public static void main(String args[]){
- System.out.println("Hello subpackage");
- }
- }
To Compile: javac -d . Simple.java
To Run: java com.javatpoint.core.Simple
Output: Hello subpackage
How to send the class file to another directory or drive?
There is a scenario, I want to put the class file of A.java source file in classes folder of c: drive. For example:
- //save as Simple.java
- Package mypack;
- Public class Simple{
- Public static void main(String args[]){
- System.out.println("Welcome to package");
- }
- }
To Compile:
e:\sources> javac -d c:\classes Simple.java
To Run:
To run this program from e:\source directory, you need to set classpath of the directory where the class file resides.
e:\sources> set classpath=c:\classes;.;
e:\sources> java mypack.Simple
Another way to run this program by -classpath switch of java:
The -classpath switch can be used with javac and java tool.
To run this program from e:\source directory, you can use -classpath switch of java that tells where to look for class file. For example:
e:\sources> java -classpath c:\classes mypack.Simple
Output:Welcome to package
Ways to load the class files or jar files
There are two ways to load the class files temporary and permanent.
● Temporary
- By setting the classpath in the command prompt
- By -classpath switch
● Permanent
- By setting the classpath in the environment variables
- By creating the jar file, that contains all the class files, and copying the jar file in the jre/lib/ext folder.
Rule: There can be only one public class in a java source file and it must be saved by the public class name.
- //save as C.java otherwise Compile Time Error
- Class A{}
- Class B{}
- Public class C{}
How to put two public classes in a package?
If you want to put two public classes in a package, have two java source files containing one public class, but keep the package name same. For example:
- //save as A.java
- Package javatpoint;
- Public class A{}
- //save as B.java
- Package javatpoint;
- Public class B{}
Advantages
1) The Java package is used to organize the classes and interfaces in order to make them easier to maintain.
2) Access control is provided via the Java package.
3) The Java package eliminates naming conflicts.
Access protection
The scope of the class and its members is defined by access modifiers (data and methods). Private members, for example, can be accessed by other members of the same class (methods). Java has several degrees of security that allow members (variables and methods) within classes, subclasses, and packages to be visible.
Packages are used to encapsulate information and act as containers for classes and subpackages. Data and methods are contained in classes. When it comes to the visibility of class members between classes and packages, Java offers four options:
● Subclasses in the same package
● Non-subclasses in the same package
● Subclasses in different packages
● Classes that are neither in the same package nor subclasses
These categories require a variety of access methods, which are provided by the three main access modifiers private, public, and protected.
Simply remember that private can only be seen within its class, public can be seen from anyone, and protected can only be accessed in subclasses within the hierarchy.
There are just two access modifiers that a class can have: default and public. If a class has default access, it can only be accessed by other code inside the same package. However, if the class is public, it can be accessed from anywhere by any code.
Key takeaway
A java package is a group of similar types of classes, interfaces and sub-packages.
Package in java can be categorized in two form, built-in package and user-defined package.
There are many built-in packages such as java, lang, awt, javax, swing, net, io, util, sql etc.
CLASSPATH: CLASSPATH is an environment variable which is used by Application ClassLoader to locate and load the .class files. The CLASSPATH defines the path, to find third-party and user-defined classes that are not extensions or part of Java platform. Include all the directories which contain .class files and JAR files when setting the CLASSPATH.
You need to set the CLASSPATH if:
● You need to load a class that is not present in the current directory or any sub-directories.
● You need to load a class that is not in a location specified by the extensions mechanism.
The CLASSPATH depends on what you are setting the CLASSPATH. The CLASSPATH has a directory name or file name at the end. The following points describe what should be the end of the CLASSPATH.
● If a JAR or zip, the file contains class files, the CLASSPATH end with the name of the zip or JAR file.
● If class files placed in an unnamed package, the CLASSPATH ends with the directory that contains the class files.
● If class files placed in a named package, the CLASSPATH ends with the directory that contains the root package in the full package name, that is the first package in the full package name.
The default value of CLASSPATH is a dot (.). It means the only current directory searched. The default value of CLASSPATH overrides when you set the CLASSPATH variable or using the -classpath command (for short -cp). Put a dot (.) in the new setting if you want to include the current directory in the search path.
If CLASSPATH finds a class file which is present in the current directory, then it will load the class and use it, irrespective of the same name class presents in another directory which is also included in the CLASSPATH.
If you want to set multiple classpaths, then you need to separate each CLASSPATH by a semicolon (;).
The third-party applications (MySQL and Oracle) that use the JVM can modify the CLASSPATH environment variable to include the libraries they use. The classes can be stored in directories or archives files. The classes of the Java platform are stored in rt.jar.
There are two ways to ways to set CLASSPATH: through Command Prompt or by setting Environment Variable.
Let's see how to set CLASSPATH of MySQL database:
Step 1: Click on the Windows button and choose Control Panel. Select System.

Step 2: Click on Advanced System Settings.
Step 3: A dialog box will open. Click on Environment Variables.
Step 4: If the CLASSPATH already exists in System Variables, click on the Edit button then put a semicolon (;) at the end. Paste the Path of MySQL-Connector Java.jar file.
If the CLASSPATH doesn't exist in System Variables, then click on the New button and type Variable name as CLASSPATH and Variable value as C:\Program Files\Java\jre1.8\MySQL-Connector Java.jar;.;
Remember: Put ;.; at the end of the CLASSPATH.
Difference between PATH and CLASSPATH
PATH | CLASSPATH |
PATH is an environment variable. | CLASSPATH is also an environment variable. |
It is used by the operating system to find the executable files (.exe). | It is used by Application ClassLoader to locate the .class file. |
You are required to include the directory which contains .exe files. | You are required to include all the directories which contain .class and JAR files. |
PATH environment variable once set, cannot be overridden. | The CLASSPATH environment variable can be overridden by using the command line option -cp or -CLASSPATH to both javac and java command. |
How to Set CLASSPATH in Windows Using Command Prompt
Type the following command in your Command Prompt and press enter.
Set CLASSPATH=%CLASSPATH%;C:\Program Files\Java\jre1.8\rt.jar;
In the above command, The set is an internal DOS command that allows the user to change the variable value. CLASSPATH is a variable name. The variable enclosed in percentage sign (%) is an existing environment variable. The semicolon is a separator, and after the (;) there is the PATH of rt.jar file.
How ext folder works in Java
The ext directory works a bit like the CLASSPATH. Ext directory is the part of the class loading mechanism. The classes which are available within JARs in the ext directory are available to Java applications.
The following table demonstrates the key difference between the CLASSPATH and Extension Mechanism:
Characteristics | CLASSPATH | Extension Mechanism |
Class loading order | CLASSPATH loads after bootstrap and extension loading. | Ext loads after bootstrap loading but before CLASSPATH loading. |
Scope | It is an application specific. All JREs on the host is the CLASSPATH environment variable. | All JVMs are running in specific JRE java.ext.dirs. |
Package name | Java.class.path is used to find the directories and JAR archives containing class files. | Java.ext.dirs is used to specify where the extension mechanism loads classes. |
Specification | It is specified by name including the extension.jar and directory containing .class files. | All JAR files in specified directories are loaded. |
The mechanism will pick up all .jar files from the extension directory even if the file does not have the .jar extension. The implementation of this is that if one can change the name of a jar placed in a classpath directory to have an extension other than .jar. The wildcard (*) does not pick it up. This technique will not work with the extension directory.
Let's understand the execution process through an example.
A.java
- Public class A
- {
- Public String toString()
- {
- Return "hello";
- }
- }
B.java
- Public class B
- {
- Public static void main(final String[] args)
- {
- System.out.println(new A());
- }
- }
Compile the A.java file. We will archive the compiled A.class file into A.jar. Place this JAR file into another directory than the compiled B.class file.
To demonstrate the use of the classpath, we place the A.jar file in a directory C:\JavaPrograms and will access that JAR through wildcard (*) for B to use.
We found that B can still load the A.class while we had deleted it from the current directory. The Java launcher was explicitly looked for C:\JavaProgram. It is also possible to have the class loaded without its presence in the same directory and explicit classpath specification.
It is often referred to as a benefit of Using the extension mechanism because all applications which are using that JRE can see the same classes without the need to specify them on the classpath explicitly.
What happens if we change the name of A.jar into A.backup in the same CLASSPATH-referenced directory. NoClassDefFoundError is encountered when we do the same because the CLASSPATH-reference does not have the .jar extension.
Key takeaway
CLASSPATH is an environment variable which is used by Application ClassLoader to locate and load the .class files. The CLASSPATH defines the path, to find third-party and user-defined classes that are not extensions or part of Java platform. Include all the directories which contain .class files and JAR files when setting the CLASSPATH.
Java Packages & API
A package in Java is used to group related classes. Think of it as a folder in a file directory. We use packages to avoid name conflicts, and to write a better maintainable code. Packages are divided into two categories:
● Built-in Packages (packages from the Java API)
● User-defined Packages (create your own packages)
Built-in Packages
The Java API is a library of prewritten classes, that are free to use, included in the Java Development Environment.
The library contains components for managing input, database programming, and much more.
The library is divided into packages and classes. Meaning you can either import a single class (along with its methods and attributes), or a whole package that contain all the classes that belong to the specified package.
To use a class or a package from the library, you need to use the import keyword:
Syntax
Import package.name.Class; // Import a single class
Import package.name.*; // Import the whole package
Import a Class
If you find a class you want to use, for example, the Scanner class, which is used to get user input, write the following code:
Example
Import java.util.Scanner;
In the example above, java.util is a package, while Scanner is a class of the java.util package.
To use the Scanner class, create an object of the class and use any of the available methods found in the Scanner class documentation. In our example, we will use the nextLine() method, which is used to read a complete line:
Example
Using the Scanner class to get user input:
Import java.util.Scanner;
Class MyClass {
Public static void main(String[] args) {
Scanner myObj = new Scanner(System.in);
System.out.println("Enter username");
String userName = myObj.nextLine();
System.out.println("Username is: " + userName);
}
}
Import a Package
There are many packages to choose from. In the previous example, we used the Scanner class from the java.util package. This package also contains date and time facilities, random-number generator and other utility classes.
To import a whole package, end the sentence with an asterisk sign (*). The following example will import ALL the classes in the java.util package:
Example
Import java.util.*;
User-defined Packages
To create your own package, you need to understand that Java uses a file system directory to store them. Just like folders on your computer:
Example
└── root
└── mypack
└── MyPackageClass.java
To create a package, use the package keyword:
MyPackageClass.java
Package mypack;
Class MyPackageClass {
Public static void main(String[] args) {
System.out.println("This is my package!");
}
}
Save the file as MyPackageClass.java, and compile it:
C:\Users\Your Name>javac MyPackageClass.java
Then compile the package:
C:\Users\Your Name>javac -d . MyPackageClass.java
This forces the compiler to create the "mypack" package.
The -d keyword specifies the destination for where to save the class file. You can use any directory name, like c:/user (windows), or, if you want to keep the package within the same directory, you can use the dot sign ".", like in the example above.
Note: The package name should be written in lower case to avoid conflict with class names.
When we compiled the package in the example above, a new folder was created, called "mypack".
To run the MyPackageClass.java file, write the following:
C:\Users\Your Name>java mypack.MyPackageClass
The output will be:
This is my package!
Key takeaway
A package in Java is used to group related classes. Think of it as a folder in a file directory. We use packages to avoid name conflicts, and to write a better maintainable code. Packages are divided into two categories:
● Built-in Packages (packages from the Java API)
● User-defined Packages (create your own packages)
References:
1. T. Budd (2009), An Introduction to Object Oriented Programming, 3rd edition, Pearson Education, India.
2. J. Nino, F. A. Hosch (2002), An Introduction to programming and OO design using Java, John Wiley & sons, New Jersey.
3. Y. Daniel Liang (2010), Introduction to Java programming, 7th edition, Pearson education, India.
4. Object Oriented Programming with C++ by E Balagurusamy, Fifth Edition, TMH.