UNIT 2
Projections of Planes and Solids
Introduction
Plane figures or surfaces have only two dimensions, viz. Length and breadth. They do not have thickness. A plane figure may be assumed to be contained by a plane, and its projections can be drawn, if the position of that plane with respect to the principal planes of projection is known.
In this chapter, we shall discuss the following topics:
1. Types of planes and their projections.
2. Traces of planes.
Type of planes:
Planes may be divided into two main types:
(1) Perpendicular planes.
(2) Oblique planes.
Perpendicular planes:
These planes can be divided into the following sub-types:
(i) Perpendicular to both the reference planes.
(ii) Perpendicular to one plane and parallel to the other.
(iii) Perpendicular to one plane and inclined to the other.
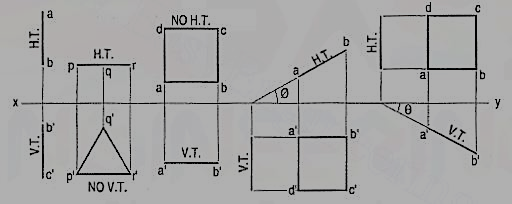
Perpendicular to both the reference planes (fig 1):
A square ABCD is perpendicular to both the planes. Its H.T. And V.T. Are in a straight-line perpendicular to xy.
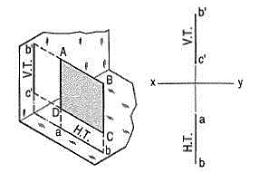
Figure 1
The front view b'c' and the top view ab of the square are both lines coinciding with the V.T. And the H.T. Respectively.
Perpendicular to one plane and parallel to the other plane:
a) Plane, perpendicular to the H.P. And parallel to the V.P. [fig. 12(i)]. A triangle PQR is perpendicular to the H.P. And is parallel to the V.P. Its H.T. Is parallel to xy. It has no V.T.
The front view p'q'r' shows the exact shape and size of the triangle. The top view pqr is a line parallel to xy. It coincides with the H.T.
(b) Plane, perpendicular to the V.P. And parallel to the H.P. [fig. 2(ii)]. A square ABCD is perpendicular to the V.P. And parallel to the H.P. Its V.T. Is parallel to xy. It has no H.T.
The top view abed shows the true shape and true size of the square. The front view a'b' is a line, parallel to xy. It coincides with the V.T.
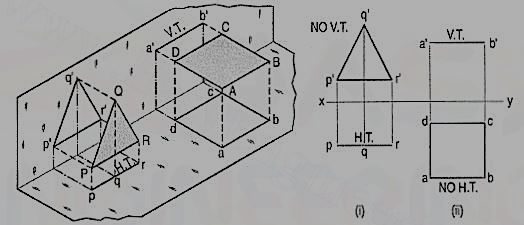
Figure 2
Perpendicular to one plane and inclined to the other plane:
A square ABCD is perpendicular to the H.P. And inclined at an angle φ to the V.P. Its V.T. Is perpendicular to xy. Its H.T. Is inclined at φ to xy.
Its top view ab is a line inclined at φ to xy. The front view a'b'c'd' is smaller than ABCD.
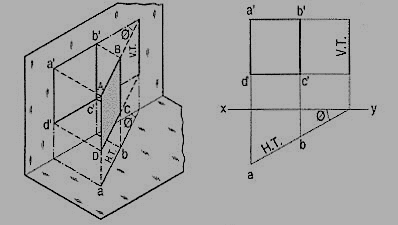
Figure 3
(b) Plane, perpendicular to the V.P. And inclined to the H.P. (fig. 3).
A square ABCD is perpendicular to the V.P. And inclined at an angle θ to the H.P. Its H.T. Is perpendicular to xy. Its V.T. Makes the angle e with xy. Its front view a'b' is a line inclined at θ to xy. The top view abed is a rectangle which is smaller than the square ABCD.
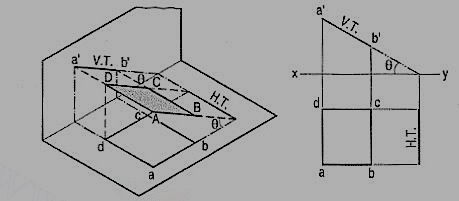
Figure 4
Fig. 4 shows the projections and the traces of all these perpendicular planes by third-angle projection method.
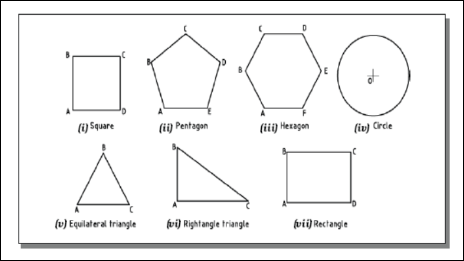
A plane is a two dimensional object having length and breadth only. Its thickness is always neglected. Various shapes of plane figures are considered such as square, rectangle, circle, pentagon, hexagon, etc.
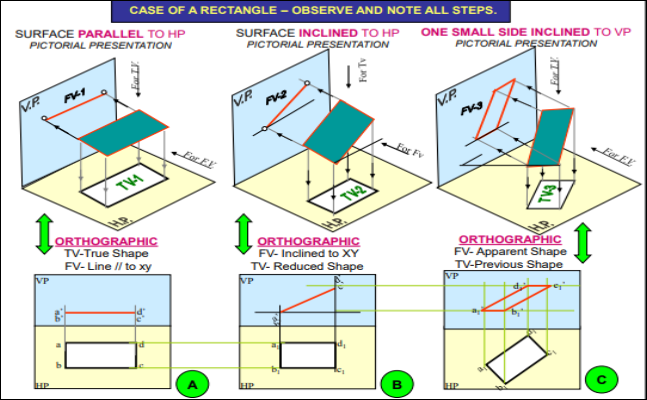
PROJECTIONS OF PLANES
- To draw their projections means F.V, T.V. & S.V.
What will be given in the problem?
- Description of the plane figure.
- It’s position with HP and VP.
In which manner it’s position with HP & VP will be described?
- Inclination of it’s SURFACE with one of the reference planes will be given
- Inclination of one of it’s EDGES with other reference plane will be given (Hence this will be a case of an object inclined to both reference Planes.)
Introduction:
A solid has three dimensions, viz. Length, breadth and thickness. To represent a solid on a flat surface having only length and breadth, at least two orthographic views are necessary. Sometimes, additional views projected on auxiliary planes become necessary to make the description of a solid complete.
This chapter deals with the following topics:
1. Types of solids.
2. Projections of solids in simple positions.
(a) Axis perpendicular to the H.P.
(b) Axis perpendicular to the V.P.
(c) Axis parallel to both the H.P. And the V.P.
3. Projections of solids with axes inclined to one of the reference planes and
Parallel to the other.
(a) Axis inclined to the V.P. And parallel to the H.P.
(b) Axis inclined to the H.P. And parallel to the V.P.
4. Projections of solids with axes inclined to both the H.P. And the V.P.
5. Projections of spheres.
Types of solids:
Solids may be divided into two main groups:
(1) Polyhedra
(2) Solids of revolution.
Polyhedra: A polyhedron is defined as a solid bounded by planes called faces. When all faces are equal and regular, the polyhedron is said to be regular. There are seven regular polyhedra which may be defined as stated below:
(i) Tetrahedron (fig.5): It has four equal faces, each an equilateral triangle.
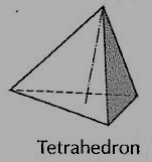
Figure 5
(ii) Cube or hexahedron (fig. 6): It has six faces, all equal squares.
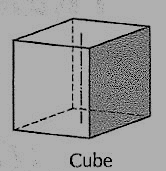
Figure 6
(iii) Octahedron (fig. 7): It has eight equal equilateral triangles as faces.
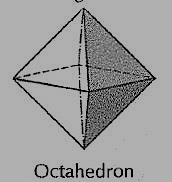
Figure 7
(iv) Dodecahedron (fig. 8): It has twelve equal and regular pentagons as faces.
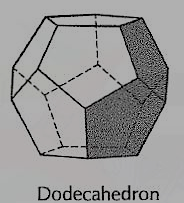
Figure 8
(v) Icosahedron (fig. 9): It has twenty faces, all equal equilateral triangles.
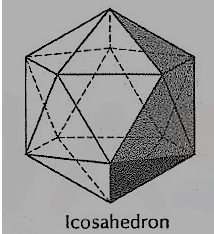
Figure 9
(vi) Prism: This is a polyhedron having two equal and similar faces called its ends or bases, parallel to each other and joined by other faces which are parallelograms. The imaginary line joining the centres of the bases is called the axis. A right and regular prism (fig. 10) has its axis perpendicular to the bases. All its faces are equal rectangles.
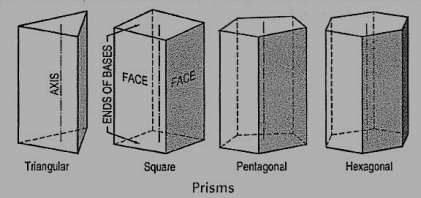
Figure 10
(vii) Pyramid: This is a polyhedron having a plane figure as a base and many triangular faces meeting at a point called the vertex or apex. The imaginary line joining the apex with the centre of the base is its axis.
A right and regular pyramid (fig. 10) has its axis perpendicular to the base which is a regular plane figure. Its faces are all equal isosceles triangles.
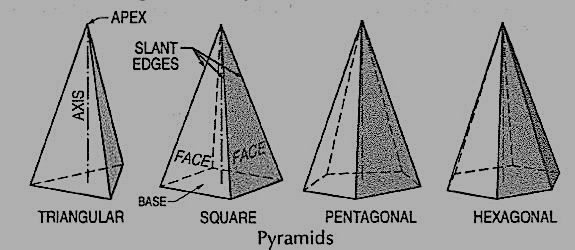
Figure 11
Oblique prisms and pyramids have their axes inclined to their bases. Prisms and pyramids are named according to the shape of their bases, as triangular, square, pentagonal, hexagonal etc.
Solids of revolution
(i) Cylinder (fig. 12): A right circular cylinder is a solid generated by the revolution of a rectangle about one of its sides which remains fixed. It has two equal circular bases. The line joining the centres of the bases is the axis. It is perpendicular to the bases.
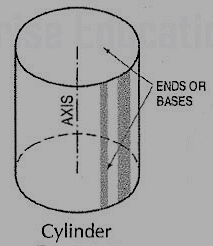
Figure 12
(ii) Cone (fig. 13): A right circular cone is a solid generated by the revolution of a right-angled triangle about one of its perpendicular sides which is fixed.
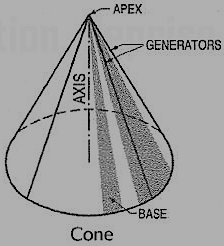
Figure 13
It has one circular base. Its axis joins the apex with the centre of the base to which it is perpendicular. Straight lines drawn from the apex to the circumference of the base-circle are all equal and are called generators of the cone. The length of the generator is the slant height of the cone.
(iii) Sphere (fig. 14): A sphere is a solid generated by the revolution of a semi-circle about its diameter as the axis. The mid-point of the diameter is the centre of the sphere. All points on the surface of the sphere are equidistant from its centre.

Figure 14
(iv) Frustum: When a pyramid or a cone is cut by a plane parallel to its base, thus removing the top portion, the remaining portion is called its frustum (fig. 15).
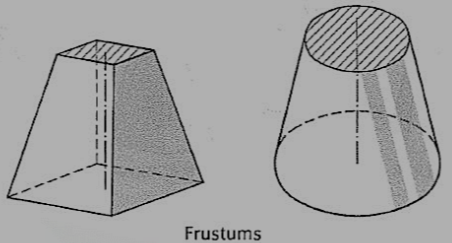
Figure 15
(v) Truncated: When a solid is cut by a plane inclined to the base it is said to be truncated.
References:
1. Engineering Drawing N.D. Bhatt / Charotar
2. Engineering Drawing / N. S. Parthasarathy and Vela Murali/ Oxford
3. Engineering Drawing / Basant Agrawal and McAgrawal/ McGraw Hill
4. Engineering Drawing/ M. B. Shah, B.C. Rane / Pearson.
5. Computer Aided Engineering Drawing – K Balaveera Reddy et al – CBS Publishers