Unit - 2
Creational Patterns
Abstract Factory Patterns are based on a super-factory that generates more factories. This plant is also known as the factory of factories. This design pattern is classified as a creational pattern since it gives one of the most effective ways to construct an object.
An interface is responsible for establishing a factory of related objects in the Abstract Factory design without explicitly declaring their classes. The objects can be given by each factory according to the Factory pattern.
An Abstract Factory Pattern is also known as Kit.
Advantage of Abstract Factory Pattern
● Client code is separated from concrete (implementation) classes using the Abstract Factory Pattern.
● It facilitates the transfer of object families.
● It encourages object consistency.
Application of the Abstract Factory Pattern
● When the system must be autonomous of the creation, composition, and representation of its objects.
● This constraint must be imposed when a family of related objects must be utilized together.
● When you want to give a library of objects that only reveals interfaces and hides implementations.
● When the system must be configured using one of several object families.
Implementation
We'll make a Shape interface and a concrete class that implements it. The next step is to design an abstract factory class called AbstractFactory. ShapeFactory is a factory class that extends AbstractFactory. FactoryProducer is a factory creator/generator class.
Our demo class, AbstractFactoryPatternDemo, uses FactoryProducer to create an AbstractFactory object. It will send information to AbstractFactory (CIRCLE, RECTANGLE, SQUARE for Shape) to determine the sort of object it requires.
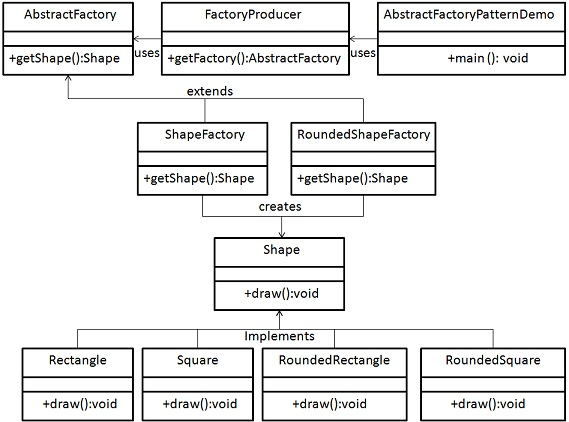
Step 1: Make a Shapes user interface.
Shape.java
Public interface Shape {
void draw();
}
Step 2: Create concrete classes that implement the same interface as the abstract classes.
RoundedRectangle.java
Public class RoundedRectangle implements Shape {
@Override
public void draw() {
System.out.println("Inside RoundedRectangle::draw() method.");
}
}
RoundedSquare.java
Public class RoundedSquare implements Shape {
@Override
public void draw() {
System.out.println("Inside RoundedSquare::draw() method.");
}
}
Rectangle.java
Public class Rectangle implements Shape {
@Override
public void draw() {
System.out.println("Inside Rectangle::draw() method.");
}
}
Step 3: To get factories for Normal and Rounded Shape Objects, create an Abstract class.
AbstractFactory.java
Public abstract class AbstractFactory {
abstract Shape getShape(String shapeType) ;
}
Step 4: Create Factory classes that extend AbstractFactory to generate concrete class objects based on input.
ShapeFactory.java
Public class ShapeFactory extends AbstractFactory {
@Override
public Shape getShape(String shapeType){
if(shapeType.equalsIgnoreCase("RECTANGLE")){
return new Rectangle();
}else if(shapeType.equalsIgnoreCase("SQUARE")){
return new Square();
}
return null;
}
}
RoundedShapeFactory.java
Public class RoundedShapeFactory extends AbstractFactory {
@Override
public Shape getShape(String shapeType){
if(shapeType.equalsIgnoreCase("RECTANGLE")){
return new RoundedRectangle();
}else if(shapeType.equalsIgnoreCase("SQUARE")){
return new RoundedSquare();
}
return null;
}
}
Step 5: To get factories, create a Factory generator/producer class and feed it information like Shape.
FactoryProducer.java
Public class FactoryProducer {
public static AbstractFactory getFactory(boolean rounded){
if(rounded){
return new RoundedShapeFactory();
}else{
return new ShapeFactory();
}
}
}
Step 6: Use the FactoryProducer to get AbstractFactory in order to get concrete class factories by passing type information.
AbstractFactoryPatternDemo.java
Public class AbstractFactoryPatternDemo {
public static void main(String[] args) {
//get shape factory
AbstractFactory shapeFactory = FactoryProducer.getFactory(false);
//get an object of Shape Rectangle
Shape shape1 = shapeFactory.getShape("RECTANGLE");
//call draw method of Shape Rectangle
shape1.draw();
//get an object of Shape Square
Shape shape2 = shapeFactory.getShape("SQUARE");
//call draw method of Shape Square
shape2.draw();
//get shape factory
AbstractFactory shapeFactory1 = FactoryProducer.getFactory(true);
//get an object of Shape Rectangle
Shape shape3 = shapeFactory1.getShape("RECTANGLE");
//call draw method of Shape Rectangle
shape3.draw();
//get an object of Shape Square
Shape shape4 = shapeFactory1.getShape("SQUARE");
//call draw method of Shape Square
shape4.draw();
}
}
Step 7: Make sure the output is correct.
Inside Rectangle::draw() method.
Inside Square::draw() method.
Inside RoundedRectangle::draw() method.
Inside RoundedSquare::draw() method.
Key takeaway
Abstract Factory Patterns are based on a super-factory that generates more factories. This plant is also known as the factory of factories.
The Builder pattern creates a complex object from small elements in a step-by-step manner. This design pattern is classified as a creational pattern since it gives one of the most effective ways to construct an object.
A Builder class builds the final object step by step. This builder is independent of other objects.
Advantage of Builder Design Pattern
The following are the primary benefits of the Builder Pattern:
● It establishes a clear distinction between the object's production and representation.
● It allows you more control over the construction process.
● It allows you to change an object's internal representation.
Implementation
We considered a fast-food restaurant with a standard meal consisting of a burger and a cold beverage. A wrapper will be used to pack the burger, which could be a Veggie Burger or a Chicken Burger. A cold drink, such as Coke or Pepsi, will be packaged in a bottle.
We'll create an Item interface to represent food items like burgers and cold drinks, as well as concrete classes that implement the Item interface, and a Packing interface to represent food item packaging, such as burger wrappers and cold drink bottles, and concrete classes that implement the Packing interface.
We next develop a Meal class with an ArrayList of Item and a MealBuilder to combine Item to produce various types of Meal objects. Our demo class, BuilderPatternDemo, will use MealBuilder to create a meal.
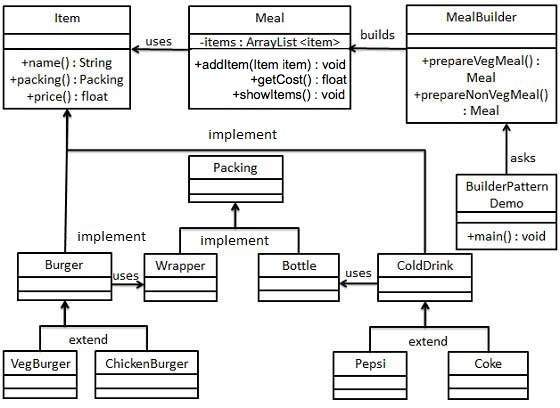
Step 1: Make a user interface Item depicting a food item and its packaging.
Item.java
Public interface Item {
public String name();
public Packing packing();
public float price();
}
Packing.java
Public interface Packing {
public String pack();
}
Step 2: Create concrete Packing interface implementation classes.
Wrapper.java
Public class Wrapper implements Packing {
@Override
public String pack() {
return "Wrapper";
}
}
Bottle.java
Public class Bottle implements Packing {
@Override
public String pack() {
return "Bottle";
}
}
Step 3: Create abstract classes that implement the item interface and provide standard functionality.
Burger.java
Public abstract class Burger implements Item {
@Override
public Packing packing() {
return new Wrapper();
}
@Override
public abstract float price();
}
ColdDrink.java
Public abstract class ColdDrink implements Item {
@Override
Public Packing packing() {
return new Bottle();
}
@Override
Public abstract float price();
}
}
Step 4: Extend the Burger and ColdDrink classes with concrete classes.
VegBurger.java
Public class VegBurger extends Burger {
@Override
public float price() {
return 25.0f;
}
@Override
public String name() {
return "Veg Burger";
}
}
ChickenBurger.java
Public class ChickenBurger extends Burger {
@Override
public float price() {
return 50.5f;
}
@Override
public String name() {
return "Chicken Burger";
}
}
Coke.java
Public class Coke extends ColdDrink {
@Override
public float price() {
return 30.0f;
}
@Override
public String name() {
return "Coke";
}
}
Pepsi.java
Public class Pepsi extends ColdDrink {
@Override
public float price() {
return 35.0f;
}
@Override
public String name() {
return "Pepsi";
}
}
Step 5: Make a Meal class with the Item objects from the previous step.
Meal.java
Import java.util.ArrayList;
Import java.util.List;
Public class Meal {
private List<Item> items = new ArrayList<Item>();
public void addItem(Item item){
items.add(item);
}
public float getCost(){
float cost = 0.0f;
for (Item item : items) {
cost += item.price();
}
return cost;
}
public void showItems(){
for (Item item : items) {
System.out.print("Item : " + item.name());
System.out.print(", Packing : " + item.packing().pack());
System.out.println(", Price : " + item.price());
}
}
}
Step 6: Make a MealBuilder class, which is the real builder for creating Meal objects.
MealBuilder.java
Public class MealBuilder {
public Meal prepareVegMeal (){
Meal meal = new Meal();
meal.addItem(new VegBurger());
meal.addItem(new Coke());
return meal;
}
public Meal prepareNonVegMeal (){
Meal meal = new Meal();
meal.addItem(new ChickenBurger());
meal.addItem(new Pepsi());
return meal;
}
}
Step 7: MealBuider is used in BuiderPatternDemo to explain the builder pattern.
BuilderPatternDemo.java
Public class BuilderPatternDemo {
public static void main(String[] args) {
MealBuilder mealBuilder = new MealBuilder();
Meal vegMeal = mealBuilder.prepareVegMeal();
System.out.println("Veg Meal");
vegMeal.showItems();
System.out.println("Total Cost: " + vegMeal.getCost());
Meal nonVegMeal = mealBuilder.prepareNonVegMeal();
System.out.println("\n\nNon-Veg Meal");
nonVegMeal.showItems();
System.out.println("Total Cost: " + nonVegMeal.getCost());
}
}
Step 8: Verify the output.
Veg Meal
Item : Veg Burger, Packing : Wrapper, Price : 25.0
Item : Coke, Packing : Bottle, Price : 30.0
Total Cost: 55.0
Non-Veg Meal
Item : Chicken Burger, Packing : Wrapper, Price : 50.5
Item : Pepsi, Packing : Bottle, Price : 35.0
Total Cost: 85.5
Key takeaway
The Builder pattern creates a complex object from small elements in a step-by-step manner. This design pattern is classified as a creational pattern since it gives one of the most effective ways to construct an object.
The factory pattern is one of Java's most popular design patterns. This design pattern is classified as a creational pattern since it gives one of the most effective ways to construct an object.
We generate objects without disclosing the creation mechanism to the client in the Factory design, and we refer to freshly formed objects using a common interface.
Advantage of Factory Design Pattern
● Sub-classes can select the sort of object they want to produce using the Factory Method Pattern.
● It encourages loose coupling by removing the need for application-specific classes to be bound into the code. That is, the code only interacts with the resultant interface or abstract class, and it will function with any classes that implement or extend that interface or abstract class.
Usage of Factory Design Pattern
● When a class is unsure of which subclasses it will need to generate
● When a class specifies the objects to be produced, its subclasses must do so.
● When the parent classes decide whether or not to create objects for their subclasses.
Implementation
We'll make a Shape interface as well as concrete classes that implement the Shape interface. As a next stage, a factory class named ShapeFactory is created.
ShapeFactory will be used by FactoryPatternDemo to obtain a Shape object. It will send information to ShapeFactory (CIRCLE, RECTANGLE, SQUARE) to determine the sort of object it requires.
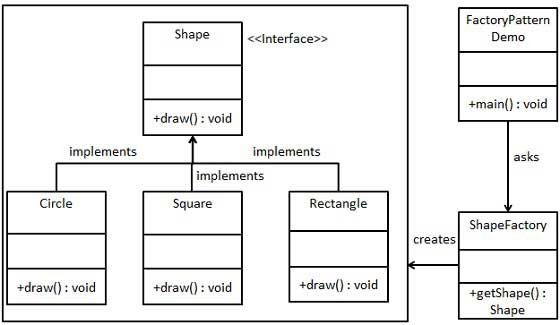
Step 1: Make a user interface.
Shape.java
Public interface Shape {
void draw();
}
Step 2: Create concrete classes that implement the same interface as the abstract classes.
Rectangle.java
Public class Rectangle implements Shape {
@Override
public void draw() {
System.out.println("Inside Rectangle::draw() method.");
}
}
Square.java
Public class Square implements Shape {
@Override
public void draw() {
System.out.println("Inside Square::draw() method.");
}
}
Circle.java
Public class Circle implements Shape {
@Override
public void draw() {
System.out.println("Inside Circle::draw() method.");
}
}
Step 3: Create a Factory to generate concrete class objects based on the information provided.
ShapeFactory.java
Public class ShapeFactory {
//use getShape method to get object of type shape
public Shape getShape(String shapeType){
if(shapeType == null){
return null;
}
if(shapeType.equalsIgnoreCase("CIRCLE")){
return new Circle();
} else if(shapeType.equalsIgnoreCase("RECTANGLE")){
return new Rectangle();
} else if(shapeType.equalsIgnoreCase("SQUARE")){
return new Square();
}
return null;
}
}
Step 4: By giving information such as type to the Factory, you can get an object of a concrete class.
FactoryPatternDemo.java
Public class FactoryPatternDemo {
public static void main(String[] args) {
ShapeFactory shapeFactory = new ShapeFactory();
//get an object of Circle and call its draw method.
Shape shape1 = shapeFactory.getShape("CIRCLE");
//call draw method of Circle
shape1.draw();
//get an object of Rectangle and call its draw method.
Shape shape2 = shapeFactory.getShape("RECTANGLE");
//call draw method of Rectangle
shape2.draw();
//get an object of Square and call its draw method.
Shape shape3 = shapeFactory.getShape("SQUARE");
//call draw method of square
shape3.draw();
}
}
Step 5: Verify the output.
Inside Circle::draw() method.
Inside Rectangle::draw() method.
Inside Square::draw() method.
Key takeaway
The factory pattern is one of Java's most popular design patterns. This design pattern is classified as a creational pattern since it gives one of the most effective ways to construct an object.
The prototype pattern refers to duplicating an item while considering performance. This design pattern is classified as a creational pattern since it gives one of the most effective ways to construct an object.
This technique entails creating a prototype interface that instructs the current object to be cloned. When creating an object directly is expensive, this pattern is employed. For instance, an object is to be constructed following a time-consuming database operation. We can cache the object, return its clone on the next request, and update the database as needed, resulting in fewer database calls.
Advantage of Prototype Pattern
The following are the key advantages of using a prototype pattern:
● It eliminates the requirement for sub-classification.
● It conceals the complexity of object creation.
● Clients can get new objects without knowing which type they will receive.
● It allows you to add and remove things in real time.
Usage of Prototype Pattern
● At runtime, when the classes are instantiated.
● When the expense of producing a product is prohibitively high or complex.
● When you wish to keep your application's class count to a bare minimum.
● When the client application doesn't need to know about object creation or representation.
Implementation
We'll make an abstract class called Shape, as well as concrete classes that extend it. As a next step, the ShapeCache class is defined, which saves shape objects in a Hashtable and returns their clone when asked.
Our demo class, PrototypPatternDemo, will acquire a Shape object using the ShapeCache class.
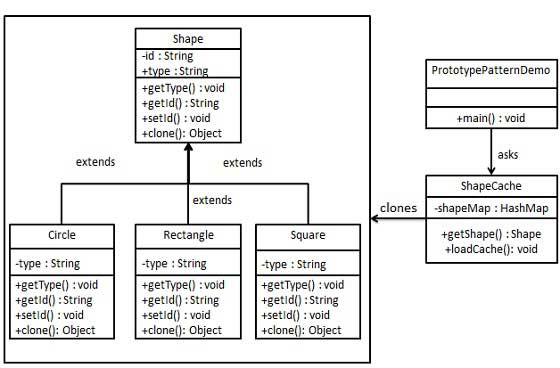
Step 1: Create an abstract class with the Clonable interface implemented.
Shape.java
Public abstract class Shape implements Cloneable {
private String id;
protected String type;
abstract void draw();
public String getType(){
return type;
}
public String getId() {
return id;
}
public void setId(String id) {
this.id = id;
}
public Object clone() {
Object clone = null;
try {
clone = super.clone();
} catch (CloneNotSupportedException e) {
e.printStackTrace();
}
return clone;
}
}
Step 2: Make concrete classes that extend the above-mentioned class.
Rectangle.java
Public class Rectangle extends Shape {
public Rectangle(){
type = "Rectangle";
}
@Override
public void draw() {
System.out.println("Inside Rectangle::draw() method.");
}
}
Square.java
Public class Square extends Shape {
public Square(){
type = "Square";
}
@Override
public void draw() {
System.out.println("Inside Square::draw() method.");
}
}
Circle.java
Public class Circle extends Shape {
public Circle(){
type = "Circle";
}
@Override
public void draw() {
System.out.println("Inside Circle::draw() method.");
}
}
Step 3: Make a class that retrieves concrete classes from the database and stores them in a Hashtable.
ShapeCache.java
Import java.util.Hashtable;
Public class ShapeCache {
private static Hashtable<String, Shape> shapeMap = new Hashtable<String, Shape>();
public static Shape getShape(String shapeId) {
Shape cachedShape = shapeMap.get(shapeId);
return (Shape) cachedShape.clone();
}
// for each shape run database query and create shape
// shapeMap.put(shapeKey, shape);
// for example, we are adding three shapes
public static void loadCache() {
Circle circle = new Circle();
circle.setId("1");
shapeMap.put(circle.getId(),circle);
Square square = new Square();
square.setId("2");
shapeMap.put(square.getId(),square);
Rectangle rectangle = new Rectangle();
rectangle.setId("3");
shapeMap.put(rectangle.getId(), rectangle);
}
}
Step 4: The ShapeCache class is used by PrototypePatternDemo to acquire clones of shapes stored in a Hash Table.
PrototypePatternDemo.java
Public class PrototypePatternDemo {
public static void main(String[] args) {
ShapeCache.loadCache();
Shape clonedShape = (Shape) ShapeCache.getShape("1");
System.out.println("Shape : " + clonedShape.getType());
Shape clonedShape2 = (Shape) ShapeCache.getShape("2");
System.out.println("Shape : " + clonedShape2.getType());
Shape clonedShape3 = (Shape) ShapeCache.getShape("3");
System.out.println("Shape : " + clonedShape3.getType());
}
}
Step 5: Make sure the output is correct.
Shape : Circle
Shape : Square
Shape : Rectangle
Key takeaway
The prototype pattern refers to duplicating an item while considering performance. This design pattern is classified as a creational pattern since it gives one of the most effective ways to construct an object.
The singleton pattern is one of Java's most basic design patterns. This design pattern is classified as a creational pattern since it gives one of the most effective ways to construct an object.
This pattern uses a single class that is in charge of creating an object while ensuring that only one object is created. This class provides a method to access its single object, which may be accessed without having to instantiate the class's object.
Advantage of Singleton design pattern
Because an object is not created for each request, memory is saved. Only one instance is utilized over and over.
Usage of Singleton design pattern
In multi-threaded and database applications, the singleton pattern is commonly employed. It's utilized for logging, caching, thread pools, and other configuration options.
Implementation
A SingleObject class will be created. SingleObject class have its constructor as private and have a static instance of itself.
The SingleObject class includes a static method for exposing its static instance to the rest of the world. Our demo class, SingletonPatternDemo, will get a SingleObject object by using the SingleObject class.
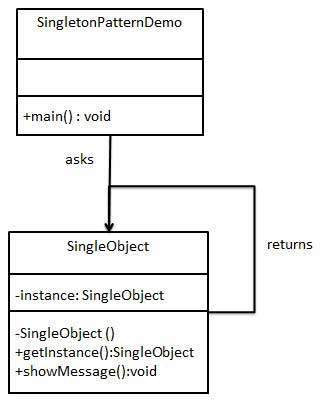
Step 1: Create a Singleton Class in your code.
SingleObject.java
Public class SingleObject {
//create an object of SingleObject
private static SingleObject instance = new SingleObject();
//make the constructor private so that this class cannot be
//instantiated
private SingleObject(){}
//Get the only object available
public static SingleObject getInstance(){
return instance;
}
public void showMessage(){
System.out.println("Hello World!");
}
}
Step 2: From the singleton class, get the only object.
SingletonPatternDemo.java
Public class SingletonPatternDemo {
public static void main(String[] args) {
//illegal construct
//Compile Time Error: The constructor SingleObject() is not visible
//SingleObject object = new SingleObject();
//Get the only object available
SingleObject object = SingleObject.getInstance();
//show the message
object.showMessage();
}
}
Step 3: Make sure the output is correct.
Hello World!
Key takeaway
The singleton pattern is one of Java's most basic design patterns. This design pattern is classified as a creational pattern since it gives one of the most effective ways to construct an object.
The way objects are created is the subject of creational design patterns. When a decision must be made during the instantiation of a class, these design patterns are employed (i.e. creating an object of a class).
However, everyone is aware that the new keyword in Java is used to construct an object. Consider the following scenario:
StudentRecord s1=new StudentRecord();
Hard-coded code is not a good technique for programming. The new keyword is used to create the instance in this case. Depending on the nature of the programme, the nature of the object may need to be altered. In such circumstances, creational design patterns can be used to provide a more broad and flexible approach.
Creational design patterns are design patterns in software engineering that deal with object creation mechanisms, attempting to generate objects in a situation-appropriate manner. The most basic kind of object production may cause design issues or contribute to the design's complexity. This challenge is solved by creational design patterns, which control the creation of objects in some way.
We'll go through four different kinds of Creational Design Patterns:
● Singleton — Ensures that an object has only one instance across the application.
● Factory Method – Factory Objects of various related classes are produced without specifying the precise item to be created.
● Abstract Factory – Creates families of connected dependent objects with Abstract Factory.
● Builder — Builds complex objects in a step-by-step manner.
Key takeaway
Creational design patterns are design patterns in software engineering that deal with object creation mechanisms, attempting to generate objects in a situation-appropriate manner.
References:
- Head First Design Patterns, by Eric Freeman and Elisabeth Freeman
- Design Patterns Explained, by Shalloway and Trott
- Introduction to design Patterns in C++ with Qt by Alan Ezust, Paul Ezust