Unit - 3
Structural Pattern
The adapter pattern acts as a link between two interfaces that are incompatible. This design pattern is classified as a structural pattern since it integrates the capabilities of two separate interfaces.
A single class is responsible for joining the capabilities of separate or incompatible interfaces in this design. A card reader, which functions as an adaptor between a memory card and a laptop, is a real-life example. The memory card is inserted into a card reader, which is then inserted into the laptop, allowing the memory card to be read via the laptop.
We'll show how to utilize the Adapter pattern in the following example, where an audio player device can only play mp3 files and wishes to use a more complex audio player that can play vlc and mp4 files.
Advantage of Adapter Pattern
The Benefits of the Adapter Pattern
● It enables the interaction of two or more previously incompatible things.
● It allows existing functionality to be reused.
Usage of Adapter pattern
It's used for:
● When an object has to use a class that has an incompatible interface.
● When you need to make a reusable class that works with other classes that don't have the same interface.
● When you need to make a reusable class that works with other classes that don't have the same interface.
Implementation
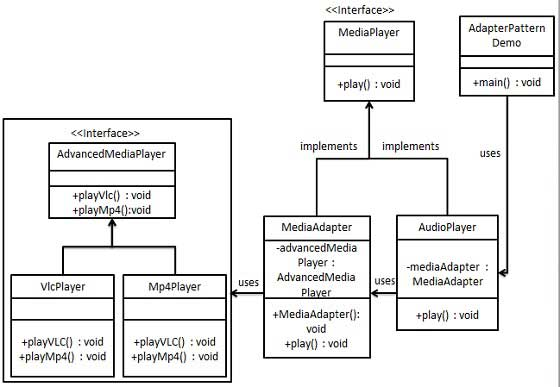
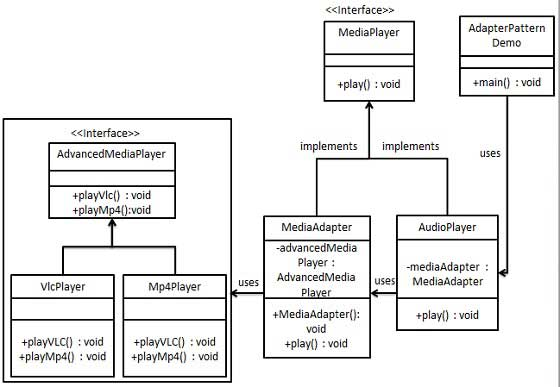
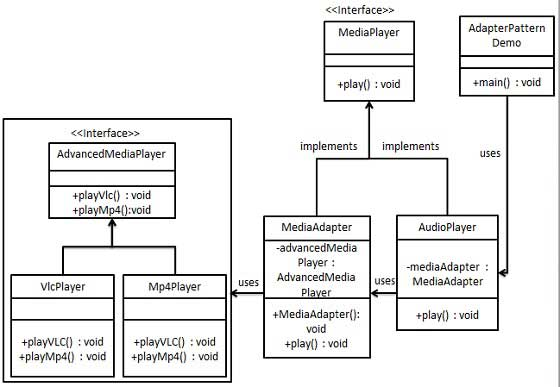
We have a MediaPlayer interface, as well as a concrete class AudioPlayer that implements it. By default, AudioPlayer can play audio files in the MP3 format.
Another interface, AdvancedMediaPlayer, has been added, as well as concrete classes that implement the AdvancedMediaPlayer interface. These classes can play files in the vlc and mp4 formats.
We want AudioPlayer to be able to play a variety of formats. To do this, we constructed the MediaAdapter adapter class, which implements the MediaPlayer interface and plays the needed format using AdvancedMediaPlayer instances.
Without knowing the exact class that can play the requested format, AudioPlayer utilizes the adapter class MediaAdapter and passes it the required audio type. Our demo class, AdapterPatternDemo, will use the AudioPlayer class to play several formats.
Step 1: Create Media Player and Advanced Media Player user interfaces.
MediaPlayer.java
Public interface MediaPlayer {
public void play(String audioType, String fileName);
}
AdvancedMediaPlayer.java
Public interface AdvancedMediaPlayer {
public void playVlc(String fileName);
public void playMp4(String fileName);
}
Step 2: Implement the AdvancedMediaPlayer interface with concrete classes.
VlcPlayer.java
Public class VlcPlayer implements AdvancedMediaPlayer{
@Override
public void playVlc(String fileName) {
System.out.println("Playing vlc file. Name: "+ fileName);
}
@Override
public void playMp4(String fileName) {
//do nothing
}
}
Mp4Player.java
Public class Mp4Player implements AdvancedMediaPlayer{
@Override
public void playVlc(String fileName) {
//do nothing
}
@Override
public void playMp4(String fileName) {
System.out.println("Playing mp4 file. Name: "+ fileName);
}
}
Step 3: Create a MediaPlayer adapter class that implements the interface.
MediaAdapter.java
Public class MediaAdapter implements MediaPlayer {
AdvancedMediaPlayer advancedMusicPlayer;
public MediaAdapter(String audioType){
if(audioType.equalsIgnoreCase("vlc") ){
advancedMusicPlayer = new VlcPlayer();
}else if (audioType.equalsIgnoreCase("mp4")){
advancedMusicPlayer = new Mp4Player();
}
}
@Override
public void play(String audioType, String fileName) {
if(audioType.equalsIgnoreCase("vlc")){
advancedMusicPlayer.playVlc(fileName);
}
else if(audioType.equalsIgnoreCase("mp4")){
advancedMusicPlayer.playMp4(fileName);
}
}
}
Step 4: Create a concrete MediaPlayer interface implementation class.
AudioPlayer.java
Public class AudioPlayer implements MediaPlayer {
MediaAdapter mediaAdapter;
@Override
public void play(String audioType, String fileName) {
//inbuilt support to play mp3 music files
if(audioType.equalsIgnoreCase("mp3")){
System.out.println("Playing mp3 file. Name: " + fileName);
}
//mediaAdapter is providing support to play other file formats
else if(audioType.equalsIgnoreCase("vlc") || audioType.equalsIgnoreCase("mp4")){
mediaAdapter = new MediaAdapter(audioType);
mediaAdapter.play(audioType, fileName);
}
else{
System.out.println("Invalid media. " + audioType + " format not supported");
}
}
}
Step 5: The AudioPlayer can be used to play a variety of audio formats.
AdapterPatternDemo.java
Public class AdapterPatternDemo {
public static void main(String[] args) {
AudioPlayer audioPlayer = new AudioPlayer();
audioPlayer.play("mp3", "beyond the horizon.mp3");
audioPlayer.play("mp4", "alone.mp4");
audioPlayer.play("vlc", "far far away.vlc");
audioPlayer.play("avi", "mind me.avi");
}
}
Step 6: Make sure the output is correct.
Playing mp3 file. Name: beyond the horizon.mp3
Playing mp4 file. Name: alone.mp4
Playing vlc file. Name: far far away.vlc
Invalid media. Avi format not supported
Key takeaway
The adapter pattern acts as a link between two interfaces that are incompatible. This design pattern is classified as a structural pattern since it integrates the capabilities of two separate interfaces.
When we need to separate an abstraction from its implementation so that both can change independently, we utilize Bridge. This design pattern is classified as a structural pattern because it provides a bridge structure that connects implementation and abstract classes.
This pattern uses an interface as a bridge, separating the functionality of concrete classes from the functionality of interface implementer classes. Structures of both sorts of classes can be changed without impacting the other.
The following example shows how to use the Bridge pattern to create a circle in several colors using the same abstract class method but distinct bridge implementer classes.
Advantage of Bridge Pattern
● It allows the implementation and the user interface to be separated.
● It increases the extensibility of the system.
● It allows the client to be unaware of implementation specifics.
Usage of Bridge Pattern
● When you don't want the functional abstraction and its implementation to be permanently linked.
● When sub-classes are used to augment both the functional abstraction and its implementation.
● It's generally utilised in situations where modifications to the implementation don't have an impact on the customers.
Implementation
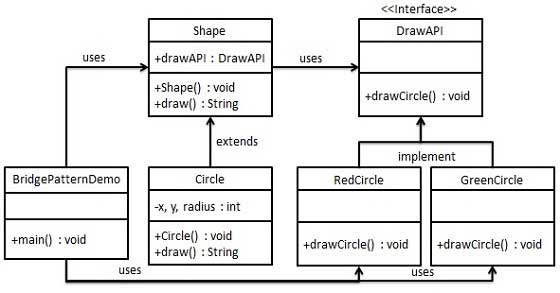
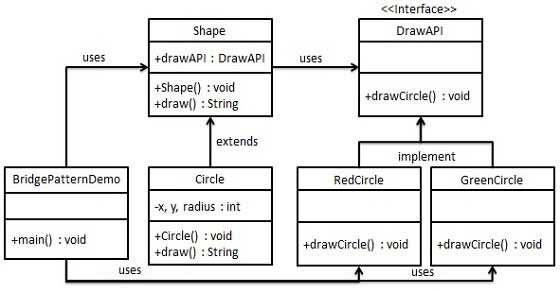
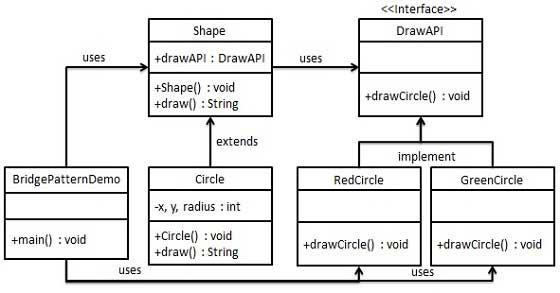
The DrawAPI interface serves as a bridge between the concrete classes RedCircle and GreenCircle, which implement the DrawAPI interface. Shape is an abstract class that will employ a DrawAPI object. Our demo class, BridgePatternDemo, will use the Shape class to draw various coloured circles.
Step 1: Create an interface for bridge implementers.
DrawAPI.java
Public interface DrawAPI {
public void drawCircle(int radius, int x, int y);
}
Step 2: Implement the DrawAPI interface using concrete bridge implementer classes.
RedCircle.java
Public class RedCircle implements DrawAPI {
@Override
public void drawCircle(int radius, int x, int y) {
System.out.println("Drawing Circle[ color: red, radius: " + radius + ", x: " + x + ", " + y + "]");
}
}
GreenCircle.java
Public class GreenCircle implements DrawAPI {
@Override
public void drawCircle(int radius, int x, int y) {
System.out.println("Drawing Circle[ color: green, radius: " + radius + ", x: " + x + ", " + y + "]");
}
}
Step 3: Using the DrawAPI interface, create an abstract class Shape.
Shape.java
Public abstract class Shape {
protected DrawAPI drawAPI;
protected Shape(DrawAPI drawAPI){
this.drawAPI = drawAPI;
}
public abstract void draw();
}
Step 4: Create a concrete Shape interface implementation class.
Circle.java
Public class Circle extends Shape {
private int x, y, radius;
public Circle(int x, int y, int radius, DrawAPI drawAPI) {
super(drawAPI);
this.x = x;
this.y = y;
this.radius = radius;
}
public void draw() {
drawAPI.drawCircle(radius,x,y);
}
}
Step 5: To draw different coloured circles, use the Shape and DrawAPI classes.
BridgePatternDemo.java
Public class BridgePatternDemo {
public static void main(String[] args) {
Shape redCircle = new Circle(100,100, 10, new RedCircle());
Shape greenCircle = new Circle(100,100, 10, new GreenCircle());
redCircle.draw();
greenCircle.draw();
}
}
Step 6: Make sure the output is correct.
Drawing Circle[ color: red, radius: 10, x: 100, 100]
Drawing Circle[ color: green, radius: 10, x: 100, 100]
Key takeaway
This design pattern is classified as a structural pattern because it provides a bridge structure that connects implementation and abstract classes.
When we need to treat a set of items as if they were a single object, we use the composite pattern. The composite pattern assembles things into a tree structure to represent both parts and the entire hierarchy. This design pattern is classified as a structural pattern since it generates a tree structure for a set of things.
This pattern generates a class with a collection of its own objects. This class allows you to change the properties of a set of similar objects.
We'll illustrate how to utilize the composite pattern in the following example, which depicts an organization's staff structure.
Advantage of Composite Design Pattern
● It establishes class hierarchies that include both simple and complicated items.
● It facilitates the addition of new types of components.
● It gives structure flexibility with a manageable class or interface.
Usage of Composite Pattern
It's used for:
● When you need to express a full or partial object hierarchy.
● When responsibilities must be introduced to particular objects dynamically without affecting other objects. Where the object's duty may change from time to time.
Implementation
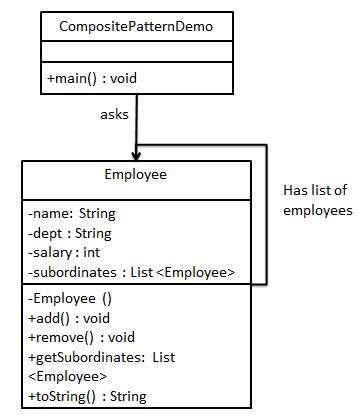
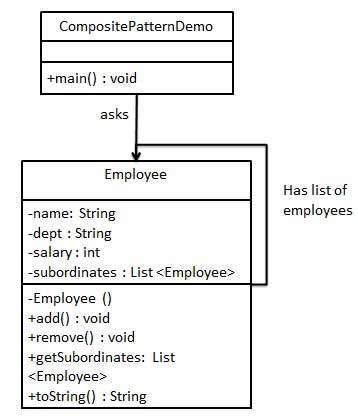
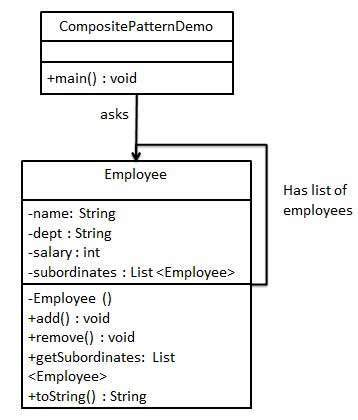
We have a class called Employee that serves as a composite pattern actor. Our demo class, CompositePatternDemo, will use the Employee class to create a department level hierarchy and print all employees.
Step 1: Create a list of Employee objects in the Employee class.
Employee.java
Import java.util.ArrayList;
Import java.util.List;
Public class Employee {
private String name;
private String dept;
private int salary;
private List<Employee> subordinates;
// constructor
public Employee(String name,String dept, int sal) {
this.name = name;
this.dept = dept;
this.salary = sal;
subordinates = new ArrayList<Employee>();
}
public void add(Employee e) {
subordinates.add(e);
}
public void remove(Employee e) {
subordinates.remove(e);
}
public List<Employee> getSubordinates(){
return subordinates;
}
public String toString(){
return ("Employee :[ Name : " + name + ", dept : " + dept + ", salary :" + salary+" ]");
}
}
Step 2: Create and print employee hierarchies with the Employee class.
CompositePatternDemo.java
Public class CompositePatternDemo {
public static void main(String[] args) {
Employee CEO = new Employee("John","CEO", 30000);
Employee headSales = new Employee("Robert","Head Sales", 20000);
Employee headMarketing = new Employee("Michel","Head Marketing", 20000);
Employee clerk1 = new Employee("Laura","Marketing", 10000);
Employee clerk2 = new Employee("Bob","Marketing", 10000);
Employee salesExecutive1 = new Employee("Richard","Sales", 10000);
Employee salesExecutive2 = new Employee("Rob","Sales", 10000);
CEO.add(headSales);
CEO.add(headMarketing);
headSales.add(salesExecutive1);
headSales.add(salesExecutive2);
headMarketing.add(clerk1);
headMarketing.add(clerk2);
//print all employees of the organization
System.out.println(CEO);
for (Employee headEmployee : CEO.getSubordinates()) {
System.out.println(headEmployee);
for (Employee employee : headEmployee.getSubordinates()) {
System.out.println(employee);
}
}
}
}
Step 3: Make sure the output is correct.
Employee :[ Name : John, dept : CEO, salary :30000 ]
Employee :[ Name : Robert, dept : Head Sales, salary :20000 ]
Employee :[ Name : Richard, dept : Sales, salary :10000 ]
Employee :[ Name : Rob, dept : Sales, salary :10000 ]
Employee :[ Name : Michel, dept : Head Marketing, salary :20000 ]
Employee :[ Name : Laura, dept : Marketing, salary :10000 ]
Employee :[ Name : Bob, dept : Marketing, salary :10000 ]
Key takeaway
The composite pattern assembles things into a tree structure to represent both parts and the entire hierarchy. This design pattern is classified as a structural pattern since it generates a tree structure for a set of things.
A user can use the Decorator pattern to add new functionality to an existing object without changing its structure. This design pattern is classified as a structural pattern since it functions as a wrapper for an existing class.
This approach produces a decorator class that encapsulates the original class and adds functionality while keeping the signature of the class methods intact.
We'll show how to utilize the decorator pattern in the following example, in which we'll colorize a shape without changing its class.
Advantage of Decorator Pattern
● It gives you more options than static inheritance.
● Because changes are done by coding new classes, the object's extensibility is increased.
● It makes coding easier by allowing you to create a sequence of functionality from certain classes rather than having to code all of the action into the object.
Usage of Decorator Pattern
It's used for:
● When you want to assign responsibilities to objects in a transparent and dynamic way without affecting other objects.
● When you want to give an object duties that you might wish to change in the future.
● Subclassing is no longer a viable method of extending functionality.
Implementation
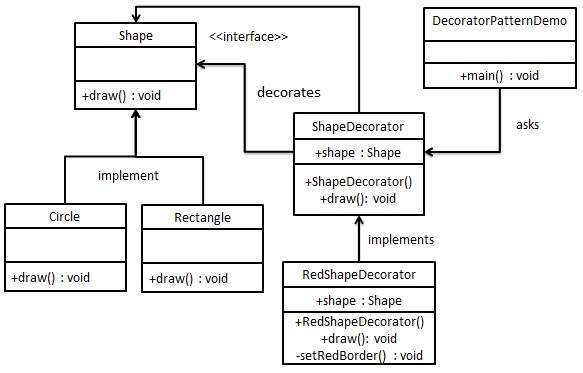
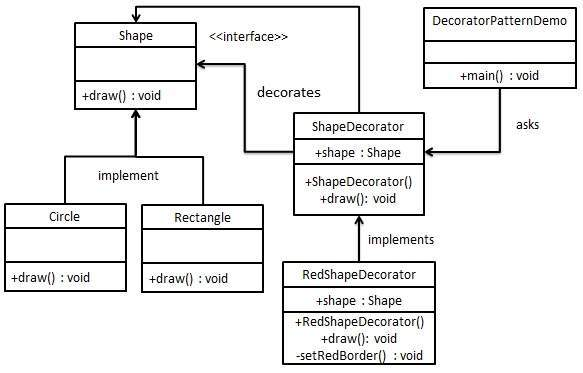
We'll make a Shape interface as well as concrete classes that implement the Shape interface. After that, we'll make an abstract decorator class called ShapeDecorator that implements the Shape interface and has Shape object as an instance variable.
ShapeDecorator is implemented by RedShapeDecorator, a concrete class.
Our demo class, DecoratorPatternDemo, will use RedShapeDecorator to adorn Shape objects.
Step 1: Make a user interface.
Shape.java
Public interface Shape {
void draw();
}
Step 2: Create concrete classes that implement the same interface as the abstract classes.
Rectangle.java
Public class Rectangle implements Shape {
@Override
public void draw() {
System.out.println("Shape: Rectangle");
}
}
Circle.java
Public class Circle implements Shape {
@Override
public void draw() {
System.out.println("Shape: Circle");
}
}
Step 3: Create a Shape interface-implementing abstract decorator class.
ShapeDecorator.java
Public abstract class ShapeDecorator implements Shape {
protected Shape decoratedShape;
public ShapeDecorator(Shape decoratedShape){
this.decoratedShape = decoratedShape;
}
public void draw(){
decoratedShape.draw();
}
}
Step 4: Make a concrete decorator class that extends ShapeDecorator.
RedShapeDecorator.java
Public class RedShapeDecorator extends ShapeDecorator {
public RedShapeDecorator(Shape decoratedShape) {
super(decoratedShape);
}
@Override
public void draw() {
decoratedShape.draw();
setRedBorder(decoratedShape);
}
private void setRedBorder(Shape decoratedShape){
System.out.println("Border Color: Red");
}
}
Step 5: To adorn Shape objects, use the RedShapeDecorator.
DecoratorPatternDemo.java
Public class DecoratorPatternDemo {
public static void main(String[] args) {
Shape circle = new Circle();
Shape redCircle = new RedShapeDecorator(new Circle());
Shape redRectangle = new RedShapeDecorator(new Rectangle());
System.out.println("Circle with normal border");
circle.draw();
System.out.println("\nCircle of red border");
redCircle.draw();
System.out.println("\nRectangle of red border");
redRectangle.draw();
}
}
Step 6: Make sure the output is correct.
Circle with normal border
Shape: Circle
Circle of red border
Shape: Circle
Border Color: Red
Rectangle of red border
Shape: Rectangle
Border Color: Red
Key takeaway
A user can use the Decorator pattern to add new functionality to an existing object without changing its structure.
The facade design hides the system's intricacies and provides a client interface through which the client can access the system. This design pattern is classified as a structural pattern since it adds an interface to an existing system in order to hide its intricacies.
This design uses a single class to provide client-side simplified methods while delegating calls to existing system classes' functions.
Advantage of Facade Pattern
● It protects customers from the sub-system components' intricacies.
● It encourages subsystems and clients to be loosely coupled.
Usage of Facade Pattern
It's used for:
● When you need a simple interface to a sophisticated sub-system.
● When there are several dependencies between clients and an abstraction's implementation classes.
Implementation
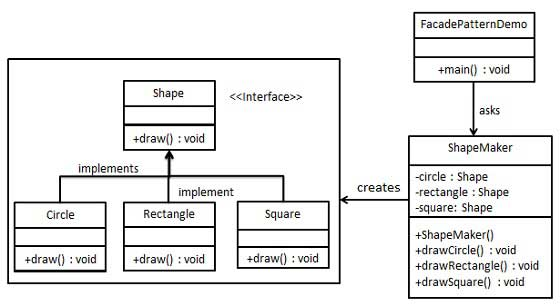
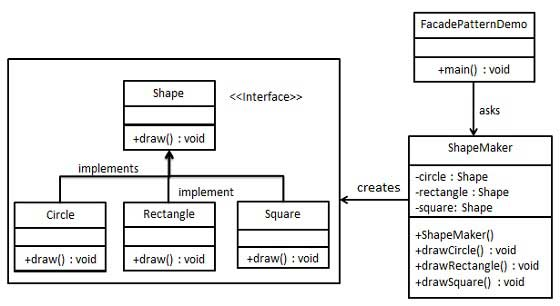
We'll make a Shape interface as well as concrete classes that implement the Shape interface. As a next step, the facade class ShapeMaker is defined.
The concrete classes are used by the ShapeMaker class to delegate user calls to these classes. Our demo class, FacadePatternDemo, will use the ShapeMaker class to display the results.
Step 1: Make a user interface.
Shape.java
Public interface Shape {
void draw();
}
Step 2: Create concrete classes that implement the same interface as the abstract classes.
Rectangle.java
Public class Rectangle implements Shape {
@Override
public void draw() {
System.out.println("Rectangle::draw()");
}
}
Square.java
Public class Square implements Shape {
@Override
public void draw() {
System.out.println("Square::draw()");
}
}
Circle.java
Public class Circle implements Shape {
@Override
public void draw() {
System.out.println("Circle::draw()");
}
}
Step 3: Make a class for the facade.
ShapeMaker.java
Public class ShapeMaker {
private Shape circle;
private Shape rectangle;
private Shape square;
public ShapeMaker() {
circle = new Circle();
rectangle = new Rectangle();
square = new Square();
}
public void drawCircle(){
circle.draw();
}
public void drawRectangle(){
rectangle.draw();
}
public void drawSquare(){
square.draw();
}
}
Step 4: Use the facade to create a variety of different shapes.
FacadePatternDemo.java
Public class FacadePatternDemo {
public static void main(String[] args) {
ShapeMaker shapeMaker = new ShapeMaker();
shapeMaker.drawCircle();
shapeMaker.drawRectangle();
shapeMaker.drawSquare();
}
}
Step 5: Verify the output.
Circle::draw()
Rectangle::draw()
Square::draw()
The Flyweight pattern is used to reduce the amount of objects created, reduce memory footprint, and improve performance. This design pattern is classified as a structural pattern since it shows how to reduce the number of objects in an application's object structure.
When no identical objects are located, the Flyweight design tries to reuse them by storing them and then constructs a new item. We'll demonstrate this pattern by drawing 20 circles in various positions, however only 5 items will be created. Because there are only five colors available, the color attribute is used to check for existing Circle objects.
Advantage of Flyweight Pattern
● The number of things is reduced.
● If the items are persistent, the quantity of memory and storage devices required is reduced.
Usage of Flyweight Pattern
● When a programme employs a large number of objects.
● When the cost of storage is high due to the large number of things.
● When the programme does not rely on the identity of the objects.
Implementation
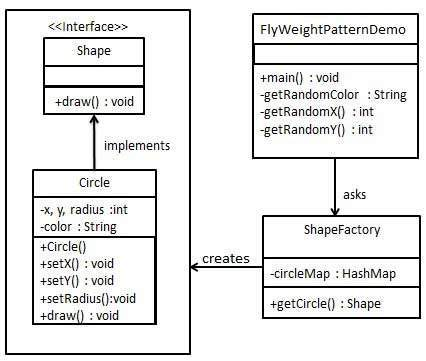
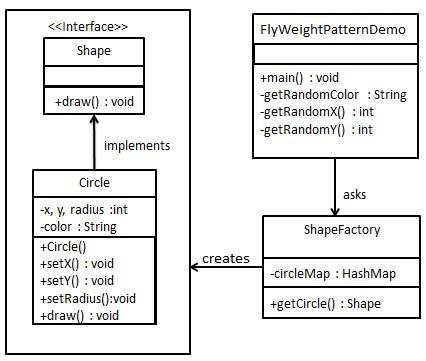
We'll construct a Shape interface and a concrete Circle class that implements the Shape interface. As a next stage, a factory class named ShapeFactory is created.
ShapeFactory has a Circle HashMap with the color of the Circle object as the key. When ShapeFactory receives a request to produce a circle of a specific hue, it first examines its HashMap for a circle object; if one is found, it is returned; otherwise, a new object is constructed, saved in the hashmap for future use, and provided to the client.
Our demo class, FlyWeightPatternDemo, will acquire a Shape object from ShapeFactory. It will send information (red, green, blue, black, and white) to ShapeFactory in order to obtain the circle of the specified color.
Step 1: Make a user interface.
Shape.java
Public interface Shape {
void draw();
}
Step 2: Create a concrete class that implements the same interface as the abstract class.
Circle.java
Public class Circle implements Shape {
private String color;
private int x;
private int y;
private int radius;
public Circle(String color){
this.color = color;
}
public void setX(int x) {
this.x = x;
}
public void setY(int y) {
this.y = y;
}
public void setRadius(int radius) {
this.radius = radius;
}
@Override
public void draw() {
System.out.println("Circle: Draw() [Color : " + color + ", x : " + x + ", y :" + y + ", radius :" + radius);
}
}
Step 3: Create a factory that generates concrete class objects based on input.
ShapeFactory.java
Import java.util.HashMap;
Public class ShapeFactory {
// Uncomment the compiler directive line and
// javac *.java will compile properly.
// @SuppressWarnings("unchecked")
private static final HashMap circleMap = new HashMap();
public static Shape getCircle(String color) {
Circle circle = (Circle)circleMap.get(color);
if(circle == null) {
circle = new Circle(color);
circleMap.put(color, circle);
System.out.println("Creating circle of color : " + color);
}
return circle;
}
}
Step 4: By supplying information like color to the factory, you can retrieve an object of a concrete class.
FlyweightPatternDemo.java
Public class FlyweightPatternDemo {
private static final String colors[] = { "Red", "Green", "Blue", "White", "Black" };
public static void main(String[] args) {
for(int i=0; i < 20; ++i) {
Circle circle = (Circle)ShapeFactory.getCircle(getRandomColor());
circle.setX(getRandomX());
circle.setY(getRandomY());
circle.setRadius(100);
circle.draw();
}
}
private static String getRandomColor() {
return colors[(int)(Math.random()*colors.length)];
}
private static int getRandomX() {
return (int)(Math.random()*100 );
}
private static int getRandomY() {
return (int)(Math.random()*100);
}
}
Step 5: Make sure the output is correct.
Creating circle of color : Black
Circle: Draw() [Color : Black, x : 36, y :71, radius :100
Creating circle of color : Green
Circle: Draw() [Color : Green, x : 27, y :27, radius :100
Creating circle of color : White
Circle: Draw() [Color : White, x : 64, y :10, radius :100
Creating circle of color : Red
Circle: Draw() [Color : Red, x : 15, y :44, radius :100
Circle: Draw() [Color : Green, x : 19, y :10, radius :100
Circle: Draw() [Color : Green, x : 94, y :32, radius :100
Circle: Draw() [Color : White, x : 69, y :98, radius :100
Creating circle of color : Blue
Circle: Draw() [Color : Blue, x : 13, y :4, radius :100
Circle: Draw() [Color : Green, x : 21, y :21, radius :100
Circle: Draw() [Color : Blue, x : 55, y :86, radius :100
Circle: Draw() [Color : White, x : 90, y :70, radius :100
Circle: Draw() [Color : Green, x : 78, y :3, radius :100
Circle: Draw() [Color : Green, x : 64, y :89, radius :100
Circle: Draw() [Color : Blue, x : 3, y :91, radius :100
Circle: Draw() [Color : Blue, x : 62, y :82, radius :100
Circle: Draw() [Color : Green, x : 97, y :61, radius :100
Circle: Draw() [Color : Green, x : 86, y :12, radius :100
Circle: Draw() [Color : Green, x : 38, y :93, radius :100
Circle: Draw() [Color : Red, x : 76, y :82, radius :100
Circle: Draw() [Color : Blue, x : 95, y :82, radius :100
Key takeaway
The facade design hides the system's intricacies and provides a client interface through which the client can access the system.
A class in the proxy pattern represents the functionality of another class. This design pattern is classified as a structural pattern.
In the proxy pattern, we create an object that contains the original object and uses it to interface its capabilities with the outside world.
Proxy pattern is also known as Surrogate or Placeholder.
Advantage of Proxy Pattern
It shields the original object from the outer world.
Usage of Proxy Pattern
It's used for:
It's appropriate for use in a Virtual Proxy scenario—-
● Consider a scenario in which numerous database calls are required to retrieve a large image. Because this is a time-consuming operation, we can utilize the proxy pattern to generate many proxies that point to the large memory-intensive object for further processing. Only when a client requests/accesses the object is the true object produced; after that, we can simply refer to the proxy to reuse the item. This prevents the object from being duplicated, conserving memory.
● It's appropriate for use in a Protective Proxy scenario—- It serves as an authorization layer, ensuring that the actual user gets access to the proper material. For instance, a proxy server that restricts internet access in the office. Only legitimate websites and content will be permitted, while the rest will be prohibited.
● It can be utilized in the case of a Remote Proxy—- The stub in an RPC call can be thought of as a remote proxy. The remote proxy creates a local version of the object that is located at a separate address. Providing an interface for remote resources such as web services or REST resources is another example.
● It's possible to use it in a Smart Proxy scenario—- When an object is accessed, a smart proxy adds an extra layer of protection by interposing certain activities. For example, before accessing an actual item, check whether it is locked or not so that no other objects can change it.
Implementation
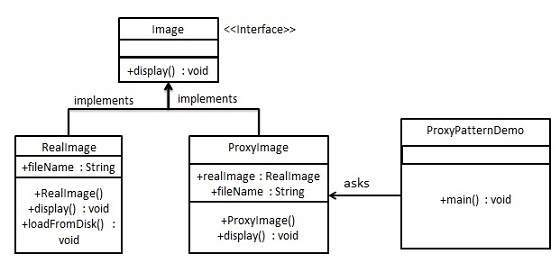
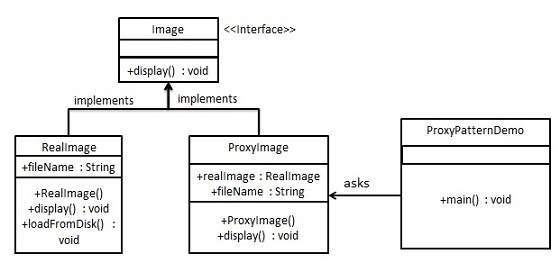
We're going to make an Image interface, as well as actual classes that implement it. ProxyImage is a class that reduces the memory footprint of loading RealImage objects.
Our demo class, ProxyPatternDemo, will use ProxyImage to get an Image object to load and show as needed.
Step 1: Make a user interface.
Image.java
Public interface Image {
void display();
}
Step 2: Create concrete classes that implement the same interface as the abstract classes.
RealImage.java
Public class RealImage implements Image {
private String fileName;
public RealImage(String fileName){
this.fileName = fileName;
loadFromDisk(fileName);
}
@Override
public void display() {
System.out.println("Displaying " + fileName);
}
private void loadFromDisk(String fileName){
System.out.println("Loading " + fileName);
}
}
ProxyImage.java
Public class ProxyImage implements Image{
private RealImage realImage;
private String fileName;
public ProxyImage(String fileName){
this.fileName = fileName;
}
@Override
public void display() {
if(realImage == null){
realImage = new RealImage(fileName);
}
realImage.display();
}
}
Step 3: When you need a RealImage instance, use the ProxyImage class.
ProxyPatternDemo.java
Public class ProxyPatternDemo {
public static void main(String[] args) {
Image image = new ProxyImage("test_10mb.jpg");
//image will be loaded from disk
image.display();
System.out.println("");
//image will not be loaded from disk
image.display();
}
}
Step 4: Make sure the output is correct.
Loading test_10mb.jpg
Displaying test_10mb.jpg
Displaying test_10mb.jpg
Key takeaway
In the proxy pattern, we create an object that contains the original object and uses it to interface its capabilities with the outside world.
Proxy pattern is also known as Surrogate or Placeholder.
The composition of classes and objects to construct larger structures is the subject of structural design patterns.
By recognising the relationships, structural design patterns simplify the structure.
These patterns are concerned with how classes inherit from one another and how they are made up of other classes.
Types of structural design patterns
The following are seven different forms of structural design patterns.
● Adapter Pattern: Transforming one interface into another based on the needs of the client.
● Bridge Pattern: Separating abstraction (interface) from implementation with the Bridge Pattern.
● Composite Pattern: Clients can act on a hierarchy of objects using the Composite Pattern.
● Decorator Pattern: The Decorator Pattern is used to dynamically add functionality to an object.
● Facade Pattern: The Facade Pattern is used to provide an interface to a group of interfaces.
● Flyweight Pattern: The Flyweight Pattern is a method of repurposing an object by sharing it.
● Proxy Pattern: This pattern is used to represent another object.
References:
- Head First Design Patterns, by Eric Freeman and Elisabeth Freeman
- Design Patterns Explained, by Shalloway and Trott
- Introduction to design Patterns in C++ with Qt by Alan Ezust, Paul Ezust
Unit - 3
Structural Pattern
The adapter pattern acts as a link between two interfaces that are incompatible. This design pattern is classified as a structural pattern since it integrates the capabilities of two separate interfaces.
A single class is responsible for joining the capabilities of separate or incompatible interfaces in this design. A card reader, which functions as an adaptor between a memory card and a laptop, is a real-life example. The memory card is inserted into a card reader, which is then inserted into the laptop, allowing the memory card to be read via the laptop.
We'll show how to utilize the Adapter pattern in the following example, where an audio player device can only play mp3 files and wishes to use a more complex audio player that can play vlc and mp4 files.
Advantage of Adapter Pattern
The Benefits of the Adapter Pattern
● It enables the interaction of two or more previously incompatible things.
● It allows existing functionality to be reused.
Usage of Adapter pattern
It's used for:
● When an object has to use a class that has an incompatible interface.
● When you need to make a reusable class that works with other classes that don't have the same interface.
● When you need to make a reusable class that works with other classes that don't have the same interface.
Implementation
We have a MediaPlayer interface, as well as a concrete class AudioPlayer that implements it. By default, AudioPlayer can play audio files in the MP3 format.
Another interface, AdvancedMediaPlayer, has been added, as well as concrete classes that implement the AdvancedMediaPlayer interface. These classes can play files in the vlc and mp4 formats.
We want AudioPlayer to be able to play a variety of formats. To do this, we constructed the MediaAdapter adapter class, which implements the MediaPlayer interface and plays the needed format using AdvancedMediaPlayer instances.
Without knowing the exact class that can play the requested format, AudioPlayer utilizes the adapter class MediaAdapter and passes it the required audio type. Our demo class, AdapterPatternDemo, will use the AudioPlayer class to play several formats.
Step 1: Create Media Player and Advanced Media Player user interfaces.
MediaPlayer.java
Public interface MediaPlayer {
public void play(String audioType, String fileName);
}
AdvancedMediaPlayer.java
Public interface AdvancedMediaPlayer {
public void playVlc(String fileName);
public void playMp4(String fileName);
}
Step 2: Implement the AdvancedMediaPlayer interface with concrete classes.
VlcPlayer.java
Public class VlcPlayer implements AdvancedMediaPlayer{
@Override
public void playVlc(String fileName) {
System.out.println("Playing vlc file. Name: "+ fileName);
}
@Override
public void playMp4(String fileName) {
//do nothing
}
}
Mp4Player.java
Public class Mp4Player implements AdvancedMediaPlayer{
@Override
public void playVlc(String fileName) {
//do nothing
}
@Override
public void playMp4(String fileName) {
System.out.println("Playing mp4 file. Name: "+ fileName);
}
}
Step 3: Create a MediaPlayer adapter class that implements the interface.
MediaAdapter.java
Public class MediaAdapter implements MediaPlayer {
AdvancedMediaPlayer advancedMusicPlayer;
public MediaAdapter(String audioType){
if(audioType.equalsIgnoreCase("vlc") ){
advancedMusicPlayer = new VlcPlayer();
}else if (audioType.equalsIgnoreCase("mp4")){
advancedMusicPlayer = new Mp4Player();
}
}
@Override
public void play(String audioType, String fileName) {
if(audioType.equalsIgnoreCase("vlc")){
advancedMusicPlayer.playVlc(fileName);
}
else if(audioType.equalsIgnoreCase("mp4")){
advancedMusicPlayer.playMp4(fileName);
}
}
}
Step 4: Create a concrete MediaPlayer interface implementation class.
AudioPlayer.java
Public class AudioPlayer implements MediaPlayer {
MediaAdapter mediaAdapter;
@Override
public void play(String audioType, String fileName) {
//inbuilt support to play mp3 music files
if(audioType.equalsIgnoreCase("mp3")){
System.out.println("Playing mp3 file. Name: " + fileName);
}
//mediaAdapter is providing support to play other file formats
else if(audioType.equalsIgnoreCase("vlc") || audioType.equalsIgnoreCase("mp4")){
mediaAdapter = new MediaAdapter(audioType);
mediaAdapter.play(audioType, fileName);
}
else{
System.out.println("Invalid media. " + audioType + " format not supported");
}
}
}
Step 5: The AudioPlayer can be used to play a variety of audio formats.
AdapterPatternDemo.java
Public class AdapterPatternDemo {
public static void main(String[] args) {
AudioPlayer audioPlayer = new AudioPlayer();
audioPlayer.play("mp3", "beyond the horizon.mp3");
audioPlayer.play("mp4", "alone.mp4");
audioPlayer.play("vlc", "far far away.vlc");
audioPlayer.play("avi", "mind me.avi");
}
}
Step 6: Make sure the output is correct.
Playing mp3 file. Name: beyond the horizon.mp3
Playing mp4 file. Name: alone.mp4
Playing vlc file. Name: far far away.vlc
Invalid media. Avi format not supported
Key takeaway
The adapter pattern acts as a link between two interfaces that are incompatible. This design pattern is classified as a structural pattern since it integrates the capabilities of two separate interfaces.
When we need to separate an abstraction from its implementation so that both can change independently, we utilize Bridge. This design pattern is classified as a structural pattern because it provides a bridge structure that connects implementation and abstract classes.
This pattern uses an interface as a bridge, separating the functionality of concrete classes from the functionality of interface implementer classes. Structures of both sorts of classes can be changed without impacting the other.
The following example shows how to use the Bridge pattern to create a circle in several colors using the same abstract class method but distinct bridge implementer classes.
Advantage of Bridge Pattern
● It allows the implementation and the user interface to be separated.
● It increases the extensibility of the system.
● It allows the client to be unaware of implementation specifics.
Usage of Bridge Pattern
● When you don't want the functional abstraction and its implementation to be permanently linked.
● When sub-classes are used to augment both the functional abstraction and its implementation.
● It's generally utilised in situations where modifications to the implementation don't have an impact on the customers.
Implementation
The DrawAPI interface serves as a bridge between the concrete classes RedCircle and GreenCircle, which implement the DrawAPI interface. Shape is an abstract class that will employ a DrawAPI object. Our demo class, BridgePatternDemo, will use the Shape class to draw various coloured circles.
Step 1: Create an interface for bridge implementers.
DrawAPI.java
Public interface DrawAPI {
public void drawCircle(int radius, int x, int y);
}
Step 2: Implement the DrawAPI interface using concrete bridge implementer classes.
RedCircle.java
Public class RedCircle implements DrawAPI {
@Override
public void drawCircle(int radius, int x, int y) {
System.out.println("Drawing Circle[ color: red, radius: " + radius + ", x: " + x + ", " + y + "]");
}
}
GreenCircle.java
Public class GreenCircle implements DrawAPI {
@Override
public void drawCircle(int radius, int x, int y) {
System.out.println("Drawing Circle[ color: green, radius: " + radius + ", x: " + x + ", " + y + "]");
}
}
Step 3: Using the DrawAPI interface, create an abstract class Shape.
Shape.java
Public abstract class Shape {
protected DrawAPI drawAPI;
protected Shape(DrawAPI drawAPI){
this.drawAPI = drawAPI;
}
public abstract void draw();
}
Step 4: Create a concrete Shape interface implementation class.
Circle.java
Public class Circle extends Shape {
private int x, y, radius;
public Circle(int x, int y, int radius, DrawAPI drawAPI) {
super(drawAPI);
this.x = x;
this.y = y;
this.radius = radius;
}
public void draw() {
drawAPI.drawCircle(radius,x,y);
}
}
Step 5: To draw different coloured circles, use the Shape and DrawAPI classes.
BridgePatternDemo.java
Public class BridgePatternDemo {
public static void main(String[] args) {
Shape redCircle = new Circle(100,100, 10, new RedCircle());
Shape greenCircle = new Circle(100,100, 10, new GreenCircle());
redCircle.draw();
greenCircle.draw();
}
}
Step 6: Make sure the output is correct.
Drawing Circle[ color: red, radius: 10, x: 100, 100]
Drawing Circle[ color: green, radius: 10, x: 100, 100]
Key takeaway
This design pattern is classified as a structural pattern because it provides a bridge structure that connects implementation and abstract classes.
When we need to treat a set of items as if they were a single object, we use the composite pattern. The composite pattern assembles things into a tree structure to represent both parts and the entire hierarchy. This design pattern is classified as a structural pattern since it generates a tree structure for a set of things.
This pattern generates a class with a collection of its own objects. This class allows you to change the properties of a set of similar objects.
We'll illustrate how to utilize the composite pattern in the following example, which depicts an organization's staff structure.
Advantage of Composite Design Pattern
● It establishes class hierarchies that include both simple and complicated items.
● It facilitates the addition of new types of components.
● It gives structure flexibility with a manageable class or interface.
Usage of Composite Pattern
It's used for:
● When you need to express a full or partial object hierarchy.
● When responsibilities must be introduced to particular objects dynamically without affecting other objects. Where the object's duty may change from time to time.
Implementation
We have a class called Employee that serves as a composite pattern actor. Our demo class, CompositePatternDemo, will use the Employee class to create a department level hierarchy and print all employees.
Step 1: Create a list of Employee objects in the Employee class.
Employee.java
Import java.util.ArrayList;
Import java.util.List;
Public class Employee {
private String name;
private String dept;
private int salary;
private List<Employee> subordinates;
// constructor
public Employee(String name,String dept, int sal) {
this.name = name;
this.dept = dept;
this.salary = sal;
subordinates = new ArrayList<Employee>();
}
public void add(Employee e) {
subordinates.add(e);
}
public void remove(Employee e) {
subordinates.remove(e);
}
public List<Employee> getSubordinates(){
return subordinates;
}
public String toString(){
return ("Employee :[ Name : " + name + ", dept : " + dept + ", salary :" + salary+" ]");
}
}
Step 2: Create and print employee hierarchies with the Employee class.
CompositePatternDemo.java
Public class CompositePatternDemo {
public static void main(String[] args) {
Employee CEO = new Employee("John","CEO", 30000);
Employee headSales = new Employee("Robert","Head Sales", 20000);
Employee headMarketing = new Employee("Michel","Head Marketing", 20000);
Employee clerk1 = new Employee("Laura","Marketing", 10000);
Employee clerk2 = new Employee("Bob","Marketing", 10000);
Employee salesExecutive1 = new Employee("Richard","Sales", 10000);
Employee salesExecutive2 = new Employee("Rob","Sales", 10000);
CEO.add(headSales);
CEO.add(headMarketing);
headSales.add(salesExecutive1);
headSales.add(salesExecutive2);
headMarketing.add(clerk1);
headMarketing.add(clerk2);
//print all employees of the organization
System.out.println(CEO);
for (Employee headEmployee : CEO.getSubordinates()) {
System.out.println(headEmployee);
for (Employee employee : headEmployee.getSubordinates()) {
System.out.println(employee);
}
}
}
}
Step 3: Make sure the output is correct.
Employee :[ Name : John, dept : CEO, salary :30000 ]
Employee :[ Name : Robert, dept : Head Sales, salary :20000 ]
Employee :[ Name : Richard, dept : Sales, salary :10000 ]
Employee :[ Name : Rob, dept : Sales, salary :10000 ]
Employee :[ Name : Michel, dept : Head Marketing, salary :20000 ]
Employee :[ Name : Laura, dept : Marketing, salary :10000 ]
Employee :[ Name : Bob, dept : Marketing, salary :10000 ]
Key takeaway
The composite pattern assembles things into a tree structure to represent both parts and the entire hierarchy. This design pattern is classified as a structural pattern since it generates a tree structure for a set of things.
A user can use the Decorator pattern to add new functionality to an existing object without changing its structure. This design pattern is classified as a structural pattern since it functions as a wrapper for an existing class.
This approach produces a decorator class that encapsulates the original class and adds functionality while keeping the signature of the class methods intact.
We'll show how to utilize the decorator pattern in the following example, in which we'll colorize a shape without changing its class.
Advantage of Decorator Pattern
● It gives you more options than static inheritance.
● Because changes are done by coding new classes, the object's extensibility is increased.
● It makes coding easier by allowing you to create a sequence of functionality from certain classes rather than having to code all of the action into the object.
Usage of Decorator Pattern
It's used for:
● When you want to assign responsibilities to objects in a transparent and dynamic way without affecting other objects.
● When you want to give an object duties that you might wish to change in the future.
● Subclassing is no longer a viable method of extending functionality.
Implementation
We'll make a Shape interface as well as concrete classes that implement the Shape interface. After that, we'll make an abstract decorator class called ShapeDecorator that implements the Shape interface and has Shape object as an instance variable.
ShapeDecorator is implemented by RedShapeDecorator, a concrete class.
Our demo class, DecoratorPatternDemo, will use RedShapeDecorator to adorn Shape objects.
Step 1: Make a user interface.
Shape.java
Public interface Shape {
void draw();
}
Step 2: Create concrete classes that implement the same interface as the abstract classes.
Rectangle.java
Public class Rectangle implements Shape {
@Override
public void draw() {
System.out.println("Shape: Rectangle");
}
}
Circle.java
Public class Circle implements Shape {
@Override
public void draw() {
System.out.println("Shape: Circle");
}
}
Step 3: Create a Shape interface-implementing abstract decorator class.
ShapeDecorator.java
Public abstract class ShapeDecorator implements Shape {
protected Shape decoratedShape;
public ShapeDecorator(Shape decoratedShape){
this.decoratedShape = decoratedShape;
}
public void draw(){
decoratedShape.draw();
}
}
Step 4: Make a concrete decorator class that extends ShapeDecorator.
RedShapeDecorator.java
Public class RedShapeDecorator extends ShapeDecorator {
public RedShapeDecorator(Shape decoratedShape) {
super(decoratedShape);
}
@Override
public void draw() {
decoratedShape.draw();
setRedBorder(decoratedShape);
}
private void setRedBorder(Shape decoratedShape){
System.out.println("Border Color: Red");
}
}
Step 5: To adorn Shape objects, use the RedShapeDecorator.
DecoratorPatternDemo.java
Public class DecoratorPatternDemo {
public static void main(String[] args) {
Shape circle = new Circle();
Shape redCircle = new RedShapeDecorator(new Circle());
Shape redRectangle = new RedShapeDecorator(new Rectangle());
System.out.println("Circle with normal border");
circle.draw();
System.out.println("\nCircle of red border");
redCircle.draw();
System.out.println("\nRectangle of red border");
redRectangle.draw();
}
}
Step 6: Make sure the output is correct.
Circle with normal border
Shape: Circle
Circle of red border
Shape: Circle
Border Color: Red
Rectangle of red border
Shape: Rectangle
Border Color: Red
Key takeaway
A user can use the Decorator pattern to add new functionality to an existing object without changing its structure.
The facade design hides the system's intricacies and provides a client interface through which the client can access the system. This design pattern is classified as a structural pattern since it adds an interface to an existing system in order to hide its intricacies.
This design uses a single class to provide client-side simplified methods while delegating calls to existing system classes' functions.
Advantage of Facade Pattern
● It protects customers from the sub-system components' intricacies.
● It encourages subsystems and clients to be loosely coupled.
Usage of Facade Pattern
It's used for:
● When you need a simple interface to a sophisticated sub-system.
● When there are several dependencies between clients and an abstraction's implementation classes.
Implementation
We'll make a Shape interface as well as concrete classes that implement the Shape interface. As a next step, the facade class ShapeMaker is defined.
The concrete classes are used by the ShapeMaker class to delegate user calls to these classes. Our demo class, FacadePatternDemo, will use the ShapeMaker class to display the results.
Step 1: Make a user interface.
Shape.java
Public interface Shape {
void draw();
}
Step 2: Create concrete classes that implement the same interface as the abstract classes.
Rectangle.java
Public class Rectangle implements Shape {
@Override
public void draw() {
System.out.println("Rectangle::draw()");
}
}
Square.java
Public class Square implements Shape {
@Override
public void draw() {
System.out.println("Square::draw()");
}
}
Circle.java
Public class Circle implements Shape {
@Override
public void draw() {
System.out.println("Circle::draw()");
}
}
Step 3: Make a class for the facade.
ShapeMaker.java
Public class ShapeMaker {
private Shape circle;
private Shape rectangle;
private Shape square;
public ShapeMaker() {
circle = new Circle();
rectangle = new Rectangle();
square = new Square();
}
public void drawCircle(){
circle.draw();
}
public void drawRectangle(){
rectangle.draw();
}
public void drawSquare(){
square.draw();
}
}
Step 4: Use the facade to create a variety of different shapes.
FacadePatternDemo.java
Public class FacadePatternDemo {
public static void main(String[] args) {
ShapeMaker shapeMaker = new ShapeMaker();
shapeMaker.drawCircle();
shapeMaker.drawRectangle();
shapeMaker.drawSquare();
}
}
Step 5: Verify the output.
Circle::draw()
Rectangle::draw()
Square::draw()
The Flyweight pattern is used to reduce the amount of objects created, reduce memory footprint, and improve performance. This design pattern is classified as a structural pattern since it shows how to reduce the number of objects in an application's object structure.
When no identical objects are located, the Flyweight design tries to reuse them by storing them and then constructs a new item. We'll demonstrate this pattern by drawing 20 circles in various positions, however only 5 items will be created. Because there are only five colors available, the color attribute is used to check for existing Circle objects.
Advantage of Flyweight Pattern
● The number of things is reduced.
● If the items are persistent, the quantity of memory and storage devices required is reduced.
Usage of Flyweight Pattern
● When a programme employs a large number of objects.
● When the cost of storage is high due to the large number of things.
● When the programme does not rely on the identity of the objects.
Implementation
We'll construct a Shape interface and a concrete Circle class that implements the Shape interface. As a next stage, a factory class named ShapeFactory is created.
ShapeFactory has a Circle HashMap with the color of the Circle object as the key. When ShapeFactory receives a request to produce a circle of a specific hue, it first examines its HashMap for a circle object; if one is found, it is returned; otherwise, a new object is constructed, saved in the hashmap for future use, and provided to the client.
Our demo class, FlyWeightPatternDemo, will acquire a Shape object from ShapeFactory. It will send information (red, green, blue, black, and white) to ShapeFactory in order to obtain the circle of the specified color.
Step 1: Make a user interface.
Shape.java
Public interface Shape {
void draw();
}
Step 2: Create a concrete class that implements the same interface as the abstract class.
Circle.java
Public class Circle implements Shape {
private String color;
private int x;
private int y;
private int radius;
public Circle(String color){
this.color = color;
}
public void setX(int x) {
this.x = x;
}
public void setY(int y) {
this.y = y;
}
public void setRadius(int radius) {
this.radius = radius;
}
@Override
public void draw() {
System.out.println("Circle: Draw() [Color : " + color + ", x : " + x + ", y :" + y + ", radius :" + radius);
}
}
Step 3: Create a factory that generates concrete class objects based on input.
ShapeFactory.java
Import java.util.HashMap;
Public class ShapeFactory {
// Uncomment the compiler directive line and
// javac *.java will compile properly.
// @SuppressWarnings("unchecked")
private static final HashMap circleMap = new HashMap();
public static Shape getCircle(String color) {
Circle circle = (Circle)circleMap.get(color);
if(circle == null) {
circle = new Circle(color);
circleMap.put(color, circle);
System.out.println("Creating circle of color : " + color);
}
return circle;
}
}
Step 4: By supplying information like color to the factory, you can retrieve an object of a concrete class.
FlyweightPatternDemo.java
Public class FlyweightPatternDemo {
private static final String colors[] = { "Red", "Green", "Blue", "White", "Black" };
public static void main(String[] args) {
for(int i=0; i < 20; ++i) {
Circle circle = (Circle)ShapeFactory.getCircle(getRandomColor());
circle.setX(getRandomX());
circle.setY(getRandomY());
circle.setRadius(100);
circle.draw();
}
}
private static String getRandomColor() {
return colors[(int)(Math.random()*colors.length)];
}
private static int getRandomX() {
return (int)(Math.random()*100 );
}
private static int getRandomY() {
return (int)(Math.random()*100);
}
}
Step 5: Make sure the output is correct.
Creating circle of color : Black
Circle: Draw() [Color : Black, x : 36, y :71, radius :100
Creating circle of color : Green
Circle: Draw() [Color : Green, x : 27, y :27, radius :100
Creating circle of color : White
Circle: Draw() [Color : White, x : 64, y :10, radius :100
Creating circle of color : Red
Circle: Draw() [Color : Red, x : 15, y :44, radius :100
Circle: Draw() [Color : Green, x : 19, y :10, radius :100
Circle: Draw() [Color : Green, x : 94, y :32, radius :100
Circle: Draw() [Color : White, x : 69, y :98, radius :100
Creating circle of color : Blue
Circle: Draw() [Color : Blue, x : 13, y :4, radius :100
Circle: Draw() [Color : Green, x : 21, y :21, radius :100
Circle: Draw() [Color : Blue, x : 55, y :86, radius :100
Circle: Draw() [Color : White, x : 90, y :70, radius :100
Circle: Draw() [Color : Green, x : 78, y :3, radius :100
Circle: Draw() [Color : Green, x : 64, y :89, radius :100
Circle: Draw() [Color : Blue, x : 3, y :91, radius :100
Circle: Draw() [Color : Blue, x : 62, y :82, radius :100
Circle: Draw() [Color : Green, x : 97, y :61, radius :100
Circle: Draw() [Color : Green, x : 86, y :12, radius :100
Circle: Draw() [Color : Green, x : 38, y :93, radius :100
Circle: Draw() [Color : Red, x : 76, y :82, radius :100
Circle: Draw() [Color : Blue, x : 95, y :82, radius :100
Key takeaway
The facade design hides the system's intricacies and provides a client interface through which the client can access the system.
A class in the proxy pattern represents the functionality of another class. This design pattern is classified as a structural pattern.
In the proxy pattern, we create an object that contains the original object and uses it to interface its capabilities with the outside world.
Proxy pattern is also known as Surrogate or Placeholder.
Advantage of Proxy Pattern
It shields the original object from the outer world.
Usage of Proxy Pattern
It's used for:
It's appropriate for use in a Virtual Proxy scenario—-
● Consider a scenario in which numerous database calls are required to retrieve a large image. Because this is a time-consuming operation, we can utilize the proxy pattern to generate many proxies that point to the large memory-intensive object for further processing. Only when a client requests/accesses the object is the true object produced; after that, we can simply refer to the proxy to reuse the item. This prevents the object from being duplicated, conserving memory.
● It's appropriate for use in a Protective Proxy scenario—- It serves as an authorization layer, ensuring that the actual user gets access to the proper material. For instance, a proxy server that restricts internet access in the office. Only legitimate websites and content will be permitted, while the rest will be prohibited.
● It can be utilized in the case of a Remote Proxy—- The stub in an RPC call can be thought of as a remote proxy. The remote proxy creates a local version of the object that is located at a separate address. Providing an interface for remote resources such as web services or REST resources is another example.
● It's possible to use it in a Smart Proxy scenario—- When an object is accessed, a smart proxy adds an extra layer of protection by interposing certain activities. For example, before accessing an actual item, check whether it is locked or not so that no other objects can change it.
Implementation
We're going to make an Image interface, as well as actual classes that implement it. ProxyImage is a class that reduces the memory footprint of loading RealImage objects.
Our demo class, ProxyPatternDemo, will use ProxyImage to get an Image object to load and show as needed.
Step 1: Make a user interface.
Image.java
Public interface Image {
void display();
}
Step 2: Create concrete classes that implement the same interface as the abstract classes.
RealImage.java
Public class RealImage implements Image {
private String fileName;
public RealImage(String fileName){
this.fileName = fileName;
loadFromDisk(fileName);
}
@Override
public void display() {
System.out.println("Displaying " + fileName);
}
private void loadFromDisk(String fileName){
System.out.println("Loading " + fileName);
}
}
ProxyImage.java
Public class ProxyImage implements Image{
private RealImage realImage;
private String fileName;
public ProxyImage(String fileName){
this.fileName = fileName;
}
@Override
public void display() {
if(realImage == null){
realImage = new RealImage(fileName);
}
realImage.display();
}
}
Step 3: When you need a RealImage instance, use the ProxyImage class.
ProxyPatternDemo.java
Public class ProxyPatternDemo {
public static void main(String[] args) {
Image image = new ProxyImage("test_10mb.jpg");
//image will be loaded from disk
image.display();
System.out.println("");
//image will not be loaded from disk
image.display();
}
}
Step 4: Make sure the output is correct.
Loading test_10mb.jpg
Displaying test_10mb.jpg
Displaying test_10mb.jpg
Key takeaway
In the proxy pattern, we create an object that contains the original object and uses it to interface its capabilities with the outside world.
Proxy pattern is also known as Surrogate or Placeholder.
The composition of classes and objects to construct larger structures is the subject of structural design patterns.
By recognising the relationships, structural design patterns simplify the structure.
These patterns are concerned with how classes inherit from one another and how they are made up of other classes.
Types of structural design patterns
The following are seven different forms of structural design patterns.
● Adapter Pattern: Transforming one interface into another based on the needs of the client.
● Bridge Pattern: Separating abstraction (interface) from implementation with the Bridge Pattern.
● Composite Pattern: Clients can act on a hierarchy of objects using the Composite Pattern.
● Decorator Pattern: The Decorator Pattern is used to dynamically add functionality to an object.
● Facade Pattern: The Facade Pattern is used to provide an interface to a group of interfaces.
● Flyweight Pattern: The Flyweight Pattern is a method of repurposing an object by sharing it.
● Proxy Pattern: This pattern is used to represent another object.
References:
- Head First Design Patterns, by Eric Freeman and Elisabeth Freeman
- Design Patterns Explained, by Shalloway and Trott
- Introduction to design Patterns in C++ with Qt by Alan Ezust, Paul Ezust
Unit - 3
Structural Pattern
The adapter pattern acts as a link between two interfaces that are incompatible. This design pattern is classified as a structural pattern since it integrates the capabilities of two separate interfaces.
A single class is responsible for joining the capabilities of separate or incompatible interfaces in this design. A card reader, which functions as an adaptor between a memory card and a laptop, is a real-life example. The memory card is inserted into a card reader, which is then inserted into the laptop, allowing the memory card to be read via the laptop.
We'll show how to utilize the Adapter pattern in the following example, where an audio player device can only play mp3 files and wishes to use a more complex audio player that can play vlc and mp4 files.
Advantage of Adapter Pattern
The Benefits of the Adapter Pattern
● It enables the interaction of two or more previously incompatible things.
● It allows existing functionality to be reused.
Usage of Adapter pattern
It's used for:
● When an object has to use a class that has an incompatible interface.
● When you need to make a reusable class that works with other classes that don't have the same interface.
● When you need to make a reusable class that works with other classes that don't have the same interface.
Implementation
We have a MediaPlayer interface, as well as a concrete class AudioPlayer that implements it. By default, AudioPlayer can play audio files in the MP3 format.
Another interface, AdvancedMediaPlayer, has been added, as well as concrete classes that implement the AdvancedMediaPlayer interface. These classes can play files in the vlc and mp4 formats.
We want AudioPlayer to be able to play a variety of formats. To do this, we constructed the MediaAdapter adapter class, which implements the MediaPlayer interface and plays the needed format using AdvancedMediaPlayer instances.
Without knowing the exact class that can play the requested format, AudioPlayer utilizes the adapter class MediaAdapter and passes it the required audio type. Our demo class, AdapterPatternDemo, will use the AudioPlayer class to play several formats.
Step 1: Create Media Player and Advanced Media Player user interfaces.
MediaPlayer.java
Public interface MediaPlayer {
public void play(String audioType, String fileName);
}
AdvancedMediaPlayer.java
Public interface AdvancedMediaPlayer {
public void playVlc(String fileName);
public void playMp4(String fileName);
}
Step 2: Implement the AdvancedMediaPlayer interface with concrete classes.
VlcPlayer.java
Public class VlcPlayer implements AdvancedMediaPlayer{
@Override
public void playVlc(String fileName) {
System.out.println("Playing vlc file. Name: "+ fileName);
}
@Override
public void playMp4(String fileName) {
//do nothing
}
}
Mp4Player.java
Public class Mp4Player implements AdvancedMediaPlayer{
@Override
public void playVlc(String fileName) {
//do nothing
}
@Override
public void playMp4(String fileName) {
System.out.println("Playing mp4 file. Name: "+ fileName);
}
}
Step 3: Create a MediaPlayer adapter class that implements the interface.
MediaAdapter.java
Public class MediaAdapter implements MediaPlayer {
AdvancedMediaPlayer advancedMusicPlayer;
public MediaAdapter(String audioType){
if(audioType.equalsIgnoreCase("vlc") ){
advancedMusicPlayer = new VlcPlayer();
}else if (audioType.equalsIgnoreCase("mp4")){
advancedMusicPlayer = new Mp4Player();
}
}
@Override
public void play(String audioType, String fileName) {
if(audioType.equalsIgnoreCase("vlc")){
advancedMusicPlayer.playVlc(fileName);
}
else if(audioType.equalsIgnoreCase("mp4")){
advancedMusicPlayer.playMp4(fileName);
}
}
}
Step 4: Create a concrete MediaPlayer interface implementation class.
AudioPlayer.java
Public class AudioPlayer implements MediaPlayer {
MediaAdapter mediaAdapter;
@Override
public void play(String audioType, String fileName) {
//inbuilt support to play mp3 music files
if(audioType.equalsIgnoreCase("mp3")){
System.out.println("Playing mp3 file. Name: " + fileName);
}
//mediaAdapter is providing support to play other file formats
else if(audioType.equalsIgnoreCase("vlc") || audioType.equalsIgnoreCase("mp4")){
mediaAdapter = new MediaAdapter(audioType);
mediaAdapter.play(audioType, fileName);
}
else{
System.out.println("Invalid media. " + audioType + " format not supported");
}
}
}
Step 5: The AudioPlayer can be used to play a variety of audio formats.
AdapterPatternDemo.java
Public class AdapterPatternDemo {
public static void main(String[] args) {
AudioPlayer audioPlayer = new AudioPlayer();
audioPlayer.play("mp3", "beyond the horizon.mp3");
audioPlayer.play("mp4", "alone.mp4");
audioPlayer.play("vlc", "far far away.vlc");
audioPlayer.play("avi", "mind me.avi");
}
}
Step 6: Make sure the output is correct.
Playing mp3 file. Name: beyond the horizon.mp3
Playing mp4 file. Name: alone.mp4
Playing vlc file. Name: far far away.vlc
Invalid media. Avi format not supported
Key takeaway
The adapter pattern acts as a link between two interfaces that are incompatible. This design pattern is classified as a structural pattern since it integrates the capabilities of two separate interfaces.
When we need to separate an abstraction from its implementation so that both can change independently, we utilize Bridge. This design pattern is classified as a structural pattern because it provides a bridge structure that connects implementation and abstract classes.
This pattern uses an interface as a bridge, separating the functionality of concrete classes from the functionality of interface implementer classes. Structures of both sorts of classes can be changed without impacting the other.
The following example shows how to use the Bridge pattern to create a circle in several colors using the same abstract class method but distinct bridge implementer classes.
Advantage of Bridge Pattern
● It allows the implementation and the user interface to be separated.
● It increases the extensibility of the system.
● It allows the client to be unaware of implementation specifics.
Usage of Bridge Pattern
● When you don't want the functional abstraction and its implementation to be permanently linked.
● When sub-classes are used to augment both the functional abstraction and its implementation.
● It's generally utilised in situations where modifications to the implementation don't have an impact on the customers.
Implementation
The DrawAPI interface serves as a bridge between the concrete classes RedCircle and GreenCircle, which implement the DrawAPI interface. Shape is an abstract class that will employ a DrawAPI object. Our demo class, BridgePatternDemo, will use the Shape class to draw various coloured circles.
Step 1: Create an interface for bridge implementers.
DrawAPI.java
Public interface DrawAPI {
public void drawCircle(int radius, int x, int y);
}
Step 2: Implement the DrawAPI interface using concrete bridge implementer classes.
RedCircle.java
Public class RedCircle implements DrawAPI {
@Override
public void drawCircle(int radius, int x, int y) {
System.out.println("Drawing Circle[ color: red, radius: " + radius + ", x: " + x + ", " + y + "]");
}
}
GreenCircle.java
Public class GreenCircle implements DrawAPI {
@Override
public void drawCircle(int radius, int x, int y) {
System.out.println("Drawing Circle[ color: green, radius: " + radius + ", x: " + x + ", " + y + "]");
}
}
Step 3: Using the DrawAPI interface, create an abstract class Shape.
Shape.java
Public abstract class Shape {
protected DrawAPI drawAPI;
protected Shape(DrawAPI drawAPI){
this.drawAPI = drawAPI;
}
public abstract void draw();
}
Step 4: Create a concrete Shape interface implementation class.
Circle.java
Public class Circle extends Shape {
private int x, y, radius;
public Circle(int x, int y, int radius, DrawAPI drawAPI) {
super(drawAPI);
this.x = x;
this.y = y;
this.radius = radius;
}
public void draw() {
drawAPI.drawCircle(radius,x,y);
}
}
Step 5: To draw different coloured circles, use the Shape and DrawAPI classes.
BridgePatternDemo.java
Public class BridgePatternDemo {
public static void main(String[] args) {
Shape redCircle = new Circle(100,100, 10, new RedCircle());
Shape greenCircle = new Circle(100,100, 10, new GreenCircle());
redCircle.draw();
greenCircle.draw();
}
}
Step 6: Make sure the output is correct.
Drawing Circle[ color: red, radius: 10, x: 100, 100]
Drawing Circle[ color: green, radius: 10, x: 100, 100]
Key takeaway
This design pattern is classified as a structural pattern because it provides a bridge structure that connects implementation and abstract classes.
When we need to treat a set of items as if they were a single object, we use the composite pattern. The composite pattern assembles things into a tree structure to represent both parts and the entire hierarchy. This design pattern is classified as a structural pattern since it generates a tree structure for a set of things.
This pattern generates a class with a collection of its own objects. This class allows you to change the properties of a set of similar objects.
We'll illustrate how to utilize the composite pattern in the following example, which depicts an organization's staff structure.
Advantage of Composite Design Pattern
● It establishes class hierarchies that include both simple and complicated items.
● It facilitates the addition of new types of components.
● It gives structure flexibility with a manageable class or interface.
Usage of Composite Pattern
It's used for:
● When you need to express a full or partial object hierarchy.
● When responsibilities must be introduced to particular objects dynamically without affecting other objects. Where the object's duty may change from time to time.
Implementation
We have a class called Employee that serves as a composite pattern actor. Our demo class, CompositePatternDemo, will use the Employee class to create a department level hierarchy and print all employees.
Step 1: Create a list of Employee objects in the Employee class.
Employee.java
Import java.util.ArrayList;
Import java.util.List;
Public class Employee {
private String name;
private String dept;
private int salary;
private List<Employee> subordinates;
// constructor
public Employee(String name,String dept, int sal) {
this.name = name;
this.dept = dept;
this.salary = sal;
subordinates = new ArrayList<Employee>();
}
public void add(Employee e) {
subordinates.add(e);
}
public void remove(Employee e) {
subordinates.remove(e);
}
public List<Employee> getSubordinates(){
return subordinates;
}
public String toString(){
return ("Employee :[ Name : " + name + ", dept : " + dept + ", salary :" + salary+" ]");
}
}
Step 2: Create and print employee hierarchies with the Employee class.
CompositePatternDemo.java
Public class CompositePatternDemo {
public static void main(String[] args) {
Employee CEO = new Employee("John","CEO", 30000);
Employee headSales = new Employee("Robert","Head Sales", 20000);
Employee headMarketing = new Employee("Michel","Head Marketing", 20000);
Employee clerk1 = new Employee("Laura","Marketing", 10000);
Employee clerk2 = new Employee("Bob","Marketing", 10000);
Employee salesExecutive1 = new Employee("Richard","Sales", 10000);
Employee salesExecutive2 = new Employee("Rob","Sales", 10000);
CEO.add(headSales);
CEO.add(headMarketing);
headSales.add(salesExecutive1);
headSales.add(salesExecutive2);
headMarketing.add(clerk1);
headMarketing.add(clerk2);
//print all employees of the organization
System.out.println(CEO);
for (Employee headEmployee : CEO.getSubordinates()) {
System.out.println(headEmployee);
for (Employee employee : headEmployee.getSubordinates()) {
System.out.println(employee);
}
}
}
}
Step 3: Make sure the output is correct.
Employee :[ Name : John, dept : CEO, salary :30000 ]
Employee :[ Name : Robert, dept : Head Sales, salary :20000 ]
Employee :[ Name : Richard, dept : Sales, salary :10000 ]
Employee :[ Name : Rob, dept : Sales, salary :10000 ]
Employee :[ Name : Michel, dept : Head Marketing, salary :20000 ]
Employee :[ Name : Laura, dept : Marketing, salary :10000 ]
Employee :[ Name : Bob, dept : Marketing, salary :10000 ]
Key takeaway
The composite pattern assembles things into a tree structure to represent both parts and the entire hierarchy. This design pattern is classified as a structural pattern since it generates a tree structure for a set of things.
A user can use the Decorator pattern to add new functionality to an existing object without changing its structure. This design pattern is classified as a structural pattern since it functions as a wrapper for an existing class.
This approach produces a decorator class that encapsulates the original class and adds functionality while keeping the signature of the class methods intact.
We'll show how to utilize the decorator pattern in the following example, in which we'll colorize a shape without changing its class.
Advantage of Decorator Pattern
● It gives you more options than static inheritance.
● Because changes are done by coding new classes, the object's extensibility is increased.
● It makes coding easier by allowing you to create a sequence of functionality from certain classes rather than having to code all of the action into the object.
Usage of Decorator Pattern
It's used for:
● When you want to assign responsibilities to objects in a transparent and dynamic way without affecting other objects.
● When you want to give an object duties that you might wish to change in the future.
● Subclassing is no longer a viable method of extending functionality.
Implementation
We'll make a Shape interface as well as concrete classes that implement the Shape interface. After that, we'll make an abstract decorator class called ShapeDecorator that implements the Shape interface and has Shape object as an instance variable.
ShapeDecorator is implemented by RedShapeDecorator, a concrete class.
Our demo class, DecoratorPatternDemo, will use RedShapeDecorator to adorn Shape objects.
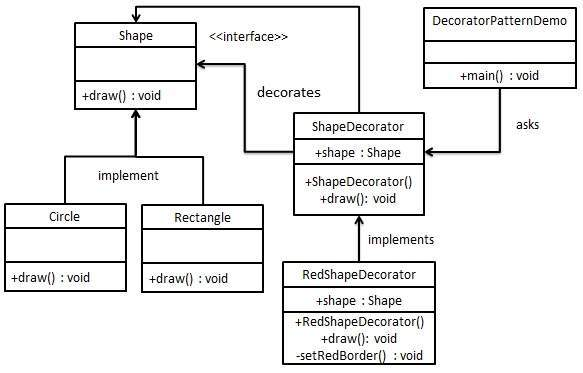
Step 1: Make a user interface.
Shape.java
Public interface Shape {
void draw();
}
Step 2: Create concrete classes that implement the same interface as the abstract classes.
Rectangle.java
Public class Rectangle implements Shape {
@Override
public void draw() {
System.out.println("Shape: Rectangle");
}
}
Circle.java
Public class Circle implements Shape {
@Override
public void draw() {
System.out.println("Shape: Circle");
}
}
Step 3: Create a Shape interface-implementing abstract decorator class.
ShapeDecorator.java
Public abstract class ShapeDecorator implements Shape {
protected Shape decoratedShape;
public ShapeDecorator(Shape decoratedShape){
this.decoratedShape = decoratedShape;
}
public void draw(){
decoratedShape.draw();
}
}
Step 4: Make a concrete decorator class that extends ShapeDecorator.
RedShapeDecorator.java
Public class RedShapeDecorator extends ShapeDecorator {
public RedShapeDecorator(Shape decoratedShape) {
super(decoratedShape);
}
@Override
public void draw() {
decoratedShape.draw();
setRedBorder(decoratedShape);
}
private void setRedBorder(Shape decoratedShape){
System.out.println("Border Color: Red");
}
}
Step 5: To adorn Shape objects, use the RedShapeDecorator.
DecoratorPatternDemo.java
Public class DecoratorPatternDemo {
public static void main(String[] args) {
Shape circle = new Circle();
Shape redCircle = new RedShapeDecorator(new Circle());
Shape redRectangle = new RedShapeDecorator(new Rectangle());
System.out.println("Circle with normal border");
circle.draw();
System.out.println("\nCircle of red border");
redCircle.draw();
System.out.println("\nRectangle of red border");
redRectangle.draw();
}
}
Step 6: Make sure the output is correct.
Circle with normal border
Shape: Circle
Circle of red border
Shape: Circle
Border Color: Red
Rectangle of red border
Shape: Rectangle
Border Color: Red
Key takeaway
A user can use the Decorator pattern to add new functionality to an existing object without changing its structure.
The facade design hides the system's intricacies and provides a client interface through which the client can access the system. This design pattern is classified as a structural pattern since it adds an interface to an existing system in order to hide its intricacies.
This design uses a single class to provide client-side simplified methods while delegating calls to existing system classes' functions.
Advantage of Facade Pattern
● It protects customers from the sub-system components' intricacies.
● It encourages subsystems and clients to be loosely coupled.
Usage of Facade Pattern
It's used for:
● When you need a simple interface to a sophisticated sub-system.
● When there are several dependencies between clients and an abstraction's implementation classes.
Implementation
We'll make a Shape interface as well as concrete classes that implement the Shape interface. As a next step, the facade class ShapeMaker is defined.
The concrete classes are used by the ShapeMaker class to delegate user calls to these classes. Our demo class, FacadePatternDemo, will use the ShapeMaker class to display the results.
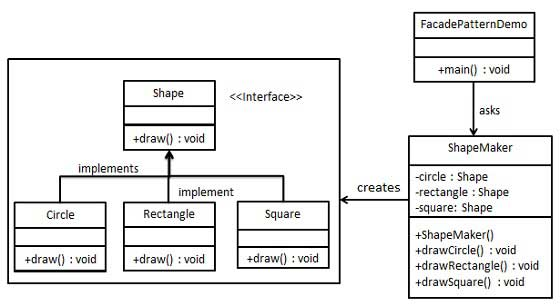
Step 1: Make a user interface.
Shape.java
Public interface Shape {
void draw();
}
Step 2: Create concrete classes that implement the same interface as the abstract classes.
Rectangle.java
Public class Rectangle implements Shape {
@Override
public void draw() {
System.out.println("Rectangle::draw()");
}
}
Square.java
Public class Square implements Shape {
@Override
public void draw() {
System.out.println("Square::draw()");
}
}
Circle.java
Public class Circle implements Shape {
@Override
public void draw() {
System.out.println("Circle::draw()");
}
}
Step 3: Make a class for the facade.
ShapeMaker.java
Public class ShapeMaker {
private Shape circle;
private Shape rectangle;
private Shape square;
public ShapeMaker() {
circle = new Circle();
rectangle = new Rectangle();
square = new Square();
}
public void drawCircle(){
circle.draw();
}
public void drawRectangle(){
rectangle.draw();
}
public void drawSquare(){
square.draw();
}
}
Step 4: Use the facade to create a variety of different shapes.
FacadePatternDemo.java
Public class FacadePatternDemo {
public static void main(String[] args) {
ShapeMaker shapeMaker = new ShapeMaker();
shapeMaker.drawCircle();
shapeMaker.drawRectangle();
shapeMaker.drawSquare();
}
}
Step 5: Verify the output.
Circle::draw()
Rectangle::draw()
Square::draw()
The Flyweight pattern is used to reduce the amount of objects created, reduce memory footprint, and improve performance. This design pattern is classified as a structural pattern since it shows how to reduce the number of objects in an application's object structure.
When no identical objects are located, the Flyweight design tries to reuse them by storing them and then constructs a new item. We'll demonstrate this pattern by drawing 20 circles in various positions, however only 5 items will be created. Because there are only five colors available, the color attribute is used to check for existing Circle objects.
Advantage of Flyweight Pattern
● The number of things is reduced.
● If the items are persistent, the quantity of memory and storage devices required is reduced.
Usage of Flyweight Pattern
● When a programme employs a large number of objects.
● When the cost of storage is high due to the large number of things.
● When the programme does not rely on the identity of the objects.
Implementation
We'll construct a Shape interface and a concrete Circle class that implements the Shape interface. As a next stage, a factory class named ShapeFactory is created.
ShapeFactory has a Circle HashMap with the color of the Circle object as the key. When ShapeFactory receives a request to produce a circle of a specific hue, it first examines its HashMap for a circle object; if one is found, it is returned; otherwise, a new object is constructed, saved in the hashmap for future use, and provided to the client.
Our demo class, FlyWeightPatternDemo, will acquire a Shape object from ShapeFactory. It will send information (red, green, blue, black, and white) to ShapeFactory in order to obtain the circle of the specified color.
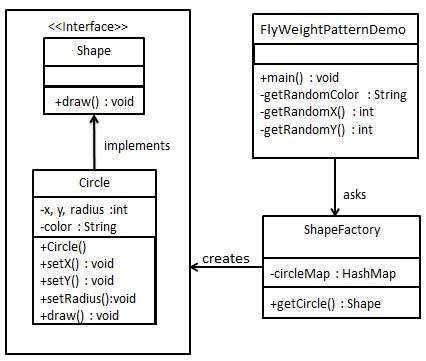
Step 1: Make a user interface.
Shape.java
Public interface Shape {
void draw();
}
Step 2: Create a concrete class that implements the same interface as the abstract class.
Circle.java
Public class Circle implements Shape {
private String color;
private int x;
private int y;
private int radius;
public Circle(String color){
this.color = color;
}
public void setX(int x) {
this.x = x;
}
public void setY(int y) {
this.y = y;
}
public void setRadius(int radius) {
this.radius = radius;
}
@Override
public void draw() {
System.out.println("Circle: Draw() [Color : " + color + ", x : " + x + ", y :" + y + ", radius :" + radius);
}
}
Step 3: Create a factory that generates concrete class objects based on input.
ShapeFactory.java
Import java.util.HashMap;
Public class ShapeFactory {
// Uncomment the compiler directive line and
// javac *.java will compile properly.
// @SuppressWarnings("unchecked")
private static final HashMap circleMap = new HashMap();
public static Shape getCircle(String color) {
Circle circle = (Circle)circleMap.get(color);
if(circle == null) {
circle = new Circle(color);
circleMap.put(color, circle);
System.out.println("Creating circle of color : " + color);
}
return circle;
}
}
Step 4: By supplying information like color to the factory, you can retrieve an object of a concrete class.
FlyweightPatternDemo.java
Public class FlyweightPatternDemo {
private static final String colors[] = { "Red", "Green", "Blue", "White", "Black" };
public static void main(String[] args) {
for(int i=0; i < 20; ++i) {
Circle circle = (Circle)ShapeFactory.getCircle(getRandomColor());
circle.setX(getRandomX());
circle.setY(getRandomY());
circle.setRadius(100);
circle.draw();
}
}
private static String getRandomColor() {
return colors[(int)(Math.random()*colors.length)];
}
private static int getRandomX() {
return (int)(Math.random()*100 );
}
private static int getRandomY() {
return (int)(Math.random()*100);
}
}
Step 5: Make sure the output is correct.
Creating circle of color : Black
Circle: Draw() [Color : Black, x : 36, y :71, radius :100
Creating circle of color : Green
Circle: Draw() [Color : Green, x : 27, y :27, radius :100
Creating circle of color : White
Circle: Draw() [Color : White, x : 64, y :10, radius :100
Creating circle of color : Red
Circle: Draw() [Color : Red, x : 15, y :44, radius :100
Circle: Draw() [Color : Green, x : 19, y :10, radius :100
Circle: Draw() [Color : Green, x : 94, y :32, radius :100
Circle: Draw() [Color : White, x : 69, y :98, radius :100
Creating circle of color : Blue
Circle: Draw() [Color : Blue, x : 13, y :4, radius :100
Circle: Draw() [Color : Green, x : 21, y :21, radius :100
Circle: Draw() [Color : Blue, x : 55, y :86, radius :100
Circle: Draw() [Color : White, x : 90, y :70, radius :100
Circle: Draw() [Color : Green, x : 78, y :3, radius :100
Circle: Draw() [Color : Green, x : 64, y :89, radius :100
Circle: Draw() [Color : Blue, x : 3, y :91, radius :100
Circle: Draw() [Color : Blue, x : 62, y :82, radius :100
Circle: Draw() [Color : Green, x : 97, y :61, radius :100
Circle: Draw() [Color : Green, x : 86, y :12, radius :100
Circle: Draw() [Color : Green, x : 38, y :93, radius :100
Circle: Draw() [Color : Red, x : 76, y :82, radius :100
Circle: Draw() [Color : Blue, x : 95, y :82, radius :100
Key takeaway
The facade design hides the system's intricacies and provides a client interface through which the client can access the system.
A class in the proxy pattern represents the functionality of another class. This design pattern is classified as a structural pattern.
In the proxy pattern, we create an object that contains the original object and uses it to interface its capabilities with the outside world.
Proxy pattern is also known as Surrogate or Placeholder.
Advantage of Proxy Pattern
It shields the original object from the outer world.
Usage of Proxy Pattern
It's used for:
It's appropriate for use in a Virtual Proxy scenario—-
● Consider a scenario in which numerous database calls are required to retrieve a large image. Because this is a time-consuming operation, we can utilize the proxy pattern to generate many proxies that point to the large memory-intensive object for further processing. Only when a client requests/accesses the object is the true object produced; after that, we can simply refer to the proxy to reuse the item. This prevents the object from being duplicated, conserving memory.
● It's appropriate for use in a Protective Proxy scenario—- It serves as an authorization layer, ensuring that the actual user gets access to the proper material. For instance, a proxy server that restricts internet access in the office. Only legitimate websites and content will be permitted, while the rest will be prohibited.
● It can be utilized in the case of a Remote Proxy—- The stub in an RPC call can be thought of as a remote proxy. The remote proxy creates a local version of the object that is located at a separate address. Providing an interface for remote resources such as web services or REST resources is another example.
● It's possible to use it in a Smart Proxy scenario—- When an object is accessed, a smart proxy adds an extra layer of protection by interposing certain activities. For example, before accessing an actual item, check whether it is locked or not so that no other objects can change it.
Implementation
We're going to make an Image interface, as well as actual classes that implement it. ProxyImage is a class that reduces the memory footprint of loading RealImage objects.
Our demo class, ProxyPatternDemo, will use ProxyImage to get an Image object to load and show as needed.
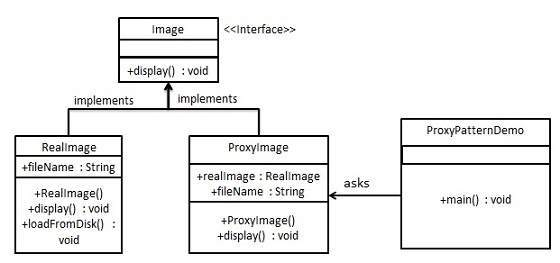
Step 1: Make a user interface.
Image.java
Public interface Image {
void display();
}
Step 2: Create concrete classes that implement the same interface as the abstract classes.
RealImage.java
Public class RealImage implements Image {
private String fileName;
public RealImage(String fileName){
this.fileName = fileName;
loadFromDisk(fileName);
}
@Override
public void display() {
System.out.println("Displaying " + fileName);
}
private void loadFromDisk(String fileName){
System.out.println("Loading " + fileName);
}
}
ProxyImage.java
Public class ProxyImage implements Image{
private RealImage realImage;
private String fileName;
public ProxyImage(String fileName){
this.fileName = fileName;
}
@Override
public void display() {
if(realImage == null){
realImage = new RealImage(fileName);
}
realImage.display();
}
}
Step 3: When you need a RealImage instance, use the ProxyImage class.
ProxyPatternDemo.java
Public class ProxyPatternDemo {
public static void main(String[] args) {
Image image = new ProxyImage("test_10mb.jpg");
//image will be loaded from disk
image.display();
System.out.println("");
//image will not be loaded from disk
image.display();
}
}
Step 4: Make sure the output is correct.
Loading test_10mb.jpg
Displaying test_10mb.jpg
Displaying test_10mb.jpg
Key takeaway
In the proxy pattern, we create an object that contains the original object and uses it to interface its capabilities with the outside world.
Proxy pattern is also known as Surrogate or Placeholder.
The composition of classes and objects to construct larger structures is the subject of structural design patterns.
By recognising the relationships, structural design patterns simplify the structure.
These patterns are concerned with how classes inherit from one another and how they are made up of other classes.
Types of structural design patterns
The following are seven different forms of structural design patterns.
● Adapter Pattern: Transforming one interface into another based on the needs of the client.
● Bridge Pattern: Separating abstraction (interface) from implementation with the Bridge Pattern.
● Composite Pattern: Clients can act on a hierarchy of objects using the Composite Pattern.
● Decorator Pattern: The Decorator Pattern is used to dynamically add functionality to an object.
● Facade Pattern: The Facade Pattern is used to provide an interface to a group of interfaces.
● Flyweight Pattern: The Flyweight Pattern is a method of repurposing an object by sharing it.
● Proxy Pattern: This pattern is used to represent another object.
References:
- Head First Design Patterns, by Eric Freeman and Elisabeth Freeman
- Design Patterns Explained, by Shalloway and Trott
- Introduction to design Patterns in C++ with Qt by Alan Ezust, Paul Ezust