Unit - 4
Behavioral Patterns
The chain of responsibility pattern, as the name implies, produces a chain of recipient objects for a request. Based on the type of request, this design decouples the sender and receiver. This pattern is classified as a behavioral pattern.
Normally, each receiver in this pattern carries a reference to another receiver. If one object is unable to handle the request, it is forwarded to the next receiver, and so on.
Advantage of Chain of Responsibility Pattern
● It decreases coupling.
● While assigning duties to objects, it adds flexibility.
● It lets a group of classes function as if they were one; events generated by one class can be passed to other handler classes via composition.
Usage of Chain of Responsibility Pattern
It's used for:
● When a request can be handled by more than one object and the handler is uncertain.
● When a group of objects capable of handling a request must be dynamically provided.
Implementation
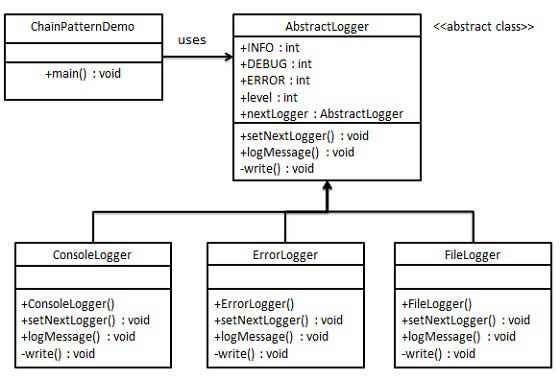
We've constructed an abstract class called AbstractLogger that has a logging level. Then, by extending the AbstractLogger, we generated three different sorts of loggers. Each logger compares the message's level to its own and prints accordingly; otherwise, the message is not printed and sent to the next logger.
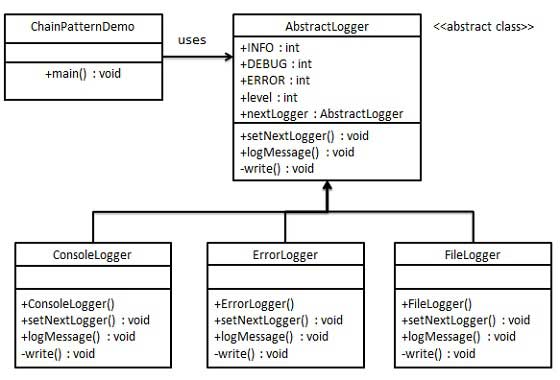
Step 1: Create a logger class that is abstract.
AbstractLogger.java
Public abstract class AbstractLogger {
public static int INFO = 1;
public static int DEBUG = 2;
public static int ERROR = 3;
protected int level;
//next element in chain or responsibility
protected AbstractLogger nextLogger;
public void setNextLogger(AbstractLogger nextLogger){
this.nextLogger = nextLogger;
}
public void logMessage(int level, String message){
if(this.level <= level){
write(message);
}
if(nextLogger !=null){
nextLogger.logMessage(level, message);
}
}
abstract protected void write(String message);
}
Step 2: Extend the logger with concrete classes.
ConsoleLogger.java
Public class ConsoleLogger extends AbstractLogger {
public ConsoleLogger(int level){
this.level = level;
}
@Override
protected void write(String message) {
System.out.println("Standard Console::Logger: " + message);
}
}
ErrorLogger.java
Public class ErrorLogger extends AbstractLogger {
public ErrorLogger(int level){
this.level = level;
}
@Override
protected void write(String message) {
System.out.println("Error Console::Logger: " + message);
}
}
FileLogger.java
Public class FileLogger extends AbstractLogger {
public FileLogger(int level){
this.level = level;
}
@Override
protected void write(String message) {
System.out.println("File::Logger: " + message);
}
}
Step 3: Make many varieties of loggers. Set the next logger in each logger and assign them error levels. The section of the chain is represented by the next logger in each logger.
ChainPatternDemo.java
Public class ChainPatternDemo {
private static AbstractLogger getChainOfLoggers(){
AbstractLogger errorLogger = new ErrorLogger(AbstractLogger.ERROR);
AbstractLogger fileLogger = new FileLogger(AbstractLogger.DEBUG);
AbstractLogger consoleLogger = new ConsoleLogger(AbstractLogger.INFO);
errorLogger.setNextLogger(fileLogger);
fileLogger.setNextLogger(consoleLogger);
return errorLogger;
}
public static void main(String[] args) {
AbstractLogger loggerChain = getChainOfLoggers();
loggerChain.logMessage(AbstractLogger.INFO,
"This is an information.");
loggerChain.logMessage(AbstractLogger.DEBUG,
"This is an debug level information.");
loggerChain.logMessage(AbstractLogger.ERROR,
"This is an error information.");
}
}
Step 4: Make sure the output is correct.
Standard Console::Logger: This is an information.
File::Logger: This is an debug level information.
Standard Console::Logger: This is an debug level information.
Error Console::Logger: This is an error information.
File::Logger: This is an error information.
Standard Console::Logger: This is an error information.
Key takeaway
The chain of responsibility pattern, as the name implies, produces a chain of recipient objects for a request. Based on the type of request, this design decouples the sender and receiver.
The command pattern is a data-driven design pattern that is classified as a behavioral pattern. A request is wrapped in an object and sent to the invoker object as a command. The invoker object searches for an object that can handle this command and sends the command to that object, which then executes it.
Advantage of command pattern
● It distinguishes between the object that executes the action and the object that invokes it.
● Because existing classes aren't modified, it's simple to add new commands.
Usage of command pattern
It's used for:
● When you need to parameterize objects based on an action.
● When many requests must be created and executed at separate times.
● When rollback, logging, or transaction functionality is required.
Implementation
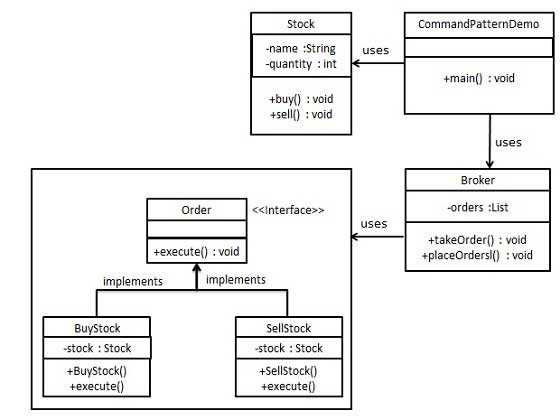
We've designed an interface called Order that acts as a command. We've made a Stock class that serves as a request. BuyStock and SellStock are concrete command classes that implement the Order interface and handle real command processing. As an invoker object, a class called Broker is constructed. It has the ability to take and place orders.
The command pattern is used by the broker object to determine which object will execute which command based on the type of command. Our sample class, CommandPatternDemo, will demonstrate the command pattern using the Broker class.
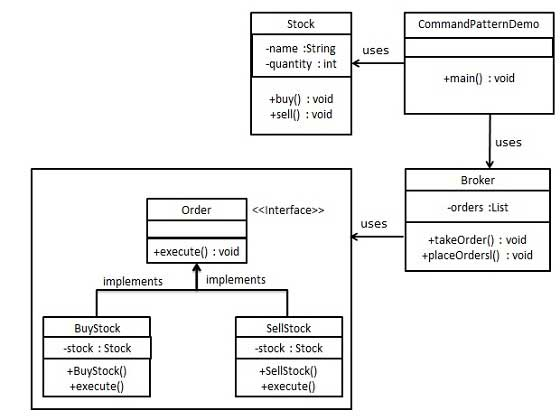
Step 1: Make a command interface for your programme.
Order.java
Public interface Order {
void execute();
}
Step 2: Make a class for requests.
Stock.java
Public class Stock {
private String name = "ABC";
private int quantity = 10;
public void buy(){
System.out.println("Stock [ Name: "+name+",
Quantity: " + quantity +" ] bought");
}
public void sell(){
System.out.println("Stock [ Name: "+name+",
Quantity: " + quantity +" ] sold");
}
}
Step 3: Create concrete Order interface implementation classes.
BuyStock.java
Public class BuyStock implements Order {
private Stock abcStock;
public BuyStock(Stock abcStock){
this.abcStock = abcStock;
}
public void execute() {
abcStock.buy();
}
}
SellStock.java
Public class SellStock implements Order {
private Stock abcStock;
public SellStock(Stock abcStock){
this.abcStock = abcStock;
}
public void execute() {
abcStock.sell();
}
}
Step 4: Create a class for command invokers.
Broker.java
Import java.util.ArrayList;
Import java.util.List;
public class Broker {
private List<Order> orderList = new ArrayList<Order>();
public void takeOrder(Order order){
orderList.add(order);
}
public void placeOrders(){
for (Order order : orderList) {
order.execute();
}
orderList.clear();
}
}
Step 5: To take and execute commands, use the Broker class.
CommandPatternDemo.java
Public class CommandPatternDemo {
public static void main(String[] args) {
Stock abcStock = new Stock();
BuyStock buyStockOrder = new BuyStock(abcStock);
SellStock sellStockOrder = new SellStock(abcStock);
Broker broker = new Broker();
broker.takeOrder(buyStockOrder);
broker.takeOrder(sellStockOrder);
broker.placeOrders();
}
}
Step 6: Make sure the output is correct.
Stock [ Name: ABC, Quantity: 10 ] bought
Stock [ Name: ABC, Quantity: 10 ] sold
Key takeaway
The command pattern is a data-driven design pattern that is classified as a behavioral pattern. A request is wrapped in an object and sent to the invoker object as a command.
"To define a representation of grammar of a particular language, as well as an interpreter that uses this representation to interpret sentences in the language," according to an Interpreter Pattern.
In general, the Interpreter pattern can only be used in a limited number of situations. The Interpreter pattern can only be discussed in terms of formal grammars, although there are superior solutions in this field, which is why it is not widely used.
This pattern can be used to parse expressions written in simple grammars and, on rare occasions, simple rule engines.
Advantage of Interpreter Pattern
● It is less difficult to modify and expand the grammar.
● It's simple to put the grammar into practice.
Usage of Interpreter pattern
It's used for:
● When the language's grammar is straightforward.
● When productivity isn't a top priority.
Implementation
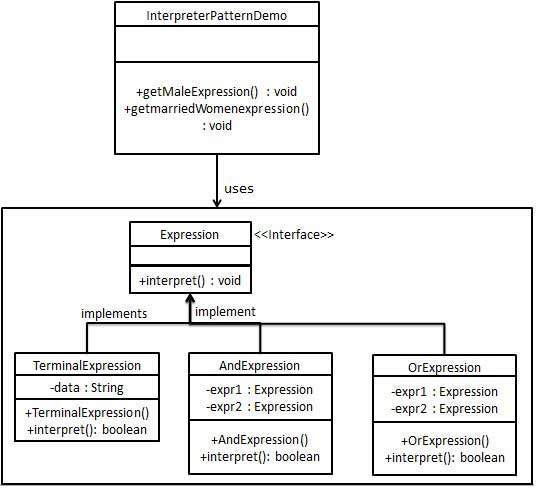
We'll make a concrete class that implements the Expression interface and an Expression interface. TerminalExpression is a class that serves as the main translator of the context in question. Combinational expressions are created using the classes OrExpression and AndExpression.
Our demo class, InterpreterPatternDemo, will use the Expression class to define rules and illustrate expression parsing.
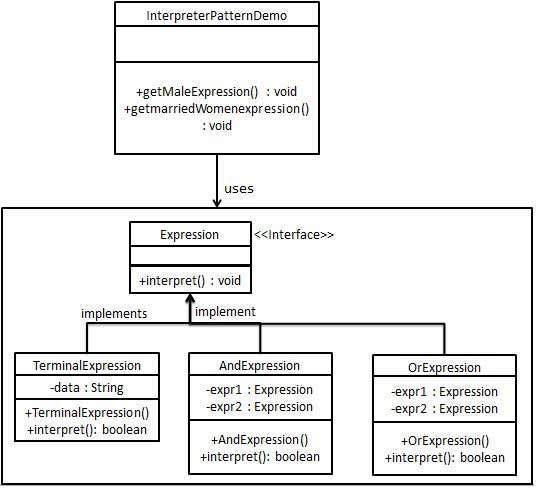
Step 1: Make a user interface for expressions.
Expression.java
Public interface Expression {
public boolean interpret(String context);
}
Step 2: Create concrete classes that implement the interface described above.
TerminalExpression.java
Public class TerminalExpression implements Expression {
private String data;
public TerminalExpression(String data){
this.data = data;
}
@Override
public boolean interpret(String context) {
if(context.contains(data)){
return true;
}
return false;
}
}
OrExpression.java
Public class OrExpression implements Expression {
private Expression expr1 = null;
private Expression expr2 = null;
public OrExpression(Expression expr1, Expression expr2) {
this.expr1 = expr1;
this.expr2 = expr2;
}
@Override
public boolean interpret(String context) {
return expr1.interpret(context) || expr2.interpret(context);
}
}
AndExpression.java
Public class AndExpression implements Expression {
private Expression expr1 = null;
private Expression expr2 = null;
public AndExpression(Expression expr1, Expression expr2) {
this.expr1 = expr1;
this.expr2 = expr2;
}
@Override
public boolean interpret(String context) {
return expr1.interpret(context) && expr2.interpret(context);
}
}
Step 3: The Expression class is used by InterpreterPatternDemo to build and parse rules.
InterpreterPatternDemo.java
Public class InterpreterPatternDemo {
//Rule: Robert and John are male
public static Expression getMaleExpression(){
Expression robert = new TerminalExpression("Robert");
Expression john = new TerminalExpression("John");
return new OrExpression(robert, john);
}
//Rule: Julie is a married women
public static Expression getMarriedWomanExpression(){
Expression julie = new TerminalExpression("Julie");
Expression married = new TerminalExpression("Married");
return new AndExpression(julie, married);
}
public static void main(String[] args) {
Expression isMale = getMaleExpression();
Expression isMarriedWoman = getMarriedWomanExpression();
System.out.println("John is male? " + isMale.interpret("John"));
System.out.println("Julie is a married women? " + isMarriedWoman.interpret("Married Julie"));
}
}
Step 4: Make sure the output is correct.
John is male? true
Julie is a married women? true
Key takeaway
In general, the Interpreter pattern can only be used in a limited number of situations. The Interpreter pattern can only be discussed in terms of formal grammars, although there are superior solutions in this field, which is why it is not widely utilised.
In the Java and.Net programming environments, the iterator pattern is a highly common design pattern. This technique is used to gain a way to sequentially access the elements of a collection object without having to know its underlying form.
The iterator pattern is a type of behavioral pattern.
Advantage of Iterator Pattern
● It allows you to traverse a collection in different ways.
● It streamlines the collection's user interface.
Usage of Iterator Pattern
It's used for:
● When you need to get a hold of a group of things without revealing their internal representation.
● When many traversals of items are required, the collection must be able to support them.
Implementation
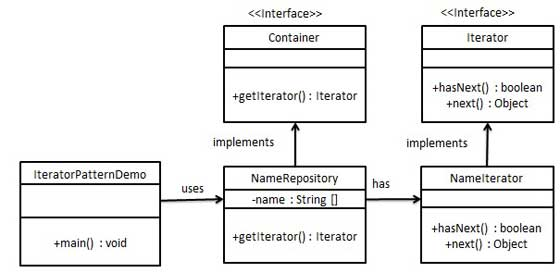
We'll make an Iterator interface to describe navigation methods, as well as a Container interface to return the iterator. Concrete classes that implement the Container interface will be responsible for implementing and using the Iterator interface.
Our demo class, IteratorPatternDemo, will print a Names saved as a collection in NamesRepository using NamesRepository, a concrete class implementation.
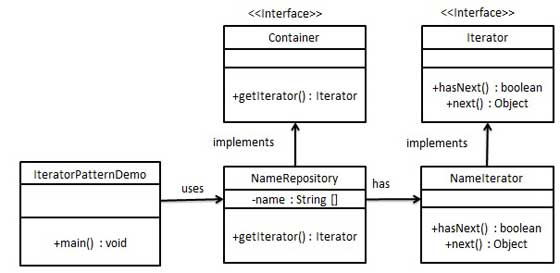
Step 1: Make user interfaces.
Iterator.java
Public interface Iterator {
public boolean hasNext();
public Object next();
}
Container.java
Public interface Container {
public Iterator getIterator();
}
Step 2: Make a concrete implementation of the Container interface. This class has a NameIterator inner class that implements the Iterator interface.
NameRepository.java
Public class NameRepository implements Container {
public String names[] = {"Robert" , "John" ,"Julie" , "Lora"};
@Override
public Iterator getIterator() {
return new NameIterator();
}
private class NameIterator implements Iterator {
int index;
@Override
public boolean hasNext() {
if(index < names.length){
return true;
}
return false;
}
@Override
public Object next() {
if(this.hasNext()){
return names[index++];
}
return null;
}
}
}
Step 3: To get an iterator and print names, use the NameRepository.
IteratorPatternDemo.java
Public class IteratorPatternDemo {
public static void main(String[] args) {
NameRepository namesRepository = new NameRepository();
for(Iterator iter = namesRepository.getIterator(); iter.hasNext();){
String name = (String)iter.next();
System.out.println("Name : " + name);
}
}
}
Step 4: Make sure the output is correct.
Name : Robert
Name : John
Name : Julie
Name : Lora
Key takeaway
In the Java and.Net programming environments, the iterator pattern is a highly common design pattern. This technique is used to gain a way to sequentially access the elements of a collection object without having to know its underlying form.
"To define an entity that captures how a set of objects communicate," says the Mediator Pattern.
I'll demonstrate the Mediator pattern by examining an issue. When we first start developing, we have a few classes that interact with one another to produce results. Consider how, as functionality expands, the logic becomes more complex. So, what happens next? We add more classes, and they still interact, but maintaining this code is becoming increasingly tough. As a result, the Mediator pattern solves this issue.
The mediator pattern is intended to simplify communication among various objects or classes. This pattern creates a mediator class that generally handles all communication between different classes while also promoting code maintainability through loose coupling.
Advantage
● The number of classes is decoupled.
● It makes object protocols easier to understand.
● Control is centralized.
● Because they don't have to communicate with one another, the individual components become significantly simpler and easier to manage.
● Because the components do not need to contain logic to communicate with one another, they are more general.
Usage
● It's widely used in message-based systems, as well as chat apps.
● When a collection of items interacts in complex but well-defined ways.
Implementation
We'll take the example of a chat room to demonstrate the mediator pattern. Multiple users can send messages to the chat room, and it's up to the chat room to display the messages to all users. ChatRoom and User are the two classes we've constructed. To share their messages, user objects will use the ChatRoom function.
Our demo class, MediatorPatternDemo, will use User objects to demonstrate communication between them.

Step 1: Create a class for mediators.
ChatRoom.java
Import java.util.Date;
Public class ChatRoom {
public static void showMessage(User user, String message){
System.out.println(new Date().toString() + " [" + user.getName() + "] : " + message);
}
}
Step 2: Make a user class.
User.java
Public class User {
private String name;
public String getName() {
return name;
}
public void setName(String name) {
this.name = name;
}
public User(String name){
this.name = name;
}
public void sendMessage(String message){
ChatRoom.showMessage(this,message);
}
}
Step 3: To demonstrate communication between them, use the User object.
MediatorPatternDemo.java
Public class MediatorPatternDemo {
public static void main(String[] args) {
User robert = new User("Robert");
User john = new User("John");
robert.sendMessage("Hi! John!");
john.sendMessage("Hello! Robert!");
}
}
Step 4: Make sure the output is correct.
Thu Jan 31 16:05:46 IST 2013 [Robert] : Hi! John!
Thu Jan 31 16:05:46 IST 2013 [John] : Hello! Robert!
Key takeaway
The mediator pattern is intended to simplify communication among various objects or classes. This pattern creates a mediator class that generally handles all communication between different classes while also promoting code maintainability through loose coupling.
"To restore the state of an object to its prior state," according to a Memento Pattern. However, it must do so without breaking Encapsulation. In the event of a mistake or failure, such a scenario is useful.
Token is another name for the Memento pattern.
One of the most commonly used operations in an editor is undo, sometimes known as backspace or ctrl+z. The undo action is implemented using the Memento design pattern. This is accomplished by saving the object's current state as it changes.
Advantage
● It keeps encapsulation borders intact.
● It makes the creator's job easier.
Usage
● In most applications, it's used in undo and redo operations.
● Database transactions also make advantage of it.
Implementation
Three actor classes are used in the Memento pattern. The state of an object to be restored is kept in Memento. The Originator object produces and preserves states in Memento objects, while the Caretaker object is in charge of restoring such states. Memento, Originator, and CareTaker are the three classes we've established.
Our demo class, MementoPatternDemo, will demonstrate the restoration of object states using CareTaker and Originator objects.
Step 1: Make a class called Memento.
Memento.java
Public class Memento {
private String state;
public Memento(String state){
this.state = state;
}
public String getState(){
return state;
}
}
Step 2: Create a class called Originator.
Originator.java
Public class Originator {
private String state;
public void setState(String state){
this.state = state;
}
public String getState(){
return state;
}
public Memento saveStateToMemento(){
return new Memento(state);
}
public void getStateFromMemento(Memento memento){
state = memento.getState();
}
}
Step 3: Make a class called CareTaker.
CareTaker.java
Import java.util.ArrayList;
Import java.util.List;
Public class CareTaker {
private List<Memento> mementoList = new ArrayList<Memento>();
public void add(Memento state){
mementoList.add(state);
}
public Memento get(int index){
return mementoList.get(index);
}
}
Step 4: Objects such as CareTaker and Originator can be used.
MementoPatternDemo.java
Public class MementoPatternDemo {
public static void main(String[] args) {
Originator originator = new Originator();
CareTaker careTaker = new CareTaker();
originator.setState("State #1");
originator.setState("State #2");
careTaker.add(originator.saveStateToMemento());
originator.setState("State #3");
careTaker.add(originator.saveStateToMemento());
originator.setState("State #4");
System.out.println("Current State: " + originator.getState());
originator.getStateFromMemento(careTaker.get(0));
System.out.println("First saved State: " + originator.getState());
originator.getStateFromMemento(careTaker.get(1));
System.out.println("Second saved State: " + originator.getState());
}
}
Step 5: Make sure the output is correct.
Current State: State #4
First saved State: State #2
Second saved State: State #3
Key takeaway
"To restore the state of an object to its prior state," according to a Memento Pattern. However, it must do so without breaking Encapsulation. In the event of a mistake or failure, such a scenario is useful.
When there is a one-to-many relationship between items, such as when one object is modified, its dependent objects must be alerted automatically, the observer pattern is employed. Observer pattern is a type of behavioral pattern.
"Just construct a one-to-one dependency so that when one object changes state, all its dependents are notified and changed immediately," according to the Observer Pattern.
Dependents or Publish-Subscribe are other names for the observer pattern.
Advantages
● It describes the interaction between the observer and the objects.
● It allows for broadcast-style communication to be supported.
Usage
● When a state change in one object must be mirrored in another without the objects being tightly connected.
● When we design a framework that will be updated in the future with new observers with few changes.
Implementation
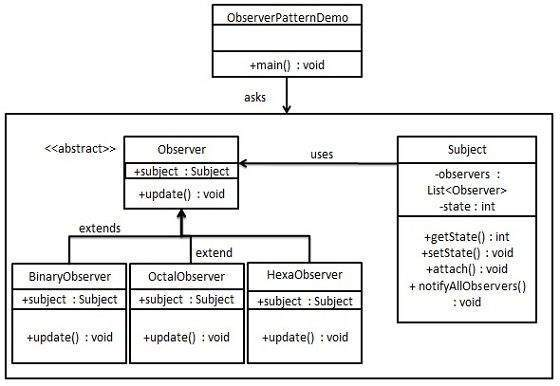
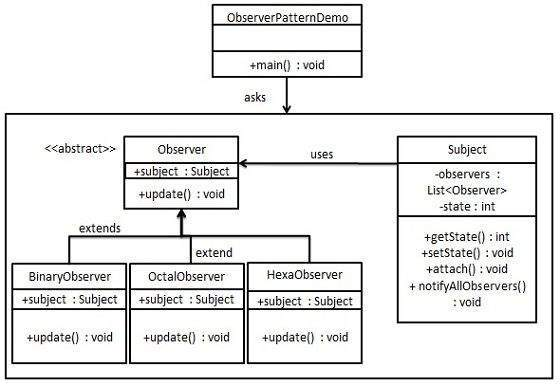
Three actor classes are used in the observer pattern. Client, Observer, and Subject A subject is a type of object that has methods for attaching and detaching observers from a client object. We've generated two classes: an abstract Observer and a concrete Subject that extends Observer.
Our demo class, ObserverPatternDemo, will demonstrate the observer pattern using Subject and concrete class objects.
Step 1: Create a class called Subject.
Subject.java
Import java.util.ArrayList;
Import java.util.List;
Public class Subject {
private List<Observer> observers = new ArrayList<Observer>();
private int state;
public int getState() {
return state;
}
public void setState(int state) {
this.state = state;
notifyAllObservers();
}
public void attach(Observer observer){
observers.add(observer);
}
public void notifyAllObservers(){
for (Observer observer : observers) {
observer.update();
}
}
}
Step 2: Create a class called Observer.
Observer.java
Public abstract class Observer {
protected Subject subject;
public abstract void update();
}
Step 3: Make specific observer classes.
BinaryObserver.java
Public class BinaryObserver extends Observer{
public BinaryObserver(Subject subject){
this.subject = subject;
this.subject.attach(this);
}
@Override
public void update() {
System.out.println( "Binary String: " + Integer.toBinaryString( subject.getState() ) );
}
}
OctalObserver.java
Public class OctalObserver extends Observer{
public OctalObserver(Subject subject){
this.subject = subject;
this.subject.attach(this);
}
@Override
public void update() {
System.out.println( "Octal String: " + Integer.toOctalString( subject.getState() ) );
}
}
HexaObserver.java
Public class HexaObserver extends Observer{
public HexaObserver(Subject subject){
this.subject = subject;
this.subject.attach(this);
}
@Override
public void update() {
System.out.println( "Hex String: " + Integer.toHexString( subject.getState() ).toUpperCase() );
}
}
Step 4: Use concrete observer objects and a subject.
ObserverPatternDemo.java
Public class ObserverPatternDemo {
public static void main(String[] args) {
Subject subject = new Subject();
new HexaObserver(subject);
new OctalObserver(subject);
new BinaryObserver(subject);
System.out.println("First state change: 15");
subject.setState(15);
System.out.println("Second state change: 10");
subject.setState(10);
}
}
Step 5: Make sure the output is correct.
First state change: 15
Hex String: F
Octal String: 17
Binary String: 1111
Second state change: 10
Hex String: A
Octal String: 12
Binary String: 1010
Key takeaway
When there is a one-to-many relationship between items, such as when one object is modified, its dependent objects must be alerted automatically, the observer pattern is employed. Observer pattern is a type of behavioral pattern.
A class's behavior changes depending on its state in the State pattern. This design pattern is classified as a behavior pattern.
We generate objects that represent multiple states and a context object whose behavior changes when its state object changes in the State pattern. Objects for States is another name for the State Pattern.
Advantages
The state-specific behavior is preserved.
Any state transitions are made explicit.
Usage
● When an object's behavior is determined by its state, it must be able to change its behavior at runtime to match the new state.
● It's used when there are a lot of multipart conditional statements in the actions that are dependent on the state of an object.
Implementation
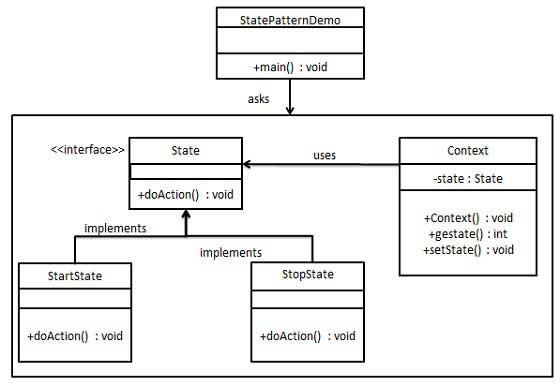
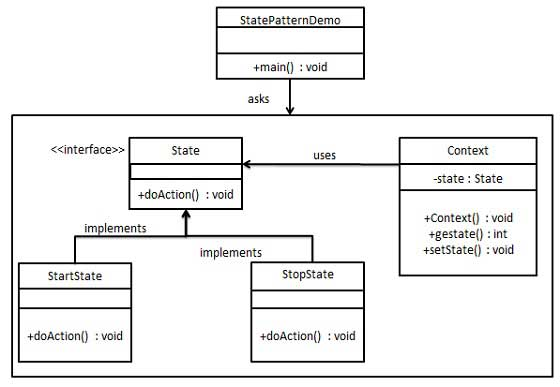
We'll develop a State interface that defines an action, as well as concrete state classes that implement the State interface. A Context is a State-carrying class.
Our demo class, StatePatternDemo, will employ Context and state objects to demonstrate how Context behavior changes depending on the state it is in.
Step 1: Make a user interface.
State.java
Public interface State {
public void doAction(Context context);
}
Step 2: Create concrete classes that implement the same interface as the abstract classes.
StartState.java
Public class StartState implements State {
public void doAction(Context context) {
System.out.println("Player is in start state");
context.setState(this);
}
public String toString(){
return "Start State";
}
}
StopState.java
Public class StopState implements State {
public void doAction(Context context) {
System.out.println("Player is in stop state");
context.setState(this);
}
public String toString(){
return "Stop State";
}
}
Step 3: Construct a Context Class.
Context.java
Public class Context {
private State state;
public Context(){
state = null;
}
public void setState(State state){
this.state = state;
}
public State getState(){
return state;
}
}
Step 4: When the State changes, use the Context to see how the behavior changes.
StatePatternDemo.java
Public class StatePatternDemo {
public static void main(String[] args) {
Context context = new Context();
StartState startState = new StartState();
startState.doAction(context);
System.out.println(context.getState().toString());
StopState stopState = new StopState();
stopState.doAction(context);
System.out.println(context.getState().toString());
}
}
Step 5: Make sure the output is correct.
Player is in start state
Start State
Player is in stop state
Stop State
Key takeaway
We generate objects that represent multiple states and a context object whose behavior changes when its state object changes in the State pattern. Objects for States is another name for the State Pattern.
"Defines a family of functionality, encapsulates each one, and makes them interchangeable," according to a Strategy Pattern. Policy is another name for the Strategy Pattern.
We generate objects that represent numerous strategies and a context object whose behavior varies depending on its strategy object in the Strategy pattern. The context object's running algorithm is changed by the strategy object.
Advantages
● It acts as a stand-in for subclassing.
● Each behavior is defined within its own class, removing the need for conditional statements.
● It makes it easy to add new functionality without having to rewrite the application.
Usage
● When the sole difference between the various classes is their behavior. Consider the Servlet API.
● When different variants of an algorithm are required, it is utilised.
Implementation
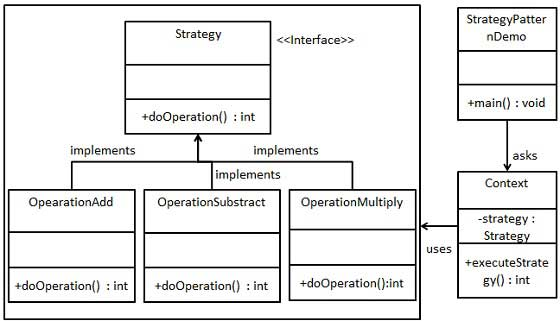
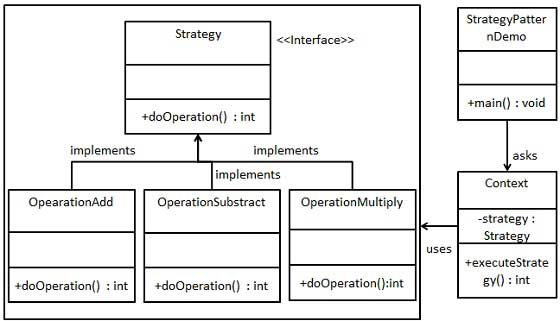
We'll make a Strategy interface that defines an action, as well as specific strategy classes that implement the Strategy interface. Context is a class that employs the use of a Strategy.
Our sample class, StrategyPatternDemo, will employ Context and strategy objects to demonstrate how Context behavior changes depending on the strategy it deploys or uses.
Step 1: Make a user interface.
Strategy.java
Public interface Strategy {
public int doOperation(int num1, int num2);
}
Step 2: Create concrete classes that implement the same interface as the abstract classes.
OperationAdd.java
Public class OperationAdd implements Strategy{
@Override
public int doOperation(int num1, int num2) {
return num1 + num2;
}
}
OperationSubstract.java
Public class OperationSubstract implements Strategy{
@Override
public int doOperation(int num1, int num2) {
return num1 - num2;
}
}
OperationMultiply.java
Public class OperationMultiply implements Strategy{
@Override
public int doOperation(int num1, int num2) {
return num1 * num2;
}
}
Step 3: Construct a Context Class.
Context.java
Public class Context {
private Strategy strategy;
public Context(Strategy strategy){
this.strategy = strategy;
}
public int executeStrategy(int num1, int num2){
return strategy.doOperation(num1, num2);
}
}
Step 4: When it changes its strategy, use the Context to determine whether there is a change in behavior.
StrategyPatternDemo.java
Public class StrategyPatternDemo {
public static void main(String[] args) {
Context context = new Context(new OperationAdd());
System.out.println("10 + 5 = " + context.executeStrategy(10, 5));
context = new Context(new OperationSubstract());
System.out.println("10 - 5 = " + context.executeStrategy(10, 5));
context = new Context(new OperationMultiply());
System.out.println("10 * 5 = " + context.executeStrategy(10, 5));
}
}
Step 5: Verify the output.
10 + 5 = 15
10 - 5 = 5
10 * 5 = 50
Key takeaway
We generate objects that represent numerous strategies and a context object whose behavior varies depending on its strategy object in the Strategy pattern. The context object's running algorithm is changed by the strategy object.
"Just define the skeleton of a function in an operation, deferring some stages to its subclasses," according to the Template Pattern.
An abstract class exposes a defined way(s)/template(s) to execute its methods in the Template pattern. Its subclasses can override the method implementation as needed, but the invocation must follow the abstract class's rules. This pattern belongs to the category of behavioral patterns.
Advantages
● It is a widely used technique for recycling code. This is only the most significant advantage.
Usage
● It's used when subclass behavior should be consolidated into a single common class to reduce duplication.
Implementation
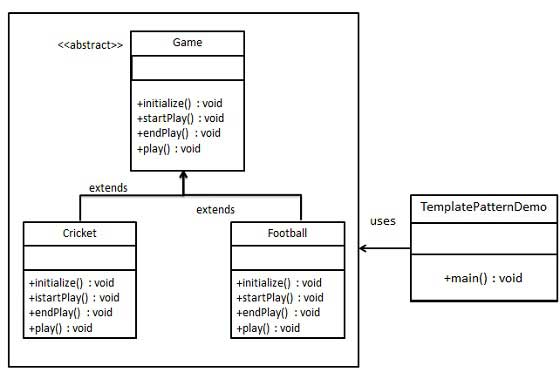
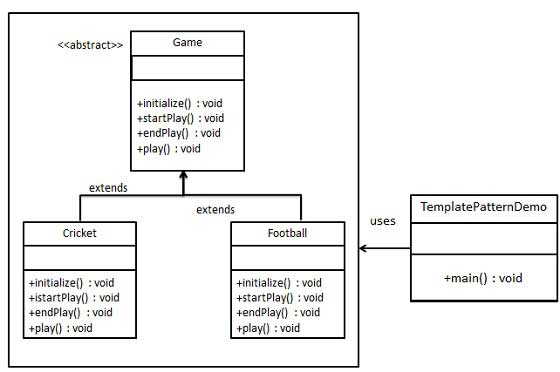
We'll make a Game abstract class that defines operations and has a template function that is set to be final so it can't be overridden. Football and Cricket are concrete classes that extend Game and override its methods.
Our demo class, TemplatePatternDemo, will use Game to explain how to use the template pattern.
Step 1: Make an abstract class with a final template method.
Game.java
Public abstract class Game {
abstract void initialize();
abstract void startPlay();
abstract void endPlay();
//template method
public final void play(){
//initialize the game
initialize();
//start game
startPlay();
//end game
endPlay();
}
}
Step 2: Make concrete classes that extend the above-mentioned class.
Cricket.java
Public class Cricket extends Game {
@Override
void endPlay() {
System.out.println("Cricket Game Finished!");
}
@Override
void initialize() {
System.out.println("Cricket Game Initialized! Start playing.");
}
@Override
void startPlay() {
System.out.println("Cricket Game Started. Enjoy the game!");
}
}
Football.java
Public class Football extends Game {
@Override
void endPlay() {
System.out.println("Football Game Finished!");
}
@Override
void initialize() {
System.out.println("Football Game Initialized! Start playing.");
}
@Override
void startPlay() {
System.out.println("Football Game Started. Enjoy the game!");
}
}
Step 3: To illustrate a specific manner of playing the game, use the Game's template method play().
TemplatePatternDemo.java
Public class TemplatePatternDemo {
public static void main(String[] args) {
Game game = new Cricket();
game.play();
System.out.println();
game = new Football();
game.play();
}
}
Step 4: Make sure the output is correct.
Cricket Game Initialized! Start playing.
Cricket Game Started. Enjoy the game!
Cricket Game Finished!
Football Game Initialized! Start playing.
Football Game Started. Enjoy the game!
Football Game Finished!
Key takeaway
An abstract class exposes a defined way(s)/template(s) to execute its methods in the Template pattern. Its subclasses can override the method implementation as needed, but the invocation must follow the abstract class's rules.
A visitor class is used in the Visitor pattern to update an element class's executing algorithm. As a result, the element's execution algorithm can change as the visitor changes. This pattern belongs to the category of behavioral patterns. The element object must accept the visitor object as per the pattern so that the visitor object can perform the operation on the element object.
Implementation
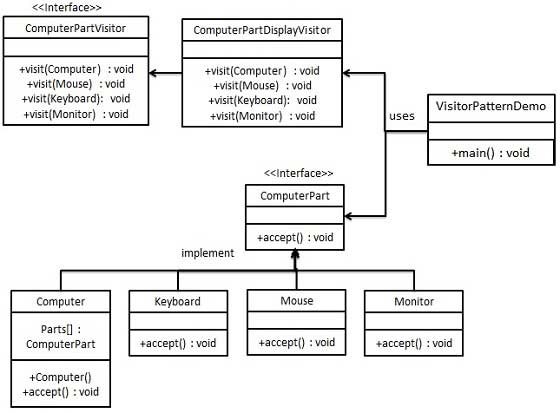
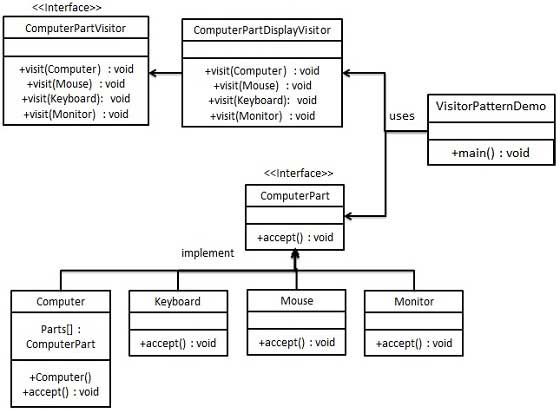
We'll make a ComputerPart interface that defines accept operation. The concrete classes that implement the ComputerPart interface are Keyboard, Mouse, Monitor, and Computer. Another interface, ComputerPartVisitor, will define the operations of a visitor class. The computer interacts with a specific visitor and performs the appropriate action.
Our demo class, VisitorPatternDemo, will employ the Computer and ComputerPartVisitor classes to explain how to use the visitor pattern.
Step 1: To represent an element, create an interface.
ComputerPart.java
Public interface ComputerPart {
public void accept(ComputerPartVisitor computerPartVisitor);
}
Step 2: Make concrete classes that extend the above-mentioned class.
Keyboard.java
Public class Keyboard implements ComputerPart {
@Override
public void accept(ComputerPartVisitor computerPartVisitor) {
computerPartVisitor.visit(this);
}
}
Monitor.java
Public class Monitor implements ComputerPart {
@Override
public void accept(ComputerPartVisitor computerPartVisitor) {
computerPartVisitor.visit(this);
}
}
Mouse.java
Public class Mouse implements ComputerPart {
@Override
public void accept(ComputerPartVisitor computerPartVisitor) {
computerPartVisitor.visit(this);
}
}
Computer.java
Public class Computer implements ComputerPart {
ComputerPart[] parts;
public Computer(){
parts = new ComputerPart[] {new Mouse(), new Keyboard(), new Monitor()};
}
@Override
public void accept(ComputerPartVisitor computerPartVisitor) {
for (int i = 0; i < parts.length; i++) {
parts[i].accept(computerPartVisitor);
}
computerPartVisitor.visit(this);
}
}
Step 3: Create a user interface that represents a visitor.
ComputerPartVisitor.java
Public interface ComputerPartVisitor {
Public void visit(Computer computer);
Public void visit(Mouse mouse);
Public void visit(Keyboard keyboard);
Public void visit(Monitor monitor);
}
Step 4: Implement the above class to create a concrete visitor.
MputerPartDisplayVisitor.java
Public class ComputerPartDisplayVisitor implements ComputerPartVisitor {
@Override
public void visit(Computer computer) {
System.out.println("Displaying Computer.");
}
@Override
public void visit(Mouse mouse) {
System.out.println("Displaying Mouse.");
}
@Override
public void visit(Keyboard keyboard) {
System.out.println("Displaying Keyboard.");
}
@Override
public void visit(Monitor monitor) {
System.out.println("Displaying Monitor.");
}
}
Step 5: To display pieces of a computer, use the ComputerPartDisplayVisitor.
CoVisitorPatternDemo.java
Public class VisitorPatternDemo {
public static void main(String[] args) {
ComputerPart computer = new Computer();
computer.accept(new ComputerPartDisplayVisitor());
}
}
Step 6: Make sure the output is correct.
Displaying Mouse.
Displaying Keyboard.
Displaying Monitor.
Displaying Computer.
Key takeaway
A visitor class is used in the Visitor pattern to update an element class's executing algorithm. As a result, the element's execution algorithm can change as the visitor changes.
The interaction and responsibility of objects are the focus of behavioral design patterns.
The interaction between the objects in these design patterns should be such that they may readily communicate with one another while being loosely connected.
In order to prevent hard coding and dependencies, the implementation and the client should be loosely connected.
Types
There are 12 different types of behavioral design patterns to choose from:
● Chain of Responsibility Pattern
● Command Pattern
● Interpreter Pattern
● Iterator Pattern
● Mediator Pattern
● Memento Pattern
● Observer Pattern
● State Pattern
● Strategy Pattern
● Template Pattern
● Visitor Pattern
● Null Object
References:
- Head First Design Patterns, by Eric Freeman and Elisabeth Freeman
- Design Patterns Explained, by Shalloway and Trott
- Introduction to design Patterns in C++ with Qt by Alan Ezust, Paul Ezust
Unit - 4
Behavioral Patterns
The chain of responsibility pattern, as the name implies, produces a chain of recipient objects for a request. Based on the type of request, this design decouples the sender and receiver. This pattern is classified as a behavioral pattern.
Normally, each receiver in this pattern carries a reference to another receiver. If one object is unable to handle the request, it is forwarded to the next receiver, and so on.
Advantage of Chain of Responsibility Pattern
● It decreases coupling.
● While assigning duties to objects, it adds flexibility.
● It lets a group of classes function as if they were one; events generated by one class can be passed to other handler classes via composition.
Usage of Chain of Responsibility Pattern
It's used for:
● When a request can be handled by more than one object and the handler is uncertain.
● When a group of objects capable of handling a request must be dynamically provided.
Implementation
We've constructed an abstract class called AbstractLogger that has a logging level. Then, by extending the AbstractLogger, we generated three different sorts of loggers. Each logger compares the message's level to its own and prints accordingly; otherwise, the message is not printed and sent to the next logger.
Step 1: Create a logger class that is abstract.
AbstractLogger.java
Public abstract class AbstractLogger {
public static int INFO = 1;
public static int DEBUG = 2;
public static int ERROR = 3;
protected int level;
//next element in chain or responsibility
protected AbstractLogger nextLogger;
public void setNextLogger(AbstractLogger nextLogger){
this.nextLogger = nextLogger;
}
public void logMessage(int level, String message){
if(this.level <= level){
write(message);
}
if(nextLogger !=null){
nextLogger.logMessage(level, message);
}
}
abstract protected void write(String message);
}
Step 2: Extend the logger with concrete classes.
ConsoleLogger.java
Public class ConsoleLogger extends AbstractLogger {
public ConsoleLogger(int level){
this.level = level;
}
@Override
protected void write(String message) {
System.out.println("Standard Console::Logger: " + message);
}
}
ErrorLogger.java
Public class ErrorLogger extends AbstractLogger {
public ErrorLogger(int level){
this.level = level;
}
@Override
protected void write(String message) {
System.out.println("Error Console::Logger: " + message);
}
}
FileLogger.java
Public class FileLogger extends AbstractLogger {
public FileLogger(int level){
this.level = level;
}
@Override
protected void write(String message) {
System.out.println("File::Logger: " + message);
}
}
Step 3: Make many varieties of loggers. Set the next logger in each logger and assign them error levels. The section of the chain is represented by the next logger in each logger.
ChainPatternDemo.java
Public class ChainPatternDemo {
private static AbstractLogger getChainOfLoggers(){
AbstractLogger errorLogger = new ErrorLogger(AbstractLogger.ERROR);
AbstractLogger fileLogger = new FileLogger(AbstractLogger.DEBUG);
AbstractLogger consoleLogger = new ConsoleLogger(AbstractLogger.INFO);
errorLogger.setNextLogger(fileLogger);
fileLogger.setNextLogger(consoleLogger);
return errorLogger;
}
public static void main(String[] args) {
AbstractLogger loggerChain = getChainOfLoggers();
loggerChain.logMessage(AbstractLogger.INFO,
"This is an information.");
loggerChain.logMessage(AbstractLogger.DEBUG,
"This is an debug level information.");
loggerChain.logMessage(AbstractLogger.ERROR,
"This is an error information.");
}
}
Step 4: Make sure the output is correct.
Standard Console::Logger: This is an information.
File::Logger: This is an debug level information.
Standard Console::Logger: This is an debug level information.
Error Console::Logger: This is an error information.
File::Logger: This is an error information.
Standard Console::Logger: This is an error information.
Key takeaway
The chain of responsibility pattern, as the name implies, produces a chain of recipient objects for a request. Based on the type of request, this design decouples the sender and receiver.
The command pattern is a data-driven design pattern that is classified as a behavioral pattern. A request is wrapped in an object and sent to the invoker object as a command. The invoker object searches for an object that can handle this command and sends the command to that object, which then executes it.
Advantage of command pattern
● It distinguishes between the object that executes the action and the object that invokes it.
● Because existing classes aren't modified, it's simple to add new commands.
Usage of command pattern
It's used for:
● When you need to parameterize objects based on an action.
● When many requests must be created and executed at separate times.
● When rollback, logging, or transaction functionality is required.
Implementation
We've designed an interface called Order that acts as a command. We've made a Stock class that serves as a request. BuyStock and SellStock are concrete command classes that implement the Order interface and handle real command processing. As an invoker object, a class called Broker is constructed. It has the ability to take and place orders.
The command pattern is used by the broker object to determine which object will execute which command based on the type of command. Our sample class, CommandPatternDemo, will demonstrate the command pattern using the Broker class.
Step 1: Make a command interface for your programme.
Order.java
Public interface Order {
void execute();
}
Step 2: Make a class for requests.
Stock.java
Public class Stock {
private String name = "ABC";
private int quantity = 10;
public void buy(){
System.out.println("Stock [ Name: "+name+",
Quantity: " + quantity +" ] bought");
}
public void sell(){
System.out.println("Stock [ Name: "+name+",
Quantity: " + quantity +" ] sold");
}
}
Step 3: Create concrete Order interface implementation classes.
BuyStock.java
Public class BuyStock implements Order {
private Stock abcStock;
public BuyStock(Stock abcStock){
this.abcStock = abcStock;
}
public void execute() {
abcStock.buy();
}
}
SellStock.java
Public class SellStock implements Order {
private Stock abcStock;
public SellStock(Stock abcStock){
this.abcStock = abcStock;
}
public void execute() {
abcStock.sell();
}
}
Step 4: Create a class for command invokers.
Broker.java
Import java.util.ArrayList;
Import java.util.List;
public class Broker {
private List<Order> orderList = new ArrayList<Order>();
public void takeOrder(Order order){
orderList.add(order);
}
public void placeOrders(){
for (Order order : orderList) {
order.execute();
}
orderList.clear();
}
}
Step 5: To take and execute commands, use the Broker class.
CommandPatternDemo.java
Public class CommandPatternDemo {
public static void main(String[] args) {
Stock abcStock = new Stock();
BuyStock buyStockOrder = new BuyStock(abcStock);
SellStock sellStockOrder = new SellStock(abcStock);
Broker broker = new Broker();
broker.takeOrder(buyStockOrder);
broker.takeOrder(sellStockOrder);
broker.placeOrders();
}
}
Step 6: Make sure the output is correct.
Stock [ Name: ABC, Quantity: 10 ] bought
Stock [ Name: ABC, Quantity: 10 ] sold
Key takeaway
The command pattern is a data-driven design pattern that is classified as a behavioral pattern. A request is wrapped in an object and sent to the invoker object as a command.
"To define a representation of grammar of a particular language, as well as an interpreter that uses this representation to interpret sentences in the language," according to an Interpreter Pattern.
In general, the Interpreter pattern can only be used in a limited number of situations. The Interpreter pattern can only be discussed in terms of formal grammars, although there are superior solutions in this field, which is why it is not widely used.
This pattern can be used to parse expressions written in simple grammars and, on rare occasions, simple rule engines.
Advantage of Interpreter Pattern
● It is less difficult to modify and expand the grammar.
● It's simple to put the grammar into practice.
Usage of Interpreter pattern
It's used for:
● When the language's grammar is straightforward.
● When productivity isn't a top priority.
Implementation
We'll make a concrete class that implements the Expression interface and an Expression interface. TerminalExpression is a class that serves as the main translator of the context in question. Combinational expressions are created using the classes OrExpression and AndExpression.
Our demo class, InterpreterPatternDemo, will use the Expression class to define rules and illustrate expression parsing.
Step 1: Make a user interface for expressions.
Expression.java
Public interface Expression {
public boolean interpret(String context);
}
Step 2: Create concrete classes that implement the interface described above.
TerminalExpression.java
Public class TerminalExpression implements Expression {
private String data;
public TerminalExpression(String data){
this.data = data;
}
@Override
public boolean interpret(String context) {
if(context.contains(data)){
return true;
}
return false;
}
}
OrExpression.java
Public class OrExpression implements Expression {
private Expression expr1 = null;
private Expression expr2 = null;
public OrExpression(Expression expr1, Expression expr2) {
this.expr1 = expr1;
this.expr2 = expr2;
}
@Override
public boolean interpret(String context) {
return expr1.interpret(context) || expr2.interpret(context);
}
}
AndExpression.java
Public class AndExpression implements Expression {
private Expression expr1 = null;
private Expression expr2 = null;
public AndExpression(Expression expr1, Expression expr2) {
this.expr1 = expr1;
this.expr2 = expr2;
}
@Override
public boolean interpret(String context) {
return expr1.interpret(context) && expr2.interpret(context);
}
}
Step 3: The Expression class is used by InterpreterPatternDemo to build and parse rules.
InterpreterPatternDemo.java
Public class InterpreterPatternDemo {
//Rule: Robert and John are male
public static Expression getMaleExpression(){
Expression robert = new TerminalExpression("Robert");
Expression john = new TerminalExpression("John");
return new OrExpression(robert, john);
}
//Rule: Julie is a married women
public static Expression getMarriedWomanExpression(){
Expression julie = new TerminalExpression("Julie");
Expression married = new TerminalExpression("Married");
return new AndExpression(julie, married);
}
public static void main(String[] args) {
Expression isMale = getMaleExpression();
Expression isMarriedWoman = getMarriedWomanExpression();
System.out.println("John is male? " + isMale.interpret("John"));
System.out.println("Julie is a married women? " + isMarriedWoman.interpret("Married Julie"));
}
}
Step 4: Make sure the output is correct.
John is male? true
Julie is a married women? true
Key takeaway
In general, the Interpreter pattern can only be used in a limited number of situations. The Interpreter pattern can only be discussed in terms of formal grammars, although there are superior solutions in this field, which is why it is not widely utilised.
In the Java and.Net programming environments, the iterator pattern is a highly common design pattern. This technique is used to gain a way to sequentially access the elements of a collection object without having to know its underlying form.
The iterator pattern is a type of behavioral pattern.
Advantage of Iterator Pattern
● It allows you to traverse a collection in different ways.
● It streamlines the collection's user interface.
Usage of Iterator Pattern
It's used for:
● When you need to get a hold of a group of things without revealing their internal representation.
● When many traversals of items are required, the collection must be able to support them.
Implementation
We'll make an Iterator interface to describe navigation methods, as well as a Container interface to return the iterator. Concrete classes that implement the Container interface will be responsible for implementing and using the Iterator interface.
Our demo class, IteratorPatternDemo, will print a Names saved as a collection in NamesRepository using NamesRepository, a concrete class implementation.
Step 1: Make user interfaces.
Iterator.java
Public interface Iterator {
public boolean hasNext();
public Object next();
}
Container.java
Public interface Container {
public Iterator getIterator();
}
Step 2: Make a concrete implementation of the Container interface. This class has a NameIterator inner class that implements the Iterator interface.
NameRepository.java
Public class NameRepository implements Container {
public String names[] = {"Robert" , "John" ,"Julie" , "Lora"};
@Override
public Iterator getIterator() {
return new NameIterator();
}
private class NameIterator implements Iterator {
int index;
@Override
public boolean hasNext() {
if(index < names.length){
return true;
}
return false;
}
@Override
public Object next() {
if(this.hasNext()){
return names[index++];
}
return null;
}
}
}
Step 3: To get an iterator and print names, use the NameRepository.
IteratorPatternDemo.java
Public class IteratorPatternDemo {
public static void main(String[] args) {
NameRepository namesRepository = new NameRepository();
for(Iterator iter = namesRepository.getIterator(); iter.hasNext();){
String name = (String)iter.next();
System.out.println("Name : " + name);
}
}
}
Step 4: Make sure the output is correct.
Name : Robert
Name : John
Name : Julie
Name : Lora
Key takeaway
In the Java and.Net programming environments, the iterator pattern is a highly common design pattern. This technique is used to gain a way to sequentially access the elements of a collection object without having to know its underlying form.
"To define an entity that captures how a set of objects communicate," says the Mediator Pattern.
I'll demonstrate the Mediator pattern by examining an issue. When we first start developing, we have a few classes that interact with one another to produce results. Consider how, as functionality expands, the logic becomes more complex. So, what happens next? We add more classes, and they still interact, but maintaining this code is becoming increasingly tough. As a result, the Mediator pattern solves this issue.
The mediator pattern is intended to simplify communication among various objects or classes. This pattern creates a mediator class that generally handles all communication between different classes while also promoting code maintainability through loose coupling.
Advantage
● The number of classes is decoupled.
● It makes object protocols easier to understand.
● Control is centralized.
● Because they don't have to communicate with one another, the individual components become significantly simpler and easier to manage.
● Because the components do not need to contain logic to communicate with one another, they are more general.
Usage
● It's widely used in message-based systems, as well as chat apps.
● When a collection of items interacts in complex but well-defined ways.
Implementation
We'll take the example of a chat room to demonstrate the mediator pattern. Multiple users can send messages to the chat room, and it's up to the chat room to display the messages to all users. ChatRoom and User are the two classes we've constructed. To share their messages, user objects will use the ChatRoom function.
Our demo class, MediatorPatternDemo, will use User objects to demonstrate communication between them.

Step 1: Create a class for mediators.
ChatRoom.java
Import java.util.Date;
Public class ChatRoom {
public static void showMessage(User user, String message){
System.out.println(new Date().toString() + " [" + user.getName() + "] : " + message);
}
}
Step 2: Make a user class.
User.java
Public class User {
private String name;
public String getName() {
return name;
}
public void setName(String name) {
this.name = name;
}
public User(String name){
this.name = name;
}
public void sendMessage(String message){
ChatRoom.showMessage(this,message);
}
}
Step 3: To demonstrate communication between them, use the User object.
MediatorPatternDemo.java
Public class MediatorPatternDemo {
public static void main(String[] args) {
User robert = new User("Robert");
User john = new User("John");
robert.sendMessage("Hi! John!");
john.sendMessage("Hello! Robert!");
}
}
Step 4: Make sure the output is correct.
Thu Jan 31 16:05:46 IST 2013 [Robert] : Hi! John!
Thu Jan 31 16:05:46 IST 2013 [John] : Hello! Robert!
Key takeaway
The mediator pattern is intended to simplify communication among various objects or classes. This pattern creates a mediator class that generally handles all communication between different classes while also promoting code maintainability through loose coupling.
"To restore the state of an object to its prior state," according to a Memento Pattern. However, it must do so without breaking Encapsulation. In the event of a mistake or failure, such a scenario is useful.
Token is another name for the Memento pattern.
One of the most commonly used operations in an editor is undo, sometimes known as backspace or ctrl+z. The undo action is implemented using the Memento design pattern. This is accomplished by saving the object's current state as it changes.
Advantage
● It keeps encapsulation borders intact.
● It makes the creator's job easier.
Usage
● In most applications, it's used in undo and redo operations.
● Database transactions also make advantage of it.
Implementation
Three actor classes are used in the Memento pattern. The state of an object to be restored is kept in Memento. The Originator object produces and preserves states in Memento objects, while the Caretaker object is in charge of restoring such states. Memento, Originator, and CareTaker are the three classes we've established.
Our demo class, MementoPatternDemo, will demonstrate the restoration of object states using CareTaker and Originator objects.
Step 1: Make a class called Memento.
Memento.java
Public class Memento {
private String state;
public Memento(String state){
this.state = state;
}
public String getState(){
return state;
}
}
Step 2: Create a class called Originator.
Originator.java
Public class Originator {
private String state;
public void setState(String state){
this.state = state;
}
public String getState(){
return state;
}
public Memento saveStateToMemento(){
return new Memento(state);
}
public void getStateFromMemento(Memento memento){
state = memento.getState();
}
}
Step 3: Make a class called CareTaker.
CareTaker.java
Import java.util.ArrayList;
Import java.util.List;
Public class CareTaker {
private List<Memento> mementoList = new ArrayList<Memento>();
public void add(Memento state){
mementoList.add(state);
}
public Memento get(int index){
return mementoList.get(index);
}
}
Step 4: Objects such as CareTaker and Originator can be used.
MementoPatternDemo.java
Public class MementoPatternDemo {
public static void main(String[] args) {
Originator originator = new Originator();
CareTaker careTaker = new CareTaker();
originator.setState("State #1");
originator.setState("State #2");
careTaker.add(originator.saveStateToMemento());
originator.setState("State #3");
careTaker.add(originator.saveStateToMemento());
originator.setState("State #4");
System.out.println("Current State: " + originator.getState());
originator.getStateFromMemento(careTaker.get(0));
System.out.println("First saved State: " + originator.getState());
originator.getStateFromMemento(careTaker.get(1));
System.out.println("Second saved State: " + originator.getState());
}
}
Step 5: Make sure the output is correct.
Current State: State #4
First saved State: State #2
Second saved State: State #3
Key takeaway
"To restore the state of an object to its prior state," according to a Memento Pattern. However, it must do so without breaking Encapsulation. In the event of a mistake or failure, such a scenario is useful.
When there is a one-to-many relationship between items, such as when one object is modified, its dependent objects must be alerted automatically, the observer pattern is employed. Observer pattern is a type of behavioral pattern.
"Just construct a one-to-one dependency so that when one object changes state, all its dependents are notified and changed immediately," according to the Observer Pattern.
Dependents or Publish-Subscribe are other names for the observer pattern.
Advantages
● It describes the interaction between the observer and the objects.
● It allows for broadcast-style communication to be supported.
Usage
● When a state change in one object must be mirrored in another without the objects being tightly connected.
● When we design a framework that will be updated in the future with new observers with few changes.
Implementation
Three actor classes are used in the observer pattern. Client, Observer, and Subject A subject is a type of object that has methods for attaching and detaching observers from a client object. We've generated two classes: an abstract Observer and a concrete Subject that extends Observer.
Our demo class, ObserverPatternDemo, will demonstrate the observer pattern using Subject and concrete class objects.
Step 1: Create a class called Subject.
Subject.java
Import java.util.ArrayList;
Import java.util.List;
Public class Subject {
private List<Observer> observers = new ArrayList<Observer>();
private int state;
public int getState() {
return state;
}
public void setState(int state) {
this.state = state;
notifyAllObservers();
}
public void attach(Observer observer){
observers.add(observer);
}
public void notifyAllObservers(){
for (Observer observer : observers) {
observer.update();
}
}
}
Step 2: Create a class called Observer.
Observer.java
Public abstract class Observer {
protected Subject subject;
public abstract void update();
}
Step 3: Make specific observer classes.
BinaryObserver.java
Public class BinaryObserver extends Observer{
public BinaryObserver(Subject subject){
this.subject = subject;
this.subject.attach(this);
}
@Override
public void update() {
System.out.println( "Binary String: " + Integer.toBinaryString( subject.getState() ) );
}
}
OctalObserver.java
Public class OctalObserver extends Observer{
public OctalObserver(Subject subject){
this.subject = subject;
this.subject.attach(this);
}
@Override
public void update() {
System.out.println( "Octal String: " + Integer.toOctalString( subject.getState() ) );
}
}
HexaObserver.java
Public class HexaObserver extends Observer{
public HexaObserver(Subject subject){
this.subject = subject;
this.subject.attach(this);
}
@Override
public void update() {
System.out.println( "Hex String: " + Integer.toHexString( subject.getState() ).toUpperCase() );
}
}
Step 4: Use concrete observer objects and a subject.
ObserverPatternDemo.java
Public class ObserverPatternDemo {
public static void main(String[] args) {
Subject subject = new Subject();
new HexaObserver(subject);
new OctalObserver(subject);
new BinaryObserver(subject);
System.out.println("First state change: 15");
subject.setState(15);
System.out.println("Second state change: 10");
subject.setState(10);
}
}
Step 5: Make sure the output is correct.
First state change: 15
Hex String: F
Octal String: 17
Binary String: 1111
Second state change: 10
Hex String: A
Octal String: 12
Binary String: 1010
Key takeaway
When there is a one-to-many relationship between items, such as when one object is modified, its dependent objects must be alerted automatically, the observer pattern is employed. Observer pattern is a type of behavioral pattern.
A class's behavior changes depending on its state in the State pattern. This design pattern is classified as a behavior pattern.
We generate objects that represent multiple states and a context object whose behavior changes when its state object changes in the State pattern. Objects for States is another name for the State Pattern.
Advantages
The state-specific behavior is preserved.
Any state transitions are made explicit.
Usage
● When an object's behavior is determined by its state, it must be able to change its behavior at runtime to match the new state.
● It's used when there are a lot of multipart conditional statements in the actions that are dependent on the state of an object.
Implementation
We'll develop a State interface that defines an action, as well as concrete state classes that implement the State interface. A Context is a State-carrying class.
Our demo class, StatePatternDemo, will employ Context and state objects to demonstrate how Context behavior changes depending on the state it is in.
Step 1: Make a user interface.
State.java
Public interface State {
public void doAction(Context context);
}
Step 2: Create concrete classes that implement the same interface as the abstract classes.
StartState.java
Public class StartState implements State {
public void doAction(Context context) {
System.out.println("Player is in start state");
context.setState(this);
}
public String toString(){
return "Start State";
}
}
StopState.java
Public class StopState implements State {
public void doAction(Context context) {
System.out.println("Player is in stop state");
context.setState(this);
}
public String toString(){
return "Stop State";
}
}
Step 3: Construct a Context Class.
Context.java
Public class Context {
private State state;
public Context(){
state = null;
}
public void setState(State state){
this.state = state;
}
public State getState(){
return state;
}
}
Step 4: When the State changes, use the Context to see how the behavior changes.
StatePatternDemo.java
Public class StatePatternDemo {
public static void main(String[] args) {
Context context = new Context();
StartState startState = new StartState();
startState.doAction(context);
System.out.println(context.getState().toString());
StopState stopState = new StopState();
stopState.doAction(context);
System.out.println(context.getState().toString());
}
}
Step 5: Make sure the output is correct.
Player is in start state
Start State
Player is in stop state
Stop State
Key takeaway
We generate objects that represent multiple states and a context object whose behavior changes when its state object changes in the State pattern. Objects for States is another name for the State Pattern.
"Defines a family of functionality, encapsulates each one, and makes them interchangeable," according to a Strategy Pattern. Policy is another name for the Strategy Pattern.
We generate objects that represent numerous strategies and a context object whose behavior varies depending on its strategy object in the Strategy pattern. The context object's running algorithm is changed by the strategy object.
Advantages
● It acts as a stand-in for subclassing.
● Each behavior is defined within its own class, removing the need for conditional statements.
● It makes it easy to add new functionality without having to rewrite the application.
Usage
● When the sole difference between the various classes is their behavior. Consider the Servlet API.
● When different variants of an algorithm are required, it is utilised.
Implementation
We'll make a Strategy interface that defines an action, as well as specific strategy classes that implement the Strategy interface. Context is a class that employs the use of a Strategy.
Our sample class, StrategyPatternDemo, will employ Context and strategy objects to demonstrate how Context behavior changes depending on the strategy it deploys or uses.
Step 1: Make a user interface.
Strategy.java
Public interface Strategy {
public int doOperation(int num1, int num2);
}
Step 2: Create concrete classes that implement the same interface as the abstract classes.
OperationAdd.java
Public class OperationAdd implements Strategy{
@Override
public int doOperation(int num1, int num2) {
return num1 + num2;
}
}
OperationSubstract.java
Public class OperationSubstract implements Strategy{
@Override
public int doOperation(int num1, int num2) {
return num1 - num2;
}
}
OperationMultiply.java
Public class OperationMultiply implements Strategy{
@Override
public int doOperation(int num1, int num2) {
return num1 * num2;
}
}
Step 3: Construct a Context Class.
Context.java
Public class Context {
private Strategy strategy;
public Context(Strategy strategy){
this.strategy = strategy;
}
public int executeStrategy(int num1, int num2){
return strategy.doOperation(num1, num2);
}
}
Step 4: When it changes its strategy, use the Context to determine whether there is a change in behavior.
StrategyPatternDemo.java
Public class StrategyPatternDemo {
public static void main(String[] args) {
Context context = new Context(new OperationAdd());
System.out.println("10 + 5 = " + context.executeStrategy(10, 5));
context = new Context(new OperationSubstract());
System.out.println("10 - 5 = " + context.executeStrategy(10, 5));
context = new Context(new OperationMultiply());
System.out.println("10 * 5 = " + context.executeStrategy(10, 5));
}
}
Step 5: Verify the output.
10 + 5 = 15
10 - 5 = 5
10 * 5 = 50
Key takeaway
We generate objects that represent numerous strategies and a context object whose behavior varies depending on its strategy object in the Strategy pattern. The context object's running algorithm is changed by the strategy object.
"Just define the skeleton of a function in an operation, deferring some stages to its subclasses," according to the Template Pattern.
An abstract class exposes a defined way(s)/template(s) to execute its methods in the Template pattern. Its subclasses can override the method implementation as needed, but the invocation must follow the abstract class's rules. This pattern belongs to the category of behavioral patterns.
Advantages
● It is a widely used technique for recycling code. This is only the most significant advantage.
Usage
● It's used when subclass behavior should be consolidated into a single common class to reduce duplication.
Implementation
We'll make a Game abstract class that defines operations and has a template function that is set to be final so it can't be overridden. Football and Cricket are concrete classes that extend Game and override its methods.
Our demo class, TemplatePatternDemo, will use Game to explain how to use the template pattern.
Step 1: Make an abstract class with a final template method.
Game.java
Public abstract class Game {
abstract void initialize();
abstract void startPlay();
abstract void endPlay();
//template method
public final void play(){
//initialize the game
initialize();
//start game
startPlay();
//end game
endPlay();
}
}
Step 2: Make concrete classes that extend the above-mentioned class.
Cricket.java
Public class Cricket extends Game {
@Override
void endPlay() {
System.out.println("Cricket Game Finished!");
}
@Override
void initialize() {
System.out.println("Cricket Game Initialized! Start playing.");
}
@Override
void startPlay() {
System.out.println("Cricket Game Started. Enjoy the game!");
}
}
Football.java
Public class Football extends Game {
@Override
void endPlay() {
System.out.println("Football Game Finished!");
}
@Override
void initialize() {
System.out.println("Football Game Initialized! Start playing.");
}
@Override
void startPlay() {
System.out.println("Football Game Started. Enjoy the game!");
}
}
Step 3: To illustrate a specific manner of playing the game, use the Game's template method play().
TemplatePatternDemo.java
Public class TemplatePatternDemo {
public static void main(String[] args) {
Game game = new Cricket();
game.play();
System.out.println();
game = new Football();
game.play();
}
}
Step 4: Make sure the output is correct.
Cricket Game Initialized! Start playing.
Cricket Game Started. Enjoy the game!
Cricket Game Finished!
Football Game Initialized! Start playing.
Football Game Started. Enjoy the game!
Football Game Finished!
Key takeaway
An abstract class exposes a defined way(s)/template(s) to execute its methods in the Template pattern. Its subclasses can override the method implementation as needed, but the invocation must follow the abstract class's rules.
A visitor class is used in the Visitor pattern to update an element class's executing algorithm. As a result, the element's execution algorithm can change as the visitor changes. This pattern belongs to the category of behavioral patterns. The element object must accept the visitor object as per the pattern so that the visitor object can perform the operation on the element object.
Implementation
We'll make a ComputerPart interface that defines accept operation. The concrete classes that implement the ComputerPart interface are Keyboard, Mouse, Monitor, and Computer. Another interface, ComputerPartVisitor, will define the operations of a visitor class. The computer interacts with a specific visitor and performs the appropriate action.
Our demo class, VisitorPatternDemo, will employ the Computer and ComputerPartVisitor classes to explain how to use the visitor pattern.
Step 1: To represent an element, create an interface.
ComputerPart.java
Public interface ComputerPart {
public void accept(ComputerPartVisitor computerPartVisitor);
}
Step 2: Make concrete classes that extend the above-mentioned class.
Keyboard.java
Public class Keyboard implements ComputerPart {
@Override
public void accept(ComputerPartVisitor computerPartVisitor) {
computerPartVisitor.visit(this);
}
}
Monitor.java
Public class Monitor implements ComputerPart {
@Override
public void accept(ComputerPartVisitor computerPartVisitor) {
computerPartVisitor.visit(this);
}
}
Mouse.java
Public class Mouse implements ComputerPart {
@Override
public void accept(ComputerPartVisitor computerPartVisitor) {
computerPartVisitor.visit(this);
}
}
Computer.java
Public class Computer implements ComputerPart {
ComputerPart[] parts;
public Computer(){
parts = new ComputerPart[] {new Mouse(), new Keyboard(), new Monitor()};
}
@Override
public void accept(ComputerPartVisitor computerPartVisitor) {
for (int i = 0; i < parts.length; i++) {
parts[i].accept(computerPartVisitor);
}
computerPartVisitor.visit(this);
}
}
Step 3: Create a user interface that represents a visitor.
ComputerPartVisitor.java
Public interface ComputerPartVisitor {
Public void visit(Computer computer);
Public void visit(Mouse mouse);
Public void visit(Keyboard keyboard);
Public void visit(Monitor monitor);
}
Step 4: Implement the above class to create a concrete visitor.
MputerPartDisplayVisitor.java
Public class ComputerPartDisplayVisitor implements ComputerPartVisitor {
@Override
public void visit(Computer computer) {
System.out.println("Displaying Computer.");
}
@Override
public void visit(Mouse mouse) {
System.out.println("Displaying Mouse.");
}
@Override
public void visit(Keyboard keyboard) {
System.out.println("Displaying Keyboard.");
}
@Override
public void visit(Monitor monitor) {
System.out.println("Displaying Monitor.");
}
}
Step 5: To display pieces of a computer, use the ComputerPartDisplayVisitor.
CoVisitorPatternDemo.java
Public class VisitorPatternDemo {
public static void main(String[] args) {
ComputerPart computer = new Computer();
computer.accept(new ComputerPartDisplayVisitor());
}
}
Step 6: Make sure the output is correct.
Displaying Mouse.
Displaying Keyboard.
Displaying Monitor.
Displaying Computer.
Key takeaway
A visitor class is used in the Visitor pattern to update an element class's executing algorithm. As a result, the element's execution algorithm can change as the visitor changes.
The interaction and responsibility of objects are the focus of behavioral design patterns.
The interaction between the objects in these design patterns should be such that they may readily communicate with one another while being loosely connected.
In order to prevent hard coding and dependencies, the implementation and the client should be loosely connected.
Types
There are 12 different types of behavioral design patterns to choose from:
● Chain of Responsibility Pattern
● Command Pattern
● Interpreter Pattern
● Iterator Pattern
● Mediator Pattern
● Memento Pattern
● Observer Pattern
● State Pattern
● Strategy Pattern
● Template Pattern
● Visitor Pattern
● Null Object
References:
- Head First Design Patterns, by Eric Freeman and Elisabeth Freeman
- Design Patterns Explained, by Shalloway and Trott
- Introduction to design Patterns in C++ with Qt by Alan Ezust, Paul Ezust
Unit - 4
Behavioral Patterns
The chain of responsibility pattern, as the name implies, produces a chain of recipient objects for a request. Based on the type of request, this design decouples the sender and receiver. This pattern is classified as a behavioral pattern.
Normally, each receiver in this pattern carries a reference to another receiver. If one object is unable to handle the request, it is forwarded to the next receiver, and so on.
Advantage of Chain of Responsibility Pattern
● It decreases coupling.
● While assigning duties to objects, it adds flexibility.
● It lets a group of classes function as if they were one; events generated by one class can be passed to other handler classes via composition.
Usage of Chain of Responsibility Pattern
It's used for:
● When a request can be handled by more than one object and the handler is uncertain.
● When a group of objects capable of handling a request must be dynamically provided.
Implementation
We've constructed an abstract class called AbstractLogger that has a logging level. Then, by extending the AbstractLogger, we generated three different sorts of loggers. Each logger compares the message's level to its own and prints accordingly; otherwise, the message is not printed and sent to the next logger.
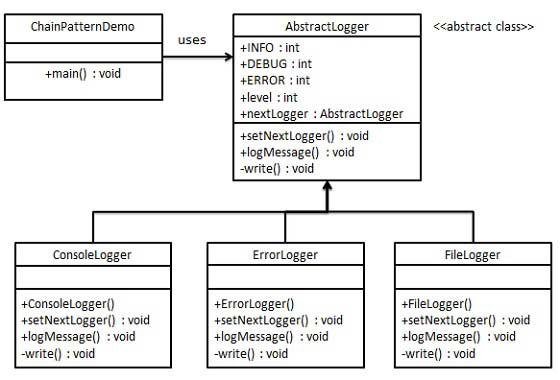
Step 1: Create a logger class that is abstract.
AbstractLogger.java
Public abstract class AbstractLogger {
public static int INFO = 1;
public static int DEBUG = 2;
public static int ERROR = 3;
protected int level;
//next element in chain or responsibility
protected AbstractLogger nextLogger;
public void setNextLogger(AbstractLogger nextLogger){
this.nextLogger = nextLogger;
}
public void logMessage(int level, String message){
if(this.level <= level){
write(message);
}
if(nextLogger !=null){
nextLogger.logMessage(level, message);
}
}
abstract protected void write(String message);
}
Step 2: Extend the logger with concrete classes.
ConsoleLogger.java
Public class ConsoleLogger extends AbstractLogger {
public ConsoleLogger(int level){
this.level = level;
}
@Override
protected void write(String message) {
System.out.println("Standard Console::Logger: " + message);
}
}
ErrorLogger.java
Public class ErrorLogger extends AbstractLogger {
public ErrorLogger(int level){
this.level = level;
}
@Override
protected void write(String message) {
System.out.println("Error Console::Logger: " + message);
}
}
FileLogger.java
Public class FileLogger extends AbstractLogger {
public FileLogger(int level){
this.level = level;
}
@Override
protected void write(String message) {
System.out.println("File::Logger: " + message);
}
}
Step 3: Make many varieties of loggers. Set the next logger in each logger and assign them error levels. The section of the chain is represented by the next logger in each logger.
ChainPatternDemo.java
Public class ChainPatternDemo {
private static AbstractLogger getChainOfLoggers(){
AbstractLogger errorLogger = new ErrorLogger(AbstractLogger.ERROR);
AbstractLogger fileLogger = new FileLogger(AbstractLogger.DEBUG);
AbstractLogger consoleLogger = new ConsoleLogger(AbstractLogger.INFO);
errorLogger.setNextLogger(fileLogger);
fileLogger.setNextLogger(consoleLogger);
return errorLogger;
}
public static void main(String[] args) {
AbstractLogger loggerChain = getChainOfLoggers();
loggerChain.logMessage(AbstractLogger.INFO,
"This is an information.");
loggerChain.logMessage(AbstractLogger.DEBUG,
"This is an debug level information.");
loggerChain.logMessage(AbstractLogger.ERROR,
"This is an error information.");
}
}
Step 4: Make sure the output is correct.
Standard Console::Logger: This is an information.
File::Logger: This is an debug level information.
Standard Console::Logger: This is an debug level information.
Error Console::Logger: This is an error information.
File::Logger: This is an error information.
Standard Console::Logger: This is an error information.
Key takeaway
The chain of responsibility pattern, as the name implies, produces a chain of recipient objects for a request. Based on the type of request, this design decouples the sender and receiver.
The command pattern is a data-driven design pattern that is classified as a behavioral pattern. A request is wrapped in an object and sent to the invoker object as a command. The invoker object searches for an object that can handle this command and sends the command to that object, which then executes it.
Advantage of command pattern
● It distinguishes between the object that executes the action and the object that invokes it.
● Because existing classes aren't modified, it's simple to add new commands.
Usage of command pattern
It's used for:
● When you need to parameterize objects based on an action.
● When many requests must be created and executed at separate times.
● When rollback, logging, or transaction functionality is required.
Implementation
We've designed an interface called Order that acts as a command. We've made a Stock class that serves as a request. BuyStock and SellStock are concrete command classes that implement the Order interface and handle real command processing. As an invoker object, a class called Broker is constructed. It has the ability to take and place orders.
The command pattern is used by the broker object to determine which object will execute which command based on the type of command. Our sample class, CommandPatternDemo, will demonstrate the command pattern using the Broker class.
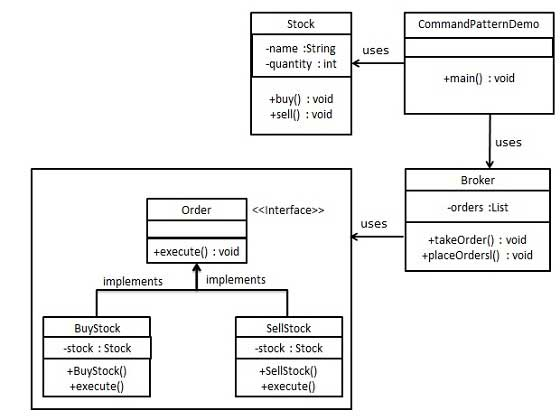
Step 1: Make a command interface for your programme.
Order.java
Public interface Order {
void execute();
}
Step 2: Make a class for requests.
Stock.java
Public class Stock {
private String name = "ABC";
private int quantity = 10;
public void buy(){
System.out.println("Stock [ Name: "+name+",
Quantity: " + quantity +" ] bought");
}
public void sell(){
System.out.println("Stock [ Name: "+name+",
Quantity: " + quantity +" ] sold");
}
}
Step 3: Create concrete Order interface implementation classes.
BuyStock.java
Public class BuyStock implements Order {
private Stock abcStock;
public BuyStock(Stock abcStock){
this.abcStock = abcStock;
}
public void execute() {
abcStock.buy();
}
}
SellStock.java
Public class SellStock implements Order {
private Stock abcStock;
public SellStock(Stock abcStock){
this.abcStock = abcStock;
}
public void execute() {
abcStock.sell();
}
}
Step 4: Create a class for command invokers.
Broker.java
Import java.util.ArrayList;
Import java.util.List;
public class Broker {
private List<Order> orderList = new ArrayList<Order>();
public void takeOrder(Order order){
orderList.add(order);
}
public void placeOrders(){
for (Order order : orderList) {
order.execute();
}
orderList.clear();
}
}
Step 5: To take and execute commands, use the Broker class.
CommandPatternDemo.java
Public class CommandPatternDemo {
public static void main(String[] args) {
Stock abcStock = new Stock();
BuyStock buyStockOrder = new BuyStock(abcStock);
SellStock sellStockOrder = new SellStock(abcStock);
Broker broker = new Broker();
broker.takeOrder(buyStockOrder);
broker.takeOrder(sellStockOrder);
broker.placeOrders();
}
}
Step 6: Make sure the output is correct.
Stock [ Name: ABC, Quantity: 10 ] bought
Stock [ Name: ABC, Quantity: 10 ] sold
Key takeaway
The command pattern is a data-driven design pattern that is classified as a behavioral pattern. A request is wrapped in an object and sent to the invoker object as a command.
"To define a representation of grammar of a particular language, as well as an interpreter that uses this representation to interpret sentences in the language," according to an Interpreter Pattern.
In general, the Interpreter pattern can only be used in a limited number of situations. The Interpreter pattern can only be discussed in terms of formal grammars, although there are superior solutions in this field, which is why it is not widely used.
This pattern can be used to parse expressions written in simple grammars and, on rare occasions, simple rule engines.
Advantage of Interpreter Pattern
● It is less difficult to modify and expand the grammar.
● It's simple to put the grammar into practice.
Usage of Interpreter pattern
It's used for:
● When the language's grammar is straightforward.
● When productivity isn't a top priority.
Implementation
We'll make a concrete class that implements the Expression interface and an Expression interface. TerminalExpression is a class that serves as the main translator of the context in question. Combinational expressions are created using the classes OrExpression and AndExpression.
Our demo class, InterpreterPatternDemo, will use the Expression class to define rules and illustrate expression parsing.
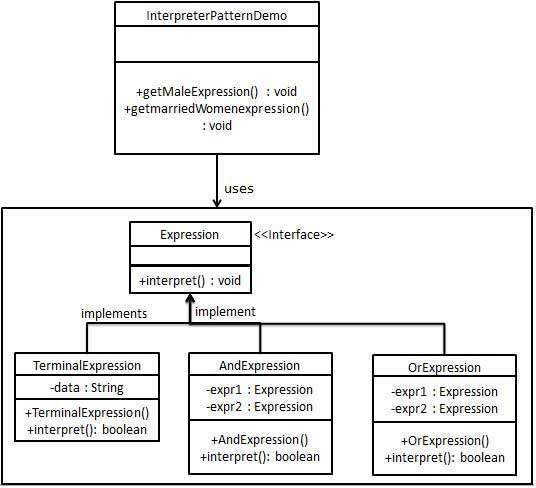
Step 1: Make a user interface for expressions.
Expression.java
Public interface Expression {
public boolean interpret(String context);
}
Step 2: Create concrete classes that implement the interface described above.
TerminalExpression.java
Public class TerminalExpression implements Expression {
private String data;
public TerminalExpression(String data){
this.data = data;
}
@Override
public boolean interpret(String context) {
if(context.contains(data)){
return true;
}
return false;
}
}
OrExpression.java
Public class OrExpression implements Expression {
private Expression expr1 = null;
private Expression expr2 = null;
public OrExpression(Expression expr1, Expression expr2) {
this.expr1 = expr1;
this.expr2 = expr2;
}
@Override
public boolean interpret(String context) {
return expr1.interpret(context) || expr2.interpret(context);
}
}
AndExpression.java
Public class AndExpression implements Expression {
private Expression expr1 = null;
private Expression expr2 = null;
public AndExpression(Expression expr1, Expression expr2) {
this.expr1 = expr1;
this.expr2 = expr2;
}
@Override
public boolean interpret(String context) {
return expr1.interpret(context) && expr2.interpret(context);
}
}
Step 3: The Expression class is used by InterpreterPatternDemo to build and parse rules.
InterpreterPatternDemo.java
Public class InterpreterPatternDemo {
//Rule: Robert and John are male
public static Expression getMaleExpression(){
Expression robert = new TerminalExpression("Robert");
Expression john = new TerminalExpression("John");
return new OrExpression(robert, john);
}
//Rule: Julie is a married women
public static Expression getMarriedWomanExpression(){
Expression julie = new TerminalExpression("Julie");
Expression married = new TerminalExpression("Married");
return new AndExpression(julie, married);
}
public static void main(String[] args) {
Expression isMale = getMaleExpression();
Expression isMarriedWoman = getMarriedWomanExpression();
System.out.println("John is male? " + isMale.interpret("John"));
System.out.println("Julie is a married women? " + isMarriedWoman.interpret("Married Julie"));
}
}
Step 4: Make sure the output is correct.
John is male? true
Julie is a married women? true
Key takeaway
In general, the Interpreter pattern can only be used in a limited number of situations. The Interpreter pattern can only be discussed in terms of formal grammars, although there are superior solutions in this field, which is why it is not widely utilised.
In the Java and.Net programming environments, the iterator pattern is a highly common design pattern. This technique is used to gain a way to sequentially access the elements of a collection object without having to know its underlying form.
The iterator pattern is a type of behavioral pattern.
Advantage of Iterator Pattern
● It allows you to traverse a collection in different ways.
● It streamlines the collection's user interface.
Usage of Iterator Pattern
It's used for:
● When you need to get a hold of a group of things without revealing their internal representation.
● When many traversals of items are required, the collection must be able to support them.
Implementation
We'll make an Iterator interface to describe navigation methods, as well as a Container interface to return the iterator. Concrete classes that implement the Container interface will be responsible for implementing and using the Iterator interface.
Our demo class, IteratorPatternDemo, will print a Names saved as a collection in NamesRepository using NamesRepository, a concrete class implementation.
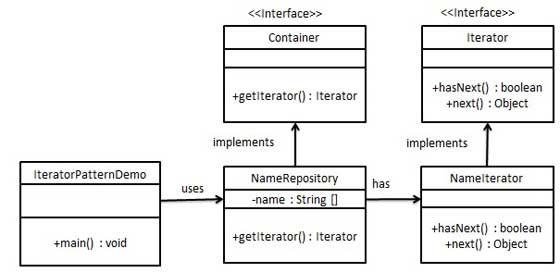
Step 1: Make user interfaces.
Iterator.java
Public interface Iterator {
public boolean hasNext();
public Object next();
}
Container.java
Public interface Container {
public Iterator getIterator();
}
Step 2: Make a concrete implementation of the Container interface. This class has a NameIterator inner class that implements the Iterator interface.
NameRepository.java
Public class NameRepository implements Container {
public String names[] = {"Robert" , "John" ,"Julie" , "Lora"};
@Override
public Iterator getIterator() {
return new NameIterator();
}
private class NameIterator implements Iterator {
int index;
@Override
public boolean hasNext() {
if(index < names.length){
return true;
}
return false;
}
@Override
public Object next() {
if(this.hasNext()){
return names[index++];
}
return null;
}
}
}
Step 3: To get an iterator and print names, use the NameRepository.
IteratorPatternDemo.java
Public class IteratorPatternDemo {
public static void main(String[] args) {
NameRepository namesRepository = new NameRepository();
for(Iterator iter = namesRepository.getIterator(); iter.hasNext();){
String name = (String)iter.next();
System.out.println("Name : " + name);
}
}
}
Step 4: Make sure the output is correct.
Name : Robert
Name : John
Name : Julie
Name : Lora
Key takeaway
In the Java and.Net programming environments, the iterator pattern is a highly common design pattern. This technique is used to gain a way to sequentially access the elements of a collection object without having to know its underlying form.
"To define an entity that captures how a set of objects communicate," says the Mediator Pattern.
I'll demonstrate the Mediator pattern by examining an issue. When we first start developing, we have a few classes that interact with one another to produce results. Consider how, as functionality expands, the logic becomes more complex. So, what happens next? We add more classes, and they still interact, but maintaining this code is becoming increasingly tough. As a result, the Mediator pattern solves this issue.
The mediator pattern is intended to simplify communication among various objects or classes. This pattern creates a mediator class that generally handles all communication between different classes while also promoting code maintainability through loose coupling.
Advantage
● The number of classes is decoupled.
● It makes object protocols easier to understand.
● Control is centralized.
● Because they don't have to communicate with one another, the individual components become significantly simpler and easier to manage.
● Because the components do not need to contain logic to communicate with one another, they are more general.
Usage
● It's widely used in message-based systems, as well as chat apps.
● When a collection of items interacts in complex but well-defined ways.
Implementation
We'll take the example of a chat room to demonstrate the mediator pattern. Multiple users can send messages to the chat room, and it's up to the chat room to display the messages to all users. ChatRoom and User are the two classes we've constructed. To share their messages, user objects will use the ChatRoom function.
Our demo class, MediatorPatternDemo, will use User objects to demonstrate communication between them.

Step 1: Create a class for mediators.
ChatRoom.java
Import java.util.Date;
Public class ChatRoom {
public static void showMessage(User user, String message){
System.out.println(new Date().toString() + " [" + user.getName() + "] : " + message);
}
}
Step 2: Make a user class.
User.java
Public class User {
private String name;
public String getName() {
return name;
}
public void setName(String name) {
this.name = name;
}
public User(String name){
this.name = name;
}
public void sendMessage(String message){
ChatRoom.showMessage(this,message);
}
}
Step 3: To demonstrate communication between them, use the User object.
MediatorPatternDemo.java
Public class MediatorPatternDemo {
public static void main(String[] args) {
User robert = new User("Robert");
User john = new User("John");
robert.sendMessage("Hi! John!");
john.sendMessage("Hello! Robert!");
}
}
Step 4: Make sure the output is correct.
Thu Jan 31 16:05:46 IST 2013 [Robert] : Hi! John!
Thu Jan 31 16:05:46 IST 2013 [John] : Hello! Robert!
Key takeaway
The mediator pattern is intended to simplify communication among various objects or classes. This pattern creates a mediator class that generally handles all communication between different classes while also promoting code maintainability through loose coupling.
"To restore the state of an object to its prior state," according to a Memento Pattern. However, it must do so without breaking Encapsulation. In the event of a mistake or failure, such a scenario is useful.
Token is another name for the Memento pattern.
One of the most commonly used operations in an editor is undo, sometimes known as backspace or ctrl+z. The undo action is implemented using the Memento design pattern. This is accomplished by saving the object's current state as it changes.
Advantage
● It keeps encapsulation borders intact.
● It makes the creator's job easier.
Usage
● In most applications, it's used in undo and redo operations.
● Database transactions also make advantage of it.
Implementation
Three actor classes are used in the Memento pattern. The state of an object to be restored is kept in Memento. The Originator object produces and preserves states in Memento objects, while the Caretaker object is in charge of restoring such states. Memento, Originator, and CareTaker are the three classes we've established.
Our demo class, MementoPatternDemo, will demonstrate the restoration of object states using CareTaker and Originator objects.
Step 1: Make a class called Memento.
Memento.java
Public class Memento {
private String state;
public Memento(String state){
this.state = state;
}
public String getState(){
return state;
}
}
Step 2: Create a class called Originator.
Originator.java
Public class Originator {
private String state;
public void setState(String state){
this.state = state;
}
public String getState(){
return state;
}
public Memento saveStateToMemento(){
return new Memento(state);
}
public void getStateFromMemento(Memento memento){
state = memento.getState();
}
}
Step 3: Make a class called CareTaker.
CareTaker.java
Import java.util.ArrayList;
Import java.util.List;
Public class CareTaker {
private List<Memento> mementoList = new ArrayList<Memento>();
public void add(Memento state){
mementoList.add(state);
}
public Memento get(int index){
return mementoList.get(index);
}
}
Step 4: Objects such as CareTaker and Originator can be used.
MementoPatternDemo.java
Public class MementoPatternDemo {
public static void main(String[] args) {
Originator originator = new Originator();
CareTaker careTaker = new CareTaker();
originator.setState("State #1");
originator.setState("State #2");
careTaker.add(originator.saveStateToMemento());
originator.setState("State #3");
careTaker.add(originator.saveStateToMemento());
originator.setState("State #4");
System.out.println("Current State: " + originator.getState());
originator.getStateFromMemento(careTaker.get(0));
System.out.println("First saved State: " + originator.getState());
originator.getStateFromMemento(careTaker.get(1));
System.out.println("Second saved State: " + originator.getState());
}
}
Step 5: Make sure the output is correct.
Current State: State #4
First saved State: State #2
Second saved State: State #3
Key takeaway
"To restore the state of an object to its prior state," according to a Memento Pattern. However, it must do so without breaking Encapsulation. In the event of a mistake or failure, such a scenario is useful.
When there is a one-to-many relationship between items, such as when one object is modified, its dependent objects must be alerted automatically, the observer pattern is employed. Observer pattern is a type of behavioral pattern.
"Just construct a one-to-one dependency so that when one object changes state, all its dependents are notified and changed immediately," according to the Observer Pattern.
Dependents or Publish-Subscribe are other names for the observer pattern.
Advantages
● It describes the interaction between the observer and the objects.
● It allows for broadcast-style communication to be supported.
Usage
● When a state change in one object must be mirrored in another without the objects being tightly connected.
● When we design a framework that will be updated in the future with new observers with few changes.
Implementation
Three actor classes are used in the observer pattern. Client, Observer, and Subject A subject is a type of object that has methods for attaching and detaching observers from a client object. We've generated two classes: an abstract Observer and a concrete Subject that extends Observer.
Our demo class, ObserverPatternDemo, will demonstrate the observer pattern using Subject and concrete class objects.
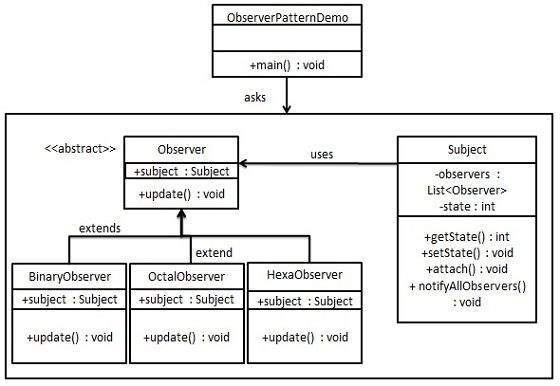
Step 1: Create a class called Subject.
Subject.java
Import java.util.ArrayList;
Import java.util.List;
Public class Subject {
private List<Observer> observers = new ArrayList<Observer>();
private int state;
public int getState() {
return state;
}
public void setState(int state) {
this.state = state;
notifyAllObservers();
}
public void attach(Observer observer){
observers.add(observer);
}
public void notifyAllObservers(){
for (Observer observer : observers) {
observer.update();
}
}
}
Step 2: Create a class called Observer.
Observer.java
Public abstract class Observer {
protected Subject subject;
public abstract void update();
}
Step 3: Make specific observer classes.
BinaryObserver.java
Public class BinaryObserver extends Observer{
public BinaryObserver(Subject subject){
this.subject = subject;
this.subject.attach(this);
}
@Override
public void update() {
System.out.println( "Binary String: " + Integer.toBinaryString( subject.getState() ) );
}
}
OctalObserver.java
Public class OctalObserver extends Observer{
public OctalObserver(Subject subject){
this.subject = subject;
this.subject.attach(this);
}
@Override
public void update() {
System.out.println( "Octal String: " + Integer.toOctalString( subject.getState() ) );
}
}
HexaObserver.java
Public class HexaObserver extends Observer{
public HexaObserver(Subject subject){
this.subject = subject;
this.subject.attach(this);
}
@Override
public void update() {
System.out.println( "Hex String: " + Integer.toHexString( subject.getState() ).toUpperCase() );
}
}
Step 4: Use concrete observer objects and a subject.
ObserverPatternDemo.java
Public class ObserverPatternDemo {
public static void main(String[] args) {
Subject subject = new Subject();
new HexaObserver(subject);
new OctalObserver(subject);
new BinaryObserver(subject);
System.out.println("First state change: 15");
subject.setState(15);
System.out.println("Second state change: 10");
subject.setState(10);
}
}
Step 5: Make sure the output is correct.
First state change: 15
Hex String: F
Octal String: 17
Binary String: 1111
Second state change: 10
Hex String: A
Octal String: 12
Binary String: 1010
Key takeaway
When there is a one-to-many relationship between items, such as when one object is modified, its dependent objects must be alerted automatically, the observer pattern is employed. Observer pattern is a type of behavioral pattern.
A class's behavior changes depending on its state in the State pattern. This design pattern is classified as a behavior pattern.
We generate objects that represent multiple states and a context object whose behavior changes when its state object changes in the State pattern. Objects for States is another name for the State Pattern.
Advantages
The state-specific behavior is preserved.
Any state transitions are made explicit.
Usage
● When an object's behavior is determined by its state, it must be able to change its behavior at runtime to match the new state.
● It's used when there are a lot of multipart conditional statements in the actions that are dependent on the state of an object.
Implementation
We'll develop a State interface that defines an action, as well as concrete state classes that implement the State interface. A Context is a State-carrying class.
Our demo class, StatePatternDemo, will employ Context and state objects to demonstrate how Context behavior changes depending on the state it is in.
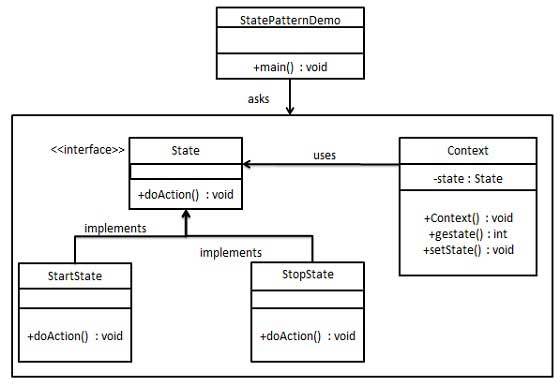
Step 1: Make a user interface.
State.java
Public interface State {
public void doAction(Context context);
}
Step 2: Create concrete classes that implement the same interface as the abstract classes.
StartState.java
Public class StartState implements State {
public void doAction(Context context) {
System.out.println("Player is in start state");
context.setState(this);
}
public String toString(){
return "Start State";
}
}
StopState.java
Public class StopState implements State {
public void doAction(Context context) {
System.out.println("Player is in stop state");
context.setState(this);
}
public String toString(){
return "Stop State";
}
}
Step 3: Construct a Context Class.
Context.java
Public class Context {
private State state;
public Context(){
state = null;
}
public void setState(State state){
this.state = state;
}
public State getState(){
return state;
}
}
Step 4: When the State changes, use the Context to see how the behavior changes.
StatePatternDemo.java
Public class StatePatternDemo {
public static void main(String[] args) {
Context context = new Context();
StartState startState = new StartState();
startState.doAction(context);
System.out.println(context.getState().toString());
StopState stopState = new StopState();
stopState.doAction(context);
System.out.println(context.getState().toString());
}
}
Step 5: Make sure the output is correct.
Player is in start state
Start State
Player is in stop state
Stop State
Key takeaway
We generate objects that represent multiple states and a context object whose behavior changes when its state object changes in the State pattern. Objects for States is another name for the State Pattern.
"Defines a family of functionality, encapsulates each one, and makes them interchangeable," according to a Strategy Pattern. Policy is another name for the Strategy Pattern.
We generate objects that represent numerous strategies and a context object whose behavior varies depending on its strategy object in the Strategy pattern. The context object's running algorithm is changed by the strategy object.
Advantages
● It acts as a stand-in for subclassing.
● Each behavior is defined within its own class, removing the need for conditional statements.
● It makes it easy to add new functionality without having to rewrite the application.
Usage
● When the sole difference between the various classes is their behavior. Consider the Servlet API.
● When different variants of an algorithm are required, it is utilised.
Implementation
We'll make a Strategy interface that defines an action, as well as specific strategy classes that implement the Strategy interface. Context is a class that employs the use of a Strategy.
Our sample class, StrategyPatternDemo, will employ Context and strategy objects to demonstrate how Context behavior changes depending on the strategy it deploys or uses.
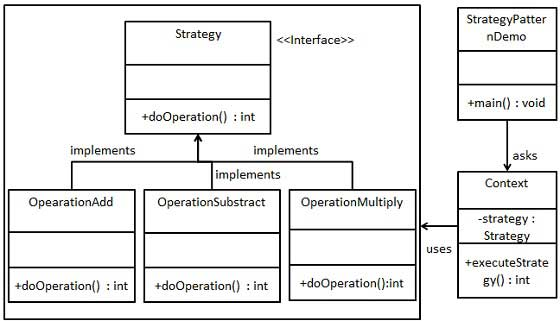
Step 1: Make a user interface.
Strategy.java
Public interface Strategy {
public int doOperation(int num1, int num2);
}
Step 2: Create concrete classes that implement the same interface as the abstract classes.
OperationAdd.java
Public class OperationAdd implements Strategy{
@Override
public int doOperation(int num1, int num2) {
return num1 + num2;
}
}
OperationSubstract.java
Public class OperationSubstract implements Strategy{
@Override
public int doOperation(int num1, int num2) {
return num1 - num2;
}
}
OperationMultiply.java
Public class OperationMultiply implements Strategy{
@Override
public int doOperation(int num1, int num2) {
return num1 * num2;
}
}
Step 3: Construct a Context Class.
Context.java
Public class Context {
private Strategy strategy;
public Context(Strategy strategy){
this.strategy = strategy;
}
public int executeStrategy(int num1, int num2){
return strategy.doOperation(num1, num2);
}
}
Step 4: When it changes its strategy, use the Context to determine whether there is a change in behavior.
StrategyPatternDemo.java
Public class StrategyPatternDemo {
public static void main(String[] args) {
Context context = new Context(new OperationAdd());
System.out.println("10 + 5 = " + context.executeStrategy(10, 5));
context = new Context(new OperationSubstract());
System.out.println("10 - 5 = " + context.executeStrategy(10, 5));
context = new Context(new OperationMultiply());
System.out.println("10 * 5 = " + context.executeStrategy(10, 5));
}
}
Step 5: Verify the output.
10 + 5 = 15
10 - 5 = 5
10 * 5 = 50
Key takeaway
We generate objects that represent numerous strategies and a context object whose behavior varies depending on its strategy object in the Strategy pattern. The context object's running algorithm is changed by the strategy object.
"Just define the skeleton of a function in an operation, deferring some stages to its subclasses," according to the Template Pattern.
An abstract class exposes a defined way(s)/template(s) to execute its methods in the Template pattern. Its subclasses can override the method implementation as needed, but the invocation must follow the abstract class's rules. This pattern belongs to the category of behavioral patterns.
Advantages
● It is a widely used technique for recycling code. This is only the most significant advantage.
Usage
● It's used when subclass behavior should be consolidated into a single common class to reduce duplication.
Implementation
We'll make a Game abstract class that defines operations and has a template function that is set to be final so it can't be overridden. Football and Cricket are concrete classes that extend Game and override its methods.
Our demo class, TemplatePatternDemo, will use Game to explain how to use the template pattern.
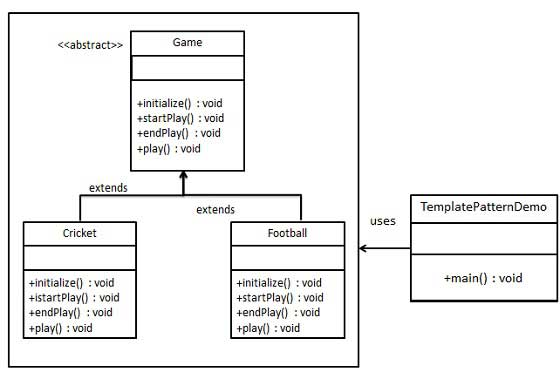
Step 1: Make an abstract class with a final template method.
Game.java
Public abstract class Game {
abstract void initialize();
abstract void startPlay();
abstract void endPlay();
//template method
public final void play(){
//initialize the game
initialize();
//start game
startPlay();
//end game
endPlay();
}
}
Step 2: Make concrete classes that extend the above-mentioned class.
Cricket.java
Public class Cricket extends Game {
@Override
void endPlay() {
System.out.println("Cricket Game Finished!");
}
@Override
void initialize() {
System.out.println("Cricket Game Initialized! Start playing.");
}
@Override
void startPlay() {
System.out.println("Cricket Game Started. Enjoy the game!");
}
}
Football.java
Public class Football extends Game {
@Override
void endPlay() {
System.out.println("Football Game Finished!");
}
@Override
void initialize() {
System.out.println("Football Game Initialized! Start playing.");
}
@Override
void startPlay() {
System.out.println("Football Game Started. Enjoy the game!");
}
}
Step 3: To illustrate a specific manner of playing the game, use the Game's template method play().
TemplatePatternDemo.java
Public class TemplatePatternDemo {
public static void main(String[] args) {
Game game = new Cricket();
game.play();
System.out.println();
game = new Football();
game.play();
}
}
Step 4: Make sure the output is correct.
Cricket Game Initialized! Start playing.
Cricket Game Started. Enjoy the game!
Cricket Game Finished!
Football Game Initialized! Start playing.
Football Game Started. Enjoy the game!
Football Game Finished!
Key takeaway
An abstract class exposes a defined way(s)/template(s) to execute its methods in the Template pattern. Its subclasses can override the method implementation as needed, but the invocation must follow the abstract class's rules.
A visitor class is used in the Visitor pattern to update an element class's executing algorithm. As a result, the element's execution algorithm can change as the visitor changes. This pattern belongs to the category of behavioral patterns. The element object must accept the visitor object as per the pattern so that the visitor object can perform the operation on the element object.
Implementation
We'll make a ComputerPart interface that defines accept operation. The concrete classes that implement the ComputerPart interface are Keyboard, Mouse, Monitor, and Computer. Another interface, ComputerPartVisitor, will define the operations of a visitor class. The computer interacts with a specific visitor and performs the appropriate action.
Our demo class, VisitorPatternDemo, will employ the Computer and ComputerPartVisitor classes to explain how to use the visitor pattern.
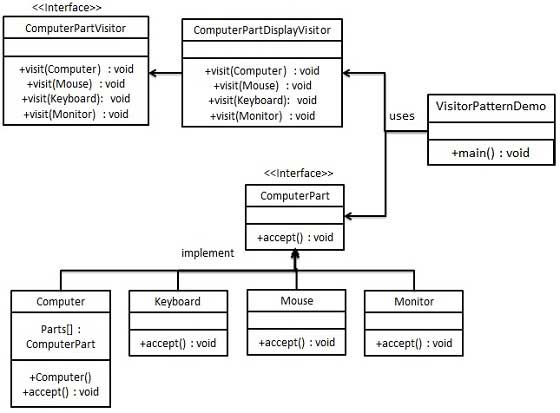
Step 1: To represent an element, create an interface.
ComputerPart.java
Public interface ComputerPart {
public void accept(ComputerPartVisitor computerPartVisitor);
}
Step 2: Make concrete classes that extend the above-mentioned class.
Keyboard.java
Public class Keyboard implements ComputerPart {
@Override
public void accept(ComputerPartVisitor computerPartVisitor) {
computerPartVisitor.visit(this);
}
}
Monitor.java
Public class Monitor implements ComputerPart {
@Override
public void accept(ComputerPartVisitor computerPartVisitor) {
computerPartVisitor.visit(this);
}
}
Mouse.java
Public class Mouse implements ComputerPart {
@Override
public void accept(ComputerPartVisitor computerPartVisitor) {
computerPartVisitor.visit(this);
}
}
Computer.java
Public class Computer implements ComputerPart {
ComputerPart[] parts;
public Computer(){
parts = new ComputerPart[] {new Mouse(), new Keyboard(), new Monitor()};
}
@Override
public void accept(ComputerPartVisitor computerPartVisitor) {
for (int i = 0; i < parts.length; i++) {
parts[i].accept(computerPartVisitor);
}
computerPartVisitor.visit(this);
}
}
Step 3: Create a user interface that represents a visitor.
ComputerPartVisitor.java
Public interface ComputerPartVisitor {
Public void visit(Computer computer);
Public void visit(Mouse mouse);
Public void visit(Keyboard keyboard);
Public void visit(Monitor monitor);
}
Step 4: Implement the above class to create a concrete visitor.
MputerPartDisplayVisitor.java
Public class ComputerPartDisplayVisitor implements ComputerPartVisitor {
@Override
public void visit(Computer computer) {
System.out.println("Displaying Computer.");
}
@Override
public void visit(Mouse mouse) {
System.out.println("Displaying Mouse.");
}
@Override
public void visit(Keyboard keyboard) {
System.out.println("Displaying Keyboard.");
}
@Override
public void visit(Monitor monitor) {
System.out.println("Displaying Monitor.");
}
}
Step 5: To display pieces of a computer, use the ComputerPartDisplayVisitor.
CoVisitorPatternDemo.java
Public class VisitorPatternDemo {
public static void main(String[] args) {
ComputerPart computer = new Computer();
computer.accept(new ComputerPartDisplayVisitor());
}
}
Step 6: Make sure the output is correct.
Displaying Mouse.
Displaying Keyboard.
Displaying Monitor.
Displaying Computer.
Key takeaway
A visitor class is used in the Visitor pattern to update an element class's executing algorithm. As a result, the element's execution algorithm can change as the visitor changes.
The interaction and responsibility of objects are the focus of behavioral design patterns.
The interaction between the objects in these design patterns should be such that they may readily communicate with one another while being loosely connected.
In order to prevent hard coding and dependencies, the implementation and the client should be loosely connected.
Types
There are 12 different types of behavioral design patterns to choose from:
● Chain of Responsibility Pattern
● Command Pattern
● Interpreter Pattern
● Iterator Pattern
● Mediator Pattern
● Memento Pattern
● Observer Pattern
● State Pattern
● Strategy Pattern
● Template Pattern
● Visitor Pattern
● Null Object
References:
- Head First Design Patterns, by Eric Freeman and Elisabeth Freeman
- Design Patterns Explained, by Shalloway and Trott
- Introduction to design Patterns in C++ with Qt by Alan Ezust, Paul Ezust