UNIT 4
Inheritance, Packages and Exception Handling using Java
Inheritance in Java is a mechanism in which one object acquires all the properties and behaviours of a parent object. It is an important part of OOPs (Object Oriented programming system).
The idea behind inheritance in Java is that you can create new classes that are built upon existing classes. When you inherit from an existing class, you can reuse methods and fields of the parent class. Moreover, you can add new methods and fields in your current class also.
Inheritance represents the IS-A relationship which is also known as a parent-child relationship.
Why use inheritance in java
Terms used in Inheritance
The syntax of Java Inheritance
The extends keyword indicates that you are making a new class that derives from an existing class. The meaning of "extends" is to increase the functionality.
In the terminology of Java, a class which is inherited is called a parent or superclass, and the new class is called child or subclass.
Java Inheritance Example
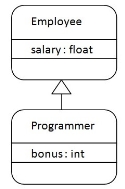
Fig 1 - Example
As displayed in the above figure, Programmer is the subclass and Employee is the superclass. The relationship between the two classes is Programmer IS-A Employee. It means that Programmer is a type of Employee.
Programmer salary is:40000.0
Bonus of programmer is:10000
In the above example, Programmer object can access the field of own class as well as of Employee class i.e. code reusability.
Types of inheritance in java
On the basis of class, there can be three types of inheritance in java: single, multilevel and hierarchical.
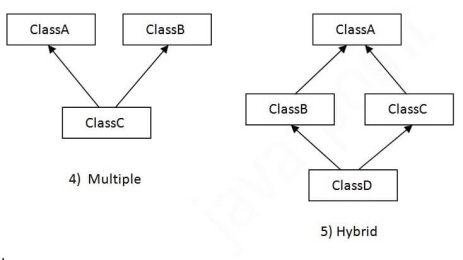
In java programming, multiple and hybrid inheritance is supported through interface only. We will learn about interfaces later.
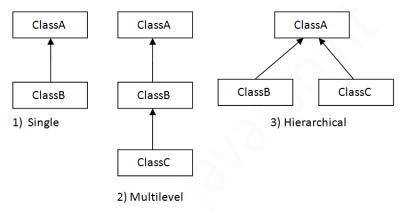
Fig 2 – Multilevel inheritance
Note: Multiple inheritance is not supported in Java through class.
When one class inherits multiple classes, it is known as multiple inheritance. For Example:
Single Inheritance Example
When a class inherits another class, it is known as a single inheritance. In the example given below, Dog class inherits the Animal class, so there is the single inheritance.
File: TestInheritance.java
Output:
barking...
eating...
Multilevel Inheritance Example
When there is a chain of inheritance, it is known as multilevel inheritance. As you can see in the example given below, BabyDog class inherits the Dog class which again inherits the Animal class, so there is a multilevel inheritance.
File: TestInheritance2.java
Output:
weeping...
barking...
eating...
Hierarchical Inheritance Example
When two or more classes inherits a single class, it is known as hierarchical inheritance. In the example given below, Dog and Cat classes inherits the Animal class, so there is hierarchical inheritance.
File: TestInheritance3.java
Output:
meowing...
eating...
Q) Why multiple inheritance is not supported in java?
To reduce the complexity and simplify the language, multiple inheritance is not supported in java.
Consider a scenario where A, B, and C are three classes. The C class inherits A and B classes. If A and B classes have the same method and you call it from child class object, there will be ambiguity to call the method of A or B class.
Since compile-time errors are better than runtime errors, Java renders compile-time error if you inherit 2 classes. So whether you have same method or different, there will be compile time error.
Compile Time Error
Key takeaway
Inheritance in Java is a mechanism in which one object acquires all the properties and behaviours of a parent object. It is an important part of OOPs (Object Oriented programming system).
The idea behind inheritance in Java is that you can create new classes that are built upon existing classes. When you inherit from an existing class, you can reuse methods and fields of the parent class. Moreover, you can add new methods and fields in your current class also.
Inheritance represents the IS-A relationship which is also known as a parent-child relationship.
Inheritance can be defined as the process where one class acquires the properties (methods and fields) of another. With the use of inheritance the information is made manageable in a hierarchical order.
The class which inherits the properties of other is known as subclass (derived class, child class) and the class whose properties are inherited is known as superclass (base class, parent class).
extends Keyword
extends is the keyword used to inherit the properties of a class. Following is the syntax of extends keyword.
Syntax
class Super {
.....
.....
}
class Sub extends Super {
.....
.....
}
Sample Code
Following is an example demonstrating Java inheritance. In this example, you can observe two classes namely Calculation and My_Calculation.
Using extends keyword, the My_Calculation inherits the methods addition() and Subtraction() of Calculation class.
Copy and paste the following program in a file with name My_Calculation.java
Example
class Calculation {
int z;
public void addition(int x, int y) {
z = x + y;
System.out.println("The sum of the given numbers:"+z);
}
public void Subtraction(int x, int y) {
z = x - y;
System.out.println("The difference between the given numbers:"+z);
}
}
public class My_Calculation extends Calculation {
public void multiplication(int x, int y) {
z = x * y;
System.out.println("The product of the given numbers:"+z);
}
public static void main(String args[]) {
int a = 20, b = 10;
My_Calculation demo = new My_Calculation();
demo.addition(a, b);
demo.Subtraction(a, b);
demo.multiplication(a, b);
}
}
Compile and execute the above code as shown below.
javac My_Calculation.java
java My_Calculation
After executing the program, it will produce the following result −
Output
The sum of the given numbers:30
The difference between the given numbers:10
The product of the given numbers:200
In the given program, when an object to My_Calculation class is created, a copy of the contents of the superclass is made within it. That is why, using the object of the subclass you can access the members of a superclass.
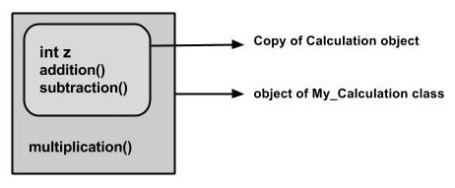
Fig 3 - Example
The Superclass reference variable can hold the subclass object, but using that variable you can access only the members of the superclass, so to access the members of both classes it is recommended to always create reference variable to the subclass.
If you consider the above program, you can instantiate the class as given below. But using the superclass reference variable ( cal in this case) you cannot call the method multiplication(), which belongs to the subclass My_Calculation.
Calculation demo = new My_Calculation();
demo.addition(a, b);
demo.Subtraction(a, b);
Note − A subclass inherits all the members (fields, methods, and nested classes) from its superclass. Constructors are not members, so they are not inherited by subclasses, but the constructor of the superclass can be invoked from the subclass.
The super keyword
The super keyword is similar to this keyword. Following are the scenarios where the super keyword is used.
Differentiating the Members
If a class is inheriting the properties of another class. And if the members of the superclass have the names same as the sub class, to differentiate these variables we use super keyword as shown below.
super.variable
super.method();
Sample Code
This section provides you a program that demonstrates the usage of the super keyword.
In the given program, you have two classes namely Sub_class and Super_class, both have a method named display() with different implementations, and a variable named num with different values. We are invoking display() method of both classes and printing the value of the variable num of both classes. Here you can observe that we have used super keyword to differentiate the members of superclass from subclass.
Copy and paste the program in a file with name Sub_class.java.
Example
class Super_class {
int num = 20;
// display method of superclass
public void display() {
System.out.println("This is the display method of superclass");
}
}
public class Sub_class extends Super_class {
int num = 10;
// display method of sub class
public void display() {
System.out.println("This is the display method of subclass");
}
public void my_method() {
// Instantiating subclass
Sub_class sub = new Sub_class();
// Invoking the display() method of sub class
sub.display();
// Invoking the display() method of superclass
super.display();
// printing the value of variable num of subclass
System.out.println("value of the variable named num in sub class:"+ sub.num);
// printing the value of variable num of superclass
System.out.println("value of the variable named num in super class:"+ super.num);
}
public static void main(String args[]) {
Sub_class obj = new Sub_class();
obj.my_method();
}
}
Compile and execute the above code using the following syntax.
javac Super_Demo
java Super
On executing the program, you will get the following result −
Output
This is the display method of subclass
This is the display method of superclass
value of the variable named num in sub class:10
value of the variable named num in super class:20
Invoking Superclass Constructor
If a class is inheriting the properties of another class, the subclass automatically acquires the default constructor of the superclass. But if you want to call a parameterized constructor of the superclass, you need to use the super keyword as shown below.
super(values);
Sample Code
The program given in this section demonstrates how to use the super keyword to invoke the parametrized constructor of the superclass. This program contains a superclass and a subclass, where the superclass contains a parameterized constructor which accepts a integer value, and we used the super keyword to invoke the parameterized constructor of the superclass.
Copy and paste the following program in a file with the name Subclass.java
Example
class Superclass {
int age;
Superclass(int age) {
this.age = age;
}
public void getAge() {
System.out.println("The value of the variable named age in super class is: " +age);
}
}
public class Subclass extends Superclass {
Subclass(int age) {
super(age);
}
public static void main(String args[]) {
Subclass s = new Subclass(24);
s.getAge();
}
}
Compile and execute the above code using the following syntax.
javac Subclass
java Subclass
On executing the program, you will get the following result −
Output
The value of the variable named age in super class is: 24
IS-A Relationship
IS-A is a way of saying: This object is a type of that object. Let us see how the extends keyword is used to achieve inheritance.
public class Animal {
}
public class Mammal extends Animal {
}
public class Reptile extends Animal {
}
public class Dog extends Mammal {
}
Now, based on the above example, in Object-Oriented terms, the following are true −
Now, if we consider the IS-A relationship, we can say −
With the use of the extends keyword, the subclasses will be able to inherit all the properties of the superclass except for the private properties of the superclass.
We can assure that Mammal is actually an Animal with the use of the instance operator.
Example
class Animal {
}
class Mammal extends Animal {
}
class Reptile extends Animal {
}
public class Dog extends Mammal {
public static void main(String args[]) {
Animal a = new Animal();
Mammal m = new Mammal();
Dog d = new Dog();
System.out.println(m instanceof Animal);
System.out.println(d instanceof Mammal);
System.out.println(d instanceof Animal);
}
}
This will produce the following result −
Output
true
true
true
Since we have a good understanding of the extends keyword, let us look into how the implements keyword is used to get the IS-A relationship.
Generally, the implements keyword is used with classes to inherit the properties of an interface. Interfaces can never be extended by a class.
Example
public interface Animal {
}
public class Mammal implements Animal {
}
public class Dog extends Mammal {
}
The instanceof Keyword
Let us use the instanceof operator to check determine whether Mammal is actually an Animal, and dog is actually an Animal.
Example
interface Animal{}
class Mammal implements Animal{}
public class Dog extends Mammal {
public static void main(String args[]) {
Mammal m = new Mammal();
Dog d = new Dog();
System.out.println(m instanceof Animal);
System.out.println(d instanceof Mammal);
System.out.println(d instanceof Animal);
}
}
This will produce the following result −
Output
true
true
true
HAS-A relationship
These relationships are mainly based on the usage. This determines whether a certain class HAS-A certain thing. This relationship helps to reduce duplication of code as well as bugs.
Lets look into an example −
Example
public class Vehicle{}
public class Speed{}
public class Van extends Vehicle {
private Speed sp;
}
This shows that class Van HAS-A Speed. By having a separate class for Speed, we do not have to put the entire code that belongs to speed inside the Van class, which makes it possible to reuse the Speed class in multiple applications.
In Object-Oriented feature, the users do not need to bother about which object is doing the real work. To achieve this, the Van class hides the implementation details from the users of the Van class. So, basically what happens is the users would ask the Van class to do a certain action and the Van class will either do the work by itself or ask another class to perform the action.
Types of Inheritance
There are various types of inheritance as demonstrated below.
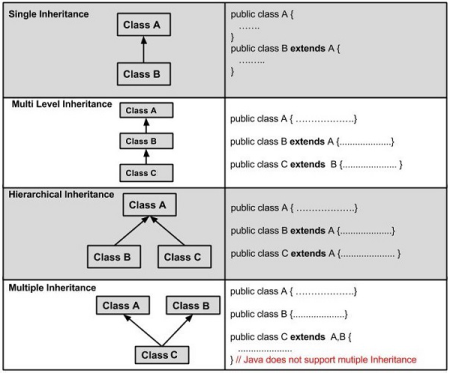
Fig 4 - Types of Inheritance
A very important fact to remember is that Java does not support multiple inheritance. This means that a class cannot extend more than one class. Therefore following is illegal −
Example
public class extends Animal, Mammal{}
However, a class can implement one or more interfaces, which has helped Java get rid of the impossibility of multiple inheritance.
Key takeaway
Inheritance can be defined as the process where one class acquires the properties (methods and fields) of another. With the use of inheritance the information is made manageable in a hierarchical order.
The class which inherits the properties of other is known as subclass (derived class, child class) and the class whose properties are inherited is known as superclass (base class, parent class).
extends Keyword
extends is the keyword used to inherit the properties of a class. Following is the syntax of extends keyword.
A static block is a block of code with a static keyword. In general, these are used to initialize the static members of a class. JVM executes static blocks before the main method at the time loading a class.
Example
public class MyClass {
static{
System.out.println("Hello this is a static block");
}
public static void main(String args[]){
System.out.println("This is main method");
}
}
Output
Hello this is a static block
This is main method
A constructor is similar to method and it is invoked at the time creating an object of the class, it is generally used to initialize the instance variables of a class. The constructors have same name as their class and, have no return type.
public class MyClass {
MyClass(){
System.out.println("Hello this is a constructor");
}
public static void main(String args[]){
new MyClass();
}
}
Output
Hello this is a constructor
Instance method
These are the normal methods of a class (non static), you need to invoke them using an object of the class −
Example
public class MyClass {
public void demo(){
System.out.println("Hello this is an instance method");
}
public static void main(String args[]){
new MyClass().demo();
}
}
Output
Hello this is an instance method
Order of execution
When you have all the three in one class, the static blocks are executed first, followed by constructors and then the instance methods.
Examplepublic class ExampleClass {
static{
System.out.println("Hello this is a static block");
}
ExampleClass(){
System.out.println("Hello this a constructor");
}
public static void demo() {
System.out.println("Hello this is an instance method");
}
public static void main(String args[]){
new ExampleClass().demo();
}
}
Output
Hello this is a static block
Hello this a constructor
Hello this is an instance method
Key takeaway
A static block is a block of code with a static keyword. In general, these are used to initialize the static members of a class. JVM executes static blocks before the main method at the time loading a class.
If subclass (child class) has the same method as declared in the parent class, it is known as method overriding in Java.
In other words, If a subclass provides the specific implementation of the method that has been declared by one of its parent class, it is known as method overriding.
Usage of Java Method Overriding
Rules for Java Method Overriding
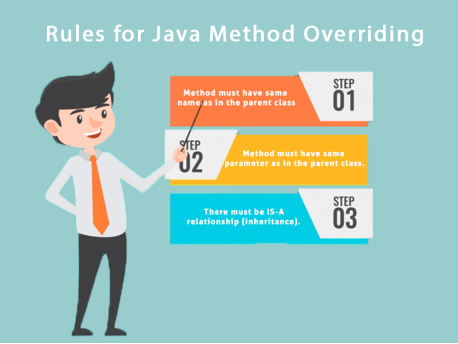
Fig 5 – Method overriding
Understanding the problem without method overriding
Let's understand the problem that we may face in the program if we don't use method overriding.
Output:
Vehicle is running
Problem is that I have to provide a specific implementation of run() method in subclass that is why we use method overriding.
Example of method overriding
In this example, we have defined the run method in the subclass as defined in the parent class but it has some specific implementation. The name and parameter of the method are the same, and there is IS-A relationship between the classes, so there is method overriding.
Output:
Bike is running safely
A real example of Java Method Overriding
Consider a scenario where Bank is a class that provides functionality to get the rate of interest. However, the rate of interest varies according to banks. For example, SBI, ICICI and AXIS banks could provide 8%, 7%, and 9% rate of interest.
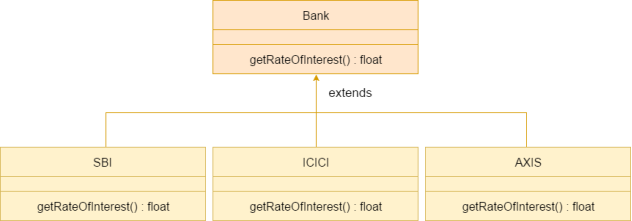
Fig 6 - Example
Java method overriding is mostly used in Runtime Polymorphism which we will learn in next pages.
Output:
SBI Rate of Interest: 8
ICICI Rate of Interest: 7
AXIS Rate of Interest: 9
Key takeaway
If subclass (child class) has the same method as declared in the parent class, it is known as method overriding in Java.
In other words, If a subclass provides the specific implementation of the method that has been declared by one of its parent class, it is known as method overriding.
Polymorphism in Java is a concept by which we can perform a single action in different ways. Polymorphism is derived from 2 Greek words: poly and morphs. The word "poly" means many and "morphs" means forms. So polymorphism means many forms.
There are two types of polymorphism in Java: compile-time polymorphism and runtime polymorphism. We can perform polymorphism in java by method overloading and method overriding.
If you overload a static method in Java, it is the example of compile time polymorphism. Here, we will focus on runtime polymorphism in java.
Runtime Polymorphism in Java
Runtime polymorphism or Dynamic Method Dispatch is a process in which a call to an overridden method is resolved at runtime rather than compile-time.
In this process, an overridden method is called through the reference variable of a superclass. The determination of the method to be called is based on the object being referred to by the reference variable.
Let's first understand the upcasting before Runtime Polymorphism.
Upcasting
If the reference variable of Parent class refers to the object of Child class, it is known as upcasting. For example:

Fig 7 - Upcasting
For upcasting, we can use the reference variable of class type or an interface type. For Example:
Here, the relationship of B class would be:
B IS-A A
B IS-A I
B IS-A Object
Since Object is the root class of all classes in Java, so we can write B IS-A Object.
Example of Java Runtime Polymorphism
In this example, we are creating two classes Bike and Splendor. Splendor class extends Bike class and overrides its run() method. We are calling the run method by the reference variable of Parent class. Since it refers to the subclass object and subclass method overrides the Parent class method, the subclass method is invoked at runtime.
Since method invocation is determined by the JVM not compiler, it is known as runtime polymorphism.
Output:
running safely with 60km.
Java Runtime Polymorphism Example: Bank
Consider a scenario where Bank is a class that provides a method to get the rate of interest. However, the rate of interest may differ according to banks. For example, SBI, ICICI, and AXIS banks are providing 8.4%, 7.3%, and 9.7% rate of interest.
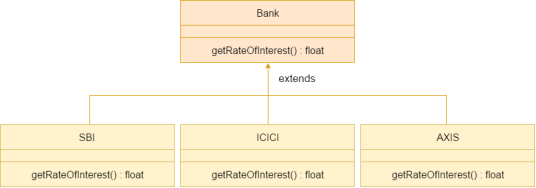
Fig 8 - Example
Note: This example is also given in method overriding but there was no upcasting.
Output:
SBI Rate of Interest: 8.4
ICICI Rate of Interest: 7.3
AXIS Rate of Interest: 9.7
Java Runtime Polymorphism Example: Shape
Output:
drawing rectangle...
drawing circle...
drawing triangle...
Java Runtime Polymorphism Example: Animal
Output:
eating bread...
eating rat...
eating meat...
Java Runtime Polymorphism with Data Member
A method is overridden, not the data members, so runtime polymorphism can't be achieved by data members.
In the example given below, both the classes have a data member speedlimit. We are accessing the data member by the reference variable of Parent class which refers to the subclass object. Since we are accessing the data member which is not overridden, hence it will access the data member of the Parent class always.
Rule: Runtime polymorphism can't be achieved by data members.
Output:
90
Java Runtime Polymorphism with Multilevel Inheritance
Let's see the simple example of Runtime Polymorphism with multilevel inheritance.
Output:
eating
eating fruits
drinking Milk
Try for Output
Output:
Dog is eating
Since, BabyDog is not overriding the eat() method, so eat() method of Dog class is invoked.
Key takeaway
Polymorphism in Java is a concept by which we can perform a single action in different ways. Polymorphism is derived from 2 Greek words: poly and morphs. The word "poly" means many and "morphs" means forms. So polymorphism means many forms.
There are two types of polymorphism in Java: compile-time polymorphism and runtime polymorphism. We can perform polymorphism in java by method overloading and method overriding.
If you overload a static method in Java, it is the example of compile time polymorphism. Here, we will focus on runtime polymorphism in java.
A class which is declared with the abstract keyword is known as an abstract class in Java. It can have abstract and non-abstract methods (method with the body).
Before learning the Java abstract class, let's understand the abstraction in Java first.
Abstraction in Java
Abstraction is a process of hiding the implementation details and showing only functionality to the user.
Another way, it shows only essential things to the user and hides the internal details, for example, sending SMS where you type the text and send the message. You don't know the internal processing about the message delivery.
Abstraction lets you focus on what the object does instead of how it does it.
Ways to achieve Abstraction
There are two ways to achieve abstraction in java
Abstract class in Java
A class which is declared as abstract is known as an abstract class. It can have abstract and non-abstract methods. It needs to be extended and its method implemented. It cannot be instantiated.
Points to Remember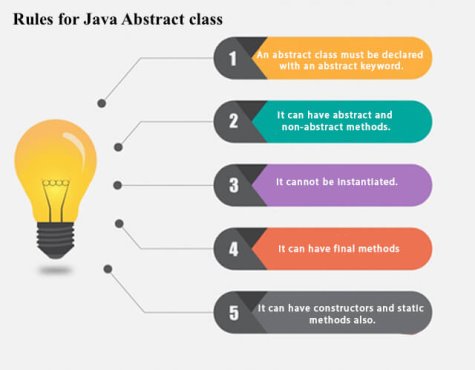
Fig 9 – Rules of abstract class
Example of abstract class
Abstract Method in Java
A method which is declared as abstract and does not have implementation is known as an abstract method.
Example of abstract method
Example of Abstract class that has an abstract method
In this example, Bike is an abstract class that contains only one abstract method run. Its implementation is provided by the Honda class.
running safely
Understanding the real scenario of Abstract class
In this example, Shape is the abstract class, and its implementation is provided by the Rectangle and Circle classes.
Mostly, we don't know about the implementation class (which is hidden to the end user), and an object of the implementation class is provided by the factory method.
A factory method is a method that returns the instance of the class. We will learn about the factory method later.
In this example, if you create the instance of Rectangle class, draw() method of Rectangle class will be invoked.
File: TestAbstraction1.java
drawing circle
Another example of Abstract class in java
File: TestBank.java
Rate of Interest is: 7 %
Rate of Interest is: 8 %
Abstract class having constructor, data member and methods
An abstract class can have a data member, abstract method, method body (non-abstract method), constructor, and even main() method.
File: TestAbstraction2.java
bike is created
running safely..
gear changed
Rule: If there is an abstract method in a class, that class must be abstract.compile time error
Rule: If you are extending an abstract class that has an abstract method, you must either provide the implementation of the method or make this class abstract.Another real scenario of abstract class
The abstract class can also be used to provide some implementation of the interface. In such case, the end user may not be forced to override all the methods of the interface.
Note: If you are beginner to java, learn interface first and skip this example.Output:I am a
I am b
I am c
I am d
The Object class is the parent class of all the classes in java by default. In other words, it is the topmost class of java.
The Object class is beneficial if you want to refer any object whose type you don't know. Notice that parent class reference variable can refer the child class object, know as upcasting.
Let's take an example, there is getObject() method that returns an object but it can be of any type like Employee,Student etc, we can use Object class reference to refer that object. For example:
The Object class provides some common behaviors to all the objects such as object can be compared, object can be cloned, object can be notified etc.

Fig 10 - Object
Methods of Object class
The Object class provides many methods. They are as follows: |
Method | Description |
public final Class getClass() | returns the Class class object of this object. The Class class can further be used to get the metadata of this class. |
public int hashCode() | returns the hashcode number for this object. |
public boolean equals(Object obj) | compares the given object to this object. |
protected Object clone() throws CloneNotSupportedException | creates and returns the exact copy (clone) of this object. |
public String toString() | returns the string representation of this object. |
public final void notify() | wakes up single thread, waiting on this object's monitor. |
public final void notifyAll() | wakes up all the threads, waiting on this object's monitor. |
public final void wait(long timeout)throws InterruptedException | causes the current thread to wait for the specified milliseconds, until another thread notifies (invokes notify() or notifyAll() method). |
public final void wait(long timeout,int nanos)throws InterruptedException | causes the current thread to wait for the specified milliseconds and nanoseconds, until another thread notifies (invokes notify() or notifyAll() method). |
public final void wait()throws InterruptedException | causes the current thread to wait, until another thread notifies (invokes notify() or notifyAll() method). |
protected void finalize()throws Throwable | is invoked by the garbage collector before object is being garbage collected. |
Key takeaway
A class which is declared with the abstract keyword is known as an abstract class in Java. It can have abstract and non-abstract methods (method with the body).
Before learning the Java abstract class, let's understand the abstraction in Java first.
Abstraction in Java
Abstraction is a process of hiding the implementation details and showing only functionality to the user.
Another way, it shows only essential things to the user and hides the internal details, for example, sending SMS where you type the text and send the message. You don't know the internal processing about the message delivery.
Abstraction lets you focus on what the object does instead of how it does it.
A java package is a group of similar types of classes, interfaces and sub-packages.
Package in java can be categorized in two form, built-in package and user-defined package.
There are many built-in packages such as java, lang, awt, javax, swing, net, io, util, sql etc.
Here, we will have the detailed learning of creating and using user-defined packages.
Advantage of Java Package
1) Java package is used to categorize the classes and interfaces so that they can be easily maintained.
2) Java package provides access protection.
3) Java package removes naming collision.
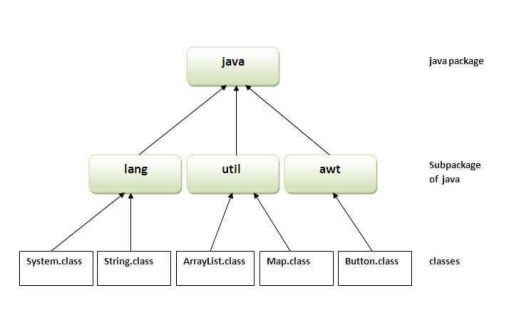
Fig 11 - Package
Simple example of java package
The package keyword is used to create a package in java.
How to compile java package
If you are not using any IDE, you need to follow the syntax given below:
For example
The -d switch specifies the destination where to put the generated class file. You can use any directory name like /home (in case of Linux), d:/abc (in case of windows) etc. If you want to keep the package within the same directory, you can use . (dot).
How to run java package program
You need to use fully qualified name e.g. mypack.Simple etc to run the class.
To Compile: javac -d . Simple.java |
To Run: java mypack.Simple |
Output:Welcome to package
The -d is a switch that tells the compiler where to put the class file i.e. it represents destination. The . represents the current folder. |
How to access package from another package?
There are three ways to access the package from outside the package.
1) Using packagename.*
If you use package.* then all the classes and interfaces of this package will be accessible but not subpackages.
The import keyword is used to make the classes and interface of another package accessible to the current package.
Example of package that import the packagename.*
Output:Hello
2) Using packagename.classname
If you import package.classname then only declared class of this package will be accessible.
Example of package by import package.classname
Output:Hello
3) Using fully qualified name
If you use fully qualified name then only declared class of this package will be accessible. Now there is no need to import. But you need to use fully qualified name every time when you are accessing the class or interface.
It is generally used when two packages have same class name e.g. java.util and java.sql packages contain Date class.
Example of package by import fully qualified name
Output:Hello
Note: If you import a package, subpackages will not be imported.
If you import a package, all the classes and interface of that package will be imported excluding the classes and interfaces of the subpackages. Hence, you need to import the subpackage as well.
Note: Sequence of the program must be package then import then class.
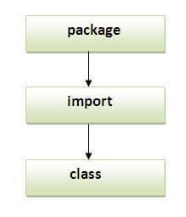
Fig 12 - Sequence
Subpackage in java
Package inside the package is called the subpackage. It should be created to categorize the package further.
Let's take an example, Sun Microsystem has definded a package named java that contains many classes like System, String, Reader, Writer, Socket etc. These classes represent a particular group e.g. Reader and Writer classes are for Input/Output operation, Socket and ServerSocket classes are for networking etc and so on. So, Sun has subcategorized the java package into subpackages such as lang, net, io etc. and put the Input/Output related classes in io package, Server and ServerSocket classes in net packages and so on.
The standard of defining package is domain.company.package e.g. com.javatpoint.bean or org.sssit.dao.
Example of Subpackage
To Compile: javac -d . Simple.java |
To Run: java com.javatpoint.core.Simple |
Output:Hello subpackage
How to send the class file to another directory or drive?
There is a scenario, I want to put the class file of A.java source file in classes folder of c: drive. For example:
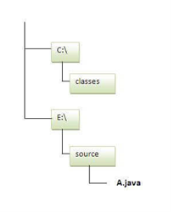
To Compile:
e:\sources> javac -d c:\classes Simple.java
To Run:
To run this program from e:\source directory, you need to set classpath of the directory where the class file resides. |
e:\sources> set classpath=c:\classes;.; |
e:\sources> java mypack.Simple |
Another way to run this program by -classpath switch of java:
The -classpath switch can be used with javac and java tool.
To run this program from e:\source directory, you can use -classpath switch of java that tells where to look for class file. For example:
e:\sources> java -classpath c:\classes mypack.Simple
Output:Welcome to package
Ways to load the class files or jar files
There are two ways to load the class files temporary and permanent. |
- By setting the classpath in the command prompt
- By -classpath switch
- By setting the classpath in the environment variables
- By creating the jar file, that contains all the class files, and copying the jar file in the jre/lib/ext folder.
Rule: There can be only one public class in a java source file and it must be saved by the public class name.
How to put two public classes in a package?
If you want to put two public classes in a package, have two java source files containing one public class, but keep the package name same. For example: |
Key takeaway
A java package is a group of similar types of classes, interfaces and sub-packages.
Package in java can be categorized in two form, built-in package and user-defined package.
There are many built-in packages such as java, lang, awt, javax, swing, net, io, util, sql etc.
Here, we will have the detailed learning of creating and using user-defined packages.
Packages are used in Java in order to prevent naming conflicts, to control access, to make searching/locating and usage of classes, interfaces, enumerations and annotations easier, etc.
A Package can be defined as a grouping of related types (classes, interfaces, enumerations and annotations ) providing access protection and namespace management.
Some of the existing packages in Java are −
Programmers can define their own packages to bundle group of classes/interfaces, etc. It is a good practice to group related classes implemented by you so that a programmer can easily determine that the classes, interfaces, enumerations, and annotations are related.
Since the package creates a new namespace there won't be any name conflicts with names in other packages. Using packages, it is easier to provide access control and it is also easier to locate the related classes.
Creating a Package
While creating a package, you should choose a name for the package and include a package statement along with that name at the top of every source file that contains the classes, interfaces, enumerations, and annotation types that you want to include in the package.
The package statement should be the first line in the source file. There can be only one package statement in each source file, and it applies to all types in the file.
If a package statement is not used then the class, interfaces, enumerations, and annotation types will be placed in the current default package.
To compile the Java programs with package statements, you have to use -d option as shown below.
javac -d Destination_folder file_name.java
Then a folder with the given package name is created in the specified destination, and the compiled class files will be placed in that folder.
Example
Let us look at an example that creates a package called animals. It is a good practice to use names of packages with lower case letters to avoid any conflicts with the names of classes and interfaces.
Following package example contains interface named animals −
/* File name : Animal.java */
package animals;
interface Animal {
public void eat();
public void travel();
}
Now, let us implement the above interface in the same package animals −
package animals;
/* File name : MammalInt.java */
public class MammalInt implements Animal {
public void eat() {
System.out.println("Mammal eats");
}
public void travel() {
System.out.println("Mammal travels");
}
public int noOfLegs() {
return 0;
}
public static void main(String args[]) {
MammalInt m = new MammalInt();
m.eat();
m.travel();
}
}
Now compile the java files as shown below −
$ javac -d . Animal.java
$ javac -d . MammalInt.java
Now a package/folder with the name animals will be created in the current directory and these class files will be placed in it as shown below.
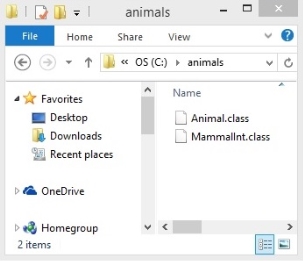
You can execute the class file within the package and get the result as shown below.
Mammal eats
Mammal travels
The import Keyword
If a class wants to use another class in the same package, the package name need not be used. Classes in the same package find each other without any special syntax.
Example
Here, a class named Boss is added to the payroll package that already contains Employee. The Boss can then refer to the Employee class without using the payroll prefix, as demonstrated by the following Boss class.
package payroll;
public class Boss {
public void payEmployee(Employee e) {
e.mailCheck();
}
}
What happens if the Employee class is not in the payroll package? The Boss class must then use one of the following techniques for referring to a class in a different package.
payroll.Employee
import payroll.*;
import payroll.Employee;
Note − A class file can contain any number of import statements. The import statements must appear after the package statement and before the class declaration.
The Directory Structure of Packages
Two major results occur when a class is placed in a package −
Here is simple way of managing your files in Java −
Put the source code for a class, interface, enumeration, or annotation type in a text file whose name is the simple name of the type and whose extension is .java.
For example −
// File Name : Car.java
package vehicle;
public class Car {
// Class implementation.
}
Now, put the source file in a directory whose name reflects the name of the package to which the class belongs −
....\vehicle\Car.java
Now, the qualified class name and pathname would be as follows −
In general, a company uses its reversed Internet domain name for its package names.
Example − A company's Internet domain name is apple.com, then all its package names would start with com.apple. Each component of the package name corresponds to a subdirectory.
Example − The company had a com.apple.computers package that contained a Dell.java source file, it would be contained in a series of subdirectories like this −
....\com\apple\computers\Dell.java
At the time of compilation, the compiler creates a different output file for each class, interface and enumeration defined in it. The base name of the output file is the name of the type, and its extension is .class.
For example −
// File Name: Dell.java
package com.apple.computers;
public class Dell {
}
class Ups {
}
Now, compile this file as follows using -d option −
$javac -d . Dell.java
The files will be compiled as follows −
.\com\apple\computers\Dell.class
.\com\apple\computers\Ups.class
You can import all the classes or interfaces defined in \com\apple\computers\ as follows −
import com.apple.computers.*;
Like the .java source files, the compiled .class files should be in a series of directories that reflect the package name. However, the path to the .class files does not have to be the same as the path to the .java source files. You can arrange your source and class directories separately, as −
<path-one>\sources\com\apple\computers\Dell.java
<path-two>\classes\com\apple\computers\Dell.class
By doing this, it is possible to give access to the classes directory to other programmers without revealing your sources. You also need to manage source and class files in this manner so that the compiler and the Java Virtual Machine (JVM) can find all the types your program uses.
The full path to the classes directory, <path-two>\classes, is called the class path, and is set with the CLASSPATH system variable. Both the compiler and the JVM construct the path to your .class files by adding the package name to the class path.
Say <path-two>\classes is the class path, and the package name is com.apple.computers, then the compiler and JVM will look for .class files in <path-two>\classes\com\apple\computers.
A class path may include several paths. Multiple paths should be separated by a semicolon (Windows) or colon (Unix). By default, the compiler and the JVM search the current directory and the JAR file containing the Java platform classes so that these directories are automatically in the class path.
Set CLASSPATH System Variable
To display the current CLASSPATH variable, use the following commands in Windows and UNIX (Bourne shell) −
To delete the current contents of the CLASSPATH variable, use −
To set the CLASSPATH variable −
CLASSPATH: CLASSPATH is an environment variable which is used by Application ClassLoader to locate and load the .class files. The CLASSPATH defines the path, to find third-party and user-defined classes that are not extensions or part of Java platform. Include all the directories which contain .class files and JAR files when setting the CLASSPATH.
You need to set the CLASSPATH if:
The CLASSPATH depends on what you are setting the CLASSPATH. The CLASSPATH has a directory name or file name at the end. The following points describe what should be the end of the CLASSPATH.
The default value of CLASSPATH is a dot (.). It means the only current directory searched. The default value of CLASSPATH overrides when you set the CLASSPATH variable or using the -classpath command (for short -cp). Put a dot (.) in the new setting if you want to include the current directory in the search path.
If CLASSPATH finds a class file which is present in the current directory, then it will load the class and use it, irrespective of the same name class presents in another directory which is also included in the CLASSPATH.
If you want to set multiple classpaths, then you need to separate each CLASSPATH by a semicolon (;).
The third-party applications (MySQL and Oracle) that use the JVM can modify the CLASSPATH environment variable to include the libraries they use. The classes can be stored in directories or archives files. The classes of the Java platform are stored in rt.jar.
There are two ways to ways to set CLASSPATH: through Command Prompt or by setting Environment Variable.
Let's see how to set CLASSPATH of MySQL database:
Step 1: Click on the Windows button and choose Control Panel. Select System.

Step 2: Click on Advanced System Settings.
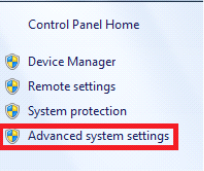
Step 3: A dialog box will open. Click on Environment Variables.
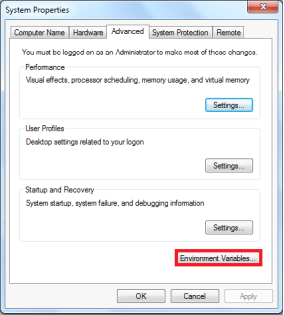
Step 4: If the CLASSPATH already exists in System Variables, click on the Edit button then put a semicolon (;) at the end. Paste the Path of MySQL-Connector Java.jar file.
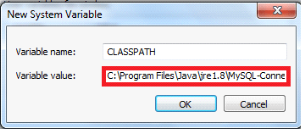
If the CLASSPATH doesn't exist in System Variables, then click on the New button and type Variable name as CLASSPATH and Variable value as C:\Program Files\Java\jre1.8\MySQL-Connector Java.jar;.;
Remember: Put ;.; at the end of the CLASSPATH.
Difference between PATH and CLASSPATH
PATH | CLASSPATH |
PATH is an environment variable. | CLASSPATH is also an environment variable. |
It is used by the operating system to find the executable files (.exe). | It is used by Application ClassLoader to locate the .class file. |
You are required to include the directory which contains .exe files. | You are required to include all the directories which contain .class and JAR files. |
PATH environment variable once set, cannot be overridden. | The CLASSPATH environment variable can be overridden by using the command line option -cp or -CLASSPATH to both javac and java command. |
How to Set CLASSPATH in Windows Using Command Prompt
Type the following command in your Command Prompt and press enter.
In the above command, The set is an internal DOS command that allows the user to change the variable value. CLASSPATH is a variable name. The variable enclosed in percentage sign (%) is an existing environment variable. The semicolon is a separator, and after the (;) there is the PATH of rt.jar file.
How ext folder works in Java
The ext directory works a bit like the CLASSPATH. ext directory is the part of the class loading mechanism. The classes which are available within JARs in the ext directory are available to Java applications.
The following table demonstrates the key difference between the CLASSPATH and Extension Mechanism:
Characteristics | CLASSPATH | Extension Mechanism |
Class loading order | CLASSPATH loads after bootstrap and extension loading. | ext loads after bootstrap loading but before CLASSPATH loading. |
Scope | It is an application specific. All JREs on the host is the CLASSPATH environment variable. | All JVMs are running in specific JRE java.ext.dirs. |
Package name | java.class.path is used to find the directories and JAR archives containing class files. | java.ext.dirs is used to specify where the extension mechanism loads classes. |
Specification | It is specified by name including the extension.jar and directory containing .class files. | All JAR files in specified directories are loaded. |
The mechanism will pick up all .jar files from the extension directory even if the file does not have the .jar extension. The implementation of this is that if one can change the name of a jar placed in a classpath directory to have an extension other than .jar. The wildcard (*) does not pick it up. This technique will not work with the extension directory.
Let's understand the execution process through an example.
A.java
B.java
Compile the A.java file. we will archive the compiled A.class file into A.jar. Place this JAR file into another directory than the compiled B.class file.
To demonstrate the use of the classpath, we place the A.jar file in a directory C:\JavaPrograms and will access that JAR through wildcard (*) for B to use.
We found that B can still load the A.class while we had deleted it from the current directory. The Java launcher was explicitly looked for C:\JavaProgram. It is also possible to have the class loaded without its presence in the same directory and explicit classpath specification.
It is often referred to as a benefit of Using the extension mechanism because all applications which are using that JRE can see the same classes without the need to specify them on the classpath explicitly.
What happens if we change the name of A.jar into A.backup in the same CLASSPATH-referenced directory. NoClassDefFoundError is encountered when we do the same because the CLASSPATH-reference does not have the .jar extension.
Key takeaway
Packages are used in Java in order to prevent naming conflicts, to control access, to make searching/locating and usage of classes, interfaces, enumerations and annotations easier, etc.
A Package can be defined as a grouping of related types (classes, interfaces, enumerations and annotations ) providing access protection and namespace management.
Some of the existing packages in Java are −
Programmers can define their own packages to bundle group of classes/interfaces, etc. It is a good practice to group related classes implemented by you so that a programmer can easily determine that the classes, interfaces, enumerations, and annotations are related.
There are two types of modifiers in Java: access modifiers and non-access modifiers.
The access modifiers in Java specifies the accessibility or scope of a field, method, constructor, or class. We can change the access level of fields, constructors, methods, and class by applying the access modifier on it.
There are four types of Java access modifiers:
There are many non-access modifiers, such as static, abstract, synchronized, native, volatile, transient, etc. Here, we are going to learn the access modifiers only.
Understanding Java Access Modifiers
Let's understand the access modifiers in Java by a simple table.
Access Modifier | within class | within package | outside package by subclass only | outside package |
Private | Y | N | N | N |
Default | Y | Y | N | N |
Protected | Y | Y | Y | N |
Public | Y | Y | Y | Y |
1) Private
The private access modifier is accessible only within the class.
Simple example of private access modifier
In this example, we have created two classes A and Simple. A class contains private data member and private method. We are accessing these private members from outside the class, so there is a compile-time error.
Role of Private Constructor
If you make any class constructor private, you cannot create the instance of that class from outside the class. For example:
Note: A class cannot be private or protected except nested class.
2) Default
If you don't use any modifier, it is treated as default by default. The default modifier is accessible only within package. It cannot be accessed from outside the package. It provides more accessibility than private. But, it is more restrictive than protected, and public.
Example of default access modifier
In this example, we have created two packages pack and mypack. We are accessing the A class from outside its package, since A class is not public, so it cannot be accessed from outside the package.
In the above example, the scope of class A and its method msg() is default so it cannot be accessed from outside the package.
3) Protected
The protected access modifier is accessible within package and outside the package but through inheritance only.
The protected access modifier can be applied on the data member, method and constructor. It can't be applied on the class.
It provides more accessibility than the default modifer.
Example of protected access modifier
In this example, we have created the two packages pack and mypack. The A class of pack package is public, so can be accessed from outside the package. But msg method of this package is declared as protected, so it can be accessed from outside the class only through inheritance.
Output:Hello
4) Public
The public access modifier is accessible everywhere. It has the widest scope among all other modifiers.
Example of public access modifier
Output:Hello
Java Access Modifiers with Method Overriding
If you are overriding any method, overridden method (i.e. declared in subclass) must not be more restrictive.
The default modifier is more restrictive than protected. That is why, there is a compile-time error.
Key takeaway
There are two types of modifiers in Java: access modifiers and non-access modifiers.
The access modifiers in Java specifies the accessibility or scope of a field, method, constructor, or class. We can change the access level of fields, constructors, methods, and class by applying the access modifier on it.
Java Packages & API
A package in Java is used to group related classes. Think of it as a folder in a file directory. We use packages to avoid name conflicts, and to write a better maintainable code. Packages are divided into two categories:
Built-in Packages
The Java API is a library of prewritten classes, that are free to use, included in the Java Development Environment.
The library contains components for managing input, database programming, and much much more.
The library is divided into packages and classes. Meaning you can either import a single class (along with its methods and attributes), or a whole package that contain all the classes that belong to the specified package.
To use a class or a package from the library, you need to use the import keyword:
Syntax
import package.name.Class; // Import a single class
import package.name.*; // Import the whole package
Import a Class
If you find a class you want to use, for example, the Scanner class, which is used to get user input, write the following code:
Example
import java.util.Scanner;
In the example above, java.util is a package, while Scanner is a class of the java.util package.
To use the Scanner class, create an object of the class and use any of the available methods found in the Scanner class documentation. In our example, we will use the nextLine() method, which is used to read a complete line:
Example
Using the Scanner class to get user input:
import java.util.Scanner;
class MyClass {
public static void main(String[] args) {
Scanner myObj = new Scanner(System.in);
System.out.println("Enter username");
String userName = myObj.nextLine();
System.out.println("Username is: " + userName);
}
}
Import a Package
There are many packages to choose from. In the previous example, we used the Scanner class from the java.util package. This package also contains date and time facilities, random-number generator and other utility classes.
To import a whole package, end the sentence with an asterisk sign (*). The following example will import ALL the classes in the java.util package:
Example
import java.util.*;
User-defined Packages
To create your own package, you need to understand that Java uses a file system directory to store them. Just like folders on your computer:
Example
└── root
└── mypack
└── MyPackageClass.java
To create a package, use the package keyword:
MyPackageClass.java
package mypack;
class MyPackageClass {
public static void main(String[] args) {
System.out.println("This is my package!");
}
}
Save the file as MyPackageClass.java, and compile it:
C:\Users\Your Name>javac MyPackageClass.java
Then compile the package:
C:\Users\Your Name>javac -d . MyPackageClass.java
This forces the compiler to create the "mypack" package.
The -d keyword specifies the destination for where to save the class file. You can use any directory name, like c:/user (windows), or, if you want to keep the package within the same directory, you can use the dot sign ".", like in the example above.
Note: The package name should be written in lower case to avoid conflict with class names.
When we compiled the package in the example above, a new folder was created, called "mypack".
To run the MyPackageClass.java file, write the following:
C:\Users\Your Name>java mypack.MyPackageClass
The output will be:
This is my package!
Key takeaway
A package in Java is used to group related classes. Think of it as a folder in a file directory. We use packages to avoid name conflicts, and to write a better maintainable code. Packages are divided into two categories:
An interface is a reference type in Java. It is similar to class. It is a collection of abstract methods. A class implements an interface, thereby inheriting the abstract methods of the interface.
Along with abstract methods, an interface may also contain constants, default methods, static methods, and nested types. Method bodies exist only for default methods and static methods.
Writing an interface is similar to writing a class. But a class describes the attributes and behaviors of an object. And an interface contains behaviors that a class implements.
Unless the class that implements the interface is abstract, all the methods of the interface need to be defined in the class.
An interface is similar to a class in the following ways −
However, an interface is different from a class in several ways, including −
Declaring Interfaces
The interface keyword is used to declare an interface. Here is a simple example to declare an interface −
Example
Following is an example of an interface −
/* File name : NameOfInterface.java */
import java.lang.*;
// Any number of import statements
public interface NameOfInterface {
// Any number of final, static fields
// Any number of abstract method declarations\
}
Interfaces have the following properties −
Example
/* File name : Animal.java */
interface Animal {
public void eat();
public void travel();
}
Implementing Interfaces
When a class implements an interface, you can think of the class as signing a contract, agreeing to perform the specific behaviors of the interface. If a class does not perform all the behaviors of the interface, the class must declare itself as abstract.
A class uses the implements keyword to implement an interface. The implements keyword appears in the class declaration following the extends portion of the declaration.
Example
/* File name : MammalInt.java */
public class MammalInt implements Animal {
public void eat() {
System.out.println("Mammal eats");
}
public void travel() {
System.out.println("Mammal travels");
}
public int noOfLegs() {
return 0;
}
public static void main(String args[]) {
MammalInt m = new MammalInt();
m.eat();
m.travel();
}
}
This will produce the following result −
Output
Mammal eats
Mammal travels
When overriding methods defined in interfaces, there are several rules to be followed −
When implementation interfaces, there are several rules −
Extending Interfaces
An interface can extend another interface in the same way that a class can extend another class. The extends keyword is used to extend an interface, and the child interface inherits the methods of the parent interface.
The following Sports interface is extended by Hockey and Football interfaces.
Example
// Filename: Sports.java
public interface Sports {
public void setHomeTeam(String name);
public void setVisitingTeam(String name);
}
// Filename: Football.java
public interface Football extends Sports {
public void homeTeamScored(int points);
public void visitingTeamScored(int points);
public void endOfQuarter(int quarter);
}
// Filename: Hockey.java
public interface Hockey extends Sports {
public void homeGoalScored();
public void visitingGoalScored();
public void endOfPeriod(int period);
public void overtimePeriod(int ot);
}
The Hockey interface has four methods, but it inherits two from Sports; thus, a class that implements Hockey needs to implement all six methods. Similarly, a class that implements Football needs to define the three methods from Football and the two methods from Sports.
Extending Multiple Interfaces
A Java class can only extend one parent class. Multiple inheritance is not allowed. Interfaces are not classes, however, and an interface can extend more than one parent interface.
The extends keyword is used once, and the parent interfaces are declared in a comma-separated list.
For example, if the Hockey interface extended both Sports and Event, it would be declared as −
Example
public interface Hockey extends Sports, Event
Tagging Interfaces
The most common use of extending interfaces occurs when the parent interface does not contain any methods. For example, the MouseListener interface in the java.awt.event package extended java.util.EventListener, which is defined as −
Example
package java.util;
public interface EventListener
{}
An interface with no methods in it is referred to as a tagging interface. There are two basic design purposes of tagging interfaces −
Creates a common parent − As with the EventListener interface, which is extended by dozens of other interfaces in the Java API, you can use a tagging interface to create a common parent among a group of interfaces. For example, when an interface extends EventListener, the JVM knows that this particular interface is going to be used in an event delegation scenario.
Adds a data type to a class − This situation is where the term, tagging comes from. A class that implements a tagging interface does not need to define any methods (since the interface does not have any), but the class becomes an interface type through polymorphism.
An interface i.e. declared within another interface or class is known as nested interface. The nested interfaces are used to group related interfaces so that they can be easy to maintain. The nested interface must be referred by the outer interface or class. It can't be accessed directly.
Points to remember for nested interfaces
There are given some points that should be remembered by the java programmer.
Syntax of nested interface which is declared within the interface
Syntax of nested interface which is declared within the class
Example of nested interface which is declared within the interface
In this example, we are going to learn how to declare the nested interface and how we can access it. |
Output:hello nested interface
As you can see in the above example, we are acessing the Message interface by its outer interface Showable because it cannot be accessed directly. It is just like almirah inside the room, we cannot access the almirah directly because we must enter the room first. In collection frameword, sun microsystem has provided a nested interface Entry. Entry is the subinterface of Map i.e. accessed by Map.Entry. |
Internal code generated by the java compiler for nested interface Message
The java compiler internally creates public and static interface as displayed below:. |
Example of nested interface which is declared within the class
Let's see how can we define an interface inside the class and how can we access it. |
Output:hello nested interface
Can we define a class inside the interface?
Yes, If we define a class inside the interface, java compiler creates a static nested class. Let's see how can we define a class within the interface:
Key takeaway
An interface is a reference type in Java. It is similar to class. It is a collection of abstract methods. A class implements an interface, thereby inheriting the abstract methods of the interface.
Along with abstract methods, an interface may also contain constants, default methods, static methods, and nested types. Method bodies exist only for default methods and static methods.
Writing an interface is similar to writing a class. But a class describes the attributes and behaviors of an object. And an interface contains behaviors that a class implements.
The java instanceof operator is used to test whether the object is an instance of the specified type (class or subclass or interface).
The instanceof in java is also known as type comparison operator because it compares the instance with type. It returns either true or false. If we apply the instanceof operator with any variable that has null value, it returns false.
Simple example of java instanceof
Let's see the simple example of instance operator where it tests the current class.
Output:true
An object of subclass type is also a type of parent class. For example, if Dog extends Animal then object of Dog can be referred by either Dog or Animal class.
Another example of java instanceof operator
Output:true
instanceof in java with a variable that have null value
If we apply instanceof operator with a variable that have null value, it returns false. Let's see the example given below where we apply instanceof operator with the variable that have null value.
Output:false
Downcasting with java instanceof operator
When Subclass type refers to the object of Parent class, it is known as downcasting. If we perform it directly, compiler gives Compilation error. If you perform it by typecasting, ClassCastException is thrown at runtime. But if we use instanceof operator, downcasting is possible.
If we perform downcasting by typecasting, ClassCastException is thrown at runtime.
Possibility of downcasting with instanceof
Let's see the example, where downcasting is possible by instanceof operator.
Output:ok downcasting performed
Downcasting without the use of java instanceof
Downcasting can also be performed without the use of instanceof operator as displayed in the following example:
Output:ok downcasting performed
Let's take closer look at this, actual object that is referred by a, is an object of Dog class. So if we downcast it, it is fine. But what will happen if we write:
Understanding Real use of instanceof in java
Let's see the real use of instanceof keyword by the example given below.
Output: b method
Key takeaway
The java instanceof operator is used to test whether the object is an instance of the specified type (class or subclass or interface).
The instanceof in java is also known as type comparison operator because it compares the instance with type. It returns either true or false. If we apply the instanceof operator with any variable that has null value, it returns false.
The Exception Handling in Java is one of the powerful mechanism to handle the runtime errors so that normal flow of the application can be maintained.
In this page, we will learn about Java exceptions, its type and the difference between checked and unchecked exceptions.
What is Exception in Java
Dictionary Meaning: Exception is an abnormal condition.
In Java, an exception is an event that disrupts the normal flow of the program. It is an object which is thrown at runtime.
What is Exception Handling
Exception Handling is a mechanism to handle runtime errors such as ClassNotFoundException, IOException, SQLException, RemoteException, etc.
Advantage of Exception Handling
The core advantage of exception handling is to maintain the normal flow of the application. An exception normally disrupts the normal flow of the application that is why we use exception handling. Let's take a scenario:
Suppose there are 10 statements in your program and there occurs an exception at statement 5, the rest of the code will not be executed i.e. statement 6 to 10 will not be executed. If we perform exception handling, the rest of the statement will be executed. That is why we use exception handling in Java.
Do You Know?
|
Hierarchy of Java Exception classes
The java.lang.Throwable class is the root class of Java Exception hierarchy which is inherited by two subclasses: Exception and Error. A hierarchy of Java Exception classes are given below:
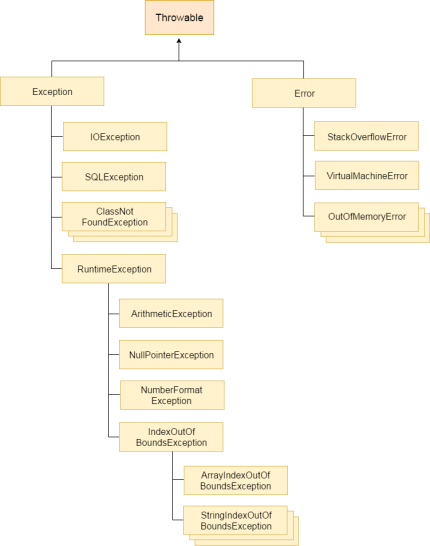
Fig 13 - A hierarchy of Java Exception classes
Types of Java Exceptions
There are mainly two types of exceptions: checked and unchecked. Here, an error is considered as the unchecked exception. According to Oracle, there are three types of exceptions:
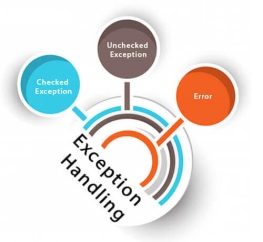
Fig 14 – Exception handling
Difference between Checked and Unchecked Exceptions
1) Checked Exception
The classes which directly inherit Throwable class except Runtime Exception and Error are known as checked exceptions e.g. IO Exception, SQL Exception etc. Checked exceptions are checked at compile-time.
2) Unchecked Exception
The classes which inherit Runtime Exception are known as unchecked exceptions e.g. Arithmetic Exception, Null Pointer Exception, Array Index Out Of Bounds Exception etc. Unchecked exceptions are not checked at compile-time, but they are checked at runtime.
3) Error
Error is irrecoverable e.g. Out Of Memory Error, Virtual Machine Error, Assertion Error etc.
Java Exception Keywords
There are 5 keywords which are used in handling exceptions in Java.
Keyword | Description |
try | The "try" keyword is used to specify a block where we should place exception code. The try block must be followed by either catch or finally. It means, we can't use try block alone. |
catch | The "catch" block is used to handle the exception. It must be preceded by try block which means we can't use catch block alone. It can be followed by finally block later. |
finally | The "finally" block is used to execute the important code of the program. It is executed whether an exception is handled or not. |
throw | The "throw" keyword is used to throw an exception. |
throws | The "throws" keyword is used to declare exceptions. It doesn't throw an exception. It specifies that there may occur an exception in the method. It is always used with method signature. |
Java Exception Handling Example
Let's see an example of Java Exception Handling where we using a try-catch statement to handle the exception.
Output:
Exception in thread main java.lang.ArithmeticException:/ by zero
rest of the code...
In the above example, 100/0 raises an Arithmetic Exception which is handled by a try-catch block.
Common Scenarios of Java Exceptions
There are given some scenarios where unchecked exceptions may occur. They are as follows:
1) A scenario where Arithmetic Exception occurs
If we divide any number by zero, there occurs an Arithmetic Exception.
2) A scenario where Null Pointer Exception occurs
If we have a null value in any variable, performing any operation on the variable throws a Null Pointer Exception.
3) A scenario where Number Format Exception occurs
The wrong formatting of any value may occur Number Format Exception. Suppose I have a string variable that has characters, converting this variable into digit will occur Number Format Exception.
4) A scenario where ArrayIndexOutOfBoundsException occurs
If you are inserting any value in the wrong index, it would result in ArrayIndexOutOfBoundsException as shown below:
Java try block
Java try block is used to enclose the code that might throw an exception. It must be used within the method.
If an exception occurs at the particular statement of try block, the rest of the block code will not execute. So, it is recommended not to keeping the code in try block that will not throw an exception.
Java try block must be followed by either catch or finally block.
Syntax of Java try-catch
Syntax of try-finally block
Java catch block
Java catch block is used to handle the Exception by declaring the type of exception within the parameter. The declared exception must be the parent class exception ( i.e., Exception) or the generated exception type. However, the good approach is to declare the generated type of exception.
The catch block must be used after the try block only. You can use multiple catch block with a single try block.
Problem without exception handling
Let's try to understand the problem if we don't use a try-catch block.
Example 1
Output:
Exception in thread "main" java.lang.ArithmeticException: / by zero
As displayed in the above example, the rest of the code is not executed (in such case, the rest of the code statement is not printed).
There can be 100 lines of code after exception. So all the code after exception will not be executed.
Solution by exception handling
Let's see the solution of the above problem by a java try-catch block.
Example 2
Output:
java.lang.ArithmeticException: / by zero
rest of the code
Now, as displayed in the above example, the rest of the code is executed, i.e., the rest of the code statement is printed.
Example 3
In this example, we also kept the code in a try block that will not throw an exception.
Output:
java.lang.ArithmeticException: / by zero
Here, we can see that if an exception occurs in the try block, the rest of the block code will not execute.
Example 4
Here, we handle the exception using the parent class exception.
Output:
java.lang.ArithmeticException: / by zero
rest of the code
Example 5
Let's see an example to print a custom message on exception.
Output:
Can't divided by zero
Example 6
Let's see an example to resolve the exception in a catch block.
Output:
25
Example 7
In this example, along with try block, we also enclose exception code in a catch block.
Output:
Exception in thread "main" java.lang.ArithmeticException: / by zero
Here, we can see that the catch block didn't contain the exception code. So, enclose exception code within a try block and use catch block only to handle the exceptions.
Example 8
In this example, we handle the generated exception (Arithmetic Exception) with a different type of exception class (ArrayIndexOutOfBoundsException).
Output:
Exception in thread "main" java.lang.ArithmeticException: / by zero
Example 9
Let's see an example to handle another unchecked exception.
Output:
java.lang.ArrayIndexOutOfBoundsException: 10
rest of the code
Example 10
Let's see an example to handle checked exception.
Output:
File saved successfully
Fig 15 -Internal working of java try-catch block
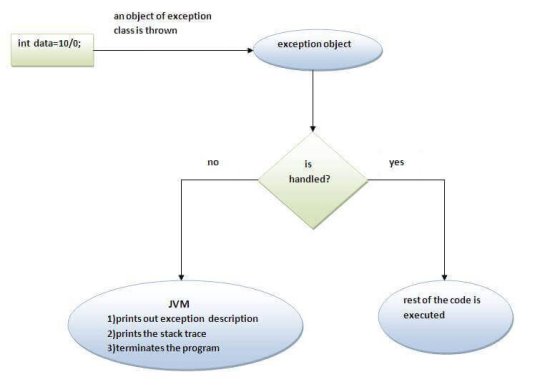
The JVM firstly checks whether the exception is handled or not. If exception is not handled, JVM provides a default exception handler that performs the following tasks:
But if exception is handled by the application programmer, normal flow of the application is maintained i.e. rest of the code is executed.
Java catch multiple exceptions
Java Multi-catch block
A try block can be followed by one or more catch blocks. Each catch block must contain a different exception handler. So, if you have to perform different tasks at the occurrence of different exceptions, use java multi-catch block.
Points to remember
Example 1
Let's see a simple example of java multi-catch block.
Output:
Arithmetic Exception occurs
rest of the code
Example 2
Output:
ArrayIndexOutOfBounds Exception occurs
rest of the code
Example 3
In this example, try block contains two exceptions. But at a time only one exception occurs and its corresponding catch block is invoked.
Output:
Arithmetic Exception occurs
rest of the code
Example 4
In this example, we generate Null Pointer Exception, but didn't provide the corresponding exception type. In such case, the catch block containing the parent exception class Exception will invoked.
Output:
Parent Exception occurs
rest of the code
Example 5
Let's see an example, to handle the exception without maintaining the order of exceptions (i.e. from most specific to most general).
Output:
Compile-time error
The try block within a try block is known as nested try block in java.
Why use nested try block
Sometimes a situation may arise where a part of a block may cause one error and the entire block itself may cause another error. In such cases, exception handlers have to be nested.
Syntax:
Java nested try example
Let's see a simple example of java nested try block.
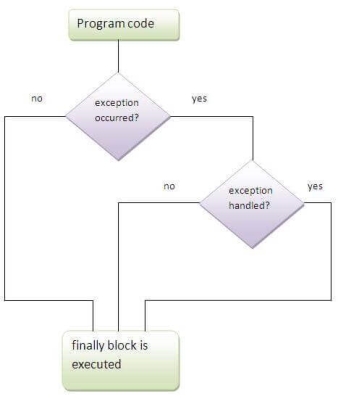
Java finally block is a block that is used to execute important code such as closing connection, stream etc.
Java finally block is always executed whether exception is handled or not.
Fig 16 - Java finally block follows try or catch block.
Why use java finally
Usage of Java finally
Let's see the different cases where java finally block can be used.
Case 1
Let's see the java finally example where exception doesn't occur.
Output:5
finally block is always executed
rest of the code...
Case 2
Let's see the java finally example where exception occurs and not handled.
Output:finally block is always executed
Exception in thread main java.lang.ArithmeticException:/ by zero
Case 3
Let's see the java finally example where exception occurs and handled.
Output:Exception in thread main java.lang.ArithmeticException:/ by zero
finally block is always executed
rest of the code...
Rule: For each try block there can be zero or more catch blocks, but only one finally block. Note: The finally block will not be executed if program exits(either by calling System.exit() or by causing a fatal error that causes the process to abort).
Java throw keyword
The Java throw keyword is used to explicitly throw an exception.
We can throw either checked or uncheked exception in java by throw keyword. The throw keyword is mainly used to throw custom exception. We will see custom exceptions later.
The syntax of java throw keyword is given below.
Let's see the example of throw IOException.
java throw keyword example
In this example, we have created the validate method that takes integer value as a parameter. If the age is less than 18, we are throwing the ArithmeticException otherwise print a message welcome to vote.
Output:
Exception in thread main java.lang.ArithmeticException:not valid
An exception is first thrown from the top of the stack and if it is not caught, it drops down the call stack to the previous method,If not caught there, the exception again drops down to the previous method, and so on until they are caught or until they reach the very bottom of the call stack.This is called exception propagation. |
Program of Exception Propagation
Output:exception handled
normal flow...
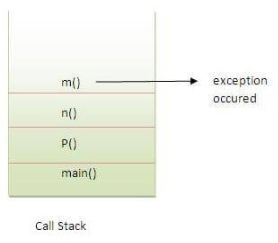
Fig 17 - Example
In the above example exception occurs in m() method where it is not handled,so it is propagated to previous n() method where it is not handled, again it is propagated to p() method where exception is handled.
Exception can be handled in any method in call stack either in main() method,p() method,n() method or m() method.
Rule: By default, Checked Exceptions are not forwarded in calling chain (propagated).Program which describes that checked exceptions are not propagated
Output:Compile Time Error
The Java throws keyword is used to declare an exception. It gives an information to the programmer that there may occur an exception so it is better for the programmer to provide the exception handling code so that normal flow can be maintained.
Exception Handling is mainly used to handle the checked exceptions. If there occurs any unchecked exception such as NullPointerException, it is programmers fault that he is not performing check up before the code being used.
Syntax of java throws
Which exception should be declared
Ans) checked exception only, because:
Advantage of Java throws keyword
Now Checked Exception can be propagated (forwarded in call stack).
It provides information to the caller of the method about the exception.
Java throws example
Let's see the example of java throws clause which describes that checked exceptions can be propagated by throws keyword.
Output:
exception handled
normal flow...
Rule: If you are calling a method that declares an exception, you must either caught or declare the exception.
There are two cases:
|
Case1: You handle the exception
Output:exception handled
normal flow...
Case2: You declare the exception
A)Program if exception does not occur
Output:device operation performed
normal flow...
B)Program if exception occurs
Output:Runtime Exception
Difference between throw and throws in Java
There are many differences between throw and throws keywords. A list of differences between throw and throws are given below:
No. | throw | throws |
1) | Java throw keyword is used to explicitly throw an exception. | Java throws keyword is used to declare an exception. |
2) | Checked exception cannot be propagated using throw only. | Checked exception can be propagated with throws. |
3) | Throw is followed by an instance. | Throws is followed by class. |
4) | Throw is used within the method. | Throws is used with the method signature. |
5) | You cannot throw multiple exceptions. | You can declare multiple exceptions e.g. |
Java throw example
Java throws example
Java throw and throws example
Difference between final, finally and finalize
There are many differences between final, finally and finalize. A list of differences between final, finally and finalize are given below:
No. | final | finally | finalize |
1) | Final is used to apply restrictions on class, method and variable. Final class can't be inherited, final method can't be overridden and final variable value can't be changed. | Finally is used to place important code, it will be executed whether exception is handled or not. | Finalize is used to perform clean up processing just before object is garbage collected. |
2) | Final is a keyword. | Finally is a block. | Finalize is a method. |
Java final example
Java finally example
Java finalize example
ExceptionHandling with MethodOverriding in Java
There are many rules if we talk about methodoverriding with exception handling. The Rules are as follows:
|
If the superclass method does not declare an exception
1) Rule: If the superclass method does not declare an exception, subclass overridden method cannot declare the checked exception.Output:Compile Time Error
2) Rule: If the superclass method does not declare an exception, subclass overridden method cannot declare the checked exception but can declare unchecked exception.Output:child
If the superclass method declares an exception
1) Rule: If the superclass method declares an exception, subclass overridden method can declare same, subclass exception or no exception but cannot declare parent exception.Example in case subclass overridden method declares parent exception
Output:Compile Time Error
Example in case subclass overridden method declares same exception
Output:child
Example in case subclass overridden method declares subclass exception
Output:child
Example in case subclass overridden method declares no exception
Output:child
If you are creating your own Exception that is known as custom exception or user-defined exception. Java custom exceptions are used to customize the exception according to user need.
By the help of custom exception, you can have your own exception and message.
Let's see a simple example of java custom exception.
Output:Exception occured: InvalidAgeException:not valid
rest of the code...
Key takeaway
The Exception Handling in Java is one of the powerful mechanism to handle the runtime errors so that normal flow of the application can be maintained.
In this page, we will learn about Java exceptions, its type and the difference between checked and unchecked exceptions.
The java.io package contains nearly every class you might ever need to perform input and output (I/O) in Java. All these streams represent an input source and an output destination. The stream in the java.io package supports many data such as primitives, object, localized characters, etc.
Stream
A stream can be defined as a sequence of data. There are two kinds of Streams −

Fig 18 - Stream
Java provides strong but flexible support for I/O related to files and networks but this tutorial covers very basic functionality related to streams and I/O. We will see the most commonly used examples one by one −
Byte Streams
Java byte streams are used to perform input and output of 8-bit bytes. Though there are many classes related to byte streams but the most frequently used classes are, FileInputStream and FileOutputStream. Following is an example which makes use of these two classes to copy an input file into an output file −
Example
import java.io.*;
public class CopyFile {
public static void main(String args[]) throws IOException {
FileInputStream in = null;
FileOutputStream out = null;
try {
in = new FileInputStream("input.txt");
out = new FileOutputStream("output.txt");
int c;
while ((c = in.read()) != -1) {
out.write(c);
}
}finally {
if (in != null) {
in.close();
}
if (out != null) {
out.close();
}
}
}
}
Now let's have a file input.txt with the following content −
This is test for copy file.
As a next step, compile the above program and execute it, which will result in creating output.txt file with the same content as we have in input.txt. So let's put the above code in CopyFile.java file and do the following −
$javac CopyFile.java
$java CopyFile
Character Streams
Java Byte streams are used to perform input and output of 8-bit bytes, whereas Java Character streams are used to perform input and output for 16-bit unicode. Though there are many classes related to character streams but the most frequently used classes are, FileReader and FileWriter. Though internally FileReader uses FileInputStream and FileWriter uses FileOutputStream but here the major difference is that FileReader reads two bytes at a time and FileWriter writes two bytes at a time.
We can re-write the above example, which makes the use of these two classes to copy an input file (having unicode characters) into an output file −
Example
import java.io.*;
public class CopyFile {
public static void main(String args[]) throws IOException {
FileReader in = null;
FileWriter out = null;
try {
in = new FileReader("input.txt");
out = new FileWriter("output.txt");
int c;
while ((c = in.read()) != -1) {
out.write(c);
}
}finally {
if (in != null) {
in.close();
}
if (out != null) {
out.close();
}
}
}
}
Now let's have a file input.txt with the following content −
This is test for copy file.
As a next step, compile the above program and execute it, which will result in creating output.txt file with the same content as we have in input.txt. So let's put the above code in CopyFile.java file and do the following −
$javac CopyFile.java
$java CopyFile
Standard Streams
All the programming languages provide support for standard I/O where the user's program can take input from a keyboard and then produce an output on the computer screen. If you are aware of C or C++ programming languages, then you must be aware of three standard devices STDIN, STDOUT and STDERR. Similarly, Java provides the following three standard streams −
Following is a simple program, which creates InputStreamReader to read standard input stream until the user types a "q" −
Example
import java.io.*;
public class ReadConsole {
public static void main(String args[]) throws IOException {
InputStreamReader cin = null;
try {
cin = new InputStreamReader(System.in);
System.out.println("Enter characters, 'q' to quit.");
char c;
do {
c = (char) cin.read();
System.out.print(c);
} while(c != 'q');
}finally {
if (cin != null) {
cin.close();
}
}
}
}
Let's keep the above code in ReadConsole.java file and try to compile and execute it as shown in the following program. This program continues to read and output the same character until we press 'q' −
$javac ReadConsole.java
$java ReadConsole
Enter characters, 'q' to quit.
1
1
e
e
q
q
Reading and Writing Files
As described earlier, a stream can be defined as a sequence of data. The InputStream is used to read data from a source and the OutputStream is used for writing data to a destination.
Here is a hierarchy of classes to deal with Input and Output streams.
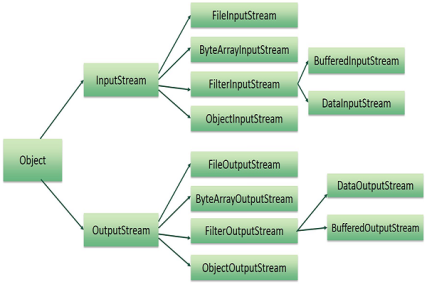
Fig 19 - hierarchy of classes to deal with Input and Output streams
The two important streams are FileInputStream and FileOutputStream, which would be discussed in this tutorial.
FileInputStream
This stream is used for reading data from the files. Objects can be created using the keyword new and there are several types of constructors available.
Following constructor takes a file name as a string to create an input stream object to read the file −
InputStream f = new FileInputStream("C:/java/hello");
Following constructor takes a file object to create an input stream object to read the file. First we create a file object using File() method as follows −
File f = new File("C:/java/hello");
InputStream f = new FileInputStream(f);
Once you have InputStream object in hand, then there is a list of helper methods which can be used to read to stream or to do other operations on the stream.
Sr.No. | Method & Description |
1 | public void close() throws IOException{} This method closes the file output stream. Releases any system resources associated with the file. Throws an IOException. |
2 | protected void finalize()throws IOException {} This method cleans up the connection to the file. Ensures that the close method of this file output stream is called when there are no more references to this stream. Throws an IOException. |
3 | public int read(int r)throws IOException{} This method reads the specified byte of data from the InputStream. Returns an int. Returns the next byte of data and -1 will be returned if it's the end of the file. |
4 | public int read(byte[] r) throws IOException{} This method reads r.length bytes from the input stream into an array. Returns the total number of bytes read. If it is the end of the file, -1 will be returned. |
5 | public int available() throws IOException{} Gives the number of bytes that can be read from this file input stream. Returns an int. |
There are other important input streams available, for more detail you can refer to the following links –
ByteArrayInputStream
DataInputStream
FileOutputStream
FileOutputStream is used to create a file and write data into it. The stream would create a file, if it doesn't already exist, before opening it for output.
Here are two constructors which can be used to create a FileOutputStream object.
Following constructor takes a file name as a string to create an input stream object to write the file −
OutputStream f = new FileOutputStream("C:/java/hello")
Following constructor takes a file object to create an output stream object to write the file. First, we create a file object using File() method as follows −
File f = new File("C:/java/hello");
OutputStream f = new FileOutputStream(f);
Once you have OutputStream object in hand, then there is a list of helper methods, which can be used to write to stream or to do other operations on the stream.
Sr.No. | Method & Description |
1 | public void close() throws IOException{} This method closes the file output stream. Releases any system resources associated with the file. Throws an IOException. |
2 | protected void finalize()throws IOException {} This method cleans up the connection to the file. Ensures that the close method of this file output stream is called when there are no more references to this stream. Throws an IOException. |
3 | public void write(int w)throws IOException{} This methods writes the specified byte to the output stream. |
4 | public void write(byte[] w) Writes w.length bytes from the mentioned byte array to the OutputStream. |
There are other important output streams available, for more detail you can refer to the following links –
ByteArrayOutputStream
DataOutputStream
Example
Following is the example to demonstrate InputStream and OutputStream −
import java.io.*;
public class fileStreamTest {
public static void main(String args[]) {
try {
byte bWrite [] = {11,21,3,40,5};
OutputStream os = new FileOutputStream("test.txt");
for(int x = 0; x < bWrite.length ; x++) {
os.write( bWrite[x] ); // writes the bytes
}
os.close();
InputStream is = new FileInputStream("test.txt");
int size = is.available();
for(int i = 0; i < size; i++) {
System.out.print((char)is.read() + " ");
}
is.close();
} catch (IOException e) {
System.out.print("Exception");
}
}
}
The above code would create file test.txt and would write given numbers in binary format. Same would be the output on the stdout screen.
File Navigation and I/O
There are several other classes that we would be going through to get to know the basics of File Navigation and I/O.
Directories in Java
A directory is a File which can contain a list of other files and directories. You use File object to create directories, to list down files available in a directory. For complete detail, check a list of all the methods which you can call on File object and what are related to directories.
Creating Directories
There are two useful File utility methods, which can be used to create directories −
Following example creates "/tmp/user/java/bin" directory −
Example
import java.io.File;
public class CreateDir {
public static void main(String args[]) {
String dirname = "/tmp/user/java/bin";
File d = new File(dirname);
// Create directory now.
d.mkdirs();
}
}
Compile and execute the above code to create "/tmp/user/java/bin".
Note − Java automatically takes care of path separators on UNIX and Windows as per conventions. If you use a forward slash (/) on a Windows version of Java, the path will still resolve correctly.
Listing Directories
You can use list( ) method provided by File object to list down all the files and directories available in a directory as follows −
Example
import java.io.File;
public class ReadDir {
public static void main(String[] args) {
File file = null;
String[] paths;
try {
// create new file object
file = new File("/tmp");
// array of files and directory
paths = file.list();
// for each name in the path array
for(String path:paths) {
// prints filename and directory name
System.out.println(path);
}
} catch (Exception e) {
// if any error occurs
e.printStackTrace();
}
}
}
This will produce the following result based on the directories and files available in your /tmp directory −
Output
test1.txt
test2.txt
ReadDir.java
ReadDir.class
Key takeaway
The java.io package contains nearly every class you might ever need to perform input and output (I/O) in Java. All these streams represent an input source and an output destination. The stream in the java.io package supports many data such as primitives, object, localized characters, etc.
The Java Console class is be used to get input from console. It provides methods to read texts and passwords.
If you read password using Console class, it will not be displayed to the user.
The java.io.Console class is attached with system console internally. The Console class is introduced since 1.5.
Let's see a simple example to read text from console.
Java Console class declaration
Let's see the declaration for Java.io.Console class:
Java Console class methods
Method | Description |
Reader reader() | It is used to retrieve the reader object associated with the console |
String readLine() | It is used to read a single line of text from the console. |
String readLine(String fmt, Object... args) | It provides a formatted prompt then reads the single line of text from the console. |
char[] readPassword() | It is used to read password that is not being displayed on the console. |
char[] readPassword(String fmt, Object... args) | It provides a formatted prompt then reads the password that is not being displayed on the console. |
Console format(String fmt, Object... args) | It is used to write a formatted string to the console output stream. |
Console printf(String format, Object... args) | It is used to write a string to the console output stream. |
PrintWriter writer() | It is used to retrieve the PrintWriter object associated with the console. |
void flush() | It is used to flushes the console. |
How to get the object of Console
System class provides a static method console() that returns the singleton instance of Console class.
Let's see the code to get the instance of Console class.
Java Console Example
Output
Enter your name: Nakul Jain
Welcome Nakul Jain
Java Console Example to read password
Output
Enter password:
Password is: 123
Java PrintWriter class is the implementation of Writer class. It is used to print the formatted representation of objects to the text-output stream.
Class declaration
Let's see the declaration for Java.io.PrintWriter class:
Methods of PrintWriter class
Method | Description |
void println(boolean x) | It is used to print the boolean value. |
void println(char[] x) | It is used to print an array of characters. |
void println(int x) | It is used to print an integer. |
PrintWriter append(char c) | It is used to append the specified character to the writer. |
PrintWriter append(CharSequence ch) | It is used to append the specified character sequence to the writer. |
PrintWriter append(CharSequence ch, int start, int end) | It is used to append a subsequence of specified character to the writer. |
boolean checkError() | It is used to flushes the stream and check its error state. |
protected void setError() | It is used to indicate that an error occurs. |
protected void clearError() | It is used to clear the error state of a stream. |
PrintWriter format(String format, Object... args) | It is used to write a formatted string to the writer using specified arguments and format string. |
void print(Object obj) | It is used to print an object. |
void flush() | It is used to flushes the stream. |
void close() | It is used to close the stream. |
Java PrintWriter Example
Let's see the simple example of writing the data on a console and in a text file testout.txt using Java PrintWriter class.
Outpt
Javatpoint provides tutorials of all technology.
The content of a text file testout.txt is set with the data Like Java, Spring, Hibernate, Android, PHP etc.
Key takeaway
The Java Console class is be used to get input from console. It provides methods to read texts and passwords.
If you read password using Console class, it will not be displayed to the user.
The java.io.Console class is attached with system console internally. The Console class is introduced since 1.5.
Let's see a simple example to read text from console.
System.out.println("Text is: "+text);
References:
1. T. W. Pratt, M. V. Zelkowitz, "Programming Languages Design and Implementation‖, 4th Ed, PHI, ISBN 81-203-2035-2.
2. Sebesta R., "Concepts of Programming Languages", 4th Edition, Pearson Education, ISBN81-7808-161-X.
3. Herbert Schildt, "The Complete Reference Java", 9th Ed, TMH,ISBN: 978-0-07-180856-9.
4. Dr.R. Nageshwar Rao, "Core Java: An Integrated Approach", Dreamtech Press
5. Deugo, ―Java Gems‖, Cambridge University Press, ISBN 10: 0521648246 ISBN 13: 9780521648240
6. Carl Townsend,” Programming in turbo PROLOG”, Tata-McGraw Hill
7. Ivan Bratko, “Prolog Programming for Artificial Intelligence”, Wesley Publishers Limited
8. Winston P., Klaus B., Horn P., "LISP", 3rd Edition, Pearson Education, 81 - 7808 -155-5
9. Carlo Ghezzi, Mehdi Jazayeri, ―Programming Language Concepts‖,3rd Ed, Wiley Publication ISBN : 978-81-265-1861-6.