UNIT 2
Material Testing and Characterization Technique
Destructive tests are generally carried out on the materials to understand its behavior or performance under different loads. These tests are much easier to carry out and yield more information.
Impact test, cupping test, hardness test is some of the testing which comes under destructive testing.
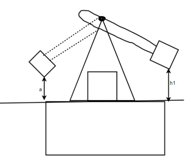
It is of two types: -
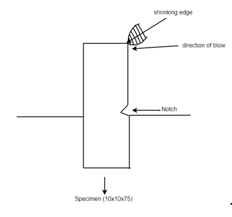
1) Izod Test: - This test uses a cantilever test piece. Let’s consider lox Test: - 75mm sections specimen having standard 45-degree notch 2 mm deep. This is broken by means of a swinging pendulum which is allowed to fall from a certain height to cause an impact load on the specimen. the angle rises of the pendulum after rupture of the specimen or energy to rupture the specimen indicated on the graduated scale.
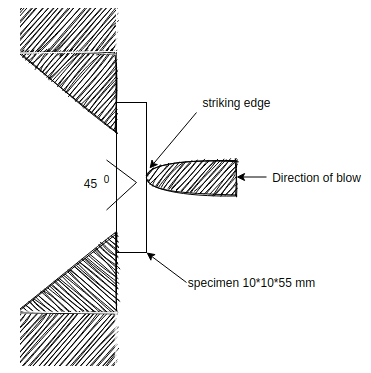
2) Charpy impact test: - this test is more common than Izod test and it uses simply supported test piece of 10mm × 10 × 55 mm section. The specimen is placed on the support so that the blue of striker is opposite to the notch.
2.Cupping test: - Test is used for check the formability are draw ability of metal sheet.
For cupping test, we require one 5 of spherical shape (nearly of 10 mm radius), along with this we will have to dies on which we place metal sheet in which we have to apply cupping test.
Now 5 will exert force on the sheet until the cup-shaped will form on the sheet. Hair fracture will also show us the properties of sheet.
After exerting force, the total height of the cup difference is the result of the deformation of the cupping test i.e. the four-setting deformed how much force it can bear.
Properties of sheet after cupping test: -
1) Anisotropic: - Variation of Mechanical properties in one direction as the force exerted only on one direction.
2) if fracture is in circular shape than sheet will be isotropic. it means Mechanical properties does not change while applying force in one direction.
3) If fracture is off flat shape then sheet will anisotropic that is mechanical properties get changed.
3.Hardness test: - Hardness test is generally of three types. They are described below:
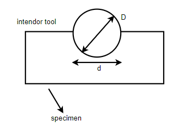
a) Brinell Hardness test: -

Where, P = load
D = diameter of spherical ball (mm)
d = diameter of impression indentation (mm)
P = 3000 kg for iron alloys
P = 500kg for non-iron alloys
b) Vicker's hardness test: -


Load exerted is 1 to 120 kg.
Time taken 10 to 30 seconds.
It can't be used for powder metallurgy materials.
c) Rockwell hardness test: -
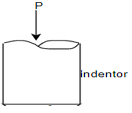

Or, 
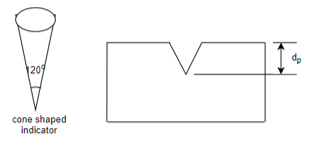
Non-destructive testing (NDT) is used in industries to evaluate the properties of a material, component or system without causing damage.
There are various types of NDT methods which are described below
1) Eddy Current test: - it is based on the principle of generating circular electric current (Eddy current) in a conductive material. This can be achieved by the help of conductive material which is connected to alternating current generator driving an alternating magnetic field.
It is used to detect surface flaws to measure thin walls from one surface only.
It is used to measure thin coating and, in some applications, to measure depth.
Crack detection, corrosion monitoring, material thickness, conductivity as some of the conditions which we can detect through this test conductive materials can be inspected. Surface finish and roughness may interfere, depth of penetration is limited. There are some limitations of Eddy current testing.
2) Ultrasonic testing: - The basic principle of ultrasonic testing is defined as when the sound energy propagates who are the material in the form of waves generated by the transducer during the travelling of waves, gender is this continuity in the wave path, part of the energy will be reflected back from the flaw surface.
Application: -
1) It is generally used for large forging materials.
2) Tube testing, rod testing
3) Also used for inspection of rails, rolled Steel and section.
4) Also used to determine thickness of pipes, tubes.
3) X ray radiography testing: - Radiographic testing use X-rays or Gamma rays to examine the internal structure of manufactured components identifying any defects. it is based on the principle that radiation is absorbed and scattered as it passes through an object. If there are variations in thickness or density (due to defects) in an object, some radiation will pass through and affects the film exposure. X rays and gamma radiation has shortest wavelength and also have a photochemical effect therefore they can produce an image on film.
Application: -
1) Use in hospital for broken bones
2) Cancer therapy
3) Airport security
4) Inspection of welding
Microscope comprises of the tools that are used to the microscopic objects which are not visible to naked eyes.
Microscopic testing of certain types some of them are explained below.
1) Etching: - Etching the process in which we use strong acid to cut the unwanted or unprotected part of the metal surface.
It is of two types
(A)Wet etching
(B)Dry etching
The principle of wet etching process is the conversion of solid materials into liquid compounds using chemical solutions there as dry exchange is removable of material by exposing the material to bombardment of lanes. Etchant for wet etch is chemical whereas reactive gases are used for bombardment in dry etch.
Application: -
- Used in manufacturing of printed circuit boards.
- Used in manufacturing of semiconductor devices.
- Also used in preparation of metallic specimens for microscopic observation.
2) Optical microscopy: - in optical microscopy, we use a combination of light and lenses to magnify an image.
Applications: -
- Crystal fragments (characteristic shape)
- Classify isotropic and anisotropic substance
- Phase analysis (impurities with separated crystalline amorphous phase)
- Crystal defects
- Refractive index determination.
3) Electronic microscopy: - Electrons are such small particles that like photons in light, the act as waves. A beam of electrons passes through the specimen then through a series of lenses that magnifies the image. It is generally of three types
a) Scanning electron microscopy (SEM): - scanning electron microscopy electrons to illuminate a specimen and create an enlarged image. Magnification power and resolution power is very high as compared to light microscope. It is used to determine the morphology and chemical composition of the specimen. we generally used scanning electron microscope to study about the surface of the material.
b) Transmission electron microscopy (TEM): - Composed of the light microscope and electronic microscope, light microscope has higher wavelength i.e. 500 mm and 0.2 mm of electron microscopy. That is why we get better magnified image.
c) X-ray diffraction: - It is a phenomenon in which the atoms of crystal by virtue of their uniform spacing, cause an interference pattern of the waves present in an incident beam of X rays. The atomic planes of the crystal act on X rays is exactly the same manner as does a uniformly ruled grading on a beam of light.
x-ray diffraction is a standard method of determining the presence or absence of crystallographic order in materials. It is often used to obtain a variety of other structural information regarding internal stress and defects in crystal for multiple crystallographic phases in composite materials.
Application: -
- Transmission electron microscope provide morphological logical compositional and crystalline information.
- Image allows researchers to views samples on a molecular level to analyze structure and texture. (In transmission electron microscopy)
- Industries including microelectronics, medical of devices, food processing, all use scanning electron microscope as a way to examine the surface composition of component and products.
- By x-ray diffraction we can differentiate in between crystalline and amorphous material.
- By XRD measurement of strain and small grain size can examine easily.
- By XRD determination of the structure of crystalline material get easier.
Various types of macroscopic techniques are defined below: -
1) Sulphur printing: - Sulphur print is a macroscopic technique of Steel samples, alloying to determine Sulphur distribution and segregation in the sample.
Sulphide when attached with dilute it is said evolves hydrogen sulphide gas which stains bromide paper and therefore can readily detected in ordinary steel and cast iron.

2) Spark test: - It is a method of determining the general classification of ferrous materials. it normally done by taking a scrap or piece of metal for grinding in order to sparks emitted.
Spark characteristics: -
a) Wrought iron sparks flow at in straight line.
b) Mild steel is similar to wrought iron except they will have tiny forks and their length will vary more.
c) High carbon Steel has bushy park pattern. The sparks are not as bright as medium carbon steel ones.
d) Cast iron has very short sparks that begin at the grinding wheel.
Questions: -
Q1. Explain izod and charpy test with diagram?
Q2. What are different types of hardness test?
Q3. Explain non-destructive testing and its types?
Q4. Why do we use ultrasonic testing for rods and tubes?
Q5. Explain principle of X ray radiography testing?
Q6. Differentiate in between wet and dry etching?
Q7. Describe electronic microscopy and its types?
Q8. How different materials react when we apply spark test on them?
Q9. Define terms isotropic and anisotropic?
Q10.Why do we use eddy current test?