UNIT 5
Section Of Solids
A solid has three dimensions, length, breadth and thickness. To represent a solid on a flat surface having only length and breadth, at least two orthographic views are necessary. Sometimes, additional views projected on auxiliary planes become necessary to make the description of a solid complete.
This chapter deals with the following topics:
1. Types of solids.
2. Projections of solids in simple positions.
(a) Axis perpendicular to the H.P.
(b) Axis perpendicular to the V.P.
(c) Axis parallel to both the H.P. And the V.P.
3. Projections of solids with axes inclined to one of the reference planes and
Parallel to the other.
(a) Axis inclined to the V.P. And parallel to the H.P.
(b) Axis inclined to the H.P. And parallel to the V.P.
4. Projections of solids with axes inclined to both the H.P. And the V.P.
5. Projections of spheres.
Types of solids:
Solids may be divided into two main groups:
(1) Polyhedra
(2) Solids of revolution.
Polyhedra: A polyhedron is defined as a solid bounded by planes called faces. When all faces are equal and regular, the polyhedron is said to be regular. There are seven regular Polyhedra which may be defined as stated below:
(i) Tetrahedron (fig. 1): It has four equal faces, each an equilateral triangle.
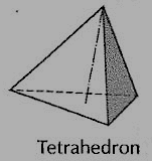
Figure 1
(ii) Cube or hexahedron (fig. 2): It has six faces, all equal squares.
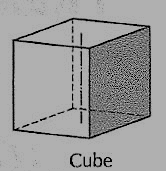
Figure 2
(iii) Octahedron (fig. 3): It has eight equal equilateral triangles as faces.
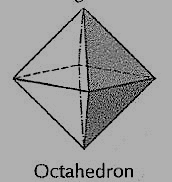
Figure 3
(iv)Dodecahedron (fig. 4): It has twelve equal and regular pentagons as faces.
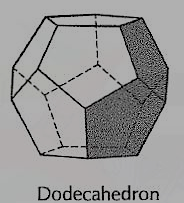
Figure 4
(v) Icosahedron (fig. 5): It has twenty faces, all equal equilateral triangles.
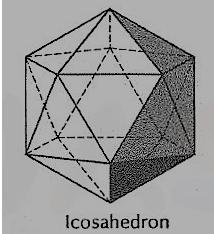
Figure 5
(vi)Prism: This is a polyhedron having two equal and similar faces called its ends or bases, parallel to each other and joined by other faces which are parallelograms. The imaginary line joining the centers of the bases is called the axis. A right and regular prism (fig. 6) has its axis perpendicular to the bases. All its faces are equal rectangles.
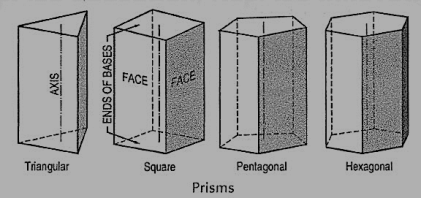
Figure 6
(vii) Pyramid: This is a polyhedron having a plane figure as a base and many triangular faces meeting at a point called the vertex or apex. The imaginary line joining the apex with the centre of the base is its axis.
A right and regular pyramid (fig. 7) has its axis perpendicular to the base which is a regular plane figure. Its faces are all equal isosceles triangles.
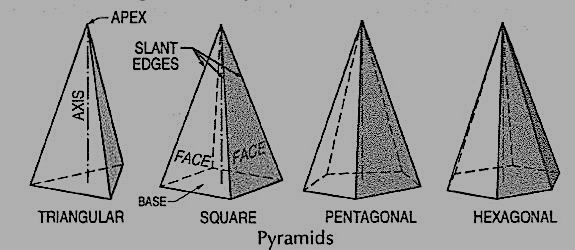
Figure 7
Oblique prisms and pyramids have their axes inclined to their bases. Prisms and pyramids are named according to the shape of their bases, as triangular, square, pentagonal, hexagonal etc.
Solids of revolution
(i) Cylinder (fig. 8): A right circular cylinder is a solid generated by the revolution of a rectangle about one of its sides which remains fixed. It has two equal circular bases. The line joining the centers of the bases is the axis. It is perpendicular to the bases.
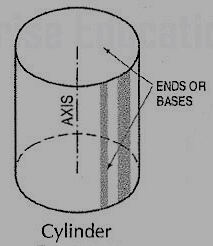
Figure 8
(ii) Cone (fig. 9): A right circular cone is a solid generated by the revolution of a right-angled triangle about one of its perpendicular sides which is fixed.
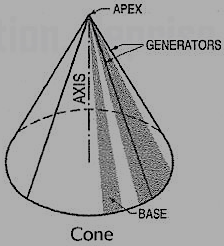
Figure 9
It has one circular base. Its axis joins the apex with the centre of the base to which it is perpendicular. Straight lines drawn from the apex to the circumference of the base-circle are all equal and are called generators of the cone. The length of the generator is the slant height of the cone.
(iii) Sphere (fig. 10): A sphere is a solid generated by the revolution of a semi-circle about its diameter as the axis. The mid-point of the diameter is the centre of the sphere. All points on the surface of the sphere are equidistant from its centre.

Figure 10
(iv) Frustum: When a pyramid or a cone is cut by a plane parallel to its base, thus removing the top portion, the remaining portion is called its frustum (fig. 11).
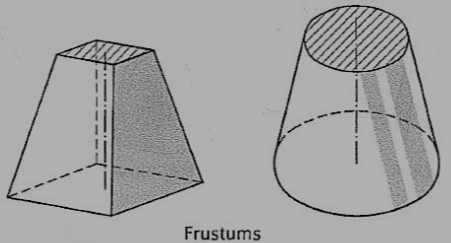
Figure 11
(v) Truncated: When a solid is cut by a plane inclined to the base it is said to be truncated.
Projections of solids in simple positions
A solid in simple position may have its axis perpendicular to one reference plane or parallel to both. When the axis is perpendicular to one reference plane, it is parallel to the other. Also, when the axis of a solid is perpendicular to a plane, its base will be parallel to that plane. When a plane is parallel to a reference plane, its projection on that plane shows its true shape and size.
Therefore, the projection of a solid on the plane to which its axis is perpendicular, will show the true shape and size of its base.
Hence, when the axis is perpendicular to the ground, i.e. to the H.P., the top view should be drawn first, and the front view projected from it.
When the axis is perpendicular to the V.P., beginning should be made with the front view. The top view should then be projected from it.
When the axis is parallel to both the H.P. And the V.P., neither the top view nor the front view will show the actual shape of the base. In this case, the projection of the solid on an auxiliary plane perpendicular to both the planes, viz. The side view must be drawn first. The front view and the top view are then projected from the side view. The projections in such cases may also be drawn in two stages.
Problems:
Axis perpendicular to the H.P.:
Problems:
1. Draw the projections of a triangular prism, base 40 mm side and axis 50 mm long, resting on one of its bases on the H.P. With a vertical face perpendicular to the V.P.
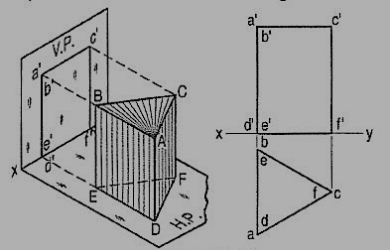
Figure 12
(i) As the axis is perpendicular to the ground i.e. the H.P. Begin with the top view. It will be an equilateral triangle of sides 40 mm long, with one of its sides perpendicular to xy. Name the corners as shown, thus completing the top view. The corners d, e and fare hidden and coincide with the top corners a, b and c respectively
(ii) Project the front view, which will be a rectangle. Name the corners. The line b'e' coincides with a'd'.
2. Draw the projections of a pentagonal pyramid, base 30 mm edge and axis 50 mm long, having its base on the H.P. And an edge of the base parallel to the V.P. Also draw its side view.
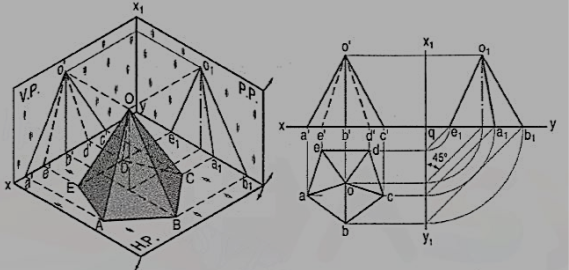
Figure 13
(i) Assume the side DE which is nearer the V.P., to be parallel to the V.P. As shown in the pictorial view.
(ii) In the top view, draw a regular pentagon abcde with ed parallel to and nearer xy. Locate its centre o and join it with the corners to indicate the slant edges.
(iii) Through o, project the axis in the front view and mark the apex o', 50 mm above xy. Project all the corners of the base on xy. Draw lines o'a', o'b' and o'c' to, show the visible edges. Show o'd' and o'e' for the hidden edges as dashed lines.
(iv)For the side view looking from the left, draw a new reference line x1y1 perpendicular to xy and to the right of the front view. Project the side view on it, horizontally from the front view as shown. The respective distances of all the points in the side view from x1y1, should be equal to their distances in the top view from xy. This is done systematically as explained below:
(v) From each point in the top view, draw horizontal lines up to x1y1. Then draw lines inclined at 45° to x1y1 (or xy) as shown. Or, with q, the point of intersection between xy and x1y1 as centre, draw quarter circles. Project up all the points to intersect the corresponding horizontal lines from the front view and complete the side view as shown in the figure. Lines o1d1 and o1c1 coincide with o1e1 and o1a1 respectively.
Axis perpendicular to the V.P.:
A hexagonal prism (fig. 14) has one of its rectangular faces parallel to the H.P. Its axis is perpendicular to the V.P. And 3.5 cm above the ground. Draw its projections when the nearer end is 2 cm in front of the V.P. Side of base 2.5 cm long; axis 5 cm long.
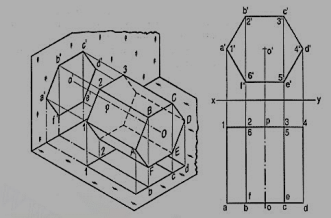
Figure 14
(i) Begin with the front view. Construct a regular hexagon of 2.5 cm long sides with its centre 3.5 cm above xy and one side parallel to it.
(ii) Project down the top view, keeping the line for nearer end, viz. 1-4, 2 cm below xy.
2. A square pyramid fig. 15, base 40 mm side and axis 65 mm long, has its base in the V.P. One edge of the base is inclined at 30° to the H.P. And a corner contained by that edge is on the H.P. Draw its projections.
(i) Draw a square in the front view with the corner d' in xy and the side d'c' inclined at 30° to it. Locate the centre o' and join it with the corners of the square.
(ii) Project down all the corners in xy (because the base is in the V.P.). Mark the apex o on a projector through o'. Draw lines for the slant edges and complete the top view.
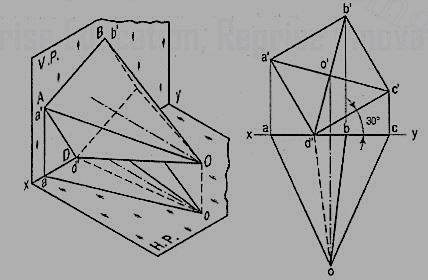
Figure 15
Axis parallel to both H.P. And the V.P.
A triangular prism1 base 40 mm side and height 65 mm is resting on the H.P. On one of its rectangular faces with the axis parallel to the V.P. Draw its projections.
As the axis is parallel to both the planes, begin with the side view.
(i) Draw an equilateral triangle representing the side view, with one side in xy.
(ii) Project the front view horizontally from this triangle.
(iii) Project down the top view from the front view and the side view, as shown.
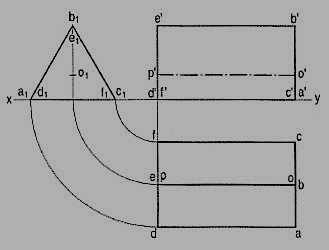
Figure 16
Problems:
Draw the projections of the following solids, situated in their respective positions, taking a side of the base 40 mm long or the diameter of the base 50 mm long and the axis 65 mm long.
1. A hexagonal pyramid, base on the H.P. And a side of the base parallel to and 25 mm in front of the V.P.
2. A square prism, base on the H.P., a side of the base inclined at 30° to the V.P. And the axis 50 mm in front of the V.P.
3. A triangular pyramid, base on the H.P. And an edge of the base inclined at 45° to the V.P.; the apex 40 mm in front of the V.P.
Projections of solids with axis inclined to one of the reference planes and parallel to the other:
When a solid has its axis inclined to one plane and parallel to the other, its projections are drawn in two stages.
(1) In the initial stage, the solid is assumed to be in simple position, i.e. its axis perpendicular to one of the planes.
If the axis is to be inclined to the ground, i.e. the H.P., it is assumed to be perpendicular to the H.P. In the initial stage. Similarly, if the axis is to be inclined to the V.P., it is kept perpendicular to the V.P. In the initial stage.
Moreover
(i) if the solid has an edge of its base parallel to the H.P. Or in the H.P. Or on the ground, that edge should be kept perpendicular to the V.P.; if the edge of the base is parallel to the V.P. Or in the V.P., it should be kept perpendicular to the H.P.
(ii) If the solid has a corner of its base in the H.P. Or on the ground, the sides of the base containing that corner should be kept equally inclined to the V.P.; if the corner is in the V.P., they should be kept equally inclined to the H.P.
Axis inclined to the VP and parallel to the HP:
1. Draw the projections of a pentagonal prism, base 25 mm side and axis 50 mm long, resting on one of its faces on the H.P., with the axis inclined at 45° to the V.P.
In the simple position, assume the prism to be on one of its faces on the ground with the axis perpendicular to the V.P.
Draw the pentagon in the front view with one side in xy and project the top view [fig. 17].
The shape and size of the figure in the top view will not change, so long as the prism has its face on the H.P. The respective distances of all the corners in the front view from xy will also remain constant.
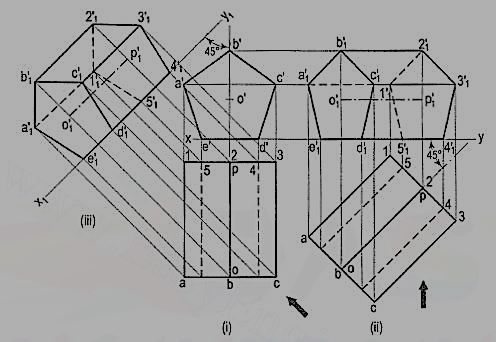
Figure 17
Method I: [fig. 17 (i)]:
(i) Alter the position of the top view, i.e. reproduce it so that the axis is inclined at 45° to xy. Project all the points upwards from this top view and horizontally from the first front view, e.g. a vertical from a intersecting a horizontal from a' at a point a'1.
(ii) Complete the pentagon a'1b'1c'1d'1e'1 for the fully visible end of the prism. Next, draw the lines for the longer edges and finally, draw the lines for the edges of the other end. Note carefully that the lines a'1 1'1, 1'12'1 and 1'15'1 are dashed lines. e'1 5'1 is also hidden but it coincides with other visible lines.
Method II: [fig. 17(ii)]:
(i) Draw a new reference line x1y1, making 45° angle with the top view of the axis, to represent an auxiliary vertical plane.
(ii) Draw projectors from all the points in the top view perpendicular to x1y1 and on them, mark points keeping the distance of each point from x1y1 equal to its distance from xy in the front view. Join the points as already explained. The auxiliary front view and the top view are the required projections.
Axis inclined to the H.P. And parallel to the V.P.
Problems:
1. A hexagonal pyramid, base 25 mm side and axis 50 mm long, has an edge of its base on the ground. Its axis is inclined at 30° to the ground and parallel to the V.P. Draw its projections. In the initial position assume the axis to be perpendicular to the H.P.
Draw the projections with the base in xy and its one edge perpendicular to the V.P. Fig. 18 (i)
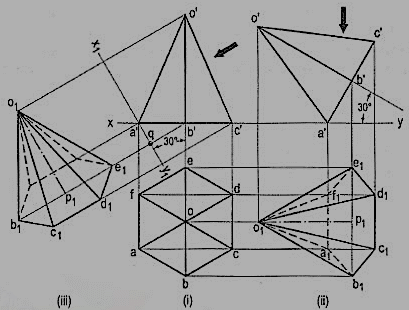
Figure 18
If the pyramid is now tilted about the edge AF (or CD) the axis will become inclined to the H.P. But will remain parallel to the V.P. The distances of all the corners from the V.P. Will remain constant.
The front view will not be affected except in its position in relation to xy. The new top view will have its corners at same distances from xy, as before.
Method I: [fig. 18 (ii)]:
(i) Reproduce the front view so that the axis makes 30° angle with xy and the point a' remains in xy.
(ii) Project all the points vertically from this front view and horizontally from the first top view. Complete the new top view by drawing (a) lines joining the apex o'1 with the corners of the base and (b) lines for the edges of the base.
The base will be partly hidden as shown by dashed line a1b1, e1f1 and f1a1. Similarly, o1f1 and o1a1 are also dashed lines.
Method II: [fig. 18(iii)]:
(i) Through a' draw a new reference line x1y1 inclined at 30° to the axis, to represent an auxiliary inclined plane.
(ii) From the front view project, the required top view on x1y1, keeping the distance of each point from x1y1 equal to the distance of its first top view from xy, viz. e1q = eb' etc.
2. Draw the projections of a cone, base 75 mm diameter and axis 100 mm long, lying on the H.P. On one of its generators with the axis parallel to the V.P.
(i) Assuming the cone to be resting on its base on the ground, draw its projections.
(ii) Re-draw the front view so that the line o'7' (or o'1 ') is in xy. Project the required top view as shown. The lines from o1 should be tangents to the ellipse.
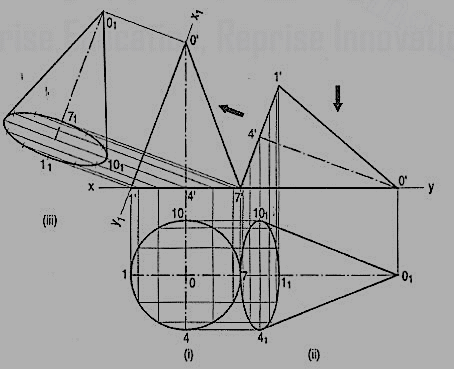
Figure 19
The top view obtained by auxiliary-plane method is shown in fig. 13-24(ii). The new reference line x1y1 is so drawn as to contain the generator o'1' instead of o'7' (for sake of convenience). The cone is thus lying on the generator o'1 '. Note that 1 '1 1 = 1 '1, o'o1 = 4'o etc. Also note that the base is fully visible in both the methods.
Projections of the solids with axis inclined to both the H.P. And the V.P.
The projections of a solid with its axis inclined to both the planes are drawn in three stages:
(i) Simple position
(ii) Axis inclined to one plane and parallel to the other
(iii) Final position.
The second and final positions may be obtained either by the alteration of the positions of the solid, i.e. the views, or by the alteration of reference lines.
Problem:
1. A square prism, base 40 mm side and height 65 mm, has its axis inclined at 45° to the H.P. And has an edge of its base, on the H.P and inclined at 30° to the V.P. Draw its projections.
Method I: Fig. 20
i) Assuming the prism to be resting on its base on the ground with an edge of the base perpendicular to the V.P., draw its projections. Assume the prism to be tilted about the edge which is perpendicular to the V.P., so that the axis makes 45° angle with the H.P.
(ii) Hence, change the position of the front view so that the axis is inclined at 45° to xy and f' (or e') is in xy. Project the second top view. Again, assume the prism to be turned so that the edge on which it rests, makes an angle of 30° with the V.P., keeping the inclination of the axis with the ground constant. The shape and size of the second top view will remain the same; only its position will change. In the front view, the distances of all the corners from xy will remain the same as in the second front view.
(iii) Therefore, reproduce the second top view making f1g1 inclined at 30° to xy. Project the final front view upwards from this top view and horizontally from the second front view, e.g. a vertical from a1 and a horizontal from a' intersecting at a'1. As the top end is further away from xy in the top view it will be fully visible in the front view. Complete the front view showing the hidden edges by dashed lines.
(iv) The second top view may be turned in the opposite direction as shown. In this position, the lower end of the prism, viz. e'lf'1g'1h'1 will be fully visible in the front view.
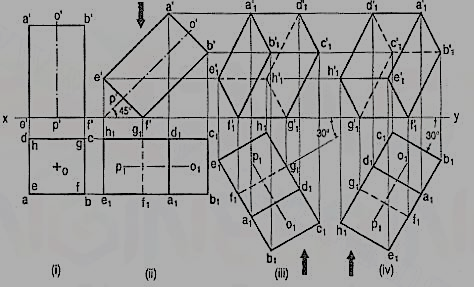
Figure 20
Method II: Fig. 21
(i) Draw the top view and front view in simple position.
(ii) Through f', draw a new reference line x1y1 making 45° angle with the axis. On it, project the auxiliary top view.
(iii) Draw another reference line x2y2 inclined at 30° to the line fig 1. From the auxiliary top view, project the required front view, keeping the distance of each point from x2y2, equal to its distance (in the first front view) from x1y1 i.e. a'1q1 = a'q etc.
Projections of spheres:
The projection of a sphere in any position on any plane is always a circle whose diameter is equal to the diameter of the sphere (fig. 13-48). This circle represents the contour of the sphere.
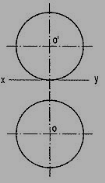
Figure 21
A flat circular surface is formed when a sphere is cut by a plane. A hemisphere (i.e. a sphere cut by a plane passing through its center) has a flat circular face of diameter equal to that of the sphere.
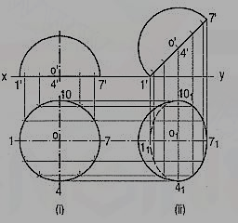
When it is placed on the ground on its flat face, its front view is a semi-circle, while its top view is a circle [fig. 22(i)].
When the flat face is inclined to the H.P. Or the ground and is perpendicular to the V.P. It is an ellipse (partly hidden) in the top view [fig. 22 (ii)], while the contour of the hemisphere is shown by the arc of the circle drawn with radius equal to that of the sphere.
Fig. 23 shows the projections of a sphere, a small portion of which is cut off by a plane. Its flat face is perpendicular to the H.P. And inclined to the V.P. An ellipse is seen in the front view within the circle for the sphere.
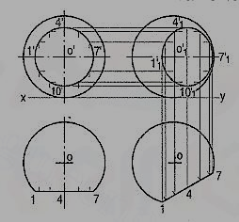
When the flat face of a cut sphere is perpendicular to the V.P. And inclined to the H.P., its projections can be drawn as described in below problem.
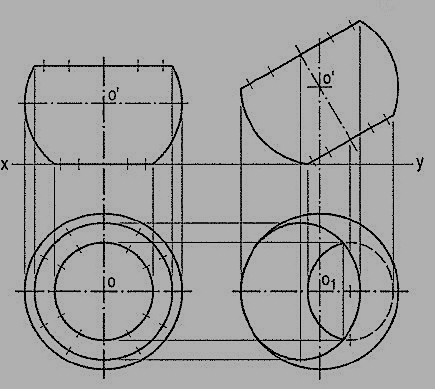
1. A brass flower-vase is spherical in shape with flat, circular top 35 cm diameter and bottom 25 cm diameter and parallel to each other. The greatest diameter is 40 cm. Draw the projections of the vase when its axis is parallel to the V.P. And makes an angle of 60° with the ground. (fig. 24)
(i) Draw the front view of the vase resting on its bottom with its axis vertical. Project the top view.
(ii) Tilt the front view so that the axis makes 60° angle with xy and project the top view. Note that a part of the ellipse for the bottom is also visible.
Spheres in contact with each other:
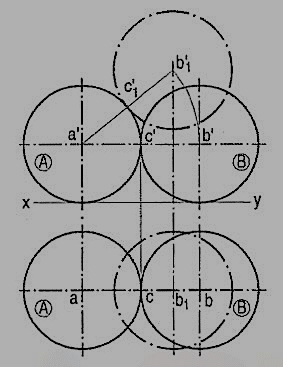
Projections of two equal spheres resting on the ground and in contact with each other, with the line joining their centres parallel to the V.P., are shown in fig. 25.
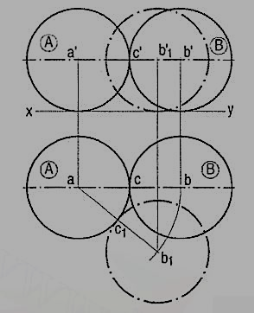
Figure 25
As the spheres are equal in size, the line joining their centers is parallel to the ground also. Hence, both ab and a'b' show the true length of that line (i.e. equal to the sum of the two radii or the diameter of the spheres). The point of contact between the two spheres is also visible in each view.
If the position of one of the spheres, say sphere B, is changed so that the line joining their centers is inclined to the V.P., in the front view, the centre b' will move along the line a'b' to b'1. The true length of the line joining the centers and the point of contact are now seen in the top view only.
When the sphere B is so moved that it remains in contact with the sphere A and the line joining their centers is parallel to the V.P., but inclined to the ground (fig. 26), the true length of that line and the point of contact are visible in the front view only.
Problem:
Three equal spheres of 38 mm diameter are resting on the ground so that each touches the other two and the line joining the centers of two of them is parallel to the V.P.
A fourth sphere of 50 mm diameter is placed on top of the three spheres to form a pile. Draw three views of the arrangement and find the distance of the centre of the fourth sphere above the ground.
As the spheres are resting on the ground and are equal in size, the lines joining their centers will be parallel to the ground. In the top view, the centers will lie at the corners of an equilateral triangle of sides equal to the sum of the two radii, i.e. 40 mm.
Draw (in the top view) an equilateral triangle abc of 40 mm long sides with one side, say ab, parallel to xy. At its corners, draw three circles of 40 mm diameter. Project the front view. The centers will lie on a line parallel to and 20 mm above xy.
When the fourth sphere is placed on top, its centre d in the top view will be in the centre of the triangle. In the front view, it will lie on a projector through d. The true distance between the centre of the top sphere and that of any one of the bottom spheres will be equal to the sum of the two radii, viz. 20 mm + 25 mm, i.e. 45 mm.
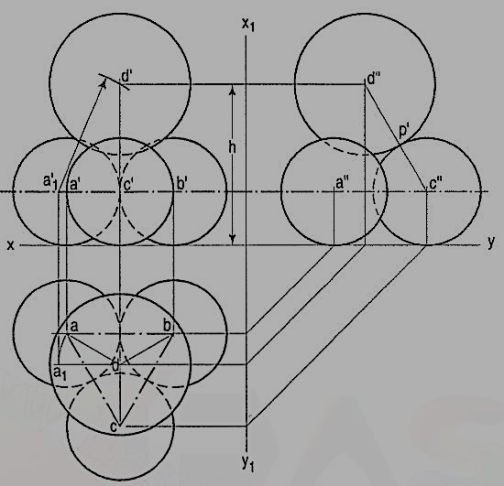
But as none of the lines da, db or de is parallel to xy, their front views will not show their true lengths. Therefore, to locate the position of the centre of the top sphere in the front view,
(i) make one of the lines, say da, parallel to xy;
(ii) project a1 to a'1 on the path of a' and
(iii) with a'1 as centre and radius equal to 45 mm, draw an arc cutting the projector through d at the required point d'. With d' as centre and radius equal to 25 mm, draw the required circle which will be partly hidden as shown. h is the distance of the centre of the sphere from the ground.
(iv) Project the side view. As c'd' is parallel to the new reference line, c"d" will be equal to 45 mm and the point of contact p' between the spheres having centers c and d will be visible.
- Projection of geometrical solids cut by cutting plane inclined to one plane and determination of cutting plane angle from the given true shape of section
Invisible features of an object are shown by dotted lines in their projected views. But when such features are too many, these lines make the views more complicated and difficult to interpret. In such cases, it is customary to imagine the object as being cut through or sectioned by planes. The part of the object between the cutting plane and the observer is assumed to be removed and the view is then shown in section.
The imaginary plane is called a section plane or a cutting plane. The surface produced by cutting the object by the section plane is called the section. It is indicated by thin section lines uniformly spaced and inclined at 45°.
The projection of the section along with the remaining portion of the object is called a sectional view. Sometimes, only the word section is also used to denote a sectional view.
(1) Section planes:
Section planes are generally perpendicular planes. They may be perpendicular to one of the reference planes and either perpendicular, parallel or inclined to the other plane. They are usually described by their traces. It is important to remember that the projection of a section plane, on the plane to which it is perpendicular, is a straight line. This line will be parallel, perpendicular or inclined to xy, depending upon the section plane being parallel, perpendicular or inclined respectively to the other reference plane.
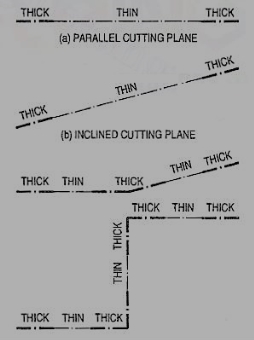
As per latest 8.1.S. Convention (SP: 46-2003), the cutting-plane line should be drawn as shown in figure
(2) Sections: The projection of the section on the reference plane to which the section plane is perpendicular, will be a straight-line coinciding with the trace of the section plane on it. Its projection on the other plane to which it is inclined is called apparent section. This is obtained by
(i) projecting on the other plane, the points at which the trace of the section plane intersects the edges of the solid and
(ii) drawing lines joining these points in proper sequence.
(3) True shape of a section: The projection of the section on a plane parallel to the section plane will show the true shape of the section. Thus, when the section plane is parallel to the H.P. Or the ground, the true shape of the section will be seen in sectional top view. When it is parallel to the V.P., the true shape will be visible in the sectional front view.
But when the section plane is inclined, the section must be projected on an auxiliary plane parallel to the section plane, to obtain its true shape. When the section plane is perpendicular to both the reference planes, the sectional side view will show the true shape of the section. In this chapter sections of different solids are explained in stages by means of typical problems as follows:
1. Sections of prisms
2. Sections of pyramids
3. Sections of cylinders
4. Sections of cones
5. Sections of spheres.
Sections of Prisms:
These are illustrated according to the position of the section plane with reference
To the principal planes as follows:
(1) Section plane parallel to the V.P.
(2) Section plane parallel to the H.P.
(3) Section plane perpendicular to the H.P. And inclined to the V.P.
(4) Section plane perpendicular to the V.P. And inclined to the H.P.
Section parallel to the VP
Problem 1:
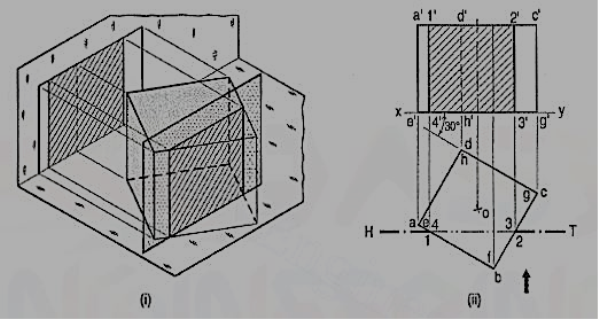
A cube of 35 mm long edges is resting on the H.P. On one of its faces with a vertical face inclined at 30° to the V.P. It is cut by a section plane parallel to the V.P. And 9 mm away from the axis and further away from the V.P. Draw its sectional front view and the top view.
In fig. (i), the section plane is assumed to be transparent and the cube is shown with the cut-portion removed. Four edges of the cube are cut and hence, the section is a figure having four sides.
Draw the projections of the whole cube in the required position [fig.2(ii)].As the section plane is parallel to the V.P., it is perpendicular to the H.P.; hence, the section will be a line in the top view coinciding with the H.T. Of the section plane.
(i) Draw a line H.T. In the top view (to represent the section plane) parallel to xy and 9 mm from o.
(ii) Name the points at which the edges are cut, viz. Ab at 1, be at 2, gf at 3 and fe at 4.
(iii) Project these points on the corresponding edges in the front view and join them in proper order.
As the section plane is parallel to the V.P., figure 1' 2' 3' 4' in the front view, shows the true shape of the section.
Show the views by dark but thin lines, leaving the lines for the cut-portion fainter.
(iv) Draw section lines in the rectangle for the section.
(2) Section plane parallel to the H.P.
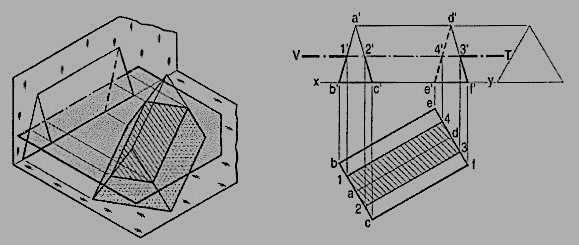
Problem 2 : A triangular prism, base 30 mm side and axis 50 mm long, is lying on the H.P. On one of its rectangular faces with its axis inclined at 30° to the V.P. It is cut by a horizontal section plane, at 12 mm above the ground. Draw its front view and sectional top view.
As the section plane is horizontal, i.e. parallel to the H.P., it is perpendicular to the V.P. Hence, the section will be a line in the front view, coinciding with the V. T. Of the section plane.
(i) Therefore, draw a line V.T. In the front view to represent the section plane, parallel to xy and 12 mm above it.
(ii) Name in correct sequence, points at which the edges are cut viz. a'b' at 1 ', a'c' at 2', d'f' at 3' and d'e' at 4'.
(iii) Project these points on the corresponding lines in the top view and complete the sectional top view by joining them in proper order.
As the section plane is parallel to the H.P., the figure 1 2 3 4 (in the top view) is the true shape of the section.
(3) Section plane perpendicular to the H.P. And inclined to the V.P.
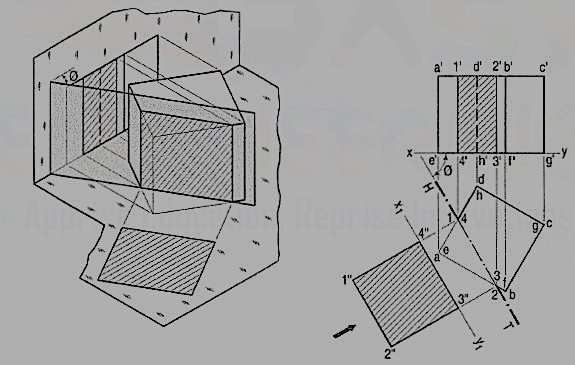
Problem 3.: A cube in the same position as in problem 1, is cut by a section plane, inclined at 60° to the V.P. And perpendicular to the H.P., so that the face which makes 60° angle with the V.P. Is cut in two equal halves. Draw the sectional front view, top view and true shape of the section.
The section will be a line in the top view coinciding with the H.T. Of the section plane.
(i) Draw the projections of the cube. Draw a line H.T. In the top view inclined at 60° to xy and cutting the line ad (or be) at its mid-point.
(ii) Name the corners at which the four edges are cut and project them in the front view. As the section plane is inclined to the V.P., the front view of the section viz. 1' 2' 3' 4' does not reveal its true shape. Only the vertical lines show true lengths, while the true lengths of the horizontal lines are seen in the top view. The true shape of the section will be seen when it is projected on an auxiliary vertical plane, parallel to the section plane.
(iii) Therefore, draw a new reference line x1y1 parallel to the H.T. And project the section on it. The distances of the points from x1y1 should be taken equal to their corresponding distances from xy in the front view. Thus 4" and 3" will be on x1y1. 1" 4" and 2" 3" will be equal to 1' 4' and 2' 3' respectively. Complete the rectangle 1" 2" 3"4" which is the true shape of the section and draw section lines in it.
(4) Section plane perpendicular to the V.P. And inclined to the H.P.
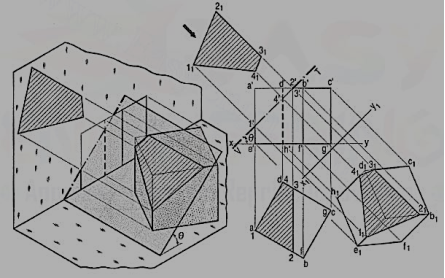
Problem 4. :A cube in the same position as in problem 14-1 is cut by a section plane, perpendicular to the V.P., inclined at 45° to the H.P. And passing through the top end of the axis. (i) Draw its front view, sectional top view and true shape of the section. (ii) Project another top view on an auxiliary plane, parallel to the section plane.
The section will be a line in the front view.
(i) Draw a line V.T. In the front view, inclined at 45° to xy and passing through the top end of the axis. It cuts four edges, viz. a' e' at 1 ', a' b' at 2', c'd' at 3' and d'h' at 4'.
(ii) Project the top view of the section, viz. It does not show the true shape of the section, as the section plane is inclined to the H.P. To determine the true shape, an auxiliary top view of the section should be projected on an A.I.P. Parallel to the section plane.
(iii) Assuming the new reference line for the A.I.P. To coincide with the V.T., project the true shape of the section as shown by quadrilateral 11 21 31 41. The distances of all the points from the V.T. Should be taken equal to their corresponding distances from xy in the top view, e.g. 111' = e'1, 414' = h'4 etc.
(iv) To project an auxiliary sectional top view of the cube, draw a new reference line x1 y1, parallel to the V.T. The whole cube may first be projected and the points for the section may then be projected on the corresponding lines for the edges. Join these points in correct sequence and obtain the required top view.
(v) Draw section lines in the cut-surface, in the views where it is seen. Keep the lines for the removed edges thin and fainter.
Sections of Pyramids:
The following cases are discussed in details.
(1) Section plane parallel to the base of the pyramid.
(2) Section plane parallel to the V.P.
(3) Section plane perpendicular to the V.P. And inclined to the H.P.
(4) Section plane perpendicular to the H.P. And inclined to the V.P.
(1) Section plane parallel to the base of the pyramid.
Problem 5 : A pentagonal pyramid, base 30 mm side and axis 65 mm long has its base horizontal and an edge of the base parallel to the V.P. A horizontal section plane cuts it at 25 mm above the base. Draw it’s from view and sectional top view.
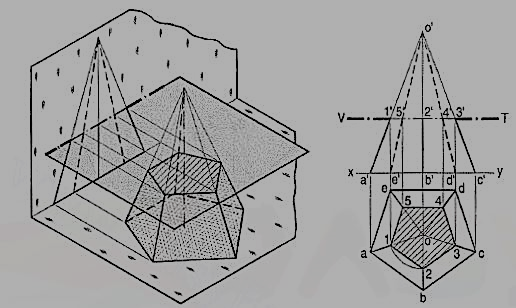
(i) Draw the projections of the pyramid in the required position and show a line V.T. For the section plane, parallel to and 25 mm above the base. All the five slant edges are cut.
(ii) Project the points at which they are cut, on the corresponding edges in the top view. The point 2' cannot be projected directly as the line ob is perpendicular to xy. But it is quite evident from the projections of other points that the lines of the section in the top view, viz. 3-4, 4-5 and 5-1 are parallel to the edges of the base in their respective faces and that the points 1, 3, 4 and 5 are equidistant from o.
(iii) Hence, line 1-2 also will be parallel to ab and o2 will be equal to o1, o3 etc. Therefore, with o as centre and radius o1, draw an arc cutting ob at a point 2 which will be the projection of 2'. Complete the sectional top view in which the true shape of the section, viz. The pentagon 1, 2, 3, 4 and 5 is also seen.
(iv) Hence, when a pyramid is cut by a plane parallel to its base, the true shape of the section will be a figure, like the base; the sides of the section will be parallel to the edges of the base in the respective faces and the corners of the section will be equidistant from the axis.
(2) Section plane parallel to the V.P.
Problem 6 : A triangular pyramid, having base 40 mm side and axis 50 mm long, is lying on the H.P. On one of its faces, with the axis parallel to the V.P. A section plane, parallel to the V.P. Cuts the pyramid at 6 mm from the axis. Draw its sectional front view and the top view.
(i) Draw the projections of the pyramid in the required position and show a line H.T. (for the cutting plane) in the top view parallel to xy and 6 mm from the axis.
(ii) Project points 1, 2 and 3 (at which the edges are cut) on corresponding edges in the front view and join them. Figure 1' 2' 3' shows the true shape of the section.
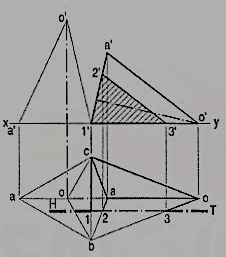
(3) Section plane perpendicular to the V.P. And inclined to the H.P.
Problem 7: A square pyramid, base 40 mm side and axis 65 mm long, has its base on the H.P. And all the edges of the base equally inclined to the V.P. It is cut by a section plane, perpendicular to the V.P., inclined at 45° to the H.P. And bisecting the axis. Draw its sectional top view, sectional side view and true shape of the section.
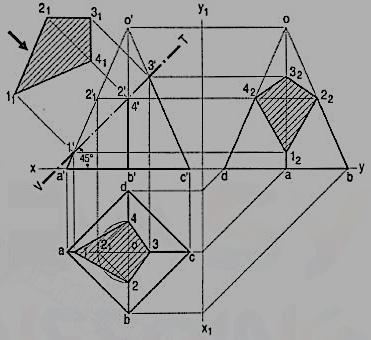
(i) Draw the projections of the pyramid in the required position. The section plane will be seen as a line in the front view. Hence, draw a line V.T. Through the mid-point of the axis and inclined at 45° to xy. Name in correct sequence the points at which the four edges are cut and project them in the top view. Here also, points 2' and 4' cannot be projected directly.
Hence, assume a horizontal section through 2' and draw a line parallel to the base, cutting o' a' at 2'1. Project 2'1 to 21 on oa in the top view. From 21 draw a line parallel to ab and cutting ob at a point 2. Or, with o as centre and radius o 21, draw an arc cutting ob at 2 and ob at 4. Complete the section 1 2 3 4 by joining the points and draw section lines in it.
(ii) Assuming the V.T. To be the new reference line, draw the true shape of the section. Project the side view from the two views. The removed portion of the pyramid may be shown by thin and faint lines.
(4) Section plane perpendicular to the H.P. And inclined to the V.P.
Problem 8 : A pentagonal pyramid has its base on the H.P. And the edge of the base nearer the V.P., parallel to it. A vertical section plane, inclined at 45° to o the V.P., cuts the pyramid at 6 mm from the axis. Draw the top view, sectional front view and the auxiliary front view on an A. V.P. Parallel to the section plane. Base of the pyramid 30 mm side; axis 50 mm long.
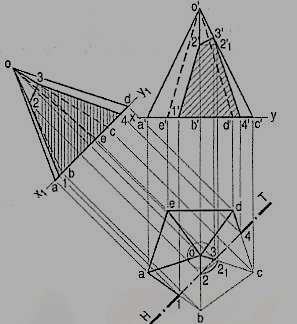
The section plane will be a line in the top view. It is to be at 6 mm from the axis.
i) Draw a circle with o as center and radius equal to 6mm.
Ii) Draw a line H.T. Tangent to this circle and inclined at 45° to xy. It can be drawn in four different positions, of which any one may be selected.
Iii) Project points 1, 2 etc. from the top view to the corresponding edges in the front view. Here again, point 2 cannot be projected directly. With centre o and radius o2 draw an arc cutting any one of the slant edges, say oc at 21. Project 21 to 2'1 on o'c'.
(iv) Through 2'1, draw a line parallel to the base, cutting o' b' at 2'. Then 2' is the required point. Complete the view. It will show the apparent section.
(v) Draw a reference line x1y1 parallel to the H.T. And project an auxiliary sectional front view which will show the true shape of the section also.
Sections of Cylinders:
It consists of following three cases:
(1) Section plane parallel to the base
(2) Section plane parallel to the axis
(1) Section plane parallel to the base:
When a cylinder is cut by a section plane parallel to the base, the true shape of the section is a circle of the same diameter.
(2) Section plane parallel to the axis:
When a cylinder is cut by a section plane parallel to the axis, the true shape of the section is a rectangle, the sides of which are respectively equal to the length of the axis and the length of the section plane within the cylinder (fig. 10). When the section plane contains the axis, the rectangle will be of the maximum size.
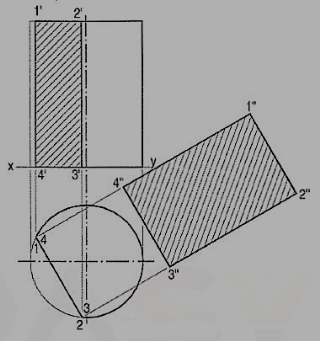
Problem 9 : A cylinder of 40 mm diameter, 60 mm height and having its axis vertical, is cut by a section plane, perpendicular to the V.P., inclined at 45° to the H.P. And intersecting the axis32 mm above the base. Draw its front view, sectional top view, sectional side view and true shape of the section.
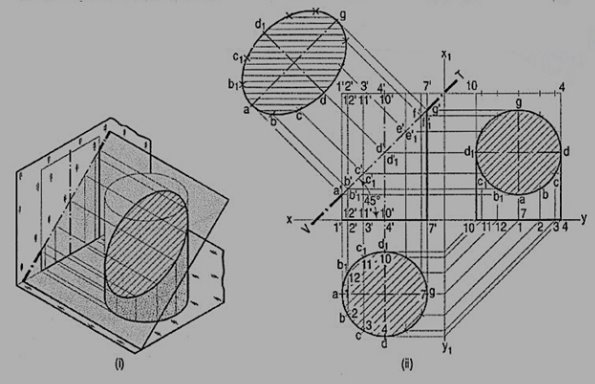
As the cylinder has no edges, many lines representing the generators may be assumed on its curved surface by dividing the base-circle into, say 12 equal parts.
(i) Name the points at which these lines are cut by the V.T. In the top view, these points lie on the circle and hence, the same circle is the top view of the section. The width of the section at any point, say c', will be equal to the length of the chord cc1 in the top view.
(ii) The true shape of the section may be drawn around the center line ag drawn parallel to V.T. As shown. It is an ellipse the major axis of which is equal to the length of the section plane viz. a'g', and the minor axis equal to the diameter of the cylinder viz. Dd1.
(iii) Project the sectional side view as shown. The section will be a circle because the section plane makes 45° angle with xy.
Sections of Cones:
(1) Section plane parallel to the base of the cone.
(2) Section plane passing through the apex of the cone.
(3) Section plane inclined to the base of the cone at an angle smaller than the angle of inclination of the generators with the base.
(4) Section plane parallel to a generator of the cone.
(5) Section plane inclined to the base of the cone at an angle greater than the angle of inclination of the generators with the base.
(1) Section plane parallel to the base of cone:
The cone resting on the H.P. On its base [fig. 12(i)] is cut by a section plane parallel to the base. The true shape of the section is shown by the circle in the top view, whose diameter is equal to the length of the section viz. a'a'. The width of the section at any point, say b', is equal to the length of the chord bb1.
Problem:
Figure To locate the position in the top view of any given point p' in the front view of the above cone.
Method I:
(i) Through p', draw a line r'r' parallel to the base.
(ii) With o as center and diameter equal to r'r', draw a circle in the top view.
(iii) Project p' to points p and p1 on this circle. p is the top view of p'. p1 is the top view of another point p'1 on the back side of the cone and coinciding with p'. The chord pp1 shows the width of the horizontal section of the cone at the point p'. This method may be called the circle method.
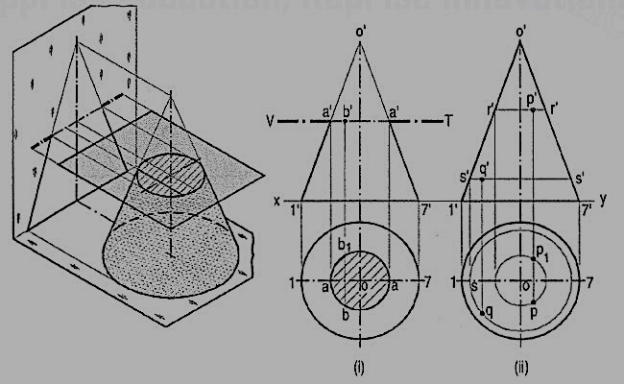
Method II:
When the position of a point in the top view say q is given, its front view q' can be determined by reversing the above process.
(i) With centre o and radius oq, draw a circle cutting the horizontal centre line at s.
(ii) Through s, draw a projector cutting the slant side o'1' at s'.
(iii) Draw the line s's' parallel to the base, intersecting a projector through q at the required point q'.
(2) Section plane passing through the apex of the cone:
Problem
Figure A cone, diameter of base 50 mm and axis 50 mm long is resting on its base on the H.P. It is cut by a section plane perpendicular to the V.P., inclined at 75° to the H.P. And passing through the apex. Draw its front view, sectional top view and true shape of the section.
Draw the projections of the cone and on it, show the line V. T. For the section plane.
Mark many points a', b' etc. on the V.T. And project them to points a, b etc. in the top view by the circle method. It will be found that these points lie on a straight line through o.
Thus, od is the top view of the line or generator o'd' and triangle odd1 is the top view of the section. The width of the section at any point b' on the section is the line bb1, obtained by projecting b' on this triangle. This method is called the generator method.
Project the true shape of the section. It is an isosceles triangle, the base of which is equal to the length of the chord on the base-circle and the altitude is equal to the length of the section plane within the cone.
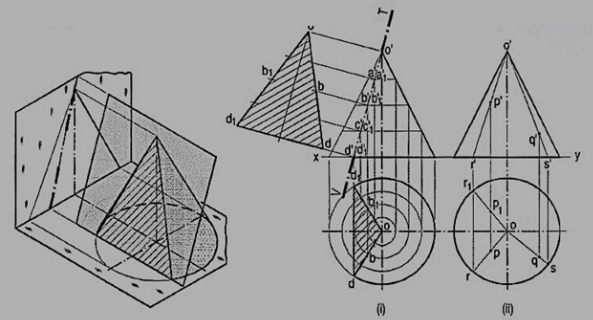
(3) Section plane inclined to the base of the cone at an angle smaller than the angle of inclination of the generators with the base:
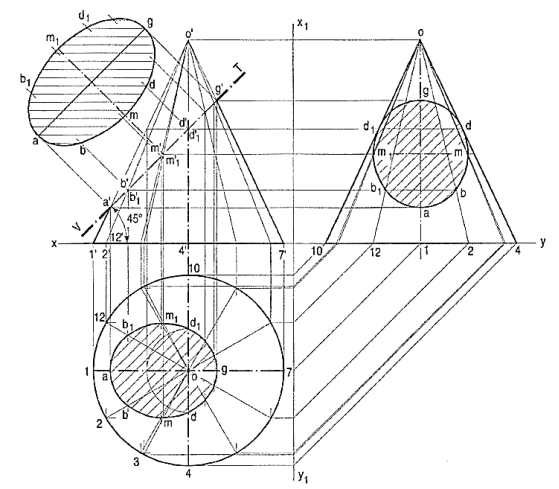
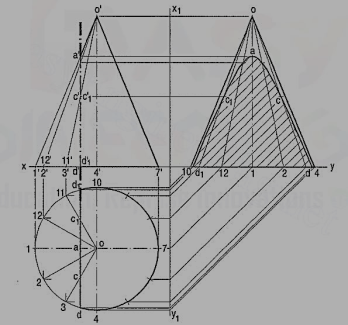
Problem 14-24. A cone, base 75 mm diameter and axis 80 mm long is resting on its base on the H.P. It is cut by a section plane perpendicular to the V.P., inclined at 45° to the H.P. And cutting the axis at a point 35 mm from the apex. Draw its front view, sectional top view, sectional side view and true shape of the section.
Draw a line V.T. In the required position in the front view of the cone.
(i) Generator method
(a) Divide the base-circle into many equal parts, say 12. Draw lines (i.e. generators) joining these points with o. Project these points on the line representing the base in the front view.
(b) Draw lines o' 2', o' 3' etc. cutting the line for the section at points b', c' etc. Project these points on the corresponding lines in the top view. For example, point b' on o' 2', also represents point b' 1 on o'-12' which coincides with o'-12'. Therefore, project b' to b on o 2 and to b1 on o'-12'. b and b1 are the points on the section (in the top view).
(c) Similarly, obtain other points. Point d' cannot be projected directly. Hence, the same method as in case of pyramids should be employed to determine the positions d and d1, as shown. In addition to these, two more points for the maximum width of the section at its centre should also be obtained. Mark m', the mid-point of the section and obtain the points m and m1. Draw a smooth curve through these points.
(d) The true shape of the section may be obtained on the V.T. As a new reference line or symmetrically around the centre line ag, drawn parallel to the V.T. As shown. It is an ellipse whose major axis is equal to the length of the section and minor axis equal to the width of the section at its centre.
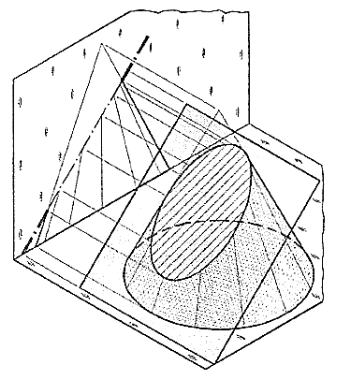
Draw the sectional side view by projecting the points on corresponding generators, as shown.
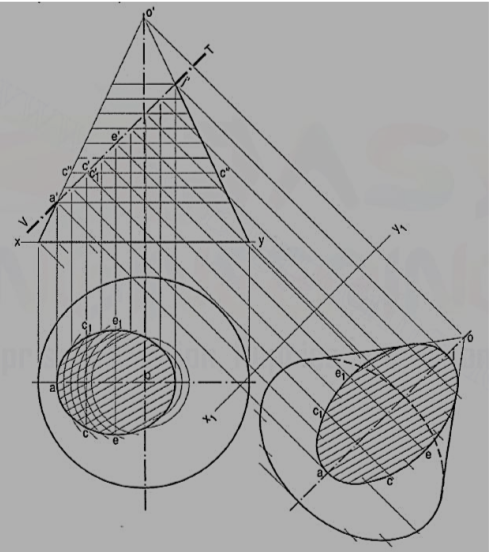
(ii) Circle method :
(a) Divide the line of section into many equal parts. Determine the width of section at, and the position of each division-point in the top view by the circle method. For example, through c', draw a line c"c" parallel to the base.
(b) With o as centre and radius equal to half of c"c", draw an arc. Project c' to c and c1 on this arc. Then c and c1 are the required points. The straight line joining c and c1 will be the width of the section at c'.
(c) Similarly, obtain all other points and draw a smooth curve through them. This curve will show the apparent section. The maximum width of the section will be at the mid-point e'. It is shown in the top view by the length of the chord joining e and e1.
(d) Draw a reference line x1 y1 parallel to the V.T. And project the true shape of the section. In the figure, the auxiliary sectional top view of the truncated cone is shown. It shows the true shape of the section.
The sectional side view may be obtained by projecting all the division-points horizontally and then marking the width of the section at each point, symmetrically around the axis of the cone.
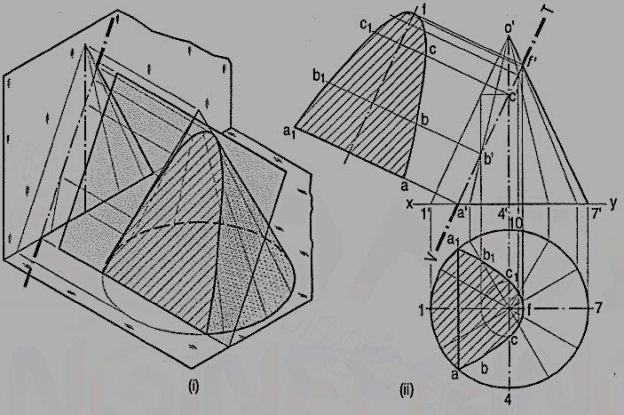
Section plane parallel to a generator of the cone:
Problem : The cone in same position as in figure , is cut by a section plane perpendicular to the V.P. And parallel to and 12 mm away from one of its end generators. Draw its front view, sectional top view and true shape of the section.
(i) Draw a line V.T. (for the section plane) parallel to and 12 mm away from the generator o' 1 '.
(ii) Draw the twelve generators in the top view and project them to the front view. All the generators except o' 1 ', o' 2' and o'-12' are cut by the section plane. Project the points at which they are cut, to the corresponding generators in the top view. The width of the section at the point where the base is cut will be the chord aa1. Draw a curve through a ...f... a1. The figure enclosed between aa1 and the curve is the apparent section.
(iii) Obtain the true shape of the section as explained in the previous problem.
It will be a parabola.
Section plane inclined to the base of the cone at an angle greater thanthe angle of inclination of the generators with the base:
Problem
A cone, base 45 mm diameter and axis 55 mm long is resting on the H.P. On its base. It is cut by a section plane, perpendicular to both the H.P. And the V.P. And 6 mm away from the axis. Draw its front view, top view and sectional side view.
The section will be a line, perpendicular to xy, in both the front view and the top view. The side view will show the true shape of the section. The width of the section at any point, say c', will be equal to cc1 obtained by the circle method [fig. 18(i)].
(i) Draw the side view of the cone.
(ii) Project the points (on the section) in the side view taking the widths from the top view. For example, through c' draw a horizontal line. Mark on it points c" and c"1 equidistant from and on both sides of the axis so that c" c"1 = cc1.
(iii) Draw a curve through the points thus obtained. It will be a hyperbola.
Figure shows the views obtained by the generator method.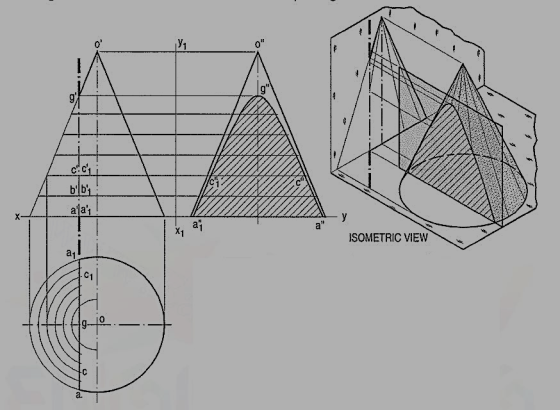
Sections of Spheres:
(1) Section plane parallel to the H.P.
(2) Section plane parallel to the V.P.
(3) Section plane perpendicular to the V.P. And inclined to the H.P.
(4) Section plane perpendicular to the H.P. And inclined to the V.P.
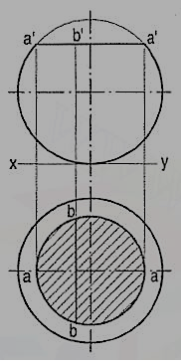
(1) Section plane parallel to the H.P.: When a sphere is cut by a plane, the true shape of the section is always a circle.
The sphere in figure is cut by a horizontal section plane. The true shape of the section (seen in the top view) is a circle of diameter a'a'. The width of the section at any points ay b', is equal to the length of the chord bb.
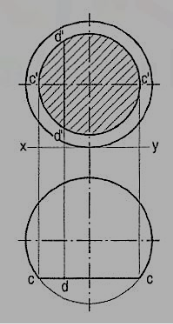
(2) Section plane parallel to the V.P.: When the sphere is cut by a section plane parallel to the V.P. The true shape of the section, seen in the front view, is a circle of diameter cc. The width of section at any point d is equal to the length of the chord d'd'.
(3) Section plane perpendicular to the V.P. And inclined to the H.P.:
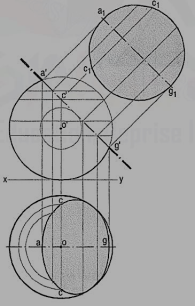
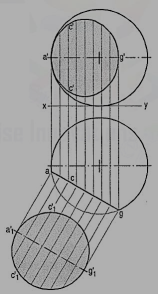
Problem : A sphere of 50 mm diameter is cut by a section plane perpendicular to the V.P., inclined at 45° to the H.P. And at 70mm from its center. Draw the sectional top view and true shape of the section.
Draw a line (for the section plane) inclined at 45° to xy and tangent to the circle of 10 mm radius drawn with o' as center. Mark many points on this line.
Method I:
(i) Find the width of section at each point in the top view as shown in figure . For example, the chord cc is the width of section at the point c'.
(ii) Draw a curve through the points thus obtained. It will be an ellipse. The true shape of the section will be a circle of diameter a'g'.
Method II:
It is known that the true shape of the section is a circle of diameter equal to a'g'. The width of section at any point say c' is equal to the chord c1c1 on this circle. Therefore, project c' to points c in the top view so that cc = c1c1. Similarly, obtain other points and draw the ellipse through them. Figure shows the sectional front view and true shape of the section when the section plane is vertical and inclined to the V.P.
Section plane perpendicular to the H.P. And inclined to the V.P.:
Problem : The projections of a hemisphere 50 mm diameter, placed centrally on the top of a frustum of a hexagonal pyramid, base 32 mm side ,top 20 mm side and axis 50 mm long are given. Draw the sectional front view when the vertical section plane H.T. Inclined at 45° to the V.P. And 10 mm from the axis, cuts them. Also draw the- true shapes of the sections of both the solids.
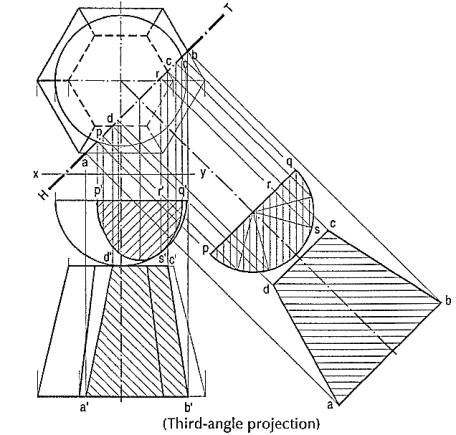
The widths of the section of the sphere at various points are obtained from the semi-circle drawn in the top view.
Orthographic Projections is a technical drawing in which different views of an object are projected on different reference planes observing perpendicular to respective reference plane.
Different Reference planes are
- Horizontal Plane (HP)
- Vertical Plane (VP)
- Side or Profile Plane (PP)
Different views are
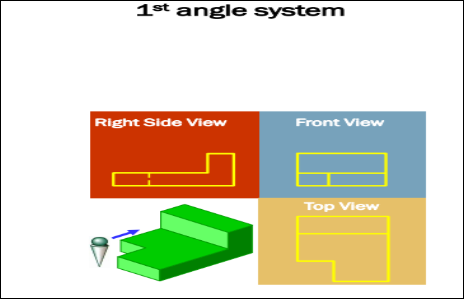
- Front View (FV) – Projected on VP
- Top View (TV) – Projected on HP
- Side View (SV) – Projected on PP
NOTATIONS
Following notations should be followed while naming
Different views in orthographic projections.
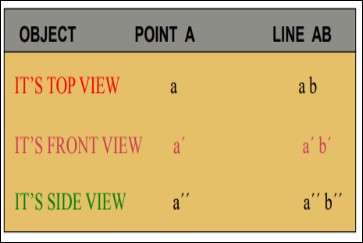
Same system of notations should be followed in case numbers, like 1, 2, 3 – are used
Types of views
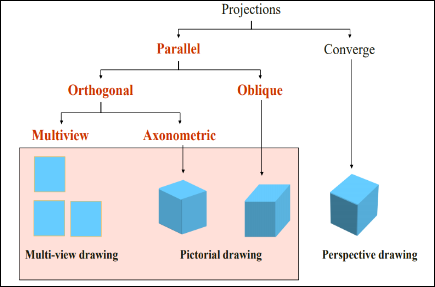
Orthographic views
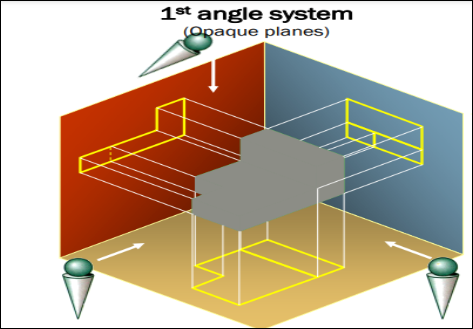
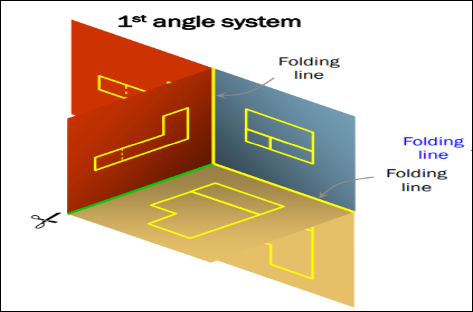
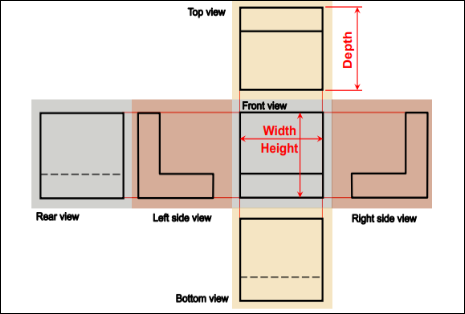
Views arrangement
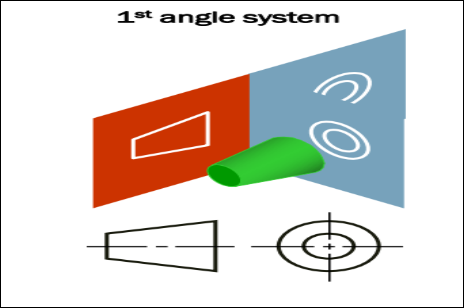
Projection symbols
Methods of Orthogonal Projection
- Natural Method: Revolve the object with respect to observer
- Glass box method: The observer moves around the object
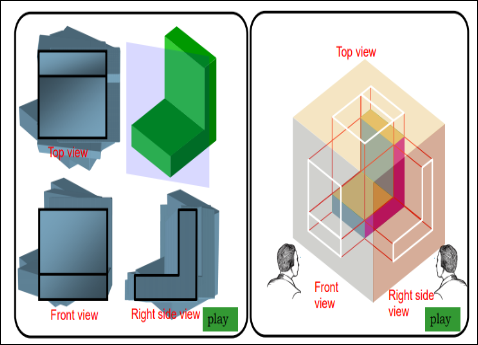
2. Glass box : Revolution of the planes of projection
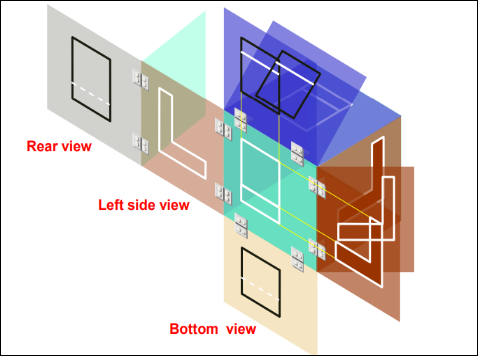
Relative orientation of views
Summary : Problem solving steps
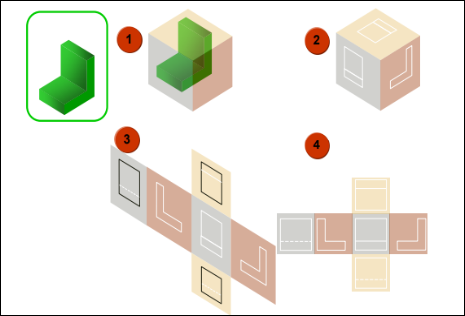
Steps for Orthographic Views
- Select the necessary views
- Layout the selected views on a drawing sheet.
- Complete each selected views.
- Complete the dimensions and notes.