UNIT I
Word Processing
Word Processing:
The act of using a machine to build, edit, save, and print documents is referred to as word processing. Specialized software (known as a Word Processor) is used to perform word processing. Microsoft Word is an example of a word processor, but other word processing programmes are still commonly used. Microsoft Works, Open Office Writer, Word Perfect, and Google Drive are only a few examples.
Meaning and Role of Word Processing in Creating of Document:
To manipulate a text document, such as a resume or a journal, word processing software is used. Typing is the most common method of entering text, and the app has facilities for copying, deleting, and formatting. The below are some of the features of word processing software:
To format your pages, you can use a variety of methods in word processing. You can, for example, divide the text into columns, add page numbers, and insert illustrations. Word processing, on the other hand, does not allow you full control over the appearance and sound of your text. You may need to use desktop publishing software to allow you more control over the style of your pages when design becomes necessary.
Word processing software usually has tools that make doing routine tasks simpler. Let's presume you need to deliver a letter to all of your clients informing them of a new strategy. Except for the name and address at the end of the message, the letter is the same for all clients. A mail merge feature allows you to create all of the letters from a single template document and a single template document.
Text editors shouldn't be confused with word processing software. While they do also allow you to create, edit and save text documents, they only work on plain text. Text editors don't use any formatting, such as underlined text or different fonts. Text editors serve a very different purpose from word processing software. They are used to work with files in plain text format, such as source code of computer programs or configuration files of an operating system. An example of a text editor would be Notepad on the Windows platform.
Word Processing Concepts
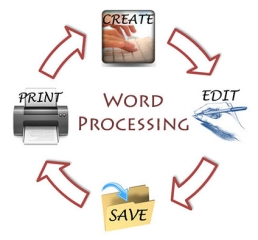
Word processing refers to the act of using a computer to create, edit, save, and print a document. Dedicated software (called a word processor) is required to perform word processing. Microsoft Word is an example of a word processor, but other word processing applications are also widely used. Examples include Microsoft Works word processors, Open Office Writer, Word Perfect, and Google Drive Docs.
These programs allow users to create a variety of documents, including, but not limited to, reports, letters, notes, newsletters, pamphlets, and more. In addition to entering text, you can use a word processor to add content such as images, tables, and graphs, and decorative items such as borders and clip art to your documents.
The word processor's editing and formatting capabilities show the true power of the application. Text can be inserted, edited, moved, copied, or deleted within a document, and the appearance of the text can be changed in a variety of ways. Most word processors also have the ability to check spelling and grammar, and often have built-in dictionaries and other tools to help you write sentences.
The rest of this lesson will introduce you to some of the basic concepts and features of word processing and help you extend your skills using Microsoft Word, Bloom Community College's standard word processing software application. Provides a link to.
Use of Templates
Use existing templates
Now you can understand how to use an existing template for your newly created Word document. The template is selected when you create a new blank document.
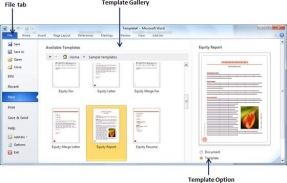
Step 1-To start a new document, click the File tab, then click the New option. This will display the Available Templates.
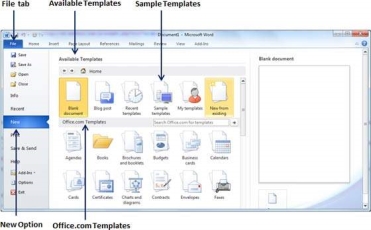
Step 2-Microsoft Word provides a list of templates placed below the Sample Templates. Alternatively, you can download hundreds of templates from office.com, located in different categories. Use the Sample Template for the document. To do this, you need to click on the sample template. This will bring up a gallery of templates. Try choosing a template based on your requirements using the Office.Com option.
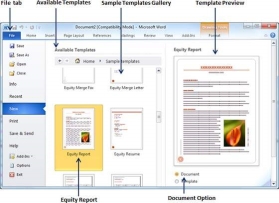
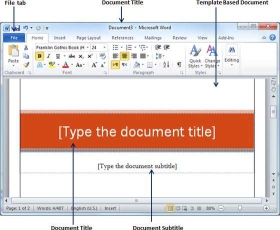
Step 3-Double-click a template to browse the list of available templates and finally select one of the templates for your document. Select the Stock Report template as the reporting requirement. When choosing a document template, you need to select the document options available in the third column. This will open the document with predefined settings that allow you to change the document title, author name, heading, etc. based on the document's requirements.
Create a New Template
You can create a new template based on your requirements, or you can modify an existing template to save it and use it later as a template. Microsoft Word template files have a .dotx extension. The following steps will assist you create a replacement template.
Step 1-To create a new template using an existing template, click the File tab, then click the New option. This will show you the Available Templates to choose from. Select one of the Available Templates and turn on the template option to open it.
Step 2-You can change the open template to suit your needs. When you're done, you can save this template with the .dotx extension, which is the standard extension for Microsoft Word templates.
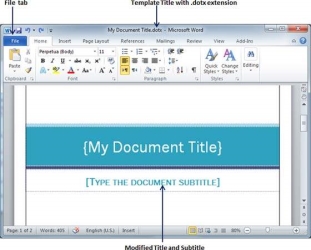
You can also create a template from a replacement document. Click the File button and click the New option to open a new document. Under Available Templates, double-click Blank Document to make a replacement document template. Save the template with a singular name and .dotx extension.
You can save the created template to the location you clicked. Whenever you use this template, simply Double-Click the template file to open a new template-based document.
Key takeaways:
We will understand how to start a Word 2010 application in simple steps. Assuming you have Microsoft Office 2010 installed in your PC, to start the Word application, follows these steps −
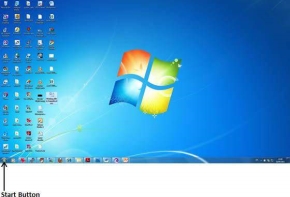
Step 1 − Click the Start button.
Step 2 − Click the All-Programs option from the menu.
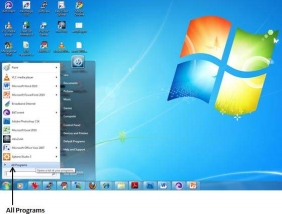
Step 3 − Search for Microsoft Office from the submenu and click it.
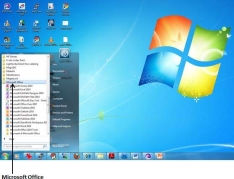
Step 4 − Search for Microsoft Word 2010 from the submenu and click it.
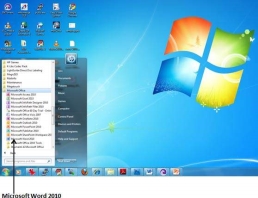
This will launch the Microsoft Word 2010 application and you will see the following window.
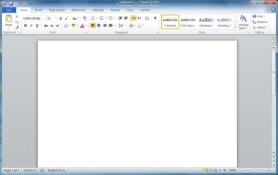
Following is the basic window which you get when you start the Word application. Let us understand the various important parts of this window.
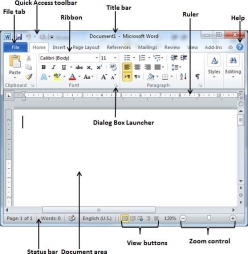
File Tab
The File tab replaces the Office button from Word 2007. You can click it to check the Backstage view. This is where you come when you need to open or save files, create new documents, print a document, and do other file-related operations.
Quick Access Toolbar
This you will find just above the File tab. This is a convenient resting place for the most frequently used commands in Word. You can customize this toolbar based on your comfort.
Ribbon

Ribbon contains commands organized in three components −
Title bar
This lies in the middle and at the top of the window. Title bar shows the program and document titles.
Rulers
Word has two rulers - a horizontal ruler and a vertical ruler. The horizontal ruler appears just beneath the Ribbon and is used to set margins and tab stops. The vertical ruler appears on the left edge of the Word window and is used to gauge the vertical position of elements on the page.
Help
The Help Icon can be used to get word related help anytime you like. This provides nice tutorial on various subjects related to word.
Zoom Control
Zoom control lets you zoom in for a closer look at your text. The zoom control consists of a slider that you can slide left or right to zoom in or out; you can click the + buttons to increase or decrease the zoom factor.
View Buttons
The group of five buttons located to the left of the Zoom control, near the bottom of the screen, lets you switch through the Word's various document views.
Document Area
This is the area where you type. The flashing vertical bar is called the insertion point and it represents the location where text will appear when you type.
Status Bar
This displays the document information as well as the insertion point location. From left to right, this bar contains the total number of pages and words in the document, language, etc.
You can configure the status bar by right-clicking anywhere on it and by selecting or deselecting options from the provided list.
Dialog Box Launcher
This appears as very small arrow in the lower-right corner of many groups on the Ribbon. Clicking this button opens a dialog box or task pane that provides more options about the group.
The Backstage view was introduced in Word 2010. This acts as the central place for managing your documents. The backstage view helps in creating new documents, saving and opening documents, printing and sharing documents, and so on.
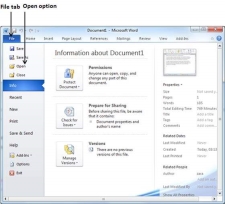
Getting to the Backstage View is easy: Just click the File tab, located in the upper-left corner of the Word Ribbon. If you already do not have any opened document, then you will see a window listing down all the recently opened documents as follows −
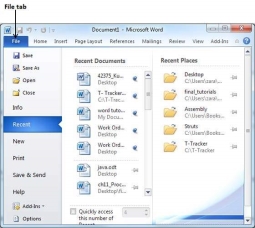
If you already have an opened document, then it will display a window showing detail about the opened document as shown below. Backstage view shows three columns when you select most of the available options in the first column.
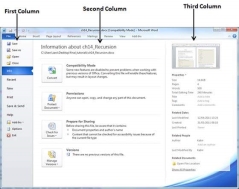
The first column of the backstage view will have following options −
S. No | Option & Description |
1 | Save If an existing document is opened, it will be saved as is, otherwise it will display a dialogue box asking for the document name. |
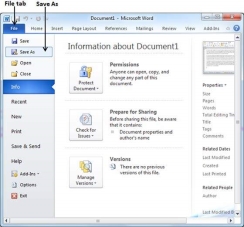
2 | Save As A dialogue box will be displayed asking for document name and document type, by default it will save in word 2010 format with extension .docx. |
3 | Open This option is used to open an existing word document. |
4 | Close This option is used to close an open document. |
5 | Info This option displays information about the opened document. |
6 | Recent This option lists down all the recently opened documents |
7 | New This option is used to open a new document. |
8 | This option is used to print an open document. |
9 | Save & Send This option will save an open document and will display options to send the document using email, etc. |
10 | Help This option is used to get the required help about Word 2010. |
11 | Options This option is used to set various option related to Word 2010. |
12 | Exit Use this option to close the document and exit. |
Document Information
When you click the Info option available in the first column, it displays the following information in the second column of the backstage view −
Document Properties
When you click the Info option available in the first column, it displays various properties in the third column of the backstage view. These properties include the document size, the number of pages in the document, the total number of words in the document, the name of the author etc.
You can also edit various properties by clicking on the property value and if the property is editable, then it will display a text box where you can add your text like title, tags, comments, Author.
Exit Backstage View
It is simple to exit from the Backstage View. Either click on the File tab or press the Esc button on the keyboard to go back to the working mode of Word.
We assume you know that when you start Word, it displays a new document by default as shown below −
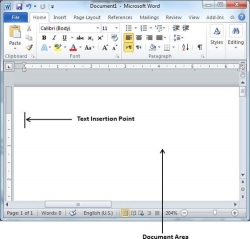
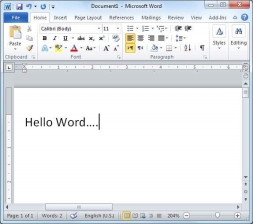
Document area is the area where you type your text. The flashing vertical bar is called the insertion point and it represents the location where the text will appear when you type. keep the cursor at the text insertion point and start typing the text. We typed only two words "Hello Word" as shown below. The text appears to the left of the insertion point as you type −
The following are the two important points that will help you while typing −
Saving New Document
Once you are done with typing in your new Word document, it is time to save your document to avoid losing work you have done on a Word document. Following are the steps to save an edited Word document −
Step 1 − Click the File tab and select the Save As option.
Step 2 − Select a folder where you will like to save the document, Enter the file name which you want to give to your document and Select the Save As option, by default it is the .docx format.
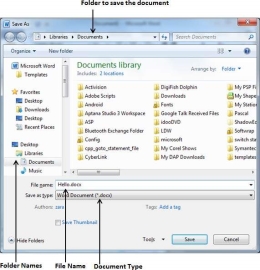
Step 3 − Finally, click on the Save button and your document will be saved with the entered name in the selected folder.
Saving New Changes
There may be an instance when you open an existing document and edit it partially or completely, or an instance where you may like to save the changes in between editing of the document. If you want to save this document with the same name, then you can use either of the following simple options −
If your document is new and it was never saved so far, then with either of the three options, Word will display a dialogue box to let you select a folder, and enter the document name as explained in case of saving new document.
Opening New Document
A new, blank document always opens when you start Microsoft Word. Suppose you want to start another new document while you are working on another document, or you closed an already opened document and want to start a new document. Here are the steps to open a new document −
Step 1 − Click the File tab and select the New option.
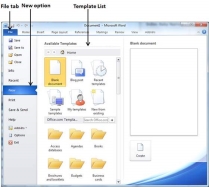
Step 2 − When you select the New option from the first column, it will display a list of templates in the second column. Double-click on the Blank document; this is the first option in the template list. We will discuss the other templates available in the list in the following chapters.
You should have your blank document as shown below. The document is now ready for you to start typing your text.
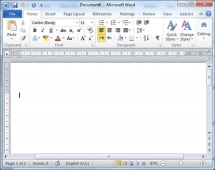
You can use a shortcut to open a blank document anytime. Try using the Ctrl + N keys and you will see a new blank document similar to the one in the above screenshot.
Opening Existing Document
There may be a situation when you open an existing document and edit it partially or completely. Follow the steps given below to open an existing document −
Step 1 − Click the File tab and select the Open option.
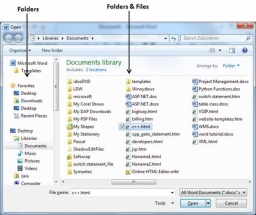
Step 2 − This will display the following file Open dialog box. This lets you navigate through different folders and files, and also lets you select a file which you want to open.
Step 3 − Finally, locate and select a file which you want to open and click the small triangle available on the Open button to open the file. You will have different options to open the file, but simply use the Open option.
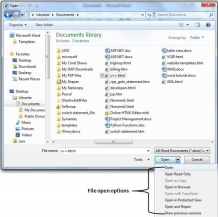
This will open your selected file. You can use the Open Read-Only option if you are willing just to read the file and you have no intention to modify, i.e., edit the file. Other options can be used for advanced usage.
Closing a Document
Closing a document removes it from your computer screen and if you had other documents open, Word displays the last document you used otherwise, you see a blank Word window. Here are simple steps to close an opened document −
Step 1 − Click the File tab and select the Close option.
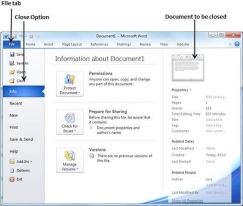
Step 2 −When you select the Close option and if the document is not saved before closing, it will display the following Warning box asking whether the document should be saved or not.
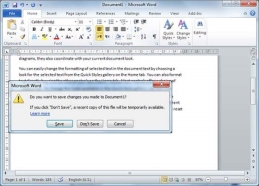
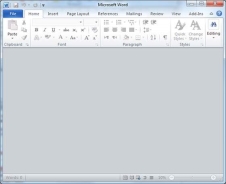
Step 3 − To save the changes, click Save, otherwise click Don't Save. To go back to the document, click Cancel. This will close the document and if you have other documents open, Word displays the last document you used, otherwise, you see a blank Word window as shown below −
Insert and Add Text
First, we will see how inserted text will be added into the existing content without replacing any existing content.
Step 1 − Click the location where you wish to insert text; you can also use the keyboard arrows to locate the place where the text needs to be inserted.
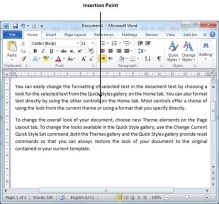
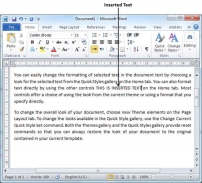
Step 2 − Start typing the text that needs to be inserted. Word inserts the text to the left of the insertion point, moving the existing text to the right
Insert and Replace Text
In the Insertion mode, text will be added into the existing content but same time it will over write all the content which comes in its way.
Step 1 − Right-click the status bar and select the Overtype option from the displayed menu.
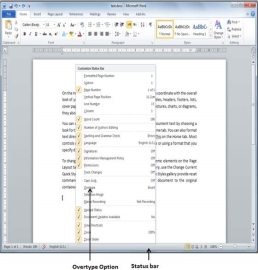
When you select the Overtype option, the status bar will show the insert mode as shown below −
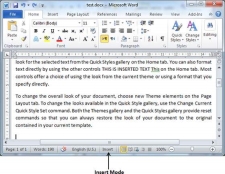
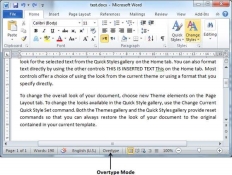
Step 2 − Click on the Insert text available at the status bar and it will switch to the Overtype mode as shown below −
Step 3 − Now click the location where the text needs to be inserted or you can use the keyboard arrows to locate the place where the text needs to be inserted.
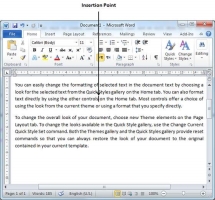
Step 4 − Start typing the text that needs to be inserted. Word will replace the existing text with the newly typed text without moving the position of the exiting test.
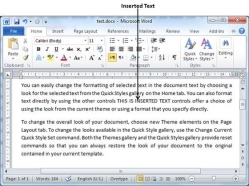
Note − Microsoft Word 2010 disabled the functionality of the Insert key and it does nothing, so you will have to follow-up with the above-mentioned procedure to turn-on or turn-off the Insert mode.
Delete Text
It is very common to delete text and retype the content in your Word document. You might type something you did not want to type or there is something extra which is not required in the document. Regardless of the reason, Word offers you various ways of deleting the text in partial or complete content of the document.
Using Backspace & Delete Keys
The most basic deletion technique is to delete characters one at a time by pressing either the backspace key or the delete key. Following table describes how you can delete single character or a whole word by using either of these two keys −
S. No | Keys & Deletion Methods |
1 | Backspace Keep the insertion point just after the character you want to delete and press the Backspace key. Word deletes the character immediately to the left of the insertion point. |
2 | Ctrl + Backspace Keep the insertion point just after the word you want to delete and press Ctrl + Backspace key. Word deletes the whole word immediately to the left of the insertion point. |
3 | Delete Keep the insertion point just before the character you want to delete and press the Delete key. Word deletes the character immediately to the right of the insertion point. |
4 | Ctrl + Delete Keep the insertion point just before the word you want to delete and press Ctrl + Delete key. Word deletes the word immediately to the right of the insertion point. |
Using Selection Method
You have learnt how to select various parts of a Word document. You can make use of that learning to delete those selected parts as described in the following table −
S. No | Component Selection & Delete Methods |
1 | Deleting text between two points Click at the start of the block of text, hold down the Shift key, and click at the end of the block to select the portion of text and finally press either the Backspace key or the Delete key. |
2 | Deleting a single word Double-click anywhere on the word you want to delete and finally press either the Backspace key or the Delete key. |
3 | Deleting a paragraph Triple-click anywhere on the paragraph you want to delete and finally press either the Backspace key or the Delete key. |
4 | Deleting a sentence Hold down the Ctrl key and click anywhere in the sentence you want to delete and finally press either the Backspace or the Delete key. |
5 | Deleting a column of text Hold down the Alt key, click and hold the mouse button, and drag over the column you want to delete and finally press either the Backspace key or the Delete key. |
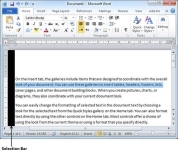
6 | Deleting a line Bring your mouse in the selection bar area and click in front of the line you want to delete and finally press either the Backspace key or the Delete key. |
7 | Deleting entire document content Press Ctrl + A keys to delete the entire document and finally press either the Backspace key or the Delete key. |
Note − The black shaded area in the following screen shot is called the selection bar. When you bring your cursor in this area, it turns into a rightward-pointing arrow.
Spell Check
Microsoft Word provides a decent Spelling and Grammar Checker which enables you to search for and correct all spelling and grammar mistakes in your document. Word is intelligent enough to identify misspelled or misused, as well as grammar errors and underlines them as follows.
Check Spelling and Grammar using Review tab
Here is the simple procedure to find out the spelling mistakes and fix them −
Step 1 − Click the Review tab and then click the Spelling & Grammar button.
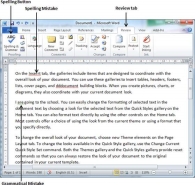
Step 2 − A Spelling and Grammar dialog box will appear and will display the wrong spellings or errors in grammar. You will also get suggestions to correct as shown below −
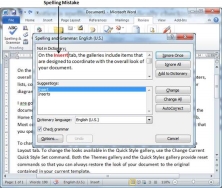
Now you have following options to fix the spelling mistakes −
Following are the different options in case you have grammatical mistake −
Step 3 − Select one of the given suggestions you want to use and click the Change option to fix the spelling or grammar mistake and repeat the step to fix all the spelling or grammar mistake.
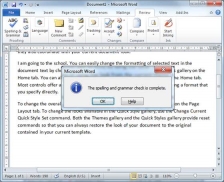
Step 4 − Word displays a dialog box when it finishes checking for spelling and grammar mistakes, finally Click OK.
Check Spelling and Grammar using Right Click
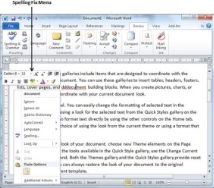
If you will right-click the mouse button over a misspelled word, then it will show you the correct suggestions and the above-mentioned options to fix the spelling or grammar mistake. Try it yourself.
Find & Replace
While working on editing a document you come across a situation very frequently when you want to search a particular word in your document and many times you will be willing to replace this word with another word at a few or all the places throughout the document. Here, we will understand how to find a word or phrase in a word document and how to replace an existing word with any other word using simple steps.
Find Command
The Find command enables you to locate specific text in your document. Following are the steps to find a word document in the following screen −
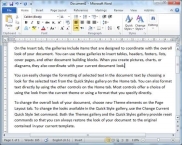
Step 1 − Let us work out on a sample text available in our Word document. Just type =rand () and press Enter; the following screen will appear −
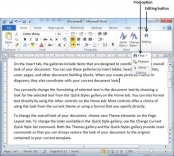
Step 2 − Click the Find option in the Editing group on the Home tab or press Ctrl + F to launch the Navigation pane −
Step 3 − Enter a word which you want to search in the Search box, as soon as you finish typing, Word searches for the text you entered and displays the results in the navigation pane and highlights the word in the document as in the following screenshot −
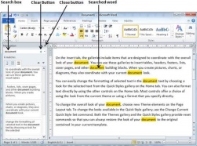
Step 4 − You can click the clear button (X) to clear the search and results and perform another search.
Step 5 − You can use further options while searching for a word. Click the option button to display the options menu and then click the Options option; this will display a list of options. You can select the options like match case to perform case-sensitive search.
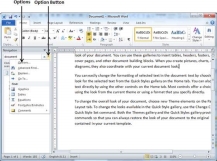
Step 6 − Finally, if you are done with the Search operation, you can click the close button (X) to close the Navigation Pane.
Find & Replace Operation
We assume you are an expert in searching a word or phrase in a word document as explained above. This section will teach you how you can replace an existing word in your document. Following are the simple steps −
Step 1 − Click the Replace option in the Editing group on the Home tab or press Ctrl + H to launch the Find and Replace dialog box shown in Step 2 −
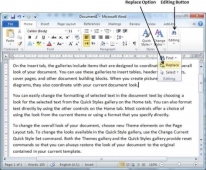
Step 2 − Type a word which you want to search. You can also replace the word using the Find and Replace dialog box as in the following screenshot −
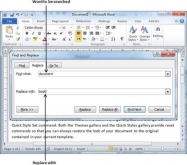
Step 3 − Click the Replace button available on the Find and Replace dialog box and you will see the first occurrence of the searched word would be replaced with the replace with word. Clicking again on Replace button would replace next occurrence of the searched word. If you will click Replace All button then it would replace all the found words in one go. You can also use Find Next button just to search the next occurrence and later you can use Replace button to replace the found word.
Step 4 − You can use More >> button available on the dialog box to use more options and to make your search more specific like case sensitive search or searching for whole word only etc.
Step 5 − Finally, if you are done with the Find and Replace operation, you can click the Close (X) or Cancel button of the dialog box to close the box.
Setting Text Fonts
Microsoft word allows you to use different fonts with different size. You can change your document's appearance by changing the fonts and their size. Usually you use different fonts for paragraphs and headings. It is important to learn how to use different fonts. This chapter will teach you how to change a font and its size in simple steps.
Change the Font Type & Size
We will understand in brief the font buttons that we will further use in this tutorial. Following is a screenshot to show you a few font related buttons.
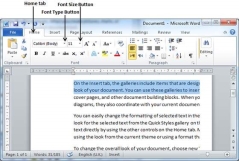
Step 1 − Select the portion of text the font of which needs to be changed and click the Home tab. Now click the Font Type button to list down all the fonts available as shown below.
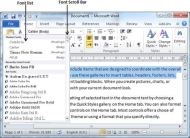
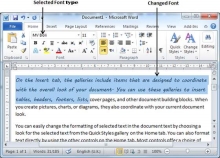
Step 2 − Try to move the mouse pointer over the listed fonts. You will see that the text font changes when you move the mouse pointer over different fonts. You can use the Font Scroll Bar to display more fonts available. Finally select a desired font by clicking over the font name in the list. We have selected MV Boli as the font for our sample text.
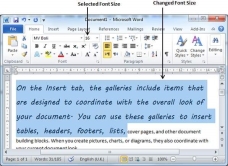
Step 3 − Similar way, to change the font size, click over the Font Size button which will display a font size list. You will use the same procedure to select a desired font size that you have used while selecting a font type.
Use Shrink and Grow Buttons
You can use a quick way to reduce or enlarge the font size. As shown in the first screenshot, the Shrink Font button can be used to reduce the font size whereas the Grow Font button can be used to enlarge the font size.
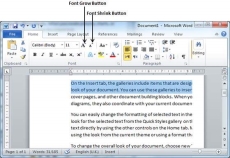
Try to click either of these two buttons and you will see the effect. You can click a single button multiple times to apply the effect. Each time you click either of the buttons, it will enlarge or reduce the font size by 1 point.
Clear Formatting Options
All of the setting can be reset to plain text, or the default formatting. To reset text to default settings −
Step 1 − Select the portion of text that you want to reset.
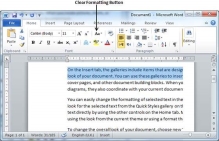
Step 2 − Click the Clear Formatting button in the Home tab Font group, or simply use Ctrl + SPACEBAR.
Text Decoration
When we use the term decorate, it means decorate by putting the text in italics, underlining the text or making it bold to look more fancy and much more. In this chapter, we will also learn how we can strikethrough a text.
Making text bold
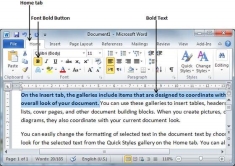
We use bold text to give more emphasis on the sentence. It is very simple to change a selected portion of text into bold font by following two simple steps −
Step 1 − Select the portion of text that the font of which needs to be made bold. You can use any of the text selection methods to select the portion of text.
Step 2 − Click the Font Bold [ B] button in the Home tab Font group, or simply use Ctrl + B keys to make the selected portion of text bold.
Making Text Italic
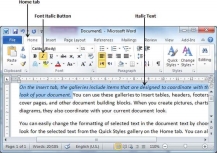
An italic text appears with a small inclination and we use the italicized text to differentiate it from other text. It is very simple to change the selected text into italic font by following two simple steps −
Step 1 − Select the portion of text the font of which needs to be italicized. You can use any of the text selection methods to select the portion of text.
Step 2 − Click the Font Italic [ I] button in the Home tab Font group, or simply use the Ctrl + I keys to convert the portion of text in italic font.
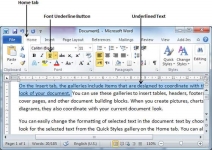
Underline the Text
An underlined portion of text appears with an underline and we use the underlined portion of text to make it more distinguished from other text. It is very simple to change the selected text into underlined font by following two simple steps −
Step 1 − Select the portion of text which needs to be underlined. You can use any of the text selection method to select the portion of text.
Step 2 − Click Font Underline [ U ] button in the Home tab Font group, or simply use the Ctrl + U keys to put an underline under the text.
Strikethrough the Text
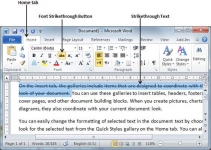
Strikethrough portion of text will look as if a line has been drawn through the middle of it. A strikethrough portion of text indicates that it has been deleted and that the portion of text is not required any more. It is very simple to change a selected portion of text into a strikethrough portion of text by following two simple steps −
Step 1 − Select the portion of text that you want to change to a bold font. You can use any of the text selection method to select the portion of text.
Step 2 − Click Font Strikethrough [ abc ] button in the Home tab Font group to put a line in the middle of the text which is called strikethrough the text.
Change Text Case
You can also capitalize a character you are typing by pressing and holding the SHIFT key while you type. You can also press the CAPS LOCK to have every letter that you type capitalized, and then press the CAPS LOCK again to turn off capitalization.
Change Text to Sentence Case
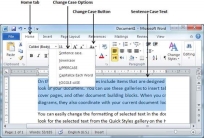
A sentence case is the case where the first character of every sentence is capitalized. It is very simple to change the selected portion of text into sentence case by following two simple steps −
Step 1 − Select the portion of text that that needs to be put in sentence case. You can use any of the text selection methods to select the portion of text.
Step 2 − Click the Change Case button and then select the Sentence Case option to capitalize the first character of every selected sentence.
Change Text to Lowercase
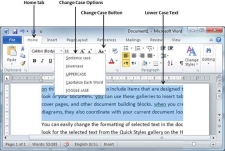
Changing text to lowercase is where every word of a sentence is in lowercase. It is very simple to change a selected portion of text into lowercase by following two simple steps −
Step 1 − Select the portion of text that needs to be put in lowercase. You can use any of the text selection methods to select the portion of text.
Step 2 − Click the Change Case button and then select Lowercase option to display all the selected words in lowercase.
Change Text to Uppercase
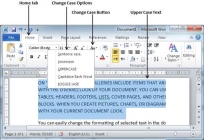
This is where every word of a sentence is in uppercase. It is very simple to change selected text into uppercase by following two simple steps −
Step 1 − Select the portion of text that you want to change to a bold font. You can use any of the text selection method to select the portion of text.
Step 2 − Click the Change Case button and then select UPPERCASE option to display all selected words in all caps. All characters of every selected word will be capitalized.
Capitalize Text
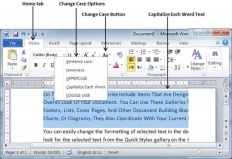
A capitalize case is the case where every first character of every selected word is in capital. This is very simple to change selected text into capitalize by following two simple steps −
Step 1 − Select the portion of text that needs to be capitalized. You can use any of the text selection method to select the portion of text.
Step 2 − Click the Change Case button and then select the Capitalize Each Word option to put a leading cap on each selected word.
Toggle the Text
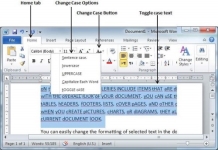
The Toggle operation will change the case of every character in reverse way. A capital character will become a character in lower case and a character in lower case will become a character in upper case. It is very simple to toggle case of the text by following two simple steps −
Step 1 − Select the portion of text that you want to change to a bold font. You can use any of the text selection method to select the portion of text.
Step 2 − Click the Change Case button and then select the tOGGLE cASE option to change all the words in lowercase into words in uppercase; the words in uppercase words change to words in lowercase.
Text Alignments
There are four types of paragraph alignment available in Microsoft Word — left-aligned, center-aligned, right aligned, and justified.
Left-Aligned Text
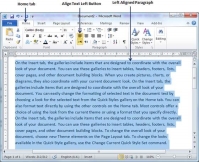
A paragraph's text is left aligned when it is aligned evenly along the left margin. Here is a simple procedure to make a paragraph text left-aligned.
Step 1 − Click anywhere on the paragraph you want to align and click the Align Text Left button available on the Home tab or simply press the Ctrl + L keys.
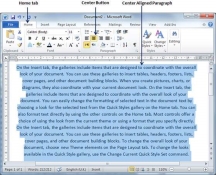
Center Aligned Text
A paragraph's text will be said center aligned if it is in the center of the left and right margins. Here is a simple procedure to make a paragraph text center aligned.
Step 1 − Click anywhere on the paragraph you want to align and click the Center button available on the Home tab or simply press the Ctrl + E keys.
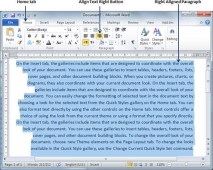
Right-Aligned Text
A paragraph's text is right-aligned when it is aligned evenly along the right margin. Here is a simple procedure to make a paragraph text right-aligned.
Step 1 − Click anywhere on the paragraph you want to align and click the Align Text Right button available on the Home tab or simply press the Ctrl + R keys.
Justified Text
A paragraph's text is justified when it is aligned evenly along both the left and the right margins. Following is a simple procedure to make a paragraph text justified.
Step 1 − Click anywhere on the paragraph you want to align and click the Justify button available on the Home tab or simply press the Ctrl + J keys.
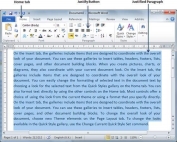
When you click the Justify button, it displays four options, justify, justify low, justify high and justify medium. You need to select only the justify option. The difference between these options is that low justify creates little space between two words, medium creates a more space than low justifies and high creates maximum space between two words to justify the text.
Create Bullets
Create a List from Existing Text
This is very simple to convert a list of lines into a bulleted or numbered list. Following are the simple steps to create either bulleted list or numbered list.
Step 1 − Select a list of text to which you want to assign bullets or numbers. You can use any of the text selection method to select the portion of text.
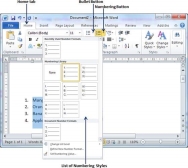
Step 2 − Click the Bullet Button triangle to display a list of bullets you want to assign to the list. You can select any of the bullet style available by simply clicking over it.
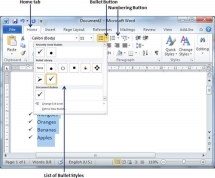
Step 3 − If you are willing to create a list with numbers, then click the Numbering Button triangle instead of the bullet button to display a list of numbers you want to assign to the list. You can select any of the numbering style available by simply clicking over it.
Create a List as You Type
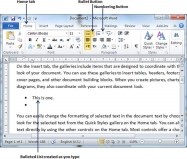
You can create a bulleted list as you type. Word will automatically format it according to your text. Following are the simple steps to create bulleted list as you type.
Step 1 − Type *, and then either press the SPACEBAR or press the TAB key, and then type the rest of what you want in the first item of the bulleted list.
Step 2 − When you are done with typing, press Enter to add the item in the list automatically and go to add next item in the list.
Step 3 − Repeat Step 2 for each list item.
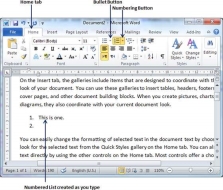
You can create a numbered list as you type. Word will automatically format it according to your text. Following are the simple steps to create numbered list as you type.
Step 1 − Type 1, and then either press the SPACEBAR or press the TAB key, and then type the rest of what you want in the first item of the numbered list.
Step 2 − When you are done with typing, press Enter to add the item in the list automatically and go to add next item in the list.
Step 3 − Repeat Step 2 for each list item.
You can create sub-lists. These sub-lists are called multi-lists. It is simple to create subsists; press the Tab key to put items in sub-list. You can try it yourself.
Set Line Spacing
A line spacing is the distance between two lines in a Microsoft Word document. You can increase or decrease this distance as per your requirement by following a few simple steps. This chapter will explain how to set the distance between two lines as well as how to set the distance between two paragraphs.
Spacing between Lines
Following are the simple steps to adjust spacing between two lines of the document.
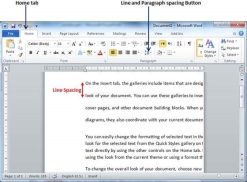
Step 1 − Select the paragraph or paragraphs for which you want to define spacing. You can use any of the text selection method to select the paragraph(s).
Step 2 − Click the Line and Paragraph Spacing Button triangle to display a list of options to adjust space between the lines. You can select any of the option available by simply clicking over it.
Spacing between Paragraphs
You can also set distance between two paragraphs. Following are the simple steps to set this distance.
Step 1 − Select the paragraph or paragraphs for which you want to define spacing and click the Paragraph Dialog Box launcher available on the Home tab.
Step 2 − Click the Before spinner to increase or decrease the space before the selected paragraph. Similar way, click the After spinner to increase or decrease the space after the selected paragraph. Finally, click the OK button to apply the changes.
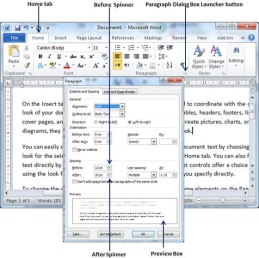
You can use the Line Spacing option available at the dialog box to set line spacing as we have seen in previous example. You can try it yourself.
Borders and Shades
Microsoft Word allows you to place a border on any or all of the four sides of selected text, paragraphs, and pages. You can also add different shades to the space occupied by the selected text, paragraphs, and pages. This chapter will teach you how to add any of the borders (left, right, top or bottom) around a text or paragraph or a page and how to add different shadows to them.
Add Borders to Text
Following are the simple steps to add border to any text or paragraph.
Step 1 −Select the portion of text or paragraph to which you want to add border. You can use any of the text selection method to select the paragraph(s).
Step 2 − Click the Border Button to display a list of options to put a border around the selected text or paragraph. You can select any of the option available by simply clicking over it.
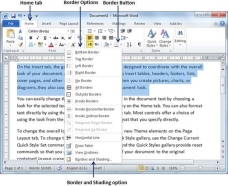
Step 3 − Try to add different borders like left, right top or bottom by selecting different options from the border options.
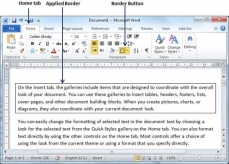
Step 4 − To delete the existing border, simply select the No Border option from the border options.
Note − You can add a horizontal line by selecting the Horizontal Line option from the border options. Otherwise, type --- (three hyphens) and press ENTER. A single, light horizontal line will be created between the left and the right margins.
Add Borders to Page
You can add borders of your choice to word pages by following the steps given below.
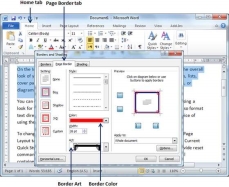
Step 1 − Click the Border Button to display a list of options to put a border. Select the Border and Shading option available at the bottom of the list of options as shown in the above screenshot. This will display a Border and Shading dialog box. This dialog box can be used to set borders and shading around a selected text or page borders.
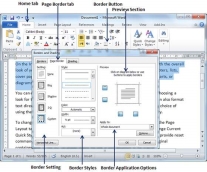
Step 2 − Click the Page Border tab which will display a list of border settings, styles and options whether this border should be applied to the whole document or just one page or the first page.
Step 3 − You can use the Preview section to disable or enable left, right, top or bottom borders of the page. Follow the instruction given in the preview section itself.
Step 4 − You can customize your border by setting its color, width by using different art available under the style section.
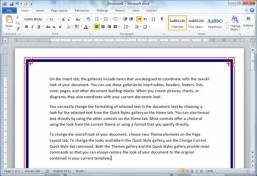
You can have similar or even better borders as given below.
Add Shades to Text
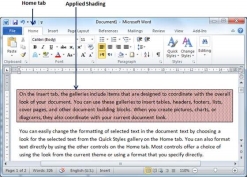
The following steps will help you understand how to add shades on a selected portion of text or a paragraph(s).
Step 1 − Click the Border Button to display a list of options to put a border. Select the Border and Shading option available at the bottom of the list of options as shown in the above screenshot. This will display a Border and Shading dialog box. This dialog box can be used to set borders and shading around a selected portion of text or page borders.
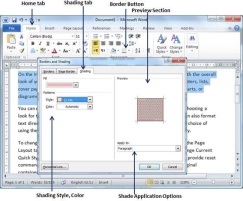
Step 2 − Click the Shading tab; this tab will display the options to select fill, color and style and whether this border should be applied to a paragraph or a portion of text.
Step 3 − You can use the Preview section to have an idea about the expected result. Once you are done, click the OK button to apply the result.
Set Tabs
Microsoft Word tabs help in setting up information properly within a column. Word enables you to set left, center, right, decimal, or bar tabs to line up columnar information. By default, Word places tabs every .5 inch across the page between the left and right margins.
S. No | Tab & Description |
1 | Left Left-aligns text at tab stop and this is the default tab. |
2 | Center Centers text over tab stop. |
3 | Right Right-aligns text at tab stop. |
4 | Decimal Aligns numbers at decimal point over tab stop. |
5 | Bar Creates a bar to separate the text. |
Setting a Tab
Following are the simple steps to set the center and the right tabs in a Word document. You can use similar steps but different tabs to set up decimal and bar tabs.
Step 1 − Type some text that you want to line up with the tab stops. Press the Tab key only once between each column of information you to want to line up. I typed the following three lines.
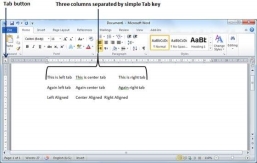
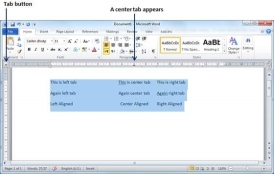
Step 2 − Select a tab type using the Tab button; assume the center tab and finally select the paragraph or paragraphs the tabs of which you want to set. Next click the ruler where you want the tab to appear, a tab will appear at the ruler where you just clicked and the selected portion of text will be adjusted in the center.
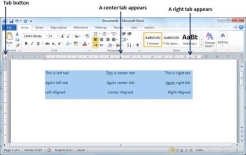
Step 3 − Now select the right tab using the Tab Button and click the ruler at the right side where you want to align the text at the right side. A right tab will appear at the ruler where you just clicked and the selected portion of text will be right-aligned.
Moving a Tab
You can move an already set tab at a particular location by following the steps given below.
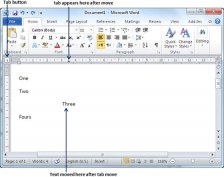
Step 1 − Click just before the line for which you want to change the tab setting. Drag the tab sign available at the ruler to the left or right.
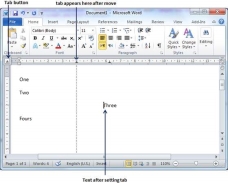
Step 2 − A vertical line marks its position as you drag and when you click and drag a tab, the text moves with the tab.
Create a Table
A table is a structure of vertical columns and horizontal rows with a cell at every intersection. Each cell can contain text or graphics, and you can format the table in any way you want. Usually, the top row in the table is kept as a table header and can be used to put some informative instruction.
Create a Table
The following steps will help you understand how to create a table in a Word document.
Step 1 − Click the Insert tab followed by the Table button. This will display a simple grid as shown below. When you move your mouse over the grid cells, it makes a table in the table that appears in the document. You can make your table having the desired number of rows and columns.
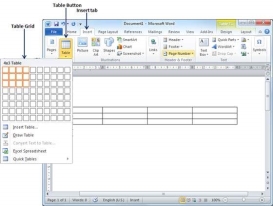
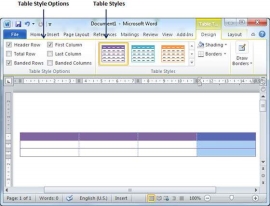
Step 2 − Click the square representing the lower-right corner of your table, which will create an actual table in your document and Word goes in the table design mode. The table design mode has many options to work with as shown below.
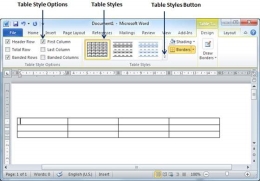
Step 3 − This is an optional step that can be worked out if you want to have a fancy table. Click the Table Styles button to display a gallery of table styles. When you move your mouse over any of the styles, it shows real time preview of your actual table.
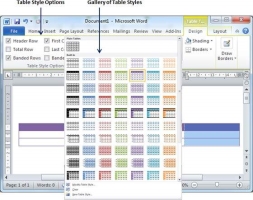
Step 4 − To select any of the styles, just click the built-in table style and you will see that the selected style has been applied on your table.
Delete a Table
Following are the simple steps to delete an existing table from a word document.
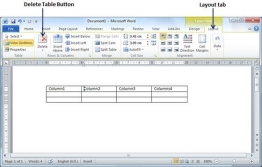
Step 1 − Click anywhere in the table you want to delete.
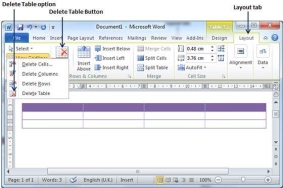
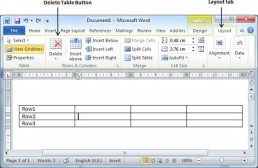
Step 2 − Click the Layout tab, and click the Delete Table option under the Delete Table Button to delete the complete table from the document along with its content.
Rows & Columns
A table is a structure of vertical columns and horizontal rows with a cell at every intersection. A Word table can contain as many as 63 columns but the number of rows is unlimited. This chapter will teach you how to add and delete rows and columns in a table.
Add a Row
Following are the simple steps to add rows in a table of a word document.
Step 1 − Click a row where you want to add an additional row and then click the Layout tab; it will show the following screen.
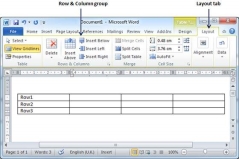
Step 2 − Now use the Row & Column group of buttons to add any row below or above to the selected row. If you click the Insert Below button, it will add a row just below the selected row as follows.
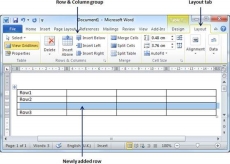
If you click the Insert Above button, it will add a row just above the selected row.
Delete a Row
The following steps will help you delete rows from a table of a Word document.
Step 1 − Click a row which you want to delete from the table and then click the Layout tab; it will show the following screen.
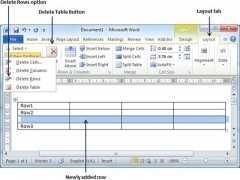
Step 2 − Click the Layout tab, and then click the Delete Rows option under the Delete Table Button to delete the selected row.
Add a Column
The following steps will help you add columns in a table of a Word document.
Step 1 − Click a column where you want to add an additional column and then click the Layout tab; it will show the following screen.
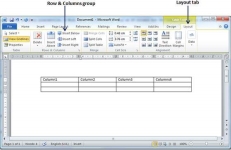
Step 2 − Now use the Row & Column group of buttons to add any column to the left or right of the selected column. If you click the Insert Left button, it will add a column just left to the selected column as follows.
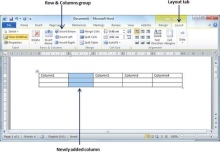
If you click the Insert Right button, it will add a column just next to the selected column.
Delete a Column
Following are the simple steps to delete columns from a table of a word document.
Step 1 − Click a column which you want to delete from the table and then click the Layout tab; it will show the following screen.
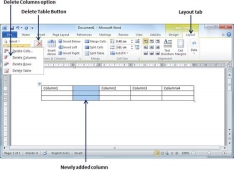
Step 2 − Click the Layout tab, and click the Delete Column option under the Delete Table Button to delete the selected column.
Merging Cells
Microsoft Word allows the merging of two or more cells to create one large cell. You will frequently need to merge columns of the top row to create the title of the table. You can merge cells either row-wise or column-wise, rather you cannot merge cells diagonally. This chapter will teach you how to merge multiple rows or columns.
Merging Cells
The following steps will help you merge table cells in a Word document.
Step 1 − Bring your mouse pointer position inside the first cell that you want to merge. Now press the Shift key and click the cells around the cell which you want to merge into the first cell. This will highlight the cells which you click and they will be ready to be merged.
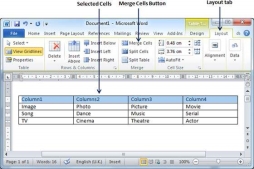
Step 2 − Now click the Layout tab and then click the Merge Cells button which will merge all the selected cells.
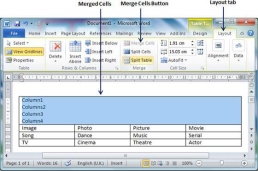
After merging the cells, all the content of the cells will be scrambled which you can fix later as you like. For example, you can convert the merged cells text into title or some other description. For example, let us have center-aligned and bigger font text as follows on top of the table.
Add Formula
Microsoft Word allows you to use mathematical formula in table cells which can be used to add numbers, to find the average of numbers, or find the largest or the smallest number in table cells you specify. There is a list of formulae, you can choose from the many based on the requirement. This chapter will teach you how to use formula in word tables.
Add a Formula
Following are the simple steps to add formula in a table cell available in Word document.
Step 1 − Consider the following table with the total number of rows. Click in a cell that should contain the sum of the rows.
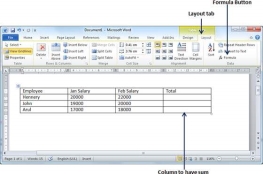
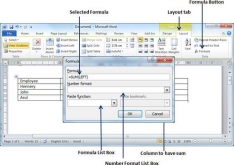
Step 2 − Now click the Layout tab and then click the Formula button; this will display a Formula Dialog Box which will suggest a default formula, which is =SUM(LEFT) in our case. You can select a number format using Number Format List Box to display the result or you can change the formula using the Formula List Box.
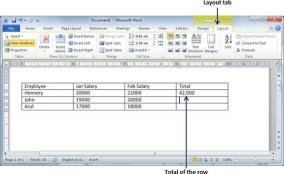
Step 3 − Now click OK to apply the formula and you will see that the left cells have been added and the sum has been put in the total cell where we wanted to have it. You can repeat the procedure to have the sum of other two rows as well.
Cell Formulae
The Formula dialog box provides the following important functions to be used as formula in a cell.
S. No | Formula & Description |
1 | AVERAGE () The average of a list of cells |
2 | COUNT () The number of items in a list of cells |
3 | MAX( ) The largest value in a list of cells |
4 | MIN( ) The smallest value in a list of cells |
5 | PRODUCT( ) The multiplication of a list of cells |
6 | SUM( ) The sum of a list of cells |
We assume you are familiar with how to create a spreadsheet program; you can construct your word cell formula. Word formulae uses a reference system to refer to an individual table cell. Each column is identified by a letter, starting with A for the first column, B for the second column, and so on. After the letter comes the row number. Thus, the first cell in the first row is A1, the third cell in the fourth row is C4, and so on.
Following are useful points to help you in constructing a word cell formula.
S.No | Cell References and Description |
1 | A single cell reference, such as B3 or F7 |
2 | A range of cells, such as A4:A9 or C5:C13 |
3 | A series of individual cells, such as A3, B4, C5 |
4 | ABOVE, referring to all cells in the column above the current cell. |
5 | BELOW, referring to all cells in the column below the current cell. |
6 | LEFT, referring to all cells in the row to the left of the current cell |
7 | RIGHT, referring to all cells in the row to the right of the current cell |
You can also construct simple Math expressions, such as B3+B5*10 by using simple mathematical operators +, -, /, *, %.
Printing Documents
Consider you are done with previewing and proofing your document and ready for the final printing. This chapter will teach you how to print a part or a complete Microsoft Word document.
The following steps will help you print your Microsoft Word document.
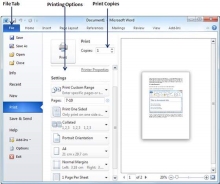
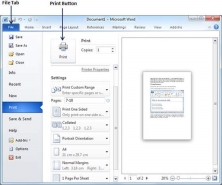
Step 1 − Open the document for which you want to see the preview. Next click the File tab followed by the Print option which will display a preview of the document in the right column. You can scroll up or scroll down your document to walk through the document using given Scrollbar. The middle column gives various options to be set before you send your document to the printer.
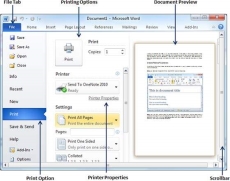
Step 2 − You can set various other printing options available. Select from among the following options, depending on your preferences.
S.No | Option and Description |
1 | Copies Set the number of copies to be printed; by default, you will have one copy of the document. |
2 | Print Custom Range This option will be used to print a particular page of the document. Type the number in Pages option, if you want to print all the pages from 7 till 10 then you would have to specify this option as 7-10 and Word will print only 7th, 8th, 9th and 10th pages. |
3 | Print One Sided By default, you print one side of the page. There is one more option where you will turn up your page manually in case you want to print your page on both sides of the page. |
4 | Collated By default, multiple copies will print Collated; if you are printing multiple copies and you want the copies uncollated, select the Uncollated option. |
5 | Orientation By default, page orientation is set to Portrait; if you are printing your document in landscape mode then select the Landscape mode. |
6 | A4 By default, the page size is A4, but you can select other page sizes available in the dropdown list. |
7 | Custom Margin Click the Custom Margins dropdown list to choose the document margins you want to use. For instance, if you want to print fewer pages, you can create narrower margins; to print with more white space, create wider margins. |
8 | 1 Page Per Sheet By default, the number of pages per sheet is 1 but you can print multiple pages on a single sheet. Select any option you like from the given dropdown list by clicking over the 1 Page Per Sheet option. |
Step 3 − Once you are done with your setting, click on the Print button which will send your document to the printer for final printing.
Send Access data to Word using email merging
Email merging is a great way to get Access data to work. This video shows you how to create a common form letter in Microsoft Word, starting with the Word Merge command in Access.
The general steps for creating a Word email merge from within Access are:
Open the Access database that contains the address you want to merge with Word.
If the navigation pane is not open, press F11 to open it.
Select the table or query that contains the address. If the address fields are spread across multiple tables, create a simple select query with the required fields and select that query for the merge operation.
On the External Data tab, within the Export group, click Merge Word.
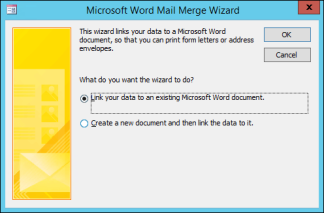
Choose whether to link the address data to an existing Word document or start with a new blank document in the wizard.
Click OK.
Word will launch and you will see the Mailing tab and the Email Merge pane.
Click the Next and Previous links at the bottom of the Email Merge pane to complete the wizard steps.
In step 3 of the wizard, you do not need to select the recipient list. This was decided when I selected it in Access. However, we recommend that you click Edit Recipient List to fine-tune the list. In the box that opens, you can remove individual recipients from the merge, apply filters, and sort the list.
In step 4 of the wizard, write a letter (unless you are working with an existing document).
Place the cursor on the document for which you want to view address data and click Address Block, Greetings, or Other Items in the Mail Merge pane to insert Access data into the document. In the box that appears, select the format you want and click Match Fields to verify that the fields match correctly.
In step 5 of the wizard, click the Next (>>) and Previous (
Key takeaway-
References-