|
|
|
|
|
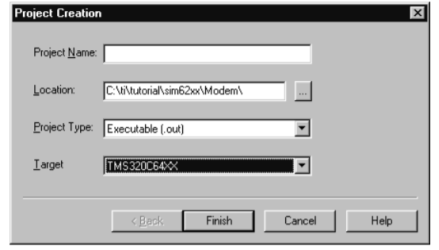
The following procedure to create new projects, one at a time. When multiple projects are created, each project’s filename must be unique . Step 1: From the Project menu, choose New. The Project Creation wizard window displays. Figure . Project Creation Step 2: In the Project Name field, type the name for the project. Each project you create must have a unique name. Step 3: In the Location field, specify directory to store the project file. Type the full path in the Location field or click the Browse button and use the Choose Directory dialog box. Step 4: In the Project Type field, select a Project Type from the drop-down list. Choose either Executable (.out) or Library (lib). Executable indicates that the project generates an executable file. Library indicates that you are building an object library. Step 5: In the Target field, select the Target Family that identifies the CPU. This information is necessary when tools are installed for multiple targets. Step 6: Click Finish. After creating a new project file, add the filenames of the source code, object libraries, and linker command file to the project list.
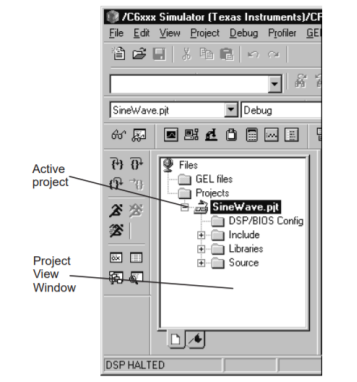
Figure 2. Code Composer Studio Project Management and Editing Tools
Adding Files to a Project Step 1: Select Project→Add Files to Project, or or right-click on the project’s filename in the Project View window and select Add Files. The Add Files to Project dialog box displays. Figure 3. Adding files
Step 2: In the Add Files to Project dialog box, specify a file to add. If the file does not exist in the current directory, browse to the correct location. Use the Files of type drop-down list to set the type of files that appear in the File name field. Step 3: Click Open to add the specified file to your project. The Project View is automatically updated when a file is added to the current project.
Figure . Selection Building and Running the Program To build and run a program, follow these steps Step 1: Choose Project→Rebuild All or click the (Rebuild All) toolbar button. The CCS IDE recompiles, reassembles, and relinks all the files in your project. Messages about this process are shown in a frame at the bottom of the window. Step 2: By default, the .out file is built into a debug directory located under your current project folder. To change this location, select a different one from the CCS toolbar.
Step 3: Choose File→Load Program. Select the program you just rebuilt, and click Open. The CCS IDE loads the program onto the target DSP and opens a Dis-Assembly window that shows the disassembled instructions that make up the program. (Notice that the CCS IDE also automatically opens a tabbed area at the bottom of the window to show the output that the program sends to stdout.) Step 4: Choose View→Mixed Source/ASM. This allows you to simultaneously view your c source and the resulting assembly code . Step 5: Click on an assembly instruction in the mixed-mode window. (Click on the actual instruction, not the address of the instruction or the fields passed to the instruction.) Press the F1 key. The CCS IDE searches for help on that instruction. This is a good way to get help on an unfamiliar assembly instruction. Building and Running the Program Code Composer Studio Project Management and Editing Tools . Step 6: Choose Debug→Go Main to begin execution from the main function. The execution halts at main and is identified by . Step 7: Choose Debug→Run or click the (Run) toolbar button to run the program. Step 8: Choose Debug→Halt to quit running the program.
|


