Back to Study material
MTE

Unit-3STANDARD TESTING AND EVALUATION PROCEDURES Q1) Explain laboratory for mechanical testing.A1) Laboratory for mechanical testing:Due to the very massive quantity of assessments offered, descriptions of these maximum generally asked were amassed into the subsequent groups:Air Permeability Testing
  • ASTM D737 – Air Permeability of Textile Fabrics
  • Axial-Torsion Testing
  • ASTM D3531 – Resin Flow
  • ASTM D3532 – Gel Time
  • Compression Testing
  • ASTM C365 – Flatwise Compressive Properties of Sandwich Cores
  • ASTM C1358 – Compression Testing of Fiber Reinforced Advanced Ceramics
  • ASTM D695 – Compression Testing of Rigid Plastics
  • Creep/Stress Rupture Testing
  • ASTM D2990 – Tensile, Compressive and Flexural Creep and Creep-Rupture of Plastics
  • ASTM E139 – Conducting Creep, Creep-Rupture and Stress-Rupture Tests on Metallic Material
  • Density Testing
  • ASTM C271 – Density of Sandwich Core Materials
  • Fatigue Testing
  • ASTM C1360 – Constant Amplitude, Axial, Tension-Tension Cyclic Fatigue Testing of Continuous Fiber-Reinforced Advanced Ceramics
  • Tests may be finished at temperatures as much as 2500 °F
  • ASTM C1361 – Constant Amplitude, Axial, Tension-Tension Cyclic Fatigue Testing of Advanced Ceramics
  • Tests may be finished at temperatures as much as 2500 °F
  • ASTM D3479 – Tension – Tension Fatigue Testing of Polymer Matrix Composite Materials
  • ASTM D7791 – Uniaxial Fatigue Properties of Plastics
  • ASTM E466 – Force Controller Constant Amplitude Axial Fatigue Testing of Metallic Materials
  • Flexural Strength Testing
  • ASTM C158 – Strength of Glass with the aid of using Flexure
  • ASTM C393 – Core Shear Properties Testing of Sandwich Constructions with the aid of using Beam Flexure
  • ASTM C651 – Flexural Strength of Carbon and Graphite with the aid of using Four-Point Loading
  • ASTM C1161 – Flexural Strength Testing of Advanced Ceramics
  • ASTM C1341 – Flexural Properties of Continuous Fiber-Reinforced Advanced Ceramic Composites
  • ASTM D790 – Flexural Properties Testing of Unreinforced and Reinforced Plastics
  • ASTM D4476 – Flexural Properties Testing of Fiber Reinforced Pultruded Plastic Rods
  • ASTM D6272 – Flexural Properties Testing of Unreinforced and Reinforced Plastics with the aid of using Four-Point Bending
  • ASTM D7264 – Flexural Properties Testing of Polymer Matrix Composite Materials
  • ISO 178 – Plastics – Determination of Flexural Properties
  • ISO 14125 (Method B) – Fibre-Reinforced Plastic Composites – Determination of Flexural Properties
  • Formability Testing
  • ASTM E643 – Ball Punch Deformation Testing of Metallic Sheet Material
  • DIN EN 1669 – Earing Test for Sheet and Strip Aluminum and Aluminum Alloys
  • Fracture Toughness Testing
  • ASTM B646 – Fracture Toughness Testing of Aluminum Alloys
  • ASTM E399 – (K-Value) Linear-Elastic Plane-Strain Fracture Toughness of Metallic Materials
  • ASTM E561 – K-R Curve Determination Testing
  • ASTM E740 – Fracture Testing with Surface-Crack Tension Specimens
  • ASTM E1820 -Measurement of Fracture Toughness
  • Impact / Drop Weight Testing
  • ASTM D256 – Izod Pendulum Impact Resistance of Plastics
  • ASTM E23 – Notched Bar Impact Test of Metallic Materials
  • ASTM E436 – Drop-Weight Tear Tests for Ferritic Steels
  • High Energy Drop Weight Impact Testing
  • ASTM D1781 – Climbing drum Peel for Adhesives
  • ASTM E2004 – Facing Cleavage of Sandwich Panels
  • Poisson’s Ratio Testing
  • ASTM E132 – Testing Poisson’s Ratio at Room Temperature-150 °F to +300 °F
  • Puncture Testing
  • ASTM D4833 – Puncture Resistance of Geomembranes and Related Products
  • Shear Testing
  • ASTM B769 – Shear Testing of Aluminum Alloys
  • ASTM C273 – Shear Properties Testing of Sandwich Core Materials
  • ASTM C1292 – Shear Strength Testing of Continuous Fiber-Reinforced Advanced Ceramics
  • ASTM D732 – Shear Strength Testing of Plastics
  • ASTM D2344 – Short-Beam Strength Testing of Polymer Matrix Composite Materials (Interlaminar Shear)
  • ASTM D3528 – Strength Properties Testing of Double Lap Shear Adhesive Joints with the aid of using Tension Loading
  • ASTM D3846 – In-Plane Shear Strength Testing of Reinforced Plastics
  • ASTM D3914 – In-Plane Shear Strength Testing of Pultruded Glass-Reinforced Plastic Rods
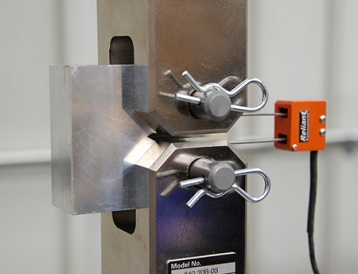
  • ASTM D5379 – Shear Properties Testing of Composite Materials with the aid of using the V-Notched Beam Method (Iosipescu Shear)
  • ASTM D7078 – Shear Properties Testing of Composite Materials with the aid of using V-Notched Rail Shear
  • ISO 1922 – Determination of Shear Strength of Rigid Cellular Plastics
  • ISO 4587 – Tensile Lap-Shear Strength of Rigid-to-Rigid Bonded Assemblies
  • Stress-Corrosion Testing
  • ASTM G38 – Standard Practice for Making and Using C-Ring Stress-Corrosion Test Specimens
  • ASTM G49 – Standard Preparation and Use of Direct Tension Stress-Corrosion Test Specimens
  • ASTM G64 – Classification of Resistance to Stress-Corrosion Cracking of Heat-Treatable Aluminum Alloys
  • ASTM G139 – Determination of Stress-Corrosion Cracking Resistance of Heat-Treatable Aluminum Alloy Products Using Breaking Load Method
  • Tensile Testing
  • ASTM C297 – Flatwise Tensile Strength of Sandwich Constructions
  • ASTM C565 – Tension Testing of Carbon and Graphite Mechanical Materials
  • ASTM C1147 – Short Term Tensile Weld Strength of Chemical-Resistant Thermoplastics
  • ASTM C1275 – Tensile Testing of Continuous Fiber-Reinforced Advanced Ceramics (CFCC’s)
  • ASTM C1359 – Monotonic Tensile Strength Testing of Fiber-Reinforced Advanced Ceramics
  • ASTM C1468 – Transthickness Tensile Strength of Continuous Fiber-Reinforced Advanced Ceramics at Ambient Temperature
  • ASTM D638 – Tensile Testing of Plastics
  • ASTM D882 – Tensile Testing of Thin Plastic Sheeting
  • ASTM D885 – Tensile Properties of Tire Cords, Tire Cord Fabrics, and Industrial Filament Yarns
  • ASTM D3039 – Tensile Testing of Polymer Matrix Composites
  • ASTM D3822 – – Tensile Properties of Single Textile Fibers
  • ASTM D3916 – Tensile Testing of Glass-Fiber-Reinforced Plastic Rods
  • ASTM D4533 – Trapezoid Tearing Strength of Geotextiles
  • ASTM D4632 – Grab Breaking Load and Elongation of Geotextiles
  • ASTM D5179 – Tensile Testing of Organic Coatings to Plastic Substrates
  • ASTM E8 – Tensile Testing of Metals
  • ASTM E21 – Tensile Testing of Metals at Elevated Temperatures (as much as 2500 °F)
  • ASTM E238 – Pin Bearing Test of Metallics
  • ASTM E338 – Sharp Notch Tension Testing of High Strength Sheet Materials
  • ASTM E345 – Tension Testing of Metallic Foil
  • ASTM E517 – Plastic Strain Ratio “r” for Sheet Metal
  • ASTM E646 – Tensile Strain-Hardening Exponents (n-Values) of Metallic Sheet Metals
  • ISO 527-1 – Tensile Properties of Plastics
  • ISO 527-3 – Tensile Properties of Plastic Films and Sheets
  • ISO 6892-1 – Tensile Testing Metallic Materials at Room Temperature
  • ISO 6892-2 – Tensile Testing Metallic Materials at Elevated Temperature
  • Thermal Expansion Testing
  • ASTM E228 – Linear Thermal Expansion of Solid Materials with a Push-Rod Dilatometer
  • Q2) Give the discussion about mechanical testing.Q2) Discussion about mechanical testing:
  • From uncooked substances to completed products, IMR's mechanical checking out institution gives a extensive variety of checking out to assess metals, polymers, composites and completed products.
  • Whether you want ordinary tensile checking out or a extra complicated multi-level fatigue program, we're ready to offer the solutions you want.
  • Most checking out is finished in 3 days or much less for ordinary tensile, hardness and Charpy effect checking out.
  • More complicated assessments like hydrogen embrittlement, dynamic mechanical evaluation (DMA) and weld checking out are dealt with in a well timed manner, whole with thorough analyses.
  • Our fatigue checking out frames permit us to simulate numerous use environments in excessive and coffee cycle mode.
  • These frames additionally permit us to carry out fracture durability and crack increase experiments.
  • With capacities to run complete check plans from -320°F to 1800°F, we are able to carry out HCF (High Cycle Fatigue) and LCF (Low Cycle Fatigue) checking out and evaluation of warm phase fueloline turbine additives and different excessive temperature applications.
  • CREEP AND STRESS RUPTURE TESTING:
  • creep-strain-rupture-crop-300Creep checking out gives facts approximately the overall performance of a fabric below an implemented load, frequently at multiplied temperatures.
  • Stress rupture checking out is just like creep, however with better stresses as samples are constantly run till failure.
  • These assessments are designed to assess the capacity of a component or cloth to securely preserve a load and are vital to producers in a extensive variety of industries inclusive of aerospace and electricity era amongst others.
  • IMR Test Labs' centers withinside the US and Asia provide creep and strain rupture checking out on metal substances.
  • We can run creep samples at temperatures as much as 1500ºF and strain rupture samples to 2100ºF, with managed relative humidity from 40% to 70%. Our frames masses have potential of as much as 12,000 lbs.
  • All specimens are single-factor machined inside IMR and coffee-strain grind is available.
  • We have complete virtual temperature and pressure statistics logging to make sure you get accurate, measurable results.
  • Description: creep-stress-rupture-crop-300


    Creep and rupture testing   Q3) Explain fatigue testing and tensile testing on various materials.A3) FATIGUE TESTING:
  • Fatigue Testing Study 1Fatigue trying out is used to decide the lifespan that may be predicted from a fabric subjected to cyclic loading.
  • A metallic or nonmetallic material's fatigue existence is the whole quantity of cycles that it may be subjected to beneathneatha unmarried loading setup.
  • A fatigue take a look at also can used for the dedication of the most load that a pattern can face up to all through a particular quantity of cycles.
  • The maximum not unusual place sorts of fatigue trying out are load managed excessive cycle (HCF) and stress managed low cycle fatigue (LCF).
  • An HCF take a look at determines elastic load traits and LCF checks assist outline plastic deformations.
  • These checks are performed to have a look at and examine the behavior, susceptibility, and quantity of resistance of sure substances to sharp-notch tension, tear, axial fatigue, stress-managed fatigue, floor crack tension, creep crack, and residual stress.
  • Our cryogenic fatigue trying out frames can accommodate temperatures down to -320°F.
  • Description: Fatigue Testing Study 1


    Fatigue testingTENSILE TESTING FOR METALS AND NON-METALLIC MATERIALS:
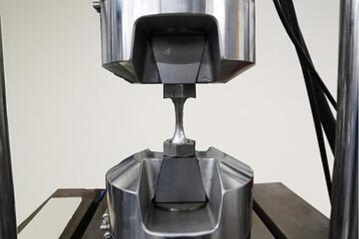
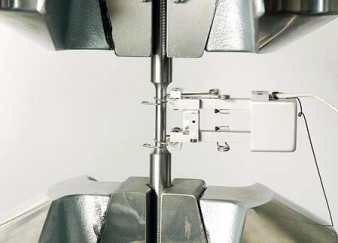
  • Tensile trying out is one of the maximum primary techniques for figuring out a cloth’s electricity characteristics.
  • Depending at the very last utility of the cloth, the take a look at can also additionally name for a static load, or one this is slowly carried out over time.
  • Uniaxial pressure outcomes degree Young’s modulus, Poisson’s ratio and yield electricity.
  • This information is essential in figuring out flexibility and electricity of the cloth used with inside the very last product.
  • For substances being applied in hot temperature environments, a complete array of cryogenic and high-temperature trying out packages are required.
  • Accurate non-ambient trying out information is decided with our often calibrated equipment.
  • IMR's clients mechanically depend on our skilled machinists for specific training in their trying out samples for consistency.
  • Description: CloseupGrips_0


    Tensile Testing Q4) Explain fracture mechanics and toughness testing and charpy impact testing.A4) FRACTURE MECHANICS AND TOUGHNESS TESTING:
  • Fracture mechanics gives fantastic perception into the connection among implemented loading, environmental factors, the presence of cracks and crack-like defects, and the inherent residences of the cloth utilized in components.
  • Many industries (eg. Aerospace, Power Generation, Automotive, Construction, etc.) depend on fracture sturdiness checking out to resource in layout of strong merchandise which can resist more than a few carrier hundreds and environments without failure, especially with cyclic loading situations which might be underneath the historically applied layout residences of yield or tensile energy of the cloth.
  • This has brought about improved, harm tolerant designs and more secure structures.
  • Fracture mechanics checking out can offer quantitative consequences that resource in predicting crack initiation and crack increase rate.
  • Testing may be carried out to decide linear elastic simple stress fracture sturdiness (K) and elastic-plastic fracture sturdiness (J) values which can then be used to apprehend how a layout will reply to carrier situations via utility of fracture mechanics like finite detail analysis (FEA).
  • IMR Test Labs gives authorized checking out to ASTME E399 (K1c) and ASTM E1820 (J1c), amongst different sturdiness tests, using present day device to assist together along with your cloth choice and layout efforts.
  • Our skilled engineers can assist with specimen layout and check parameter choice to pleasant help with fracture mechanic checking out needs.
  • Description: fracture-mechanics-450-1


    Fracture Mechanics and Toughness testingCHARPY IMPACT TESTING:
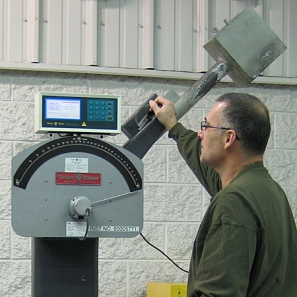
  • Charpy effect trying out is a treasured approach to decide the quantity of strength a fabric absorbs in the course of fracture.
  • Also referred to as a Charpy V-Notch test, a pendulum is dropped from a regarded peak and influences a notched specimen of material.
  • By evaluating the distinction with inside the peak of the hammer earlier than and after the fracture, one could degree the strength absorbed.
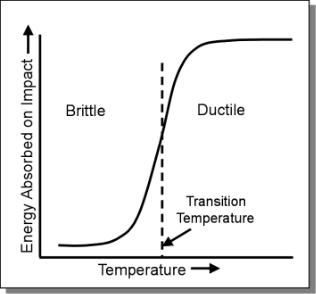
  • This offers records at the material's notch durability and facilitates recognize temperature-based ductile-brittle transition.
  • Ductile vs. brittle fracture may be in comparison via way of means of searching on the shear regions of damaged Charpy specimens to estimate a percent of each.
  • IMR Test Labs gives Charpy effect trying out to numerous specs and at temperatures from -320°F to 400°F.
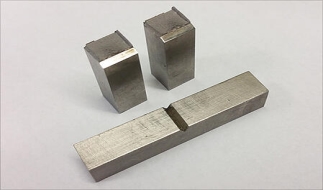
  • Description: charpy samples


    Specimen of charpy test Q5) Explain hardness testing and analysis.A5) HARDNESS TESTING AND ANALYSIS:
  • Hardness checking out is a simple mechanical take a look at used to confirm that uncooked substances meet specifications, or it could be used as a brief take a look at for substances that are not acting as expected.
  • Hardness checks quantify the resistance of a cloth to plastic deformation and are to be had as micro indentation or macro indentation.
  • IMR gives numerous substances hardness checking out options:
  • Rockwell, Brinell (on metals)
  • Macro Vickers, Vickers, Knoop (microhardness)
  • Barcol, Durometer, Shore (on polymers and composites)
  • The number one reason of hardness checking out is to decide if a cloth is appropriate for a given application, or the specific remedy to which the fabric has been subjected.
  • Hardness checks are commonly clean to perform, which has made this sort of checking out the maximum not unusual place inspection technique for metals and alloys.
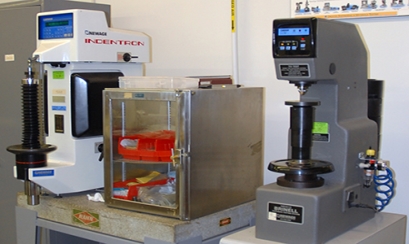
  • Description: Hardness-1


    Equipments of Hardness TestingNaming system for various irons,steels and nonferrous metals:
  • AISI/SAE metallic numbers are indicated below:
  • AISI - American Iron and Steel Institute
  • SAE - Society of Automotive Engineers
  • Alloy steels and carbon steels may be unique with particular grades via way of means of a four-digit AISE/SAE numerical index gadget.
  • The gadget is primarily based totally at the chemical compositions of the steels and alloys.
  • Example AISI/SAE No. 1020
  • the primary digit suggests that that is simple carbon metallic.
  • the second one digit suggests there aren't anyt any alloying elements
  • the remaining  digits suggests that the metallic incorporates about 0.20 percentage carbon
  • Example AISI/SAE No. 4340
  • the primary  digits suggests a Nickel-Chromium-Molybdenum alloy metallic
  • the remaining  digits suggests carbon content material more or less 0.4 percentage
  • AISI/SAE

    Designation

    Steel/Alloy

    Chemical Composition

    10XX

    Carbon steels

    Plain carbon, Mn 1.00% max

    11XX

    Resulfurized free machining

    12XX

    Resulfurized / rephosphorized free machining

    15XX

    Plain carbon, Mn 1.00-1.65%

    13XX

    Manganese steel

    Mn 1.75%

    23XX

    Nickel steels

    Ni 3.50%

    25XX

    Ni 5.00%

    31XX

    Nickel-chromium steels

    Ni 1.25%, Cr 0.65-0.80%

    32XX

    Ni 1.75%, Cr 1.07%

    33XX

    Ni 3.50%, Cr 1.50-1.57%

    34XX

    Ni 3.00%, Cr 0.77%

    40XX

    Molybdenum steels

    Mo 0.20-0.25%

    44XX

    Mo 0.40-0.52%

    41XX

    Chromium-molybdenum steels

    Cr 0.50-0.95%, Mo 0.12-0.30%

    43XX

    Nickel-chromium-molybdenum steels

    Ni 1.82%, Cr 0.50-0.80%, Mo 0.25%

    47XX

    Ni 1.05%, Cr 0.45%, Mo 0.20-0.35%

    46XX

    Nickel-molybdenum steels

    Ni 0.85-1.82%, Mo 0.20-0.25%

    48XX

    Ni 3.50%, Mo 0.25%

    50XX

    Chromium steels

    Cr 0.27-0.65%

    51XX

    Cr 0.80-1.05%

    50XXX

    Cr 0.50%, C 1.00% min

    51XXX

    Cr 1.02%, C 1.00% min

    52XXX

    Cr 1.45%, C 1.00% min

    61XX

    Chromium-vanadium steels

    Cr 0.60-0.95%, V 0.10-0.15%

    72XX

    Tungsten-chromium steels

    W 1.75%, Cr 0.75%

    81XX

    Nickel-chromium-molybdenum steels

    Ni .30%, Cr 0.40%, Mo 0.12%

    86XX

    Ni .55%, Cr 0.50%, Mo 0.20%

    87XX

    Ni .55%, Cr 0.50%, Mo 0.25%

    88XX

    Ni .55%, Cr 0.50%, Mo 0.35%

    92XX

    Silicon-manganese steels

    Si 1.40-2.00%, Mn 0.65-0.85%, Cr 0-0.65%

    93XX

    Nickel-chromium-molybdenum steels

    Ni 3.25%, Cr 1.20%, Mo 0.12%

    94XX

    Ni 0.45%, Cr 0.40%, Mo 0.12%

    97XX

    Ni 0.55%, Cr 0.20%, Mo 0.20%

    98XX

    Ni 1.00%, Cr 0.80%, Mo 0.25%

     Q6) Give the discussion about elastic deformation.A6) Discussion about elastic deformations:
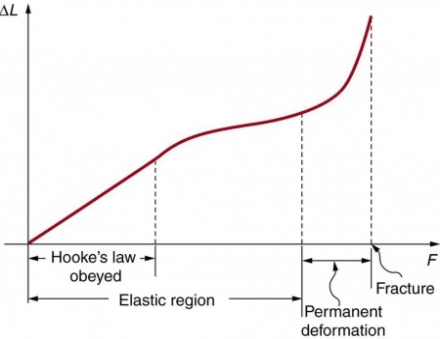
  • Elastic deformation refers to a transient deformation of a fabric's form this is self-reversing after doing away with the pressure or load.
  • Elastic deformation alters the form of a fabric upon the software of a pressure inside its elastic limit.
  • This bodily assets guarantees that elastic substances will regain their authentic dimensions following the discharge of the implemented load.
  • Here deformation is reversible and non-permanent. Elastic deformation of metals and ceramics is usually visible at low strains; their elastic conduct is typically linear.
  • When metals are positioned beneath small masses or stresses, they deform. When the implemented masses are removed, metals go back to their authentic form.
  • This transient deformation of metals is referred to as elastic deformation.
  • Elastic deformation entails the transient stretching or bending of bonds among atoms.
  • For example, whilst bending a metal sheet, the bonds are bent or stretched only some percentage however the atoms do now no longer slip beyond every other.
  • Elastic deformation may be because of making use of shear forces or tension / compression strain.
  • In contrast, plastic deformation takes place whilst those stresses are enough to completely deform the metal.
  • In plastic deformation, breaking of bonds is because of the dislocation of atoms.
  • The elastic deformation of cloth permits them to get over strain and repair their everyday functionality.
  • But those homes degrade over the years and in a few situations the cloth can turn out to be brittle and lose their ductility.
  • Materials turn out to be much less pliable whilst bloodless or subjected to hardening chemical compounds that intervene with their elasticity.
  • To hold or boom a fabric's elasticity, a few softening substances are introduced to the blend.
  • For example, unique softening substances may be introduced to the polymer plastics blend to permit them to bend and supply beneath stress without completely converting their form.
  • Description: Elasticity: Stress and Strain | Physics


    Graph showing elastic deformation Q7) Explain what do you mean by plastic deformation?A7) Plastic Deformation:
  • Plastic deformation is a process in which enough stress is placed on metal or plastic to cause the object to change its size or shape in a way that is not reversible.
  • In other words, the changes are permanent; even when the stress is removed the material will not go back to its original shape.
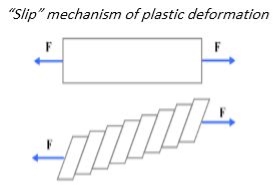
  • Description: enter image description here


    Slip mechanism of plastic deformation
  • Both the deformation of plastic and the deformation of metals contain adjustments to the make-up of the fabric itself.
  • For example, metals that go through this method of plastic deformation revel in a circumstance called dislocation.
  • As pressure of a few kind is exerted at the steel the fabric reaches a factor called the yield power.
  • When this factor is carried out the styles of the molecules that make up the steel start to shift.
  • The cease end result is that the molecules realign in a sample this is fashioned via way of means of the outside pressure located at the object.
  • Plastic deformation is a alternate of the fabric dimensions closing after elimination of the burden triggered the deformation.
  • When the yield pressure is carried out one aircraft of atoms in crystal lattice glides over any other.
  • Few parallel slip planes shape a block neighboring with any other block. Thus motion of the crystal planes is ended in a chain of steps forming slip bands – black traces considered below optical microscope.
  • Slip happens whilst the percentage resolved pressure alongside the gliding planes reaches a vital cost. This vital resolved shear pressure is a feature of the fabric.
  • Certain metals (Zn and Sn) deform via way of means of a method of twinning, differing from the everyday slip mechanism, in which all atoms in a block pass the identical distance.
  • In the deformation via way of means of twinning atoms of every slip aircraft in a block pass one of a kind distance, inflicting 1/2 of of the crystal lattice to end up a replicate photograph of any other 1/2 of.
  • In polycrystalline fabric guidelines of slips are one of a kind in one of a kind crystals.
  • If a grain is orientated unfavorably to the pressure course its deformation is impeded.
  • In addition to this grain boundaries are boundaries for the slip motion because the slip course have to be modified whilst it crosses the boundary.
  • As a end result of the above power of polycrystalline substances is better, than that of mono-crystals.
  • Slip and twinning processes, going on in the course of plastic deformation bring about formation of desired orientation of the grains.
  • If the pressure cost required for a slip is better than concord power, steel fracture happens.
  •  Q8) Explain what do you mean by impact test?A8) Impact Test:
  • Impact Testing of metals is executed to decide the effect resistance or sturdiness of substances via way of means of calculating the quantity of electricity absorbed in the course of fracture.
  • The effect check is executed at numerous temperatures to find any results on effect electricity.
  • These offerings offer check effects that may be very beneficial in assessing the suitability of a cloth for a particular software and in predicting its anticipated carrier life.
  • IMPACT TEST METHODS OFFERED BY LTI:
  • Laboratory Testing Inc. with inside the Philadelphia, PA (USA) vicinity gives steel effect checking out the use of the drop weight check and charpy effect checking out techniques, along with the charpy V-notch check and weld charpy check.
  • The ASTM effect check techniques are often executed.
  • Testing may be performed at temperatures withinside the variety of -452ºF to 500ºF with an effect electricity as much as 320 ft. lbs.
  • The Charpy Test approach determines the sturdiness or effect power of the fabric with inside the presence of a flaw or notch and speedy loading conditions.
  • This unfavorable check entails fracturing notched effect check specimens at a chain of temperatures with a swinging pendulum.
  • The quantity of electricity absorbed via way of means of the fabric in the course of fracture is measured.
  • Charpy V notch or U notch check specimens are used.
  • The Drop Weight Test determines the temperature at which the fracture mode of metal adjustments from ductile to brittle the use of a free-falling weight or striker.
  • SPECIMENS FOR IMPACT TESTING:
  • LTI has sizable in-residence machining abilities permitting us to fast put together precision specimens for our effect checking out lab.
  • Our full-carrier Machine Shop prepares all kinds of steel effect specimens with the ultra-modern CNC equipment.
  • LTI is on NIST’s (National Institute of Standards and Technology) Qualified Manufacturers List for Charpy V-notch Impact verification specimens.
  •  TEST METHODS/SPECIFICATIONS:
  • ASTM A370
  • ASTM E23
  • ASTM E208
  • ISO 148
  • THE IMPACT TEST PROCESSES:Iron and all different body-targeted cubic metals go through a transition from ductile conduct at better temperatures to brittle conduct at decrease temperatures. Impact Testing is needed via way of means of many industries to assess the sturdiness of substances utilized in production products, along with metal hull plate for ships, nuclear plant strain vessels and forgings for electric powered energy plant generator rotors.

    Description: https://www.labtesting.com/wp-content/uploads/2012/08/charpy_impact_test.jpg


    Impact testingQ9) What do you mean by charpy testing?A9) CHARPY TESTING:
  • The Charpy Impact Test includes placing a notched effect specimen with a swinging weight or a “tup” connected to a swinging pendulum.
  • The specimen breaks at its notched cross-phase upon effect, and the upward swing of the pendulum is used to decide the quantity of power absorbed (notch sturdiness) with inside the process.
  • Energy absorption is without delay associated with the brittleness of the material. Since temperature can have an effect on the sturdiness of a fabric, the charpy check is achieved at a chain of temperatures to reveal the connection of ductile to brittle transition in absorbed power.
  • Several machined bar specimens, sized at 1cm x 1cm x 5.5cm with a 2mm deep U-formed notch on the center of a certain flat surface, are required to carry out a few techniques of charpy checking out.
  • The charpy V-notch effect check is likewise very not unusual place and calls for a specimen with a V-formed notch.
  • The effect specimens are examined at a chain of certain temperatures (e.g. -20ºC, -10ºC, 0ºC, +10ºC, +20ºC) with inside the variety of -452ºF to 500ºF.
  • Low temperature charpy checking out includes setting the charpy check specimen in a chamber tub of propylene glycol and dry ice till a calibrated thermocouple facts the temperature required for the check.
  • Once a specimen reaches an appropriate temperature, it's miles fast positioned right into a unique holder with inside the check machine.
  • The charpy check specimen is positioned horizontally with the notch dealing with far from the pendulum or striker and is supported on sides.
  • DROP WEIGHT TEST:
  • The drop weight effect checks topics a chain of specimens at a development of temperatures to an unmarried effect load from a guided free-falling weight or striker dropped in a vertical direction.
  • The drop weight check determines the most temperature at which a beam specimen breaks or the temperature at which the fracture mode of the metal modifications from ductile to brittle, that's referred to as nil-ductility transition (NDT).
  • The preliminary check is performed at a temperature predicted to be close to the NDT temperature.
  • The last specimens are then examined at a development of temperature periods to decide the damage and no-damage overall performance temperatures inside 10°F or (5°C).
  •  Transition temperatures:
  • Transition temperature is the temperature at which a fabric modifications from one crystal state (allotrope) to another.
  • More formally, it's miles the temperature at which crystalline varieties of a substance can co-exist in equilibrium.
  • For instance, whilst rhombic sulfur is heated above 95.6 °C, it modifications shape into monoclinic sulfur; whilst cooled beneath 95.6 °C, it reverts to rhombic sulfur.
  • At 95.6 °C the 2 bureaucracy can co-exist. Another instance is tin, which transitions from a cubic crystal beneath 13.2 °C to a tetragonal crystal above that temperature.
  • In the case of ferroelectric or ferromagnetic crystals, a transition temperature can be referred to as the Curie temperature.
  • Description: 2:Ductile to Brittle Transition | School of Materials Science and  Engineering


    Showing Transition temperature graph Q10) Explain fracture mechanics background and fracture toughness.A10) Fracture Mechanics – background:
  • In 1983, the National Bureau of Standards (now the National Institute for Science and Technology) and Battelle Memorial Institute1 anticipated the prices for failure because of fracture to be $119 billion according to yr in 1982 bucks.
  • The bucks are critical, however the value of many screw ups in human lifestyles and damage is infinitely extra so.
  • Failures have passed off for plenty reasons, inclusive of uncertainties with inside the loading or environment, defects with inside the substances, inadequacies in layout, and deficiencies in creation or maintenance.
  • Design towards fracture has an era of its own, and that is a totally energetic place of cutting-edge research.
  • This module will offer a creation to a critical factor of this field, due to the fact without an expertise of fracture the strategies in pressure evaluation mentioned formerly could be of little use.
  • We will recognition on fractures because of easy tensile overstress, however the clothier is advised once more approximately the want to recollect truly as many elements as viable that could cause failure, particularly while lifestyles is at risk.
  • The Module at the Dislocation Basis of Yield (Module 21) suggests how the energy of structural metals – mainly steel – may be improved to very excessive degrees through manipulating the microstructure so that it will inhibit dislocation motion.
  • Unfortunately, this renders the cloth more and more brittle, in order that cracks can form and propagate catastrophically with little or no warning.
  • An unlucky quantity of engineering screw ups are associated immediately to this phenomenon, and engineers worried in structural layout ought to be privy to the approaches now to be had to guard towards brittle fracture.
  • The vital issue in designing towards fracture in excessive-energy substances is that the presence of cracks can adjust the nearby stresses to such an volume that the elastic pressure analyses carried out so cautiously through the designers are insufficient.
  • When a crack reaches a positive essential length, it is able to propagate catastrophically via the structure, despite the fact that the gross pressure is a great deal much less than could generally motive yield or failure in a tensile specimen.
  • The term “fracture mechanics” refers to a essential specialization inside stable mechanics wherein the presence of a crack is assumed, and we want to discover quantitative family members among the crack length, the cloth’s inherent resistance to crack growth, and the pressure at which the crack propagates at excessive pace to motive structural failure.
  • Fracture Toughness:
  • In substances science, fracture durability is the essential pressure depth issue of a pointy crack wherein propagation of the crack all at once will become fast and unlimited.
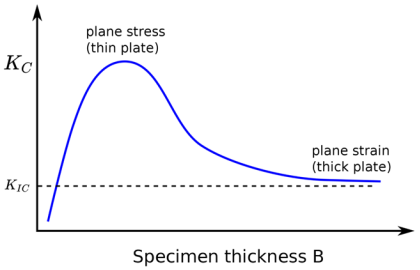
  • A component's thickness impacts the constraint situations on the tip of a crack with skinny additives having aircraft pressure situations and thick additives having aircraft stress situations.
  • Plane stress situations supply the bottom fracture durability cost that's a fabric property.
  • The essential cost of pressure depth issue in mode I loading measured below aircraft stress situations is referred to as the aircraft stress fracture durability, denoted KIc.
  • When a take a look at fails to satisfy the thickness and different take a look at necessities which are in region to make sure aircraft stress situations, the fracture durability cost produced is given the designation Kc.
  • Fracture durability is a quantitative manner of expressing a fabric's resistance to crack propagation and popular values for a given cloth are commonly to be had.
  •  

    Graph of Fracture toughnessFig. Impact of specimen thickness on fracture longevity
  • Slow self-maintaining crack propagation called strain corrosion cracking, can arise in corrosive surroundings above the brink Kiscc and beneath Kic.
  • Small increments of crack extension also can arise throughout fatigue crack growth, which after repeated loading cycles, can steadily develop a crack till very last failure happens with the aid of using exceeding the fracture longevity.
  •