Metrology
Q1) What do you mean by dimension and limits.
A1)
Limits:
Q2) Define fits and explain its types?
A2)
Fits:
It is defined as the degree of looseness or tightness between two mating parts.
Fit refers to the mating of two mechanical components. Manufactured parts are very frequently required to mate with one another. They may be designed to slide freely against one another or they may be designed to bind together to form a single unit. The most common fit found in the machine shop is that of a shaft in a hole.
Types of Fits:
There are three general categories of fits:
1) Clearance fits for when it may be desirable for the shaft to rotate or slide freely within the hole.
2) Transition fits for when it is desirable that the shaft to be held precisely, yet not so tightly that it cannot be disassembled, this is usually referred to as a Location or Transition fit.
3) Interference fits, for when it is desirable for the shaft to be securely held within the hole and it is acceptable that some force be necessary for assembly.
Clearance Fit:
Interference Fit:
Transition Fit:
Q3) Define Tolerance and its types? Why needs a tolerance? Give reason.
A3)
Tolerance:
It is defined as the difference between maximum limit and minimum limit of the hole or shaft.
Need of Tolerance:
Types of Tolerances:
Unilateral Tolerance:
Bilateral Tolerance:
Q4) What do you understand by term:
A4)
1. Linear Measurement:
Linear measurement means measurement between two points or planes. It is basically related with distance between them using line or end standard. Equipment's for linear measurement are:
2. Angular Measurement:
Vernier Bevel protractor:
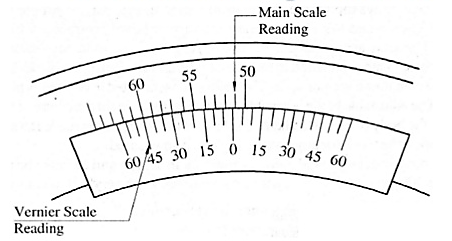
Fig. Vernier Bevel protractor
Q5) Explain the clinometer in detail.
A5)
Clinometers:
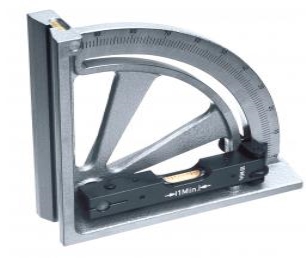
Fig. Clinometers
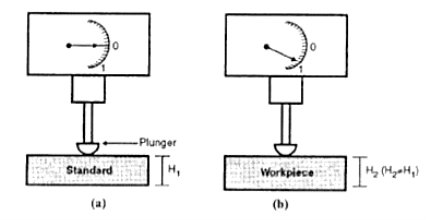
Q6) What do you mean by comparator and write its Basic principle.
A6)
Basic Principle:
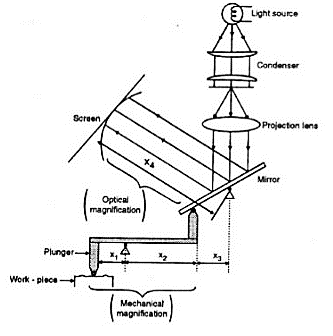
Q7) Write the principle of Mechanical-Optical Comparators and what are its uses?
A7)
Mechanical-Optical Comparators:
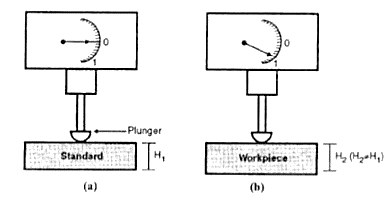
Fig. Mechanical-Optical Comparators:
Principle:
It works based on fundamental optical law as the edge of the shadow is projected on a curved graduated scale to indicate the comparison measurement.
Advantages: -
1. Less friction and inertia effect and higher accuracy
2. High magnification
3. Enables readings to be taken irrespective of room lighting conditions
4. High range and no parallax
Disadvantages: -
1. Requires light source
2. Large and expensive
3. Inconvenient for continuous use
4. Instrument setting may drift
Uses of Comparators:
Comparators can be used as:
1. Laboratory Standards
2. Working Gauges
3. Final Inspection Gauges
4. Receiving Inspection Gauges
5. For Checking Newly Purchased Gauges
Q8) Write the principle of Mechanical-Optical Comparators and write its characteristics?
A8)
Principle:
It works based on fundamental optical law as the edge of the shadow is projected on a curved graduated scale to indicate the comparison measurement.
Characteristics:
1. Robust Design and Construction
2. Linear Characteristics of Scale
3. High Magnification
4. Quick in Results
5. Versatility
6. Minimum Wear of Contact Point
7. Free from oscillations and back lash
8. Quick Insertion of Work piece
9. Adjustable table
10.Compensation from Temperature Effects
11.Means to Prevent Damage
Q9) What are the Important Points for Gauge Design to be considered while designing gauges?
A9)
When designing a gauge to check a piece of work you need to remember that like the items itself it is impossible to manufacture it to the exact size and form therefore there is also a tolerancing system for gauge design.
The tolerances and their dispositions for gauges depend on the following:
1) The nominal size of the product.
2) The tolerance grade of the product.
3) The type of gauge e.g., plug, ring Gap etc.
Important Points for Gauge Design Points to be considered while designing gauges:
1. The GO gauges should be replica of the mating parts.
2. GO gauges, enables several related dimensions to be checked simultaneously.
3. In inspection, GO gauges must be put into conditions of maximum impassability.
4. NOT GO gauges check a single element of feature at a time.
5. In inspection, NOT GO gauges must be put into conditions of maximum possibility.
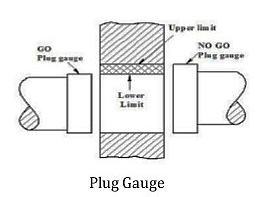
Fig. GO and NOT GO limits of plug gauge
Q10) Explain the Principle of Interference.
A10)
Principle of Interference:

Fig. Two waves of different wavelength, out of [phase by 180 degrees
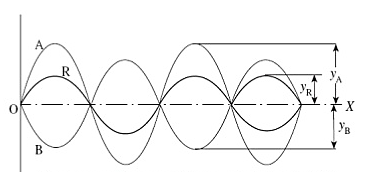
Fig. Two waves of different amplitude are in same phase