Question Bank
Unit - 6
- What are terminologies used in Isometric scales?
Ans:
Isometric projection is a type of pictorial projection in which the three dimensions of a solid are not only shown in one view, but their actual sizes can be measured directly from it.
If a cube is placed on one of its corners on the ground with a solid diagonal perpendicular to the V.P., the front view is the isometric projection of the cube. The step-by-step construction is shown in fig. 1.
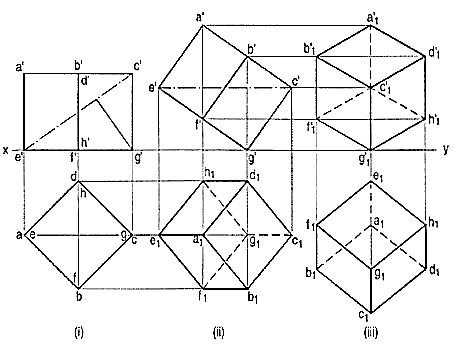
Figure 1
To draw the projections of a cube of 25 mm long edges resting on the ground on one of its corners with a solid diagonal perpendicular to the V.P., assume the cube to be resting on one of its faces on the ground with a solid diagonal parallel to the V.P.
(i) Draw a square abed in the top view with its sides inclined at 45° to xy. The line ac representing the solid diagonals AG and CE is parallel to xy. Project the front view.
(ii) Tilt the front view about the corner g' so that the line e' c' becomes parallel to xy. Project the second top view. The solid diagonal CE is now parallel to both the H.P. And the V.P.
(iii) Reproduce the second top view so that the top view of the solid diagonal, viz. e1 c1 is perpendicular to xy. Project the required front view.
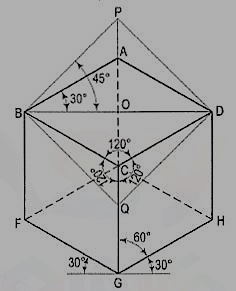
Fig. 2 shows the front view of the cube in the above position, with the corners named in capital letters. Its careful study will show that
(a) All the faces of the cube are equally inclined to the V.P. And hence, they are seen as similar and equal rhombuses instead of squares.
(b) The three lines CB, CD and CG meeting at C and representing the three edges of the solid right-angle are also equally inclined to the V.P. And are therefore, equally foreshortened. They make equal angles of 120° with each other. The line CG being vertical, the other two lines CB and CD make 30° angle each, with the horizontal
2. What is Isometric scale?
Ans:
As all the edges of the cube are equally foreshortened, the square faces are rhombuses. The rhombus ABCD (fig. 2) shows the isometric projection of the top square face of the cube in which BO is the true length of the diagonal.
Construct a square BQDP around BO as a diagonal. Then BP shows the true length of BA.
In triangle ABO, 
In triangle PBO, 

The ratio,  .
.
Thus, the isometric projection is reduced in the ratio  , i.e. the isometric lengths are 0.815 of the true lengths.
Therefore, while drawing an isometric projection, it is necessary to convert true lengths into isometric lengths for measuring and marking the sizes. This is conveniently done by constructing and making use of an isometric scale as shown below.
a) Draw a horizontal line BO of any length (fig. 3). At the end B, draw lines BA and BP, such that L OBA = 30° and L OBP = 45°. Mark divisions of true length on the line BP and from each division-point, draw verticals to BO meeting BA at respective points. The divisions thus obtained on BA give lengths on isometric scale.
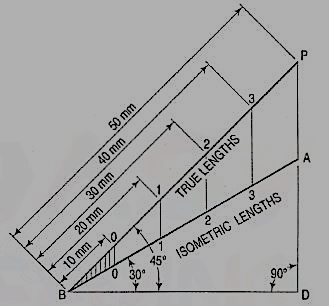
Figure 3
(b) The same scale may also be drawn with divisions of natural scale on a horizontal line AB (fig. 4). At the ends A and B, draw lines AC and BC making 15° and 45° angles with AB respectively, and intersecting each other at C.
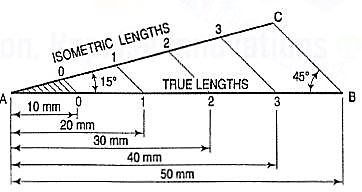
Figure 4
From division-points of true lengths on AB, draw lines parallel to BC and meeting AC at respective points. The divisions along AC give lengths to isometric scale.
The lines BO and AC (fig. 2) represent equal diagonals of a square face of the cube, but are not equally shortened in isometric projection. BO retains its true length, while AC is considerably shortened. Thus, it is seen that lines which are not parallel to the isometric axes are not reduced according to any fixed ratio. Such lines are called non-isometric lines. The measurements should, therefore, be made on isometric axes and isometric lines only. The non-isometric lines are drawn by locating positions of their ends on isometric planes and then joining them.
3. What are various Isometric views?
Ans:
If the foreshortening of the isometric lines in an isometric projection is disregarded and instead, the true lengths are marked, the view obtained [fig. 5(iii)] will be exactly of the same shape but larger in proportion (about 22.5%) than that obtained using the isometric scale [fig. 5(ii)]. Due to the ease in construction and the advantage of measuring the dimensions directly from the drawing, it has become a general practice to use the true scale instead of the isometric scale.
To avoid confusion, the view drawn with the true scale is called isometric drawing or isometric view, while that drawn with the use of isometric scale is called isometric projection.
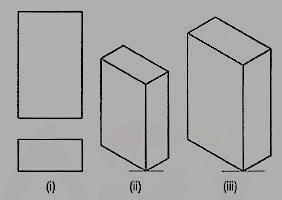
Figure 5
Referring again to fig. 2, the axes BC and CD represent the sides of a right angle in horizontal position. Each of them together with the vertical axis CG, represents the right angle in vertical position. Hence, in isometric view of any rectangular solid resting on a face on the ground, each horizontal face will have its sides parallel to the two sloping axes; each vertical face will have its vertical sides parallel to the vertical axis and the other sides parallel to one of the sloping axes.
In other words, the vertical edges are shown by vertical lines, while the horizontal edges are represented by lines, making 30° angles with the horizontal. These lines are very conveniently drawn with the T-square and a 30°-60° set-square or drafter.
4. What is Isometric Graph?
Ans:
An isometric graph as shown in fig. 6 facilitates the drawing of isometric view of an object. Students are advised to make practice for drawing of isometric view using such graphs.
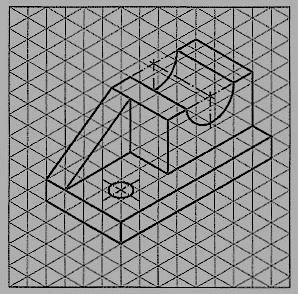
Figure 6
5. The front view of a square is given in fig. 7 (i). Draw its isometric view.
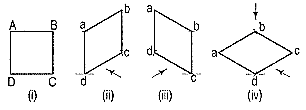
Figure 7
As the top view is a square, the surface of the square is horizontal. In isometric view, all the sides will be drawn inclined at 30° to the horizontal.
(i) From any point d [fig. 7(iv)], draw two lines da and dc inclined at 30° to the horizontal and making 120° angle between themselves.
(ii) Complete the rhombus abed which is the required isometric view.
6. Fig. 11 (i) shows the front view of a semi-circle whose surface is para1lel to the V.P. Draw its isometric view.
(i) Enclose the semi-circle in a rectangle. Draw the isometric view of the rectangle [fig. 11 (ii) and [fig. 11 (iii)].
(ii) Using the four-centre method, draw the half-ellipse in it which is the required view. The centre for the longer arc may be obtained as shown or by completing the rhombus.
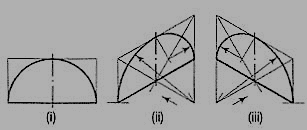
Figure 11
If the view given in fig. 11 (i) is the top view of a horizontal semi-circle, its isometric view would be drawn as shown in fig. 12 (i) and fig. 12 (ii).
7. Draw the isometric view of a square prism, side of the base 20 mm long and the axis 40 mm long, when its axis is (i) vertical and (ii) horizontal.
(i) When the axis is vertical, the ends of the prism will be horizontal. Draw the isometric view (the rhombus 1-2-3-4) of the top end [fig. 14 (i)]. Its sides will make 30°-angles with the horizontal. The length of the prism will be drawn in the third direction, i.e. vertical. Hence, from the corners of the rhombus, draw vertical lines 1-5, 2-6 and 3-7 of length equal to the length of the axis. The line 4-8 should not be drawn, as that edge will not be visible. Draw lines 5-6 and 6-7, thus completing the required isometric view. Lines 7-8 and 8-5 also should not be drawn. Beginning may also be made by drawing lines from the point 6 on the horizontal line and then proceeding upwards.
(ii) When the axis is horizontal, the ends will be vertical. The ends can be drawn in two ways as shown in fig. 14 (ii) and fig. 14 (iii). In each case, the length is shown in the direction of the third isometric axis.
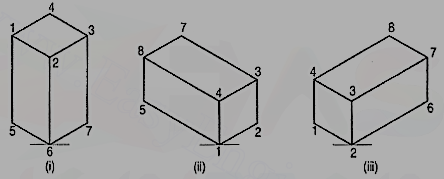
Figure 14
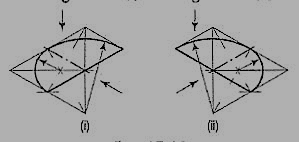
Figure 12
8. List out methods for drawing non-isometric lines.
Methods of drawing non-isometric lines.
When an object contains inclined edges which in the isometric view would be shown by non-isometric lines, the view may be drawn by using any one of the following methods:
(i) box method or
(ii) co-ordinate or offset method.
(iii) Box method: This method is used when the non-isometric lines or their ends lie in isometric planes. The object is assumed to be enclosed in a rectangular box. Initially, the box is drawn in isometric. The ends of the lines for the inclined edges are then located by measuring on or from the outlines of the box.
9. Draw the isometric view of the pentagonal pyramid, the projections of which are given in fig. 18 (i).
(i) Enclose the base (in the top view) in an oblong.
(ii) Draw an offset oq (i.e. pq) on the line ab.
(iii) Draw the isometric view of the oblong and locate the corners of the base in it [fig. 18 (ii)].
(iv) Mark a point Q on the line AB such that AQ = aq. From Q, draw a line QP equal to qo and parallel to 2C. At P, draw a vertical OP equal to o'p'.
(v) Join O with the corners of the base, thus completing the isometric view of the pyramid.
Fig. 18(iii) shows the isometric view of the same pyramid with its axis in horizontal position.
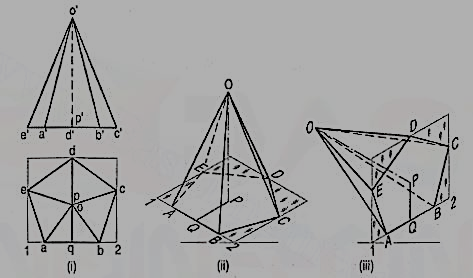
Figure 18
10. Draw the isometric view of the frustum of a cone shown in fig. 24 (i).
(i) Draw the ellipse for the base [fig. 24 (ii)]. Draw the axis.
(ii) Around the top end of the axis, draw the ellipse for the top.
(iii) Draw common tangents, erase the unwanted part of the ellipse and complete the view as shown.
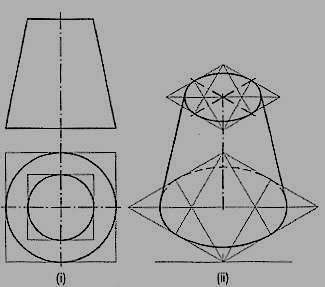
Figure 24