Unit – 2
Projections of Planes
Q1) Explain the projection of plane
A1) Plane: A 2-d surface having length and breadth and zero thickness.
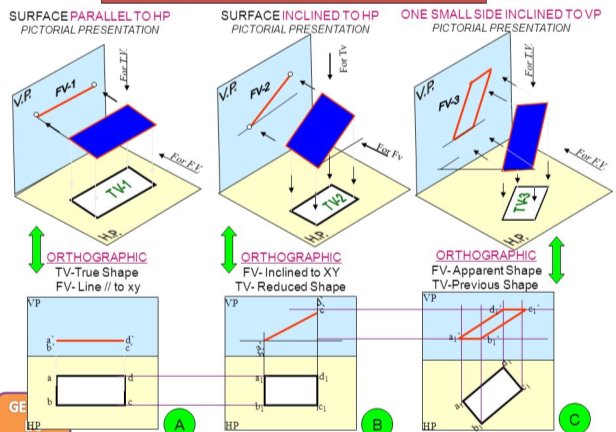
Different position of plane w.r.t. principle planes (HP, VP) •
Parallel to HP • Parallel to VP • Perpendicular to both HP and VP • Inclined to HP and perpendicular to VP • Inclined to VP and perpendicular to HP • Inclined to both HP and VP

Q2) A cube of 35 mm long edges is resting on the H.P. on one of its faces with a vertical face inclined at 30° to the V.P. It is cut by a section plane parallel to the V.P. and 9 mm away from the axis and further away from the V.P. Draw its sectional front view and the top view.
A2) In fig. (i), the section plane is assumed to be transparent and the cube is shown with the cut-portion removed. Four edges of the cube are cut and hence, the section is a figure having four sides.
Draw the projections of the whole cube in the required position [fig. (ii)]. As the section plane is parallel to the V.P., it is perpendicular to the H.P.; hence, the section will be a line in the top view coinciding with the H.T. of the section plane.
(i) Draw a line H.T. in the top view (to represent the section plane) parallel to xy and 9 mm from o.
(ii) Name the points at which the edges are cut, viz. ab at 1, be at 2, gf at 3 and fe at 4.
(iii) Project these points on the corresponding edges in the front view and join them in proper order.
As the section plane is parallel to the V.P., figure 1' 2' 3' 4' in the front view, shows the true shape of the section.
Show the views by dark but thin lines, leaving the lines for the cut-portion fainter.
(iv) Draw section lines in the rectangle for the section.

Q3) A square lamina of 40mm side rests on one of its sides on HP. The lamina makes 30° to HP and the side on which it rests makes 45° to VP. Draw its projections.
A4)

Q4) Pentagonal lamina of edges 25mm is resting on HP with one of its sides such that the surface makes an angle of 600 with HP. The edge on which it rests is inclined at 450 to VP. Draw its projections.
A4)

Q5) A triangular prism, base 30 mm side and axis 50 mm long, is lying on the H.P. on one of its rectangular faces with its axis inclined at 30° to the V.P. It is cut by a horizontal section plane, at 12 mm above the ground. Draw its front view and sectional top view.
A5) As the section plane is horizontal, i.e., parallel to the H.P., it is perpendicular to the V.P. Hence, the section will be a line in the front view, coinciding with the V. T. of the section plane.
(i) Therefore, draw a line V.T. in the front view to represent the section plane, parallel to xy and 12 mm above it.
(ii) Name in correct sequence, points at which the edges are cut viz. a'b' at 1 ', a'c' at 2', d'f' at 3' and d'e' at 4'.
(iii) Project these points on the corresponding lines in the top view and complete the sectional top view by joining them in proper order. As the section plane is parallel to the H.P., the figure 1 2 3 4 (in the top view) is the true shape of the section

Q6) Explain True Shape of Sections of Solids
A6) A section will show its true shape when viewed in normal direction. To find the true shape of a section, it must be projected on a plane parallel to the section plane. For polyhedra, the true shape of the section depends on the number of POIs. The true shape of the section of a sphere is always a circle. Types of sections of solid.
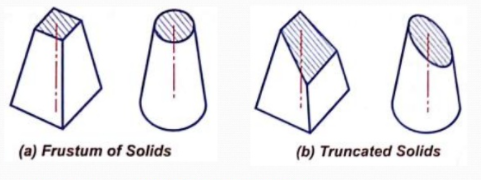
1) Frustum of a solid
When a solid is cut by a cutting plane parallel to its base, the portion obtained after removing the top portion is called Frustum solid.
2) Truncated solid
When a solid is cut by a cutting plane incline to its base, the portion obtained after removing the top portion is called truncated solid.

