Unit – 4
Isometric Projections
Q1) What is the Isometric Projections
A1) Isometric projection is a type of pictorial projection in which the three dimensions of a solid are not only shown in one view, but their actual sizes can be measured directly from it.
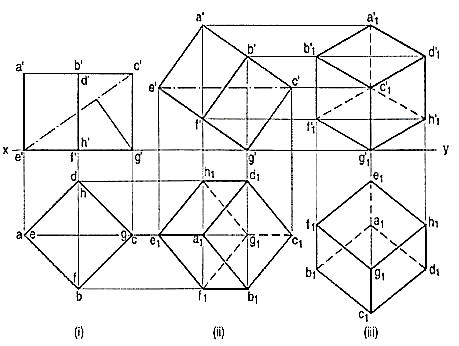
If a cube is placed on one of its corners on the ground with a solid diagonal perpendicular to the V.P., the front view is the isometric projection of the cube. The step-by-step construction is shown in fig.

To draw the projections of a cube of 25 mm long edges resting on the ground on one of its corners with a solid diagonal perpendicular to the V.P., assume the cube to be resting on one of its faces on the ground with a solid diagonal parallel to the V.P.
(I) draw a square abed in the top view with its sides inclined at 45° to xy. The line ac representing the solid diagonals AG and CE is parallel to xy. Project the front view.
(ii) Tilt the front view about the corner g' so that the line e' c' becomes parallel to xy. Project the second top view. The solid diagonal CE is now parallel to both the H.P. and the V.P.
(iii) Reproduce the second top view so that the top view of the solid diagonal, viz. e1 c1 is perpendicular to xy. Project the required front view.
Figure shows the front view of the cube in the above position, with the corners named in capital letters. Its careful study will show that
(a) All the faces of the cube are equally inclined to the V.P. and hence, they are seen as similar and equal rhombuses instead of squares.
(b) The three lines CB, CD and CG meeting at C and representing the three edges of the solid right-angle are also equally inclined to the V.P. and are therefore, equally fore shortened. They make equal angles of 120° with each other. The line CG being vertical, the other two lines CB and CD make 30° angle each, with the horizontal.
Q2) Explain the Views and Drawing of various Plane and Solids objects.
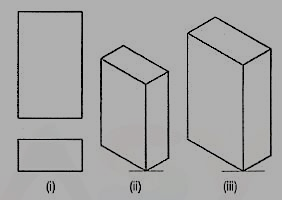
A2) If the foreshortening of the isometric lines in an isometric projection is disregarded and instead, the true lengths are marked, the view obtained [fig. 5(iii)] will be exactly of the same shape but larger in proportion (about 22.5%) than that obtained using the isometric scale [fig. (ii)]. Due to the ease in construction and the advantage of measuring the dimensions directly from the drawing, it has become a general practice to use the true scale instead of the isometric scale.
To avoid confusion, the view drawn with the true scale is called isometric drawing or isometric view, while that drawn with the use of isometric scale is called isometric projection.

Referring again to fig., the axes BC and CD represent the sides of a right angle in horizontal position. Each of them together with the vertical axis CG, represents the right angle in vertical position. Hence, in isometric view of any rectangular solid resting on a face on the ground, each horizontal face will have its sides parallel to the two sloping axes; each vertical face will have its vertical sides parallel to the vertical axis and the other sides parallel to one of the sloping axes.
In other words, the vertical edges are shown by vertical lines, while the horizontal edges are represented by lines, making 30° angles with the horizontal. These lines are very conveniently drawn with the T-square and a 30°-60° set-square or drafter
Q3) Draw the isometric view of a square prism, side of the base 20 mm long and the axis 40 mm long, when its axis is (i) vertical and (ii) horizontal.
(i) Draw the ellipse for the base (i)]. Determine the position of the apex by the offset method.
(ii) Draw tangents to the ellipse from the apex. Erase the part of the ellipse between the tangents and complete the view as shown.
(iii) See fig. (ii) which is self-explanatory.

2. Draw the isometric view of the frustum of a cone shown in fig. (i).
(i) Draw the ellipse for the base [fig. (ii)]. Draw the axis.
(ii) Around the top end of the axis, draw the ellipse for the top.
(iii) Draw common tangents, erase the unwanted part of the ellipse and complete the view as shown.
A3) Isometric drawing of Sphere
The orthographic view of a sphere seen from any direction is a circle of diameter equal to the diameter of the sphere. Hence, the isometric projection of a sphere is also a circle of the same diameter as explained below.
The front view and the top view of a sphere resting on the ground are shown in fig. (i). C is its center; D is the diameter and P is the point of its contact with the ground.

Assume a vertical section through the centre of the sphere. Its shape will be a circle of diameter D. The isometric projection of this circle is shown in fig. 29 (ii) by ellipses 1 and 2, drawn in two different vertical positions around the same centre C. The length of the major axis in each case is equal to D. The distance of the point P from the centre C is equal to the isometric radius of the sphere.
Again, assume a horizontal section through the centre of the sphere. The isometric projection of this circle is shown by the ellipse 3, drawn in a horizontal position around the same centre C. In this case also, the distance of the outermost points on the ellipse from the centre C is equal to O.5D.
Thus, in an isometric projection, the distances of all the points on the surface of a sphere from its centre, are equal to the radius of the sphere.
Hence, the isometric projection of a sphere is a circle whose diameter is equal to the true diameter of the sphere.
Also, the distance of the centre of the sphere from its point of contact with the ground is equal to the isometric radius of the sphere, viz. CP.
It is, therefore, of the utmost importance to note that, isometric scale must invariably be used, while drawing isometric projections of solids in conjunction with spheres or having spherical parts.
Q4) Explain Classification of perspective projections.
A4)
I. Parallel perspective or single point perspective.
2. Angular perspective or two-point perspective.
3. Oblique perspective or three-point perspective.
Parallel perspective or single point perspective
If the principal face of the object viewed, is parallel to the picture plane, the perspective view formed is called parallel perspective. Such a perspective view is shown in Fig. 17 (a). In parallel perspective views, the horizontal lines receding the object converge to a single point called vanishing point (V.P.). But the vertical and horizontal lines on the principal face and the other faces of the object, do not converge, if these lines are parallel to the picture plane. Because the lines on the faces parallel to the picture plane do not converge to a point and the horizontal lines receding the object converge to a single vanishing point, the perspective projection obtained is called parallel or single point perspective. Single point perspective projection is generally used to present the interior details of a room, interior features of various components, etc.
Angular perspective or two-point perspective
If the two principal faces of the object viewed are inclined to the picture plane, the perspective view formed is called angular perspective. Such a perspective is shown in Fig. 17 (b). In angular perspective views, all the horizontal lines converge to two different points called vanishing point left (V.P.L.) and vanishing point right (V.P.R). But the vertical lines remain vertical. Because the two principal faces are inclined to picture plane and all the horizontal lines on the object converge to two different vanishing points, the perspective view obtained is called angular or two-point perspective. Two-point perspective projection is the most generally used to present the pictorial views of long and wide objects like buildings, structures, machines, etc.
Oblique perspective or three-point perspective
If all the three mutually perpendicular principal faces of the object viewed, are inclined to the picture plane, the perspective view formed is called oblique perspective. Such a perspective view is shown in Fig. 17(c). In oblique perspective views, all the horizontal tines converge to two different points called vanishing point left (V.P.L.) and vanishing point right (V.P.R) and all the vertical lines converge to a third vanishing point located either above or below the horizon line. Because all the three principal faces are inclined to the picture plane and all the horizontal and the vertical lines on the object converge to three different vanishing points, the perspective view obtained is called oblique or three-point perspective.
Three-point perspective projection may be used to draw pictorial views of huge and tall objects like tall buildings, towers, structures, etc. If the station point is near by the ground plane, the vertical lines will vanish at a point above the horizon line. If the station point is located above the object, all the vertical lines will vanish at a point below the horizon line. Oblique perspective projection is seldom used in practice.
