Unit – 3
Cold Working
Q1) Discuss the operations that can be performed on lathe machine.
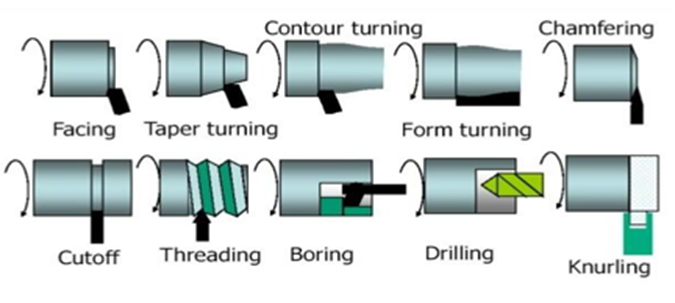
A1) Turning is the most important machining process and can produce a wide variety of parts on lathe.
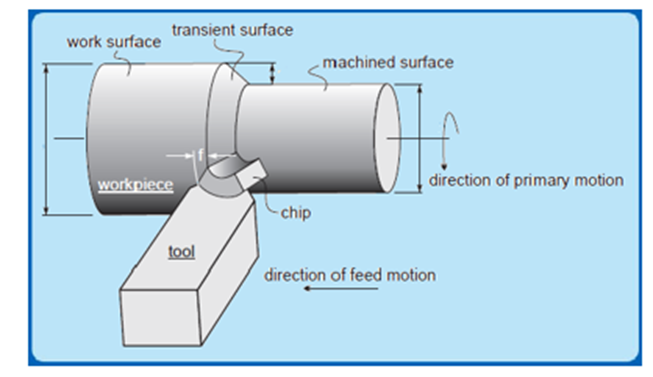
The major sub types of turning are:
Q2) What do you mean by forging and their defects.
A2) Forging
Forging is defined as the plastic deformation of metals at elevated temperatures into a predetermined size or shape using compressive forces exerted through some means of hand hammers, small power hammers, die, press or upsetting machine. It consists essentially of changing or altering the shape and section of metal by hammering at a temperature of about 980°C, at which the metal is entirely plastic and can be easily deformed or shaped under
pressure.
Forging operation can be accomplished by hand or by a machine hammer. Forging processes may be classified into hot forging and cold forgings and each of them possesses their specific characteristics, merits, demerits and applications. Hand forging process is also known as black-smithy work which is commonly employed for production of small articles using hammers on heated jobs.
Forging Defects:
1. Unfilled Section:
As the name implies in this type of defect some of the forging section remain unfilled. This is due to poor design of die or poor forging technic. This is also due to less raw material or poor heating. This defect can be removed by proper die design, proper availability of raw material and proper heating.
2. Cold Shut:
Cold shut includes small cracks at corners. These defects occur due to improper design of forging die. It is also due to sharp corner, and excessive chilling in forge product. The fillet radius of the die should be increase to remove these defects.
3. Scale Pits:
Scale pits are due to improper cleaning of forged surface. This defect generally associated with forging in open environment. It is irregular deputations on the surface of forging. It can be removed by proper cleaning of forged surface.
4. Die Shift:
Die shift is caused by misalignment of upper die and lower die. When both these dies are not properly aligned the forged product does not get proper dimensions. This defect can be removed by proper alignment. It can be done by provide half notch on upper die and half on lower die so at the time of alignment, both these notches will be matched.
5. Flakes:
These are internal cracks occur due to improper cooling of forge product. When the forge product cooled quickly, these cracks generally occur which can reduce the strength of forge product. This defect can be removed by proper cooling
Q3) Differentiate between hot working and cold working.
A3) Cold working is metal forming performed at room temperature or slightly above whereas hot working involves deformation at temperatures above the recrystallization temperature.
Significant advantages of cold forming compared to hot forming are: (i) greater accuracy, meaning closer tolerances can be achieved, (ii) better surface finish, (iii) higher strength and hardness of the part due to strain hardening, (iv) grain flow during deformation provides the opportunity for desirable directional properties to be obtained in the resulting product, and (v) no heating of the work is required, which saves on furnace and fuel costs and permits higher production rates.
Advantages of hot working relative to cold working:
(i) the shape of the work part can be significantly altered, (ii) lower forces and power are required to deform the metal, (iii) metals that usually fracture in cold working can be hot formed, (iv) strength properties are generally isotropic because of the absence of the oriented grain structure typically created in cold working.
Q4) List any six forging defects.
A4) 1. Unfilled Section:
As the name implies in this type of defect some of the forging section remain unfilled. This is due to poor design of die or poor forging technic. This is also due to less raw material or poor heating. This defect can be removed by proper die design, proper availability of raw material and proper heating.
2. Cold Shut:
Cold shut includes small cracks at corners. These defects occur due to improper design of forging die. It is also due to sharp corner, and excessive chilling in forge product. The fillet radius of the die should be increase to remove these defects.
3. Scale Pits:
Scale pits are due to improper cleaning of forged surface. This defect generally associated with forging in open environment. It is irregular deputations on the surface of forging. It can be removed by proper cleaning of forged surface.
4. Die Shift:
Die shift is caused by misalignment of upper die and lower die. When both these dies are not properly aligned the forged product does not get proper dimensions. This defect can be removed by proper alignment. It can be done by provide half notch on upper die and half on lower die so at the time of alignment, both these notches will be matched.
5. Flakes:
These are internal cracks occur due to improper cooling of forge product. When the forge product cooled quickly, these cracks generally occur which can reduce the strength of forge product. This defect can be removed by proper cooling.
6. Improper Grain Growth:
This defect occurs due to improper flow of metal in casting which changes predefine grain structure of product. It can be removed by proper die design.
Q5) Write the sheet metal operations and explain them.
A5) 1. Shearing
It is a cut in a straight line across a strip, sheet or bar. It leaves a lean edge on the piece of metal is sheared or cut. In this operation, a sheet metal workpiece is placed or kept between two dies from one end. And, the punch is hit at the other end of the sheet, producing a shearing effect.
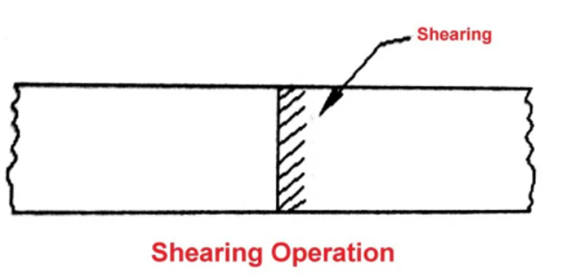
It has 3 basic stages:
a) Plastic Deformation
When a metal is placed between the upper and lower blades of the shear and pressure is applied, plastic deformation takes place. It extends into metal for about 5 to 40% of metal thickness.
b) Fracture
At the point of greatest stress concentration fracture takes place.
c) Shear
Small fractures are found and the metal is sheared.
2. Blanking

It is an operation of cutting a whole piece from sheet metal. In which enough scrap is left all around as shown in fig. A punch and die is applied for this type of sheet metal operation.
3. Punching

It is an operation of producing circular holes on a sheet of metal by a punch and die. This is the exact opposite of blanking but the operation is nearly the same. A Punch and die are further used here such as blanking operations.
4. Piercing
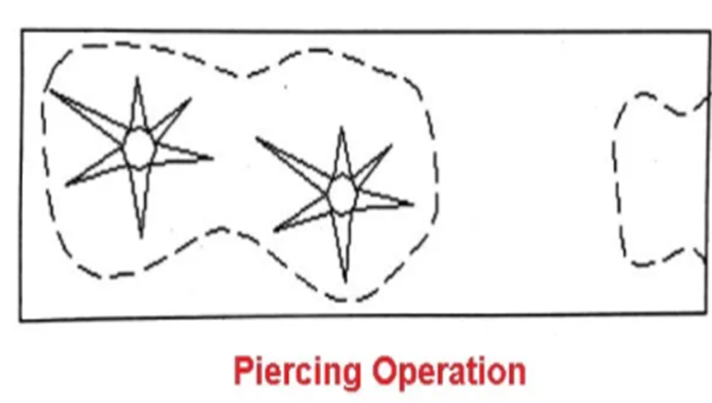
Piercing is the process in which desired shape holes are produced in a piece of sheet metal without eliminating any material from the sheet or removing a very small amount of material as shown in the figure. Both punch and die are also applied in this operation. The punch used in the piercing operation is usually bullet-shaped.
5. Trimming

The trimming operation is also known as shaving operation. It is a finishing operation by removing the burrs from the cut edges is taken out in order to make edges smooth and also provide dimensional accuracy.
6. Drawing
It is an operation of producing thin-walled hallows or vessel shaped parts from sheet metal. It can be divided into two categories:
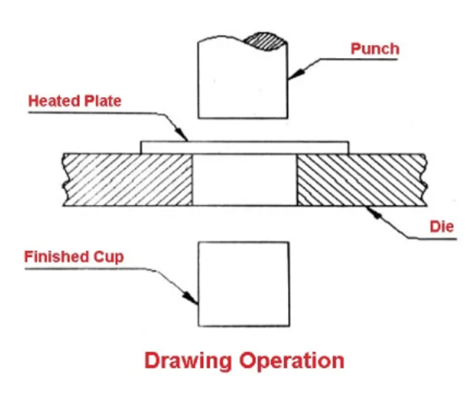
a) Deep Drawing
The length of depth of the object to be drawn is deeper than its width.
b) Shallow Drawing
The length of the object to be drawn is less than its width. The examples of drawing are pans, tubes and cams.
7. Embossing
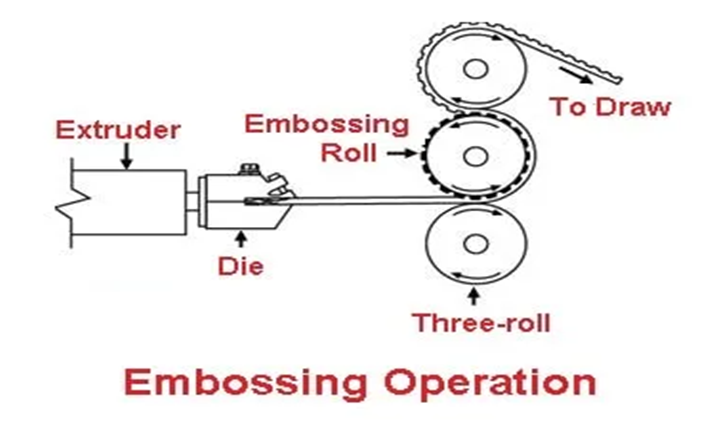
It is the metalworking operation which is used to create raised surfaces or lettering in sheet metal. There is no change in metal thickness during this operation.
8. Bending
It occurs when forces are applied to localized areas. Here the metal flow is uniform along the bend axis with the inner surface in compression and outer surface in tension.

9. Squeezing
It is a quick and widely used way of forming ductile metals. It has different operations such as sizing, coining, riveting etc.
1. Sizing
Sizing operation is a squeezing operation that reduces the thickness of the metal. The sizing is done in an open die and only the surface where the die and workpiece touch will be sized.
2. Coining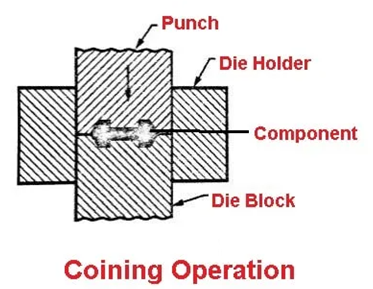
It is a process of pressing metal in a die so that it flows into the die space. For example, Medals, Coins, and Jewellery.
Q6) Explain the following
A6) Hot Rolling
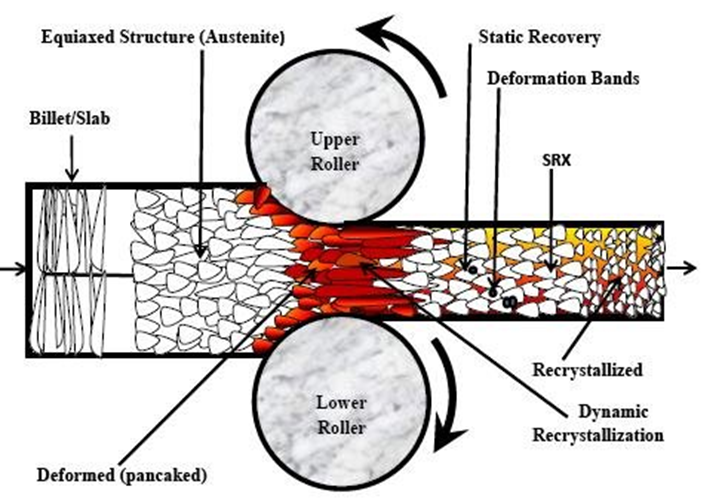
Rolling is the most rapid method of forming metal into desired shapes by plastic deformation through compressive stresses using two or more than two rolls. It is one of the most widely used of all the metal working processes. The main objective of rolling is to convert larger sections such as ingots into smaller sections which can be used either directly in as rolled state or as stock for working through other processes. Hot rolling process is being widely used in the production of large number of useful products such as rails, sheets, structural sections, plates etc. There are different types of rolling mills, which are described as under.
Drawing
In sheet metalworking, drawing refers to the forming of a flat metal sheet into a hollow or concave shape, such as a cup, by stretching the metal. A blank holder is used to hold down the blank while the punch pushes into the sheet metal. To distinguish this operation from bar and wire drawing, the terms cup drawing or deep drawing are often used.

Q7) What do you mean by machining process and define cutting tool materials.
A7)
Cutting Tool Materials
Commonly machined materials include plastics, aluminum, many varieties of steels including heat-treated tool steels that are as hard as a knife blade, ceramics, and many others. Cutting tools must be capable of retaining their hardness at high temperatures (hot hardness).
A variety of cutting tool materials are needed. Some must be very hard for long tool life and to machine hard workpiece materials. Others must be very shock resistant (tough) to withstand interrupted cuts (intermittent cutting action).
Q8) Explain forming with its applications.
A8) Forming is a process in which the desired size and shape are obtained through the plastic deformation of a material. The stresses induced during the process are greater than the yield strength, but less than the fracture strength of the material. The types of loading may be tensile, compressive, bending, or shearing, or a combination of these.
This is a very economical process as the desired shape, size, and finish can be obtained without any significant loss of material. Moreover, a part of the input energy is fruitfully utilized in improving the strength of the product. The typical forming processes are (i) rolling, (ii) forging, (iii) drawing, (iv) deep drawing, (v) bending, and (vi) extrusion.
Q9) Explain the following:
A9) Milling
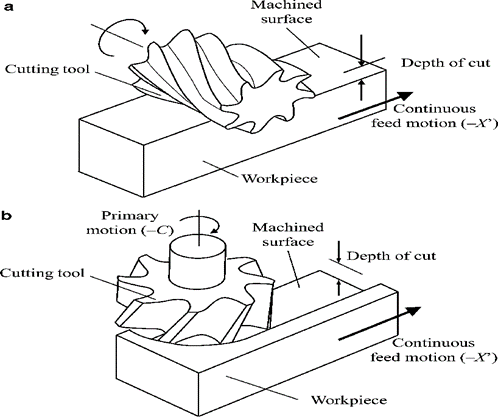
Milling is a process of producing flat and complex shapes with the use of multi-point (or multi-tooth) cutting tool. The axis of rotation of the cutting tool is perpendicular to the direction of feed, either parallel or perpendicular to the machined surface. Milling is usually an interrupted cutting operation
since the teeth of the milling cutter enter and exit the workpiece during each revolution.
Drilling
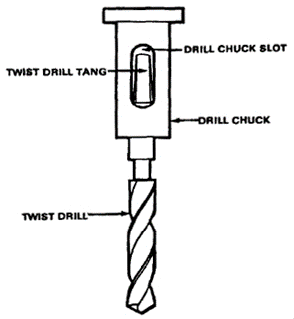
Drilling is a process of producing round holes in a solid material or enlarging existing holes with the use of multi-point cutting tools called drills or drill bits. Various cutting tools are available for drilling, but the most common is the twist drill.
Q10) Explain the wire drawing process.
A10) Wire Drawing
Drawing is an operation in which the cross-section of solid rod, wire or tubing is reduced or changed in shape by pulling it through a die. The principle of this procedure consists of reducing the thickness of a pointed, tapered wire by drawing it through a conical opening in a tool made of a hard material. The wire will take shape of the hole. Drawing improves strength and hardness when these properties are to be developed by cold work and not by subsequent heat treatment.
This process is widely used for the production of thicker walled seamless tubes and cylinders therefore; shafts, spindles, and small pistons and as the raw material for fasteners such as rivets, bolts, screws. Drawing is classified as
1. Wire drawing
2. Tube drawing
Wire Drawing: -
Wire drawing is a metal-reducing process in which a wire rod is pulled or drawn through a single die or a series of continuous dies, thereby reducing its diameter. Because the volume of the wire remains the same, the length of the wire changes according to its new diameter. Various wire tempers can be produced by a series of drawing and annealing operations. (Temper refers to toughness.) (a)
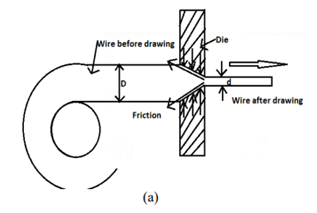
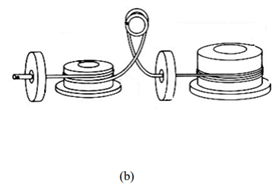

Figure-(a)Wire Drawing sectional view (b) wire drawing set up (c) Enlarge View of Wire Reduction
Process Characteristics
Tube Drawing
When a hollow tube is drawn through a die, generally a mandrel or plug is used to support the inside diameter of the tube, this process is called tube drawing. The function of the plug is to effect wall reduction and to control the size of the hole. However, the mandrel may be omitted if it is not necessary to make a reduction in the wall thickness, or if the dimensions and surface of the inside are not important. The process to draw a pipe without any mandrel is known as tube sinking.
In drawing tubes over a stationary mandrel, the maximum practical sectional area reduction does not exceed 40 per cent per pass due to the increased friction from the mandrel. If a carefully matched mandrel floats in the throat of the die, it is possible to achieve a reduction in area of 45 percent, and for the same reduction the drawing loads are lower than for drawing with a fixed plug. This style is called the drawing with floating plug. It is worth mentioning here that in this style, the tool design and lubrication can be very critical. Problems with friction in tube drawing are minimized in drawing with a long mandrel. The mandrel consists of a long hard rod or wire that extends over the entire length of the tube and is drawn through the die with the tube.
In this design, the area reduction can be 50 per cent. However, after drawing, the mandrel must be removed from the tube by rolling (reeling), which increases the tube diameter slightly and disturbs the dimensional tolerances. The drawing process discussed above has been illustrated in the figure

Figure-Tube drawing processes. (a) Sinking; (b) fixed plug; (c) floating plug; (d) moving mandrel
Defects in drawing process:

Figure (a) Wrinkling in the flange or (b) in the wall (c) tearing, (d) Earing, (e) surface scratches