Unit I
Conventional Manufacturing Processes
Question 1) Explain open Shrinkage Defects?
Answer 1) If the metal cools and shrinks with insufficient liquid available to fill any voids, pipes may form in the surface and extend into the body of the casting. Similarly, defects that form on the surface and spread across the face are sometimes called cave defects, or sinks. In both instances, the defects are open to atmosphere and air takes the place of molten metal.
Cracks and hot tears usually form in the final stages of solidification and can be localized around abrupt changes where stress concentration exists such as a thin web connecting two heavy sections. They can also occur where insufficient draft in the part exists and in heavy sections where heat pools.
Question 2) Explain Closed Shrinkage Defects?
Answer 2) Porosity is one of the main defects in castings and is caused by both trapped gases in the molten metal and as the casting shrinks during cooling. Shrinkage porosity is by far the most common type and can usually be detected on the surface of a cast part by what appear to be small holes or cracks. These holes may seem round but are actually angular in shape and tend to form branching internal fractures. Thick multi-angled parts are most susceptible to such shrinkage, which occurs as the metal cools and solidifies in a non-uniform pattern. Porosity can exist in the interior of a casting as well, without necessarily showing on the surface of a part. This occurs when liquid metal is surrounded by solidified metal and molten metal is unable to fill in behind the liquid as it cools and shrinks.
The most common causes of shrinkage are related to the casting sprue, which is the passage through which molten metal is poured into a mold. In some areas, such as the heavy sections of the mold, the metal takes longer to contract and solidify which reduces feed material availability and increases the likelihood of shrinkage, especially if the sprue is too small for the volume of flow. A properly sized sprue attached directly to the heavy section can fill the shrinkage cavity and provide the feed material necessary to counteract shrinkage as cooling occurs. In addition, using a rounded, rather than a flat or square, gate on the sprue can further reduce the risk of forming defects.
Using a narrow or tapered sprue can result in the molten metal being sprayed rather than poured into the cavity. When this happens, certain sections of the workpiece begin to solidify before the entire mold is filled. Molten flow into the cavity should be as uniform as possible, and a larger central sprue or a multiple-sprue arrangement can help achieve the even supply of material.
Risers are used to ensure that sufficient molten material is available to fill in where the part is solidifying and shrinking. Risers should be sized such that they are the last parts to freeze. Sometimes insulation is added to ensure this.
Shrinkage defects can be reduced by employing local heat dissipation, such as chills (metal inserted in the mold that melts during the pour), in areas where heat tends to pool--in thick, heavy sections, for example.
Simulation software can be used to optimize the filling of cavities through improved runner and gate designs and can predict the occurrence of shrinkage porosity. The flow of material through the mold can be controlled by good mold design and employment of techniques such as directional solidification.
Question 3) Explain Thermal Variations?
Answer 3) When an object is cooled from a high temperature (eg after welding), there is often a large difference in the rate of cooling throughout the body. The difference in cooling rates experienced by the surface and interior of the object results in localised variations in thermal contraction. The differing thermal contractions develop non-uniform stresses. During cooling, the surface cools at a quicker rate, compressing the heated material at the centre. As the material in the centre tries to cool, it is constrained by the cooler outer material. Consequently, the inner portion will have a residual tensile stress and the outer portion of the component will have a residual compressive stress.
How Can I Measure Residual Stress
There are many techniques used to measure residual stresses. These are broadly categorised into three areas: Destructive, semi-destructive and non-destructive. The approach to be used is often dependent on the information required. Owing to the complexity of some of the measurement techniques, the measurement must be performed in a specialised facility. This is particularly true for many non-destructive techniques.
Question 4) Explain Yield criteria?
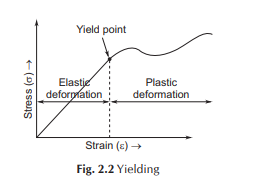
Answer 4) The yield strength or yield point of a material is defined as the stress at which a material begins to deform plastically. For loading less than yield point, the material will deform elastically and it will return to original shape when the loading is removed. Once the yield point is passed, some fraction of the deformation will be permanent and non-reversible. Knowledge of the yield point is vital when designing a component as it represents the upper limit to the load which can be applied on the component. The yield point is also important for the control of many manufacturing processes such as (i) forging, (ii) rolling and (iii) bending in which the material has to be plastically deformed.

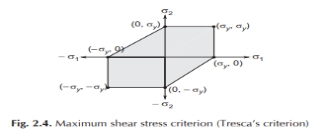
Graphically, the maximum shear stress criterion requires that the two principal stresses be within the shaded zone as shown shaded in Fig. 2.4

Question 5) What is Hot Working?
Answer 5) If the metalworking process is carried out above its re-crystallization temperature, it is called as hot working.
Re-crystallization temperature is the temperature at which atomic mobility can be repaired when any defect was present in the metal caused by the working process. In this process, the metal is heated to the plastic state, and then the pressure is applied to get various size and shapes. When the pressure is applied, the metal grain size will be varied, and the metal’s mechanical properties are improved.
If the pressure is applied by hand hammer, then it is called as hand or smith forging. If hand hammering is replaced by power hammers, then it is called hammer forging. Such type hot working of metals is called as hot forging. Hot-working can be used for forging, extrusion, and drawing, etc.
When metals are worked above the re-crystallization temperature, then it becomes plastic and causes the growth of grains. During the hot working, the grains become loosened in their structure, and they realign in a proper manner. Only small pressure is required to shape the metal.
Question 6) Explain Disadvantages of Hot working?
Answer 6)
1. It is a costlier process.
2. Hot working leads to poor surface finish due to oxidation, because the material will be worked under high temperature.
3. Sometimes it leads to lower strength due to loss of carbon due to oxidation.
4. On account of the loss of carbon from the surface of the steel piece being worked, the surface layer loses its strength, which is a disadvantage when the part is put to service.
5. It is difficult to attain dimensional accuracy due to uneven shrinkage of metal
Question 7) What is Cold Working?
Answer 7) If the metalworking process is carried out at a temperature below the re-crystallization temperature, it is called a cold working process. This process needs comparatively higher pressure than hot working.
Soft, ductile, and malleable metals can be easily worked with cold working. But this process leads to hardness and distorted grain structure. The cold working process is used in rolling, bending, spinning process, etc.
The cold working process also affects the following mechanical properties of metals significantly.
1. Hardness.
2. Yield Strength.
3. Ductility.
4. Tensile Strength.
Question 8) Explain Advantages of Cold Working?
Answer 8)
1. Dimensional accuracy can be maintained.
2. No heating of metals.
3. Better surface finish can be achieved since there is no oxidation during the cold working of metals.
4. Strength and hardness of the metal are increased.
5. Due to cold working, metal gains strength and hardness.
6. Better strength and wear properties of the material can be achieved.
Question 9) Explain Blending and Mixing?
Answer 9) this is carried out to achieve uniformity of the product manufactured. Distribution of properly sized particles is attained by mixing elementary powder with alloy powders to obtain a homogeneous mixture. Lubricants are also mixed with powders to minimize the wear of dies and reduce friction between the surfaces of dies and particles of powder during compaction. Mixing time will depend upon the results desired, and over-mixing should be prevented, or otherwise the size of particles will be decreased and they will be hardened.
Question 10) Explain Properties of Metal Powders?
Answer 10) Properties of metal powder depend upon the process employed for its production. Therefore, it is essential to determine the physical and chemical properties of powders to prevent variations in the desired characteristics of the compactions. Significant properties of metal powders are:
Chemical composition that is determined by chemical analysis.
Shape of particles that is affected by methods employed for production of powder.
Particle size influences the properties of flow and density of powder metal. It can be measured by a microscope, sieve, or by sedimentation.
Distribution of particle size has a significant effect on physical properties of powder, and can be determined by sieving test.
Flow ability is the relative ease of the flow of powder through an orifice.
Bulk density can be measured by filling a pot whose volume is known with powder, and then obtaining the weight of the powder.
Other properties include compressibility, compatibility, sintering ability, and specific surface.