Question Bank
Unit 7
1. Methods of projection?
Ans –
Following four methods of projection are commonly used,
1) Orthographic projection.
2) Isometric projection.
3) Oblique projection.
4) Perspective projection.
2. What is dimetric and trimetric projections?
Ans –
Dimetric projection involvesthe use of two different scales. The simplest is isometric,which uses a single scale for all axes. Trimetric projection isthe mostinvolved of the three and uses three different scalesfor measurement. Figure illustrates the differences in scalebetween isometric, diametric, and trimetric drawings.

3. What is perspective view from a picture plane?
Ans –
The perspective will show the object reduced in size when it is
Placed behind the picture plane. If the object is moved nearer the picture plane,
The size of the perspective will increase. When the picture plane coincides with theobject, the perspective of the object will be of its exact size. When the object isplaced in front of the picture plane, its perspective, when projected back, will showthe object enlarged in size.
In fig. 1(i), the line AB is behind the picture plane. Its perspective A'B' is
Shorter than AB. In fig. 1(ii), AB is in the picture plane; its perspective A'B' is
Equal to AB and coincides with it. Fig. 1(iii) shows the line AB placed in front
Of the picture plane; when projected back on the picture plane, its perspective A 'B'is longer than AB.

4. What is full sectional view?
Ans –
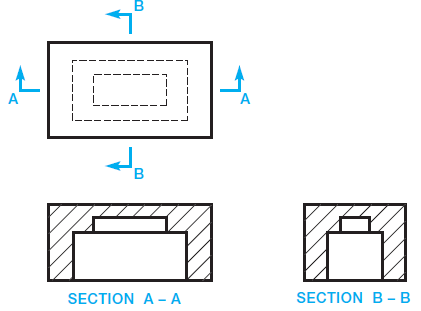
A full section is drawn when the cutting plane extends completely through the object, usually along a center plane as shown in Figure 3. The object shown in Figure 3 could have used two full sections to further clarify hidden features. In such a case, the cutting planes and related views are labelled (see Figure 3). The cutting-plane line can be omitted when the relationship between views is obvious. Confirm this practice with your instructor or employer. It is normally best to show the cutting-plane line for clarity.


Figure 3