UNIT 5
Isometric Projection
1. Draw the projections of a cube of 25 mm long edges resting on the ground on one of its corners with a solid diagonal perpendicular to the V.P., assume the cube to be resting on one of its faces on the ground with a solid diagonal parallel to the V.P.
(i) Draw a square abed in the top view with its sides inclined at 45° to xy. The line ac representing the solid diagonals AG and CE is parallel to xy. Project the front view.
(ii) Tilt the front view about the corner g' so that the line e' c' becomes parallel to xy. Project the second top view. The solid diagonal CE is now parallel to both the H.P. And the V.P.
(iii) Reproduce the second top view so that the top view of the solid diagonal, viz. e1 c1 is perpendicular to xy. Project the required front view.
Fig. 2 shows the front view of the cube in the above position, with the corners named in capital letters. Its careful study will show that
(a) All the faces of the cube are equally inclined to the V.P. And hence, they are seen as similar and equal rhombuses instead of squares.
(b) The three lines CB, CD and CG meeting at C and representing the three edges of the solid right-angle are also equally inclined to the V.P. And are therefore, equally foreshortened. They make equal angles of 120° with each other. The line CG being vertical, the other two lines CB and CD make 30° angle each, with the horizontal.
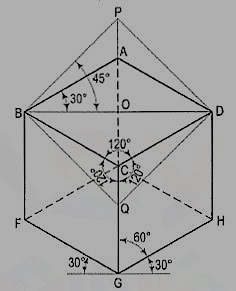
Figure 1
(c) All the other lines representing the edges of the cube are parallel to one or the other of the above three lines and are also equally foreshortened.
(d) The diagonal BO of the top face is parallel to the V.P. And hence, retains its true length.
2. Draw a horizontal line BO of any length (fig. 3). At the end B, draw lines BA and BP, such that L OBA = 30° and L OBP = 45°. Mark divisions of true length on the line BP and from each division-point, draw verticals to BO meeting BA at respective points. The divisions thus obtained on BA give lengths on isometric scale.

Figure 2
3. The same scale may also be drawn with divisions of natural scale on a horizontal line AB (fig. 4). At the ends A and B, draw lines AC and BC making 15° and 45° angles with AB respectively, and intersecting each other at C.
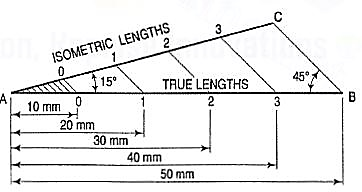
Figure 3
From division-points of true lengths on AB, draw lines parallel to BC and meeting AC at respective points. The divisions along AC give lengths to isometric scale.
The lines BO and AC (fig. 2) represent equal diagonals of a square face of the cube, but are not equally shortened in isometric projection. BO retains its true length, while AC is considerably shortened. Thus, it is seen that lines which are not parallel to the isometric axes are not reduced according to any fixed ratio. Such lines are called non-isometric lines. The measurements should, therefore, be made on isometric axes and isometric lines only. The non-isometric lines are drawn by locating positions of their ends on isometric planes and then joining them.
4. The front view of a square is given in fig. 4 (i). Draw its isometric view.

Figure 4
As the top view is a square, the surface of the square is horizontal. In isometric view, all the sides will be drawn inclined at 30° to the horizontal.
(i) From any point d [fig. 4(iv)], draw two lines da and dc inclined at 30° to the horizontal and making 120° angle between themselves.
(ii) Complete the rhombus abed which is the required isometric view.
5. Fig. 5 (i) shows the front view of a circle whose surface is parallel to the V.P. Draw the isometric view of the circle.
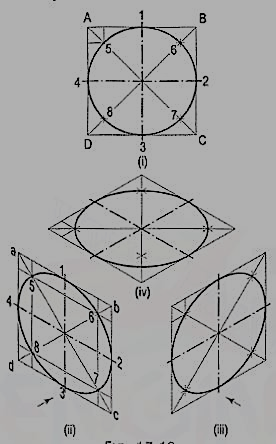
Figure 5
I. Method of points:
(i) Enclose the circle in a square, touching it in points 1, 2, 3 and 4. Draw the diagonals of the square cutting the circle in points 5, 6, 7 and 8.
(ii) Draw the isometric view of the square [fig. 8 (ii) and [fig. 8 (iii)] and on it mark the mid-points 1, 2, 3 and 4 of its sides. Obtain points 5, 6, 7 and 8 on the diagonals.
If the view given in fig. 8 (i) is the top view of a circle whose surface is horizontal, its isometric view will be as shown in fig. 8 (iv).
As the isometric views have been drawn with the true scale, the major axis of the ellipse is longer than the diameter of the circle.

Figure 6
Fig. 6 (ii), fig. 6 (iii) and fig. 6 (iv) show the isometric projection of the circle drawn with isometric scale. Note that when the length of the side of the rhombus is equal to the isometric diameter of the circle, the length of the major axis of the ellipse is equal to the true diameter of the circle.
6. Draw the isometric view of the square [fig. 7 (i)]. Draw perpendicular bisectors of the sides of the rhombus, intersecting each other on the longer diagonal at points p and q, and which meet at the 120°-angles b and d.
Or, draw lines joining the 120°-angles b and d with the mid-points of the opposite sides and intersecting each other on the longer diagonal at points p and q. Two of these lines will be drawn horizontal, while the other two will make 60°-angles with the horizontal. With centres b and d, draw arcs 3-4 and 1-2 respectively. With centres p and q, draw arcs 1-4 and 2-3 respectively and complete the required ellipse. Fig. 10 (ii) shows the ellipse obtained in the rhombus drawn in the direction of the other sloping axis. Fig. 10 (iii) shows the isometric view of the circle when its surface is horizontal.

Figure 10
The ellipse obtained by the four-centre method is not a true ellipse and differs considerably in size and shape from the ellipse plotted through points. But owing to the ease in construction and to avoid the labour of drawing freehand neat curves, this method is generally employed.
7. Fig. 11 (i) shows the front view of a semi-circle whose surface is para1lel to the V.P. Draw its isometric view.
(i) Enclose the semi-circle in a rectangle. Draw the isometric view of the rectangle [fig. 11 (ii) and [fig. 11 (iii)].
(ii) Using the four-centre method, draw the half-ellipse in it which is the required view. The centre for the longer arc may be obtained as shown or by completing the rhombus.

Figure 11
If the view given in fig. 11 (i) is the top view of a horizontal semi-circle, its isometric view would be drawn as shown in fig. 12 (i) and fig. 12 (ii).
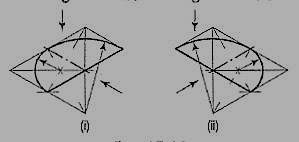
Figure 12
8. Fig. 13 (i) shows the front view of a plane parallel to the V.P. Draw its isometric view.

Figure 13
(i) The upper two corners of the plane are rounded with quarter circles. Enclose the plane in a rectangle.
(ii) Draw the isometric view of the rectangle. From the upper two corners of the parallelogram, mark points on the sides at a distance equal to R, the radius of the arcs. At these points erect perpendiculars to the respective sides to intersect each other at points p and q. With p and q as centres, and radii p1 and q3, draw the arcs and complete the required view.
UNIT 5
Isometric Projection
1. Draw the projections of a cube of 25 mm long edges resting on the ground on one of its corners with a solid diagonal perpendicular to the V.P., assume the cube to be resting on one of its faces on the ground with a solid diagonal parallel to the V.P.
(i) Draw a square abed in the top view with its sides inclined at 45° to xy. The line ac representing the solid diagonals AG and CE is parallel to xy. Project the front view.
(ii) Tilt the front view about the corner g' so that the line e' c' becomes parallel to xy. Project the second top view. The solid diagonal CE is now parallel to both the H.P. And the V.P.
(iii) Reproduce the second top view so that the top view of the solid diagonal, viz. e1 c1 is perpendicular to xy. Project the required front view.
Fig. 2 shows the front view of the cube in the above position, with the corners named in capital letters. Its careful study will show that
(a) All the faces of the cube are equally inclined to the V.P. And hence, they are seen as similar and equal rhombuses instead of squares.
(b) The three lines CB, CD and CG meeting at C and representing the three edges of the solid right-angle are also equally inclined to the V.P. And are therefore, equally foreshortened. They make equal angles of 120° with each other. The line CG being vertical, the other two lines CB and CD make 30° angle each, with the horizontal.

Figure 1
(c) All the other lines representing the edges of the cube are parallel to one or the other of the above three lines and are also equally foreshortened.
(d) The diagonal BO of the top face is parallel to the V.P. And hence, retains its true length.
2. Draw a horizontal line BO of any length (fig. 3). At the end B, draw lines BA and BP, such that L OBA = 30° and L OBP = 45°. Mark divisions of true length on the line BP and from each division-point, draw verticals to BO meeting BA at respective points. The divisions thus obtained on BA give lengths on isometric scale.
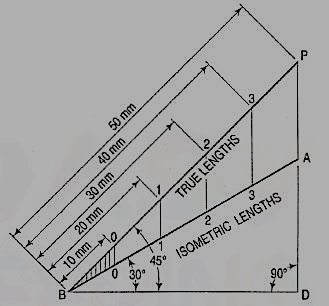
Figure 2
3. The same scale may also be drawn with divisions of natural scale on a horizontal line AB (fig. 4). At the ends A and B, draw lines AC and BC making 15° and 45° angles with AB respectively, and intersecting each other at C.

Figure 3
From division-points of true lengths on AB, draw lines parallel to BC and meeting AC at respective points. The divisions along AC give lengths to isometric scale.
The lines BO and AC (fig. 2) represent equal diagonals of a square face of the cube, but are not equally shortened in isometric projection. BO retains its true length, while AC is considerably shortened. Thus, it is seen that lines which are not parallel to the isometric axes are not reduced according to any fixed ratio. Such lines are called non-isometric lines. The measurements should, therefore, be made on isometric axes and isometric lines only. The non-isometric lines are drawn by locating positions of their ends on isometric planes and then joining them.
4. The front view of a square is given in fig. 4 (i). Draw its isometric view.
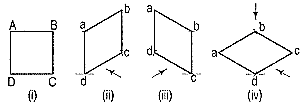
Figure 4
As the top view is a square, the surface of the square is horizontal. In isometric view, all the sides will be drawn inclined at 30° to the horizontal.
(i) From any point d [fig. 4(iv)], draw two lines da and dc inclined at 30° to the horizontal and making 120° angle between themselves.
(ii) Complete the rhombus abed which is the required isometric view.
5. Fig. 5 (i) shows the front view of a circle whose surface is parallel to the V.P. Draw the isometric view of the circle.

Figure 5
I. Method of points:
(i) Enclose the circle in a square, touching it in points 1, 2, 3 and 4. Draw the diagonals of the square cutting the circle in points 5, 6, 7 and 8.
(ii) Draw the isometric view of the square [fig. 8 (ii) and [fig. 8 (iii)] and on it mark the mid-points 1, 2, 3 and 4 of its sides. Obtain points 5, 6, 7 and 8 on the diagonals.
If the view given in fig. 8 (i) is the top view of a circle whose surface is horizontal, its isometric view will be as shown in fig. 8 (iv).
As the isometric views have been drawn with the true scale, the major axis of the ellipse is longer than the diameter of the circle.
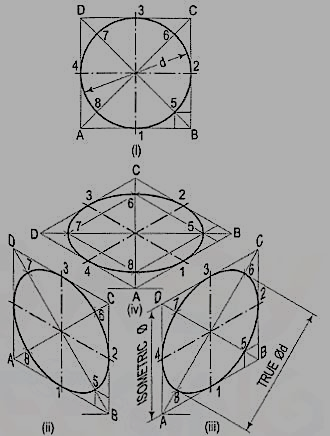
Figure 6
Fig. 6 (ii), fig. 6 (iii) and fig. 6 (iv) show the isometric projection of the circle drawn with isometric scale. Note that when the length of the side of the rhombus is equal to the isometric diameter of the circle, the length of the major axis of the ellipse is equal to the true diameter of the circle.
6. Draw the isometric view of the square [fig. 7 (i)]. Draw perpendicular bisectors of the sides of the rhombus, intersecting each other on the longer diagonal at points p and q, and which meet at the 120°-angles b and d.
Or, draw lines joining the 120°-angles b and d with the mid-points of the opposite sides and intersecting each other on the longer diagonal at points p and q. Two of these lines will be drawn horizontal, while the other two will make 60°-angles with the horizontal. With centres b and d, draw arcs 3-4 and 1-2 respectively. With centres p and q, draw arcs 1-4 and 2-3 respectively and complete the required ellipse. Fig. 10 (ii) shows the ellipse obtained in the rhombus drawn in the direction of the other sloping axis. Fig. 10 (iii) shows the isometric view of the circle when its surface is horizontal.
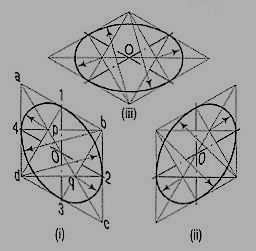
Figure 10
The ellipse obtained by the four-centre method is not a true ellipse and differs considerably in size and shape from the ellipse plotted through points. But owing to the ease in construction and to avoid the labour of drawing freehand neat curves, this method is generally employed.
7. Fig. 11 (i) shows the front view of a semi-circle whose surface is para1lel to the V.P. Draw its isometric view.
(i) Enclose the semi-circle in a rectangle. Draw the isometric view of the rectangle [fig. 11 (ii) and [fig. 11 (iii)].
(ii) Using the four-centre method, draw the half-ellipse in it which is the required view. The centre for the longer arc may be obtained as shown or by completing the rhombus.
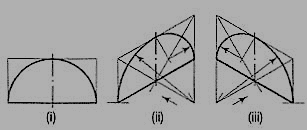
Figure 11
If the view given in fig. 11 (i) is the top view of a horizontal semi-circle, its isometric view would be drawn as shown in fig. 12 (i) and fig. 12 (ii).

Figure 12
8. Fig. 13 (i) shows the front view of a plane parallel to the V.P. Draw its isometric view.
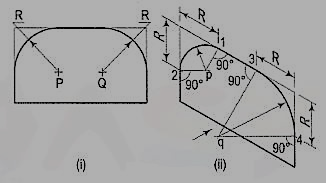
Figure 13
(i) The upper two corners of the plane are rounded with quarter circles. Enclose the plane in a rectangle.
(ii) Draw the isometric view of the rectangle. From the upper two corners of the parallelogram, mark points on the sides at a distance equal to R, the radius of the arcs. At these points erect perpendiculars to the respective sides to intersect each other at points p and q. With p and q as centres, and radii p1 and q3, draw the arcs and complete the required view.