Unit - 3
Applets
Q1) What is an applet?
A1) An applet is a type of application that generates dynamic content by embedding itself in a webpage. It is a client-side application that runs within the browser.
Applet subclasses are AWT-based applets. Applets aren't standalone applications. Instead, they use a web browser or an applet viewer to run.
An applet's execution does not begin at the main menu ( ). In fact, just a few applets have main() functions. An totally distinct technique, is used to initiate and control the operation of an applet. System.out.println does not conduct output to your applet's window ( ). Rather, output is handled by several AWT methods in an AWT-based applet, such as drawString(), which outputs a string to a specified X,Y location. Input is also handled differently in this program than it is in a console application.
A deployment strategy must be chosen before an applet can be utilized. There are two ways that can be used. The first option is to make advantage of the Java Network Launch Protocol (JNLP) (JNLP). This method provides the most flexibility, particularly in the case of rich Internet applications. JNLP is frequently the best solution for creating real-world applets.
The second common method for deploying an applet is to specify it directly in an HTML file rather than via JNLP. When Java was first established, this was the only way to launch applets, and it is still used today—especially for small applets. It is also the best method for the applet examples provided in this book due of its inherent simplicity. Oracle recommends the APPLET tag for this purpose as of this writing.
The given applet will be executed by a Java-enabled web browser when an APPLET tag is encountered in the HTML file.
When building applets, the APPLET tag has an additional benefit in that it allows you to quickly examine and test the applet. Simply add a comment at the top of your Java source code file using the APPLET tag to accomplish this. This manner, your code is documented with the HTML statements that your applet requires, and you can test the built applet by opening the applet viewer and selecting your Java source code file as the target. Here's an example of a comment like this:
/*
<applet code="MyApplet" width=200 height=60> </applet>
*/
This comment contains an APPLET tag, which will launch the MyApplet applet in a window that is 200 pixels wide by 60 pixels tall. Because the APPLET command makes it easier to test applets, all of the applets in this book will have the necessary APPLET tag inserted in a remark.
Advantages
There are numerous advantages to using an applet. The following are the details:
● It works at the client's end, resulting in a faster response time.
● Secured
● It can be used by browsers on a variety of platforms, including Linux, Windows, and Mac OS.
Disadvantages
To run the applet, a plugin must be installed on the client browser.
Q2) What do you mean by Architecture and skeleton?
A2) In general, an applet is a graphical user interface (GUI) program. As a result, it differs from the console-based programs shown. You'll feel right at home writing applets if you're already experienced with GUI development.
First and foremost, applets are event-driven. It's crucial to grasp how the event-driven architecture affects the design of an applet in general. A group of interrupt service functions resembles an applet. The following is a diagram of how the procedure works. An applet sits and waits for something to happen. The applet is notified of an event by the run-time system invoking an event handler given by the applet.
When this occurs, the applet must take the required action and then return soon. This is a really important point. Your applet should not, for the most part, enter a "mode" of operation in which it retains control for a lengthy period of time. Instead, it must respond to events with specific actions before returning control to the run-time system. In circumstances where your applet must complete a repeating activity on its own.
Second, rather than the other way around, the user initiates contact with an applet. As you may be aware, when a console-based software requires input, it will ask the user and then call an input method, such as readLine ( ). In an applet, this is not the case. Instead, the user can engage with the applet whenever and however he or she wants. The applet receives these interactions as events to which it must reply. A mouse-clicked event is generated, for example, when the user clicks the mouse inside the applet's window. A keypress event is triggered when the user presses a key while the applet's window has input focus.
While an applet's architecture is not as straightforward to comprehend as that of a console-based program, Java makes it as simple as feasible. If you've ever created software for Windows (or any other GUI-based operating system), you know how frightening it can be. Fortunately, Java offers a more simpler technique that is easier to grasp.
Skeleton
All applets override a set of methods that provide the basic mechanism by which the browser or applet viewer interacts with the applet and controls its execution, with the exception of the simplest. Applet defines four of these methods: init(), start(), stop(), and destroy(), which apply to all applets. All of these methods come with default implementations. Applets aren't required to override methods that they don't use. Only the simplest applets, however, will require all of them to be defined.
The paint() method, which is defined by the AWT Component class, is frequently overridden by AWT-based applets. When the applet's output needs to be redisplayed, this function is invoked. (To accomplish this goal, swing-based applets employ a different technique.) The skeleton depicted here is made up of these five methods:
// An Applet skeleton.
Import java.awt.*; import java.applet.*; /*
<applet code="AppletSkel" width=300 height=100> </applet>
*/
Public class AppletSkel extends Applet { // Called first.
Public void init() { // initialization
}
/* Called second, after init(). Also called whenever the applet is restarted. */
Public void start() {
// start or resume execution
}
// Called when the applet is stopped.
Public void stop() {
// suspends execution
}
/* Called when applet is terminated. This is the last method executed. */
Public void destroy() {
// perform shutdown activities
}
// Called when an applet’s window must be restored.
Public void paint(Graphics g) {
// redisplay contents of window
}
}
Despite the fact that this skeleton accomplishes nothing, it can be assembled and run. When viewed using appletviewer, it generates the following empty window when executed. Of course, depending on your execution environment, the exact appearance of the appletviewer frame in this and future examples may vary.
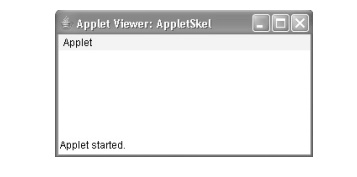
Fig 1: applet skeleton
Q3) Write about HTML Applet Tag?
A3) An applet reader will open a new window for each APPLET tag it sees, whereas web browsers will allow many applets on a single page. We've only used a simplified version of the APPLET tag thus far. Now is the time to examine it more closely.
The syntax for a more comprehensive version of the APPLET tag is shown here. The items in brackets are optional.
< APPLET>
[CODEBASE = codebaseURL] CODE = appletFile
[ALT = alternateText]
[NAME = appletInstanceName] WIDTH = pixels HEIGHT = pixels
[ALIGN = alignment ]
[VSPACE = pixels] [HSPACE = pixels]
>
[< PARAM NAME = AttributeName VALUE = AttributeValue>] [< PARAM NAME = AttributeName2 VALUE = AttributeValue>]
. . .
[HTML Displayed in the absence of Java] </APPLET>
Let’s take a look at each part now -
CODEBASE - CODEBASE is an optional parameter that provides the applet code's base URL, which is the directory in which the applet's executable class file will be searched (specified by the CODE tag). If this attribute is not specified, the HTML document's URL directory is utilized as the CODEBASE.
CODE - CODE is a mandatory element that specifies the name of the file that contains the compiled.class file for your applet. This file is relative to the applet's code base URL, which is either the HTML file's directory or the directory specified by CODEBASE if set.
ALT - If the browser understands the APPLET tag but is unable to run Java applets, the ALT tag is used to define a short text message that should be displayed. This is not to be confused with the substitute HTML you give for browsers that don't support applets.
NAME - NAME is an optional attribute that is used to give the applet instance a name. Applets must be given names so that other applets on the same page can recognize them and communicate with them. Use getApplet(), which is defined by the AppletContext interface, to get an applet by name.
WIDTH and HEIGHT - The size (in pixels) of the applet display area is determined by the WIDTH and HEIGHT parameters.
ALIGN - The ALIGN attribute is an optional attribute that specifies the applet's alignment. LEFT, RIGHT, TOP, BOTTOM, MIDDLE, BASELINE, TEXTTOP, ABSMIDDLE, and ABSBOTTOM are the available values for this attribute, which are interpreted the same as the HTML IMG tag.
VSPACE and HSPACE - These properties are not required. VSPACE defines the amount of space above and below the applet in pixels. HSPACE provides the amount of space on either side of the applet in pixels. They're considered the same as the VSPACE and HSPACE characteristics of the IMG tag.
PARAM NAME and VALUE - You can use the PARAM tag to define applet-specific arguments. The getParameter() method is used by applets to access their characteristics.
ARCHIVE, which allows you to define one or more archive files, and OBJECT, which specifies a stored version of the applet, are two more suitable APPLET properties. In general, an APPLET tag should only have one of two attributes: CODE or OBJECT.
Q4) What is applet context and show document()?
A4) Java may be used to give a graphical manner of exploring the Web that is more entertaining than simply text-based links by using active pictures and animation. You must utilize the showDocument() function offered by the AppletContext interface to allow your applet to transfer control to another URL. AppletContext is a user interface that allows you to create applets.
Obtain data from the execution environment of the applet Table lists the methods defined by AppletContext. A call to the getAppletContext() method defined by Applet returns the context of the currently running applet.
Applet getApplet(String appletName) - If the applet indicated by appletName is within the current applet context, it is returned. If not, null is returned.
Enumeration<Applet> getApplets( ) - This method returns an enumeration containing all of the applets in the current applet context.
AudioClip getAudioClip(URL url) - Returns an AudioClip object containing the audio clip found at the url provided location.
Image getImage(URL url) - Returns a Picture object containing the image found at the url provided location.
InputStream getStream(String key) - The stream associated with key is returned. The setStream() method is used to link keys to streams. If no stream is linked to key, a null reference is returned.
Iterator<String> getStreamKeys( ) - The keys associated with the invoking object are returned as an iterator. Streams are linked to the keys. See getStream() and setStream() for more information ( ).
Void setStream(String key, InputStream strm) throws IOException - The key supplied in key is linked to the stream specified by strm. If strm is null, the key is removed from the calling object.
Void showDocument(URL url) - This command displays the document at the url supplied by url. Applet viewers may not be able to support this method.
Void showDocument(URL url, String where) - This command displays the document at the url supplied by url. Applet viewers may not be able to support this method.
Void showStatus(String str) - In the status box, str is displayed.
You can bring another document into display within an applet by using showDocument once you've obtained the applet's context ( ). Because this method has no return value and does not throw an exception if it fails, it should be used with caution. There are two methods for showing documents: showDocument() and showDocument().
The showDocument(URL) method displays the document at the URL supplied. ShowDocument(URL, String) displays the provided document in the browser window at the specified location. "_self" (show in current frame), "_parent" (show in parent frame), "_top" (display in topmost frame), and "_blank" are all valid parameters for where (show in new browser window). You can also give the document a name, which will open it in a new browser window with that name.
AppletContext and showDocument are demonstrated in the applet below ( ). It obtains the current applet context and utilizes that context to pass control to a file named Test.html when it is executed. This file must be located in the same folder as the applet. Any valid hypertext can be included in Test.html.
/* Using an applet context, getCodeBase(), and showDocument() to display an HTML file.
*/
Import java.awt.*; import java.applet.*; import java.net.*;
/*
<applet code="ACDemo" width=300 height=50> </applet>
*/
Public class ACDemo extends Applet { public void start() {
AppletContext ac = getAppletContext();
URL url = getCodeBase(); // get url of this applet
Try {
Ac.showDocument(new URL(url+"Test.html"));
} catch(MalformedURLException e) { showStatus("URL not found");
}
}
}
Q5) Explain the delegation event model?
A5) The delegation event model, which establishes standard and consistent techniques for generating and processing events, is the current way to handling events. It works on the simple premise that a source generates an event and sends it to one or more listeners. The listener in this scheme just waits for an event to arrive. After receiving an event, the listener processes it and then returns. This architecture has the advantage of separating the application logic that processes events from the user interface logic that generates those events. The processing of an event can be "delegated" by a user interface element to another piece of code.
Listeners must register with a source in order to get event notifications in the delegation event model. This has a significant advantage: notifications are only sent to listeners who have expressed an interest in receiving them. This is a more efficient method of dealing with events than the original Java 1.0 approach. An event was previously propagated up the containment hierarchy until it reached a component. This necessitated components receiving events that they did not process, wasting time. This overhead is eliminated with the delegation event model.
Events
An event is an object in the delegation model that describes a state change in a source. An event can be triggered by a human interacting with the elements of a graphical user interface, among other things. Pressing a button, typing a character, picking an item from a list, and clicking the mouse are some of the behaviors that cause events to be generated. There are numerous other user procedures that might be used as examples.
Events that are not directly caused by interactions with a user interface may also occur. When a timer ends, a counter surpasses a value, software or hardware fails, or an action is completed, for example, an event is triggered. You have complete freedom to specify events that are relevant to your application.
Event Sources
A source is an object that causes an event to occur. This happens when the object's internal state changes in some way. More than one sort of event can be generated by a single source.
Listeners must be registered with a source in order to get notifications about a specific sort of event. Each event has its own registration procedure. The general format is as follows:
Public void addTypeListener (TypeListener el )
Type refers to the event's name, and el refers to the event listener. The method addKeyListener, for example, is used to register a keyboard event listener ( ). AddMouseMotionListener is the technique for registering a mouse motion listener ( ). All registered listeners are notified when an event occurs and given a copy of the event object. This is referred to as multicasting an event. Notifications are only sent to listeners who have signed up to receive them.
Event Listeners
When an event occurs, a listener is an object that is notified. There are two main prerequisites. It must have been registered with one or more sources in order to get notifications about specific occurrences. Second, it must develop methods for receiving and processing these alerts.
A set of interfaces, such as those present in java.awt.event, specify the methods that receive and process events. The MouseMotionListener interface, for example, has two methods for receiving notifications when the mouse is moved or dragged. If an object implements this interface, it can receive and process any or both of these events.
Q6) Describe event classes?
A6) The event-representation classes are at the heart of Java's event-handling mechanism. As a result, the event classes must come first in any discussion of event handling. It's crucial to note, however, that Java provides a variety of event types, and not all of them can be covered in this chapter. At the time of writing, the most extensively utilized events are those defined by the AWT and those defined by Swing. The AWT events are the focus of this chapter. (The majority of these occurrences also apply to Swing.)
EventObject, which is found in the java.util package, is at the top of the Java event class hierarchy. It is the all-events superclass. It has only one constructor, which is illustrated here:
EventObject(Object src)
The object that triggers this event is referred to as src.
GetSource() and toString() are two methods defined by EventObject ( ). The getSource( ) method returns the event's source. Here's how it looks in its most basic form:
Object getSource( )
ToString() returns the event's string equivalent, as intended.
A subclass of EventObject is AWTEvent, which is specified in the java.awt package. It is the superclass of all AWT-based events used by the delegation event model (either directly or indirectly). Its getID() method can be used to figure out what kind of event it is. This method's signature is as follows:
Int getID( )
All events have a superclass called EventObject.
The delegation event model handles all AWT events under the AWTEvent superclass.
Many sorts of events are defined in the java.awt.event package, which are generated by various user interface elements. The table below lists some regularly used event classes as well as a brief description of when they occur. In each class, the most often used constructors and methods are covered.
Classes and descriptions
The ActionEvent Class
When a button is pressed, a list item is double-clicked, or a menu item is selected, an ActionEvent is triggered. ALT MASK, CTRL MASK, META MASK, and SHIFT MASK are four integer variables defined by the ActionEvent class that can be used to identify any modifiers linked with an action event. There's also an integer constant called ACTION PERFORMED that can be used to track down action occurrences.
There are three constructors in ActionEvent:
● ActionEvent(Object src, int type, String cmd)
● ActionEvent(Object src, int type, String cmd, int modifiers)
● ActionEvent(Object src, int type, String cmd, long when, int modifiers)
The object that triggered this event is referenced by source. Type specifies the event's kind, and cmd specifies the command string. The modifier keys (alt, ctrl, meta, and/or shift) pushed when the event was generated are listed in the argument modifiers.
The getActionCommand() method returns the command name for the invoking ActionEvent object:
String getActionCommand()
When a button is pressed, for example, an action event is triggered with a command name corresponding to the label on the button.
The getModifier() method gives a result indicating which modifier keys were pressed at the time the event was created.
Int getModifier()
The getWhen() method returns the date and time of the event.
The AdjustmentEvent Class
A scroll bar generates an AdjustmentEvent. Adjustment events can be divided into five categories. Integer constants are defined in the AdjustmentEvent class and can be used to identify them. Here are the constants and their definitions:
BLOCK_DECREMENT | The user decreased the value of the scroll bar by clicking within it. |
BLOCK_INCREMENT | To increase the value of the scroll bar, the user clicked inside it. |
TRACK | The slider was moved around. |
UINT_DECREMENT | The value of the scroll bar was decreased by clicking the button at the end of the scroll bar. |
UNIT_INCREMENT | The value of the scroll bar was increased by clicking the button at the end of the scroll bar. |
There's also an integer constant called ADJUSTMENT VALUE CHANGED that shows when something has changed.
The constructors for AdjustmentEvent are as follows:
AdjustmentEvent (Adjustable src, int id, int type, int data)
The object that triggered this event is referenced by source. The type of adjustment is defined by type, and the data that goes with it is defined by data.
The object that generated the event is returned by the getAdjustable() function.
Adjustable get Adjustable()
When a button is pressed, for example, an action event is triggered with a command name corresponding to the label on the button.
The type of adjustment event is returned by the getAdjustmentType() method.
Int getAdjustmentType()
The amount of adjustment is returned by the getValue() method.
Long getValue()
The ComponentEvent Class
When a component's size, position, or visibility is modified, a ComponentEvent is triggered. Component events are divided into four categories. Integer constants are defined in the ComponentEvent class and can be used to identify them. Here are the constants and their definitions:
COMPONENT_HIDDEN : The component was hidden.
COMPONENT_MOVED : The component was moved.
COMPONENT_RESIZED : The component was resized.
COMPONENT_SHOWN : The component became visible.
ComponentEvent has this constructor:
● ComponentEvent(Component src, int type)
The object that triggered this event is referenced by source. The event's type is determined by type.
ComponentEvent is the superclass of ContainerEvent, either directly or indirectly.
Among the events are FocusEvent, KeyEvent, MouseEvent, and WindowEvent.
The getComponent() method retrieves the event's originating component. This is what it looks like:
Component getComponent( )
The ContainerEvent Class
When a component is added to or removed from a container, a ContainerEvent is triggered. Container events can be divided into two categories. COMPONENT ADDED and COMPONENT REMOVED are int constants defined by the ContainerEvent class that can be used to identify them. They denote the addition or removal of a component from the container.
ContainerEvent is a ComponentEvent subclass with the following constructor:
● ContainerEvent(Component src, int type, Component comp)
The container that triggered this event is referenced by source. Type specifies the event's kind, and comp specifies the component that has been added to or removed from the container. Using the getContainer () method, you may get a reference to the container that triggered this event:
Container getContainer( )
The getChild() function delivers a reference to the container's component that was added or removed. Here's how it looks in its most basic form:
Component getChild( )
The FocusEvent Class
When a component gains or loses input focus, a FocusEvent is fired. The integer constants FOCUS GAINED and FOCUS LOST identify these events.
FocusEvent is a ComponentEvent subclass with the following constructors:
● FocusEvent(Component src, int type) FocusEvent(Component src, int type, boolean temporaryFlag)
● FocusEvent(Component src, int type, boolean temporaryFlag, Component other)
The component that triggered this event is referenced by src. The event's type is determined by type. If the focus event is temporary, the argument temporaryFlag is set to true. It's set to false if it's not. (A temporary focus event happens when another user interface operation occurs.) Consider the case where the attention is on a text field. The focus is temporarily lost if the user moves the mouse to modify a scroll bar.)
The opposite component, which is also involved in the focus change, is passed in other. Other will refer to the component that lost focus if a FOCUS GAINED event occurs. If a FOCUS LOST event occurs, on the other hand, other will relate to the component that regains focus.
The other component can be found by calling getOppositeComponent(), as seen here: getOppositeComponent is a component that returns the opposite component ( )
The component that is returned is the polar opposite.
If this focus change is transient, the isTemporary() method indicates that. Here's how it looks:
Boolean isTemporary( )
If the modification is only temporary, the method returns true. Otherwise, false is returned.
The InputEvent Class
Component input events are superclassed by the abstract class InputEvent, which is a subclass of ComponentEvent. KeyEvent and MouseEvent are its subclasses.
InputEvent provides numerous integer constants that indicate any modifiers that may be associated with the event, such as the control key being pressed. To represent the modifiers, the InputEvent class originally defined the following eight values:
● ALT_MASK
● ALT_GRAPH_MASK
● BUTTON1_MASK
● BUTTON2_MASK
● BUTTON3_MASK
● CTRL_MASK
● META_MASK
● SHIFT_MASK
However, the following extended modifier values were introduced due to potential conflicts between the modifiers used by keyboard and mouse events, as well as other issues:
● ALT_DOWN_MASK
● ALT_GRAPH_DOWN_MASK
● BUTTON1_DOWN_MASK
● BUTTON2_DOWN_MASK
● BUTTON3_DOWN_MASK
● CTRL_DOWN_MASK
● META_DOWN_MASK
● SHIFT_DOWN_MASK
Use the isAltDown(), isAltGraphDown(), isControlDown(), isMetaDown(), and isShiftDown() methods to see if a modifier was pressed at the moment an event was generated. The following are the several types of these methods:
● boolean isAltDown()
● boolean isAltGraphDown()
● boolean isControlDown()
● boolean isMetaDown()
● boolean isShiftDown()
To acquire a value that contains all of the original modifier flags, use the getModifier() method.
Int getModifier()
The extended modifiers are obtained using the getModifierEx() function.
Int getModifierEx()
The ItemEvent Class
When a check box or a list item is clicked, or when a checkable menu item is selected or deselected, an ItemEvent is fired. (More on check boxes and list boxes later in this book.) Item events are classified as one of two categories, as indicated by the integer constants:
DESELECTED : The user deselected an item.
SELECTED : The user selected an item.
ItemEvent also provides an integer constant, ITEM STATE CHANGED, that denotes a status change.
This constructor is found in ItemEvent:
● ItemEvent(ItemSelectable src, int type, Object entry, int state)
The component that triggered this event is referenced by src. This could be a list or a selection element, for example. The event's type is determined by type. The item that caused the item event is specified in the record. That item's current status is in state.
The getItem() method returns a reference to the event-producing item.
Object getItem ()
The getItemSelectable() function returns a reference to the event-generating ItemSelectable object.
ItemSelectable getItemSelectable ()
The getStateChange() method returns the event's current state (SELECTED or DESELECTED):
Int getStateChange ()
The TextEvent Class
The integer constant TEXT VALUE CHANGED is defined by TextEvents.
The constructor for TextEvent is:
● TextEvent (Object src, int type)
The object that triggered this event is referenced by source. The event's type is determined by type.
The characters that are now in the text components that triggered the event are not included in the text event object.
Q7) Explain event listener interface?
A7) There are two aspects to the delegation event model: sources and listeners. Listeners are constructed by implementing one or more of the interfaces defined by the java.awt.event package. When an event happens, the event source calls the listener's relevant method and passes an event object as an argument. There are various listings of frequently used listener interfaces, each with a brief description of the methods they define. The sections that follow look at the specific methods that each interface contains.
The ActionListener Interface
When an action event occurs, this interface defines the actionPerformed() function, which is called. Here's how it looks in its most basic form:
Void actionPerformed(ActionEvent ae)
The AdjustmentListener Interface
When an adjustment event happens, this interface defines the adjustmentValueChanged() method. Here's how it looks in its most basic form:
Void adjustmentValueChanged(AdjustmentEvent ae)
The ComponentListener Interface
When a component is resized, moved, shown, or hidden, this interface defines four methods that are called. Here are some examples of their general forms:
Void componentResized(ComponentEvent ce)
Void componentMoved(ComponentEvent ce)
Void componentShown(ComponentEvent ce)
Void componentHidden(ComponentEvent ce)
The ContainerListener Interface
There are two methods in this interface. ComponentAdded() is called when a component is added to a container. ComponentRemoved() is called when a component is removed from a container. Here are some examples of their general forms:
Void componentAdded(ContainerEvent ce)
Void componentRemoved(ContainerEvent ce)
The FocusListener Interface
Two methods are defined by this interface. FocusGained() is called when a component gains keyboard focus. FocusLost() is called when a component loses keyboard attention. Here are some examples of their general forms:
Void focusGained(FocusEvent fe)
Void focusLost(FocusEvent fe)
The ItemListener Interface
When the state of an item changes, this interface defines the itemStateChanged( ) function. Here's how it looks in its most basic form:
Void itemStateChanged(ItemEvent ie)
The KeyListener Interface
Three methods are defined by this interface. When a key is pushed or released, the keyPressed() and keyReleased() functions are called. When a character is entered, the keyTyped() method is called.
When a user presses and releases a key, for example, three events are generated: key pressed, typed, and released. Two key events are created in sequence when a user presses and releases the home key: key pressed and key released.
The following are the general forms of these methods:
Void keyPressed(KeyEvent ke)
Void keyReleased(KeyEvent ke)
Void keyTyped(KeyEvent ke)
The MouseListener Interface
There are five methods defined in this interface. MouseClicked() is called when the mouse is pressed and released at the same time. The mouseEntered() method is called when the mouse enters a component. MouseExited() is called when it exits. When the mouse is pressed or released, the mousePressed() and mouseReleased() functions are called.
The following are the general forms of these methods:
Void mouseClicked(MouseEvent me)
Void mouseEntered(MouseEvent me)
Void mouseExited(MouseEvent me)
Void mousePressed(MouseEvent me)
Void mouseReleased(MouseEvent me)
The MouseMotionListener Interface
Two methods are defined by this interface. As the mouse is dragged, the mouseDragged() method is called many times. As the mouse moves, the mouseMoved() method is called many times. Here are some examples of their general forms:
Void mouseDragged(MouseEvent me)
Void mouseMoved(MouseEvent me)
The MouseWheelListener Interface
The mouseWheelMoved() function of this interface is called when the mouse wheel is moved. Here's how it looks in its most basic form:
Void mouseWheelMoved(MouseWheelEvent mwe)
The TextListener Interface
This interface defines the textValueChanged() method, which is called when a text area or text field is changed. Here's how it looks in its most basic form:
Void textValueChanged(TextEvent te)
The WindowFocusListener Interface
WindowGainedFocus() and windowLostFocus() are two methods defined by this interface ( ). When a window gains or loses input focus, they are called. Here are some examples of their general forms:
Void windowGainedFocus(WindowEvent we)
Void windowLostFocus(WindowEvent we)
The WindowListener Interface
There are seven methods defined in this interface. When a window is activated or deactivated, the windowActivated() and windowDeactivated() functions are called. The windowIconified() method is called when a window is iconified. When a window is deiconified, it loses its icon.
The method windowDeiconified() is used. The windowOpened() and windowClosed() methods are called when a window is opened or closed, respectively. When a window is closed, the windowClosing() method is called. These approaches come in a variety of shapes and sizes.
Void windowActivated(WindowEvent we)
Void windowClosed(WindowEvent we)
Void windowClosing(WindowEvent we)
Void windowDeactivated(WindowEvent we)
Void windowDeiconified(WindowEvent we)
Void windowIconified(WindowEvent we)
Void windowOpened(WindowEvent we)
Q8) Write about adapter classes?
A8) In some instances, Java provides a specific feature called an adapter class that might make the construction of event handlers easier. All methods in an event listener interface are implemented by an adapter class, which is an empty implementation. When you just wish to receive and process a subset of the events handled by a given event listener interface, adapter classes come in handy. By extending one of the adapter classes and implementing only the events in which you are interested, you may create a new class that acts as an event listener.
The MouseMotionAdapter class, for example, provides two methods, mouseDragged() and mouseMoved(), which correspond to the MouseMotionListener interface's methods. You could just extend MouseMotionAdapter and override mouseDragged if you were only interested in mouse drag events ( ). The mouse motion events would be handled by the empty implementation of mouseMoved().
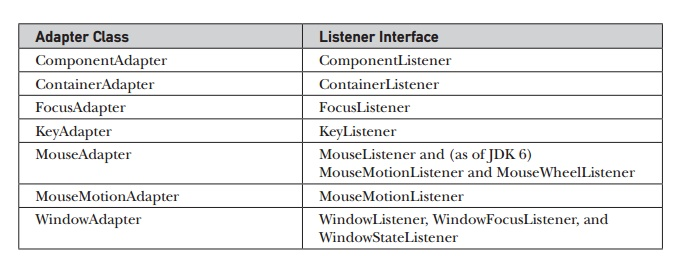
An adapter is demonstrated in the following example. When the mouse is clicked or dragged, it shows a message in the status bar of an applet viewer or browser. All other mouse events, on the other hand, are silently disregarded. There are three classes in the program. Applet is extended by AdapterDemo. Its init( ) method creates a MyMouseAdapter instance and registers it to receive mouse event notifications. It also builds a MyMouseMotionAdapter instance and registers it to receive mouse motion event notifications. As a parameter, both constructors accept a reference to the applet.
MyMouseAdapter is a subclass of MouseAdapter that extends the mouseClicked() method. The code inherited from the MouseAdapter class discreetly ignores the other mouse events. MouseMotionAdapter is extended by MyMouseMotionAdapter, and the mouseDragged() method is overridden. The code inherited from the MouseMotionAdapter class silently ignores the other mouse motion event. (MouseAdaptor also supplies an empty MouseMotionListener implementation.) This example, however, treats each separately for the sake of illustration.)
It's worth noting that both event listener classes keep track of the applet. This data is passed to their constructors as an argument and is later utilized to call the showStatus() method.
// Demonstrate an adapter.
Import java.awt.*;
Import java.awt.event.*; import java.applet.*; /*
<applet code="AdapterDemo" width=300 height=100> </applet>
*/
Public class AdapterDemo extends Applet { public void init() {
AddMouseListener(new MyMouseAdapter(this));
AddMouseMotionListener(new MyMouseMotionAdapter(this));
}
}
Class MyMouseAdapter extends MouseAdapter {
AdapterDemo adapterDemo;
Public MyMouseAdapter(AdapterDemo adapterDemo) { this.adapterDemo = adapterDemo;
}
// Handle mouse clicked.
Public void mouseClicked(MouseEvent me) { adapterDemo.showStatus("Mouse clicked");
}
}
Class MyMouseMotionAdapter extends MouseMotionAdapter {
AdapterDemo adapterDemo;
Public MyMouseMotionAdapter(AdapterDemo adapterDemo) {
This.adapterDemo = adapterDemo;
}
// Handle mouse dragged.
Public void mouseDragged(MouseEvent me) {
AdapterDemo.showStatus("Mouse dragged");
}
}
Q9) What is AWT classes?
A9) The java.awt package contains the AWT classes. It is one of Java's most comprehensive packages. Fortunately, it is easier to comprehend and use than you might think because it is rationally arranged in a top-down, hierarchical manner.
Class : Description
AWTEvent : Encapsulates AWT events.
AWTEventMulticaster : Dispatches events to multiple listeners.
BorderLayout : The border layout manager. Border layouts use five componentsNorth, South, East, West, and Center.
Button : Creates a push button control.
Canvas : A blank, semantics-free window.
CardLayout : The card layout manager. Card layouts emulate index cards. Only the one on top is showing.
Checkbox : Creates a check box control.
CheckboxGroup : Creates a group of check box controls.
CheckboxMenuItem : Creates an on/off menu item.
Choice : Creates a pop-up list.
Color : Manages colors in a portable, platform-independent fashion.
Component : An abstract superclass for various AWT components.
Container : A subclass of Component that can hold other components.
Cursor : Encapsulates a bitmapped cursor.
Dialog : Creates a dialog window.
Dimension : Specifies the dimensions of an object. The width is stored in width, and the height is stored in height.
EventQueue : Queues events.
FileDialog : Creates a window from which a file can be selected.
FlowLayout : The flow layout manager. Flow layout positions components left to right, top to bottom.
Font : Encapsulates a type font.
FontMetrics : Encapsulates various information related to a font. This information helps you display text in a window.
Frame : Creates a standard window that has a title bar, resize corners, and a menu bar.
Graphics : Encapsulates the graphics context. This context is used by the various output methods to display output in a window.
GraphicsDevice : Describes a graphics device such as a screen or printer.
GraphicsEnvironment : Describes the collection of available Font and GraphicsDevice objects.
GridBagConstraints : Defines various constraints relating to the GridBagLayout class.
GridBagLayout : The grid bag layout manager. Grid bag layout displays components subject to the constraints specified by GridBagConstraints.
GridLayout : The grid layout manager. Grid layout displays components in a two-dimensional grid.
Image : Encapsulates graphical images.
Insets : Encapsulates the borders of a container.
Label : Creates a label that displays a string.
List : Creates a list from which the user can choose. Similar to the standard Windows list box.
MediaTracker : Manages media objects.
Menu : Creates a pull-down menu.
MenuBar : Creates a menu bar.
MenuComponent : An abstract class implemented by various menu classes.
MenuItem : Creates a menu item.
MenuShortcut : Encapsulates a keyboard shortcut for a menu item.
Panel : The simplest concrete subclass of Container.
Point : Encapsulates a Cartesian coordinate pair, stored in x and y.
Polygon : Encapsulates a polygon.
PopupMenu : Encapsulates a pop-up menu.
PrintJob : An abstract class that represents a print job.
Rectangle : Encapsulates a rectangle.
Robot : Supports automated testing of AWT-based applications.
Scrollbar : Creates a scroll bar control.
ScrollPane : A container that provides horizontal and/or vertical scroll bars for another component.
SystemColor : Contains the colors of GUI widgets such as windows, scroll bars, text, and others.
TextArea : Creates a multiline edit control.
TextComponent : A superclass for TextArea and TextField.
TextField : Creates a single-line edit control.
Toolkit : Abstract class implemented by the AWT.
Window : Creates a window with no frame, no menu bar, and no title.
Q10) What is Window fundamentals?
A10) The AWT defines windows via a class hierarchy, with each level adding functionality and specificity. Those derived from Panel, which are used by applets, and those derived from Frame, which form a typical application window, are the two most frequent windows. The parent classes provide a lot of the functionality for these windows. As a result, comprehending these two classes requires a description of the class hierarchies that relate to them. The class hierarchy for Panel and Frame is shown in the diagram. Let's take a closer look at each of these classes.
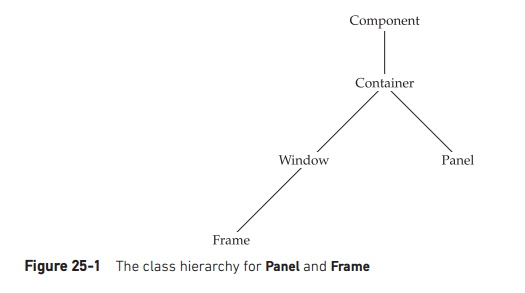
Fig 2: class hierarchy for panel and frame
Components
The Component class is at the top of the AWT hierarchy. Component is an abstract class that encapsulates all of the visual component's properties. All user interface elements that are displayed on the screen and interact with the user, with the exception of menus, are subclasses of Component. It has over a hundred public methods for controlling events including mouse and keyboard input, window positioning and scaling, and repainting. (You've already used a lot of these techniques when making applets.) The current foreground and background colors, as well as the presently selected text font, are remembered by a Component object.
Container
Component has a subtype called Container. It contains additional methods that allow it to be nested within other Component instances. Containers can be used to store other Container objects (since they are themselves instances of Component). As a result, a multileveled containment system is created. Any components that it contains must be laid out (that is, positioned) by a container.
Panel
Container has a concrete subclass called Panel. A Panel is a concrete screen component that can be nested indefinitely. Applet has a superclass called Panel. Screen output is drawn on the surface of a Panel object when it is pointed to an applet. In its most basic form, a Panel is a window that lacks a title bar, menu bar, or border. This is why these items aren't shown when an applet is run in a browser. When you run an applet through an applet viewer, the title and border are provided by the applet viewer.
A Panel object's add() method can be used to add other components to it (inherited from Container). After you've added these components, you may manually position and resize them using Component's setLocation(), setSize(), setPreferredSize(), and setBounds() methods.
Window
A top-level window is created with the Window class. A top-level window is unenclosed by any other object and sits alone on the desktop. In most cases, you won't directly create Window objects.
Frame
The term "frame" encompasses what is typically referred to as a "window." It has a title bar, menu bar, borders, and resizing corners and is a subclass of Window. The exact appearance of a Frame will vary depending on the environment.
Canvas
There is another form of window that you will find useful, despite the fact that it is not part of the hierarchy for applet or frame windows: canvas. Canvas is derived from a Component and represents a blank window on which you can draw.
Q11) How to create a frame?
A11) While you can just construct a window by creating an instance of Frame, you will rarely do so because you will be limited in what you can do with it. You won't be able to accept or process events that occur within it, for example, or readily export data to it. Most of the time, you'll make a Frame subclass. This allows you to override Frame's methods and handle events.
It's actually fairly simple to create a new frame window from within an AWT-based applet. Create a Frame subclass first. Then, to show or hide the frame, override any of the usual applet methods, such as init(), start(), and stop(). Finally, implement the WindowListener interface's windowClosing() function, which calls setVisible(false) when the window is closed.
You can build an object of a Frame subclass after you've defined it. A frame window is created as a result of this, but it is not visible at first. By invoking setVisible, you can make it visible ( ). The window is given a preset height and width when it is created. The setSize() method can be used to explicitly set the window's size.
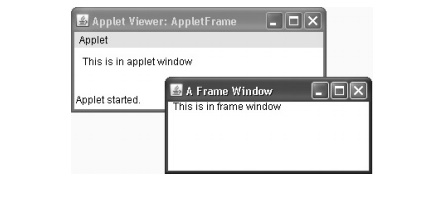
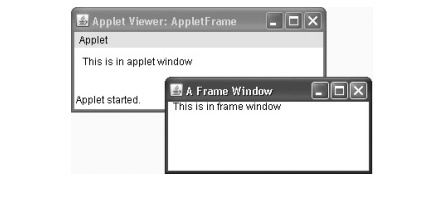
The following applet produces a SampleFrame subclass of Frame. In the init() method of AppletFrame, a window of this subclass is created. It's worth noting that SampleFrame invokes Frame's constructor. A typical frame window with the title passed in title is constructed as a result of this. The start() and stop() methods of the applet are overridden in this example to show and hide the child window, accordingly. Or you close the window or exit the applet, or if you're using a browser, when you switch to another website, the window will be automatically closed. When the browser returns to the applet, the child window is also displayed.
//Create a child frame window from within an applet.
Import java.awt.*;
Import java.awt.event.*;
Import java.applet.*; /*
<applet code="AppletFrame" width=300 height=50> </applet>
*/
//Create a subclass of Frame.
Class SampleFrame extends Frame { SampleFrame(String title) {
Super(title);
// create an object to handle window events
MyWindowAdapter adapter = new MyWindowAdapter(this);
// register it to receive those events
AddWindowListener(adapter);
}
Public void paint(Graphics g) {
g.drawString("This is in frame window", 10, 40);
}
}
Class MyWindowAdapter extends WindowAdapter { SampleFrame sampleFrame;
Public MyWindowAdapter(SampleFrame sampleFrame) { this.sampleFrame = sampleFrame;
}
Public void windowClosing(WindowEvent we) { sampleFrame.setVisible(false);
}
}
// Create frame window.
Public class AppletFrame extends Applet { Frame f;
Public void init() {
f = new SampleFrame("A Frame Window");
f.setSize(250, 250); f.setVisible(true);
}
Public void start() { f.setVisible(true);
}
Public void stop() { f.setVisible(false);
}
Public void paint(Graphics g) {
g.drawString("This is in applet window", 10, 20);
}
}
Output
Q12) What do you mean by windows in an applet?
A12) While you can just construct a window by creating an instance of Frame, you will rarely do so because you will be limited in what you can do with it. You won't be able to accept or process events that occur within it, for example, or readily export data to it. Most of the time, you'll make a Frame subclass. This allows you to override Frame's methods and handle events.
It's actually fairly simple to create a new frame window from within an AWT-based applet. Create a Frame subclass first. Then, to show or hide the frame, override any of the usual applet methods, such as init(), start(), and stop(). Finally, implement the WindowListener interface's windowClosing() function, which calls setVisible(false) when the window is closed.
You can build an object of a Frame subclass after you've defined it. A frame window is created as a result of this, but it is not visible at first. By invoking setVisible, you can make it visible ( ). The window is given a preset height and width when it is created. The setSize() method can be used to explicitly set the window's size.
The following applet produces a SampleFrame subclass of Frame. In the init() method of AppletFrame, a window of this subclass is created. It's worth noting that SampleFrame invokes Frame's constructor. A typical frame window with the title passed in title is constructed as a result of this. The start() and stop() methods of the applet are overridden in this example to show and hide the child window, accordingly. Or you close the window or exit the applet, or if you're using a browser, when you switch to another website, the window will be automatically closed. When the browser returns to the applet, the child window is also displayed.
//Create a child frame window from within an applet.
Import java.awt.*;
Import java.awt.event.*;
Import java.applet.*; /*
<applet code="AppletFrame" width=300 height=50> </applet>
*/
//Create a subclass of Frame.
Class SampleFrame extends Frame { SampleFrame(String title) {
Super(title);
// create an object to handle window events
MyWindowAdapter adapter = new MyWindowAdapter(this);
// register it to receive those events
AddWindowListener(adapter);
}
Public void paint(Graphics g) {
g.drawString("This is in frame window", 10, 40);
}
}
Class MyWindowAdapter extends WindowAdapter { SampleFrame sampleFrame;
Public MyWindowAdapter(SampleFrame sampleFrame) { this.sampleFrame = sampleFrame;
}
Public void windowClosing(WindowEvent we) { sampleFrame.setVisible(false);
}
}
// Create frame window.
Public class AppletFrame extends Applet { Frame f;
Public void init() {
f = new SampleFrame("A Frame Window");
f.setSize(250, 250); f.setVisible(true);
}
Public void start() { f.setVisible(true);
}
Public void stop() { f.setVisible(false);
}
Public void paint(Graphics g) {
g.drawString("This is in applet window", 10, 20);
}
}
Output
Q13) How to work with graphics?
A13) A wide range of graphics methods are supported by AWT. All graphics are proportional to the size of the window...........
The AWT provides a wide range of graphical methods.
All graphics are scaled to fit the window.
This can be an applet's main window, a child window, or a standalone application of a window.
Each window's origin is at 0,0 in the top-left corner. Pixels are used to specify coordinates. A graphics context is responsible for all output to a window.
The Graphics class encapsulates a graphics environment, which can be accessed in one of two ways:
● It's supplied as an input to a function like paint() or update().
● It's returned by Component's getGraphics() function.
A number of drawing functions are defined in the Graphics class. Each form can be drawn with just the edges or with a fill. There are numerous drawing methods:
Drawing lines
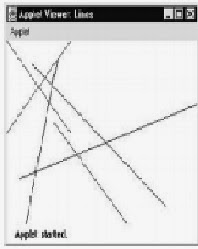
The drawLine() method is used to draw lines, as demonstrated here:
Void drawLine(int startX,int startY,int endX,int endY)
Simple applet program to drawn a line
Import java.applet.*;
Import java.awt.*;
Public class DrawingLines extends Applet
{
Int width, height;
Public void init()
{
Width = getSize().width;
Height = getSize().height;
SetBackground( Color.black );
}
Public void paint( Graphics g )
{
g.setColor( Color.green );
For ( int i = 0; i < 10; ++i )
{
g.drawLine( width, height, i * width / 10, 0 );
}
}
}
Output
Drawing Rectangles
The drawRect() and fillRect() functions, respectively, draw an outlined and filled rectangle.
Syntax
Void drawRect(int top,int left,int width,int height)
Void fillRect(int top,int left,int width,int height)
The rectangle's upper left corner is at top, left. The width and height of the rectangle define its dimensions. Use drawRoundRect() or fillRoundRect() to create a rounded rectangle ().
Syntax
Void drawRoundRect(int top,int left,int width,int height,int xDiam,int yDiam)
Void fillRoundRect(int top,int left,int width,int height,int xDiam,int yDiam)
The corners of a rounded rectangle are rounded. The rectangle's upper-left corner is at top, left. The width and height of the rectangle define its dimensions. Diam specifies the diameter of the rounding arc along the X axis. YDiam specifies the dimension of the rounding arc along the Y axis.
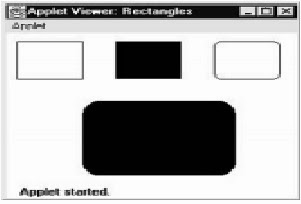
Applet program to draws several rectangles:
// Draw rectangles
Import java.awt.*;
Import java.applet.*;
/*
<applet code="Rectangles" width=300 height=200>
</applet>
*/
Public class Rectangles extends Applet
{
Public void paint(Graphics g)
{
g.drawRect(10, 10, 60, 50);
g.fillRect(100, 10, 60, 50);
g.drawRoundRect(190, 10, 60, 50, 15, 15);
g.fillRoundRect(70, 90, 140, 100, 30, 40);
}
}
Output
Drawing Arcs
DrawArc() and fillArc() can be used to create arcs, as demonstrated here:
Void drawArc(int top, int left, int width, int height, intstartAngle,intsweepAngle)
Void fillArc(int top, int left, int width, int height, intstartAngle,intsweepAngle)
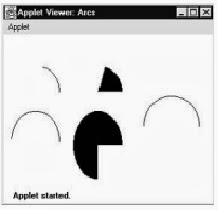
The rectangle whose upper-left corner is determined by top,left and whose width and height are specified by width and height, defines the arc. The arc is drawn from startAngle to sweepAngle via the provided angular distance. Degrees are used to describe angles. The three o'clock position is at zero degrees on the horizontal. If sweepAngleis is positive, the arc is drawn counterclockwise; if sweepAngleis is negative, the arc is drawn clockwise. To draw an arc from 12 o'clock to 6 o'clock, the start angle would be 90 degrees and the sweep angle would be 180 degrees.
The following applet draws several arcs:
// Draw Arcs
Import java.awt.*;
Import java.applet.*;
/*
<applet code="Arcs" width=300 height=200>
</applet>
*/
Public class Arcs extends Applet
{
Public void paint(Graphics g)
{
g.drawArc(10, 40, 70, 70, 0, 75);
g.fillArc(100, 40, 70, 70, 0, 75);
g.drawArc(10, 100, 70, 80, 0, 175);
g.fillArc(100, 100, 70, 90, 0, 270);
g.drawArc(200, 80, 80, 80, 0, 180);
}
}
Output
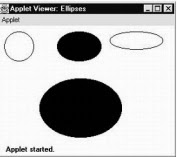
Drawing Ellipses and Circles
Use drawOval to create an ellipse ( ). Use fillOval to fill an ellipse ( ).
Syntax:
Void drawOval(int top, int left, int width, int height)
Void fillOval(int top, int left, int width, int height)
The ellipse is drawn within a bounding rectangle whose width and height are defined by width and height and whose upper-left corner is provided by top,left. Set the bounding rectangle to a square to draw a circle.
The following program draws several ellipses:
// Draw Ellipses
Import java.awt.*;
Import java.applet.*;
/*
<applet code="Ellipses" width=300 height=200>
</applet>
*/
Public class Ellipses extends Applet {
Public void paint(Graphics g) {
g.drawOval(10, 10, 50, 50);
g.fillOval(100, 10, 75, 50);
g.drawOval(190, 10, 90, 30);
g.fillOval(70, 90, 140, 100);
}
}
Output
Q14) What is controls?
A14) The following sorts of controls are supported by the AWT:
● Labels
● Push buttons
● Check boxes
● Choice lists
● Lists
● Scroll bars
● Text Editing
These controls are Component subclasses. Although this isn't a particularly extensive collection of controls, it's adequate for most applications. (It's worth noting that both Swing and JavaFX offer a far bigger and more sophisticated collection of controls.)
Adding and Removing Controls
A control must be added to a window before it can be used. To do so, you must first build an instance of the required control and then execute Container's add() method to add it to a window. There are various versions of the add() method.
Component add(Component compRef)
CompRef is a reference to a control instance that you want to add in this case. The object is returned as a reference. When a control is installed, it will appear automatically anytime its parent window is displayed.
When a control is no longer required, it is sometimes desirable to remove it from a window. To do so, dial delete ( ). Container also defines this technique. Here's an example of one of its forms:
Void remove(Component compRef)
CompRef is a reference to the control you want to get rid of in this case. By calling removeAll, you may get rid of all the controls ( ).
Responding to Controls
All other controls, with the exception of labels, which are passive, generate events when they are accessed by the user. When a user clicks a push button, for example, an event is received that identifies the push button. In general, your program simply implements the necessary interface and then registers an event listener for each control that needs to be monitored. Events are automatically provided to a listener after it is setup. For each control, the relevant interface is given.
The HeadlessException
When attempting to instantiate a GUI component in a non-interactive environment, most of the AWT controls described in this chapter include constructors that can throw a HeadlessException (such as one in which no display, mouse, or keyboard is present). This exception can be used to write code that adapts to non-interactive settings. (Obviously, this isn't always the case.) Because an interactive environment is necessary to demonstrate the AWT controls, the programs in this chapter do not handle this exception.
Q15) Explain layout manager?
A15) Layout Managers are used to organize components in a specific way. The Java Layout Managers help us control the size and positioning of components in GUI forms. The interface Layout Manager is implemented by all kinds of layout managers. The layout managers are represented by the following classes:
- Java.awt.BorderLayout
- Java.awt.FlowLayout
- Java.awt.GridLayout
- Java.awt.CardLayout
- Java.awt.GridBagLayout
- Javax.swing.BoxLayout
- Javax.swing.GroupLayout
- Javax.swing.ScrollPaneLayout
- Javax.swing.SpringLayout etc.
Border Layout
The Border Layout is used to divide the components into five different regions: north, south, east, west, and middle. Only one component can be present in each region (area). That is the standard frame or window arrangement. For each field, the Border Layout provides five constants:
- Public static final int NORTH
- Public static final int SOUTH
- Public static final int EAST
- Public static final int WEST
- Public static final int CENTER
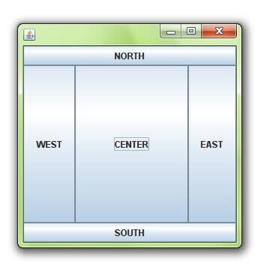
Fig 3: example of border layout
Flow Layout
The Flow Layout is used to line up the components one after another in a line (in a flow). It is the applet or panel's default layout.
Field of flow layout class
- Public static final int LEFT
- Public static final int RIGHT
- Public static final int CENTER
- Public static final int LEADING
- Public static final int TRAILING
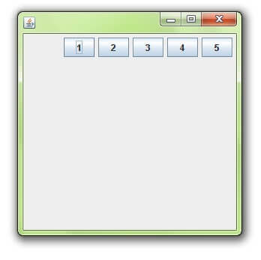
Fig 4: example of flowlayout
Grid Layout
The Grid Layout is used to make a rectangular grid out of the components. Each rectangle displays a single part.
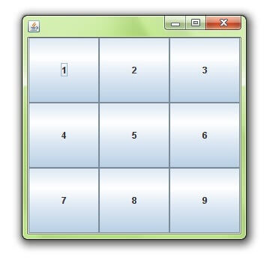
Fig 5: example of grid layout
Constructor of grid layout class
- GridLayout(): creates a grid layout in which each part in a row has one column.
- GridLayout(int rows, int columns): creates a grid layout with the defined rows and columns, but no gaps between them.
- GridLayout(int rows, int columns, int hgap, int vgap): creates a grid with the specified rows and columns, as well as the specified horizontal and vertical gaps.
Card Layout
The Card Layout class organizes the components such that only one is available at any given time. It is called Card Layout because it treats each part as a card.
Constructors of Card Layout class
- CardLayout(): creates a card layout with no vertical or horizontal gaps.
- CardLayout(int hgap, int vgap): creates a card layout with the horizontal and vertical gaps specified.
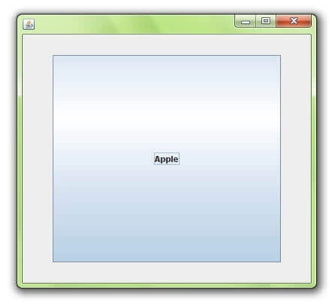
Fig 6: example of card layout
Gridbag Layout
Components may be aligned vertically, horizontally, or along their baseline using the Java GridBag Layout class.
It's possible that the components aren't all the same size. A dynamic, rectangular grid of cells is maintained by each GridBagLayout object. Each portion has a display area that consists of one or more cells. GridBagConstraints is associated with each component. We use the constraints object to organize the display area of the part on the grid. In order to decide component size, the GridBagLayout manages each component's minimum and desired sizes.
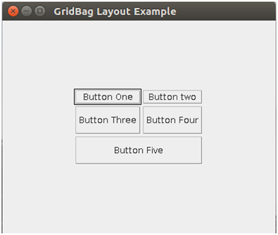
Fig 7: example of Gridbag layout
Box Layout
The Box Layout is used to vertically or horizontally organize the elements. BoxLayout offers four constants for this reason. The following are the details:
- Public static final int X_AXIS
- Public static final int Y_AXIS
- Public static final int LINE_AXIS
- Public static final int PAGE_AXIS
Constructor
● BoxLayout(Container c, int axis): creates a box arrangement with the specified axis that arranges the components.
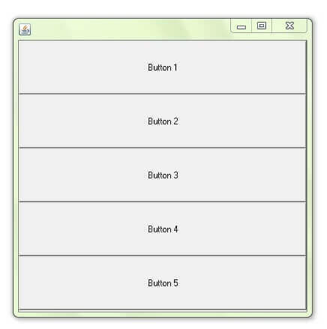
Fig 8: example of box layout
Q16) Describe core java API?
A16) Below is a list of all of the core API packages defined by Java (those in the java namespace) as of this writing, along with a summary of their functions.
Package - Primary Function
Java.applet :- Supports construction of applets.
Java.awt :- Provides capabilities for graphical user interfaces.
Java.awt.color :- Supports color spaces and profiles.
:-
Java.awt.datatransfer :- Transfers data to and from the system clipboard.
Java.awt.dnd :- Supports drag-and-drop operations.
Java.awt.event :- Handles events.
Java.awt.font :- Represents various types of fonts.
Java.awt.geom :- Allows you to work with geometric shapes.
Java.awt.im :- Allows input of Japanese, Chinese, and Korean characters to text editing components.
Java.awt.im.spi :- Supports alternative input devices.
Java.awt.image :- Processes images.
Java.awt.image.renderable :- :- Supports rendering-independent images.
Java.awt.print :- Supports general print capabilities.
Java.beans :- Allows you to build software components.
Java.beans.beancontext :- Provides an execution environment for Beans.
Java.io :- Inputs and outputs data.
Java.lang :- Provides core functionality.
Java.lang.annotation :- Supports annotations (metadata).
Java.lang.instrument :- Supports program instrumentation.
Java.lang.invoke :- Supports dynamic languages.
Java.lang.management :- Supports management of the execution environment.
Java.lang.ref :- Enables some interaction with the garbage collector.
Java.lang.reflect :- Analyzes code at run time.
Java.math :- Handles large integers and decimal numbers.
Java.net :- Supports networking.
Java.nio :- Top-level package for the NIO classes. Encapsulates buffers.
Java.nio.channels :- Encapsulates channels, which are used by the NIO system.
Java.nio.channels.spi :- Supports service providers for channels.
Java.nio.charset :- Encapsulates character sets.
Java.nio.charset.spi :- Supports service providers for character sets.
Java.nio.file :- Provides NIO support for files.
Java.nio.file.attribute:- Supports NIO file attributes.
Java.nio.file.spi :- Supports NIO service providers for files.
Java.rmi :- Provides remote method invocation.
Java.rmi.activation :- Activates persistent objects.
Java.rmi.dgc :- Manages distributed garbage collection.
Java.rmi.registry :- Maps names to remote object references.
Java.rmi.server :- Supports remote method invocation.
Java.security :- Handles certificates, keys, digests, signatures, and other security functions.
Java.security.acl :- Manages access control lists.
Java.security.cert :- Parses and manages certificates.
Java.security.interfaces :- Defines interfaces for DSA (Digital Signature Algorithm) keys.
Java.security.spec :- Specifies keys and algorithm parameters.
Java.sql :- Communicates with a SQL (Structured Query Language) database.
Java.text :- Formats, searches, and manipulates text.
Java.text.spi :- Supports service providers for text formatting classes in java.text.
Java.time :- Primary support for the new date and time API. (Added by JDK 8.)
Java.time.chrono :- Supports alternative, non-Gregorian calendars. (Added by JDK 8.)
Java.time.format :- Supports date and time formatting. (Added by JDK 8.)
Java.time.temporal :- Supports extended date and time functionality. (Added by JDK 8.)
Java.time.zone :- Supports time zones. (Added by JDK 8.)
Java.util :- Contains common utilities.
Java.util.concurrent :- Supports the concurrent utilities.
Java.util.concurrent.atomic :- Supports atomic (that is, indivisible) operations on variables without the use of locks.
Java.util.concurrent.locks :- Supports synchronization locks.
Java.util.function :- Provides several functional interfaces. (Added by JDK 8.)
Java.util.jar :- Creates and reads JAR files.
Java.util.logging :- Supports logging of information related to a program’s execution.
Java.util.prefs :- Encapsulates information relating to user preference.
Java.util.regex :- Supports regular expression processing.
Java.util.spi :- Supports service providers for the utility classes in java.util.
Java.util.stream :- Supports the new stream API. (Added by JDK 8.)
Java.util.zip :- Reads and writes compressed and uncompressed ZIP files.
Q17) Explain reflection?
A17) Software's capacity to analyze itself is known as reflection. The java.lang.reflect package and parts in Class provide this. Reflection is a vital feature, especially when employing Java Bean components. It enables you to dynamically assess and define the capabilities of a software component rather than at build time. You may know what methods, constructors, and fields a class supports, for example, by using reflection.
Several interfaces are included in the java.lang.reflect package. Member is particularly interesting since it defines methods for retrieving information about a class's field, constructor, or method. This package also includes eleven classes.
These are listed below
Class : Primary Function
AccessibleObject : Allows you to bypass the default access control checks.
Array : Allows you to dynamically create and manipulate arrays.
Constructor : Provides information about a constructor.
Executable : An abstract superclass extended by Method and Constructor. (Added by JDK 8.)
Field : Provides information about a field.
Method : Provides information about a method.
Modifier : Provides information about class and member access modifiers.
Parameter : Provides information about parameters. (Added by JDK 8.)
Proxy : Supports dynamic proxy classes.
ReflectPermission : Allows reflection of private or protected members of a class.
The following application demonstrates how to use Java's reflection features in a simple way. The constructors, properties, and methods of the java.awt.Dimension class are printed. The program starts by getting a class object for java.awt.Dimension using the forName() function of Class. This is then used to investigate the class object using getConstructors(), getFields(), and getMethods().
They return an array of Constructor, Field, and Method objects that contain the object's details. The Constructor, Field, and Method classes define a number of methods for obtaining object information. You'll want to go ahead and investigate these on your own. The toString() method is supported by all. As a result, as seen in the example, passing Constructor, Field, and Method objects as parameters to the println() method is simple.
// Demonstrate reflection.
Import java.lang.reflect.*; public class ReflectionDemo1 {
Public static void main(String args[]) { try {
Class<?> c = Class.forName("java.awt.Dimension"); System.out.println("Constructors:");
Constructor<?> constructors[] = c.getConstructors(); for(int i = 0; i < constructors.length; i++) {
System.out.println(" " + constructors[i]);
}
System.out.println("Fields:"); Field fields[] = c.getFields();
For(int i = 0; i < fields.length; i++) { System.out.println(" " + fields[i]);
}
System.out.println("Methods:");
Method methods[] = c.getMethods();
For(int i = 0; i < methods.length; i++) { System.out.println(" " + methods[i]);
}
}
Catch(Exception e) { System.out.println("Exception: " + e);
}
}
}
Output
Constructors:
Public java.awt.Dimension(int,int)
Public java.awt.Dimension()
Public java.awt.Dimension(java.awt.Dimension)
Fields:
Public int java.awt.Dimension.width
Public int java.awt.Dimension.height
Methods:
Public int java.awt.Dimension.hashCode()
Public boolean java.awt.Dimension.equals(java.lang.Object)
Public java.lang.String java.awt.Dimension.toString()
Publicjava.awt.Dimension java.awt.Dimension.getSize()
Publicvoid java.awt.Dimension.setSize(double,double)
Publicvoid java.awt.Dimension.setSize(java.awt.Dimension)
Publicvoid java.awt.Dimension.setSize(int,int)
Publicdouble java.awt.Dimension.getHeight()
Publicdouble java.awt.Dimension.getWidth()
Publicjava.lang.Object java.awt.geom.Dimension2D.clone()
Publicvoid java.awt.geom.
Dimension2D.setSize(java.awt.geom.Dimension2D)
Publicfinal native java.lang.Class java.lang.Object.getClass()
Publicfinal native void java.lang.Object.wait(long)
Throws java.lang.InterruptedException
Publicfinal void java.lang.Object.wait()
Throws java.lang.InterruptedException
Publicfinal void java.lang.Object.wait(long,int)
Throws java.lang.InterruptedException
Publicfinal native void java.lang.Object.notify()
Publicfinal native void java.lang.Object.notifyAll()
Pros and cons of reflection
Java reflection should be utilized with prudence at all times. While introspection has many advantages, it also has some negatives. Let's start with the benefits.
Pros - Reflection allows you to inspect interfaces, classes, methods, and fields at runtime without having to use their names during compile time. Reflection can also be used to call methods, create a clear, and set the value of fields. It aids in the development of Visual Development Environments (VDEs) and class browsers, which assist developers in writing accurate code.
Cons - The concepts of encapsulation can be broken by using reflection. Reflection can be used to gain access to a class's private methods and fields. As a result, reflection may expose sensitive information to the outside world, which is risky. For example, if one user accesses a class's private members and sets a null value to them, another user of the same class may receive a NullReferenceException, which is not expected.
Another flaw is the performance overhead. JVM (Java Virtual Machine) optimization is not possible since the types in reflection are resolved dynamically. As a result, the processes that reflections undertake are typically slow.
Q18) Define remote method invocation?
A18) The RMI (Remote Method Invocation) API is a Java API that allows you to develop distributed applications. The RMI allows an object to call methods on another JVM-based object.
The RMI uses two objects, stub and skeleton, to facilitate remote communication between programs.
For communication with the remote object, RMI uses stub and skeleton objects.
A remote object is one whose method can be called from another Java virtual machine.
Let's look at the stub and skeleton objects in more detail:
Stub
The stub is an object that serves as a client-side gateway. It is via which all outbound requests are directed. It is a client-side object that represents a distant object. The caller does the following duties when calling a method on the stub object:
● It initiates a connection with remote Virtual Machine (JVM),
● It writes and transmits (marshals) the parameters to the remote Virtual Machine (JVM),
● It waits for the result
● It reads (unmarshals) the return value or exception, and
● It finally, returns the value to the caller.
Skeleton
The skeleton is a server-side object that serves as a gateway. It is where all inbound requests are routed. When a skeleton receives a request, it performs the following actions:
- It reads the parameter for the remote method
- It invokes the method on the actual remote object, and
- It writes and transmits (marshals) the result to the caller.
A stub protocol was introduced in the Java 2 SDK, which eliminates the requirement for skeletons.
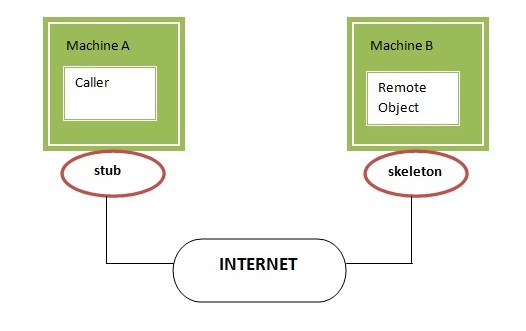
Fig 10: stub and skeleton
Example
The is given the 6 steps to write the RMI program.
- Create the remote interface
- Provide the implementation of the remote interface
- Compile the implementation class and create the stub and skeleton objects using the rmic tool
- Start the registry service by rmiregistry tool
- Create and start the remote application
- Create and start the client application
Q19) What is swing applet?
A19) The applet is the second type of program that employs Swing. Swing-based applets are similar to AWT-based applets, but there's a key distinction: Instead of Applet, a Swing applet extends JApplet. Applet is a descendant of JApplet. As a result, JApplet combines all of the features of Applet with Swing compatibility. Because JApplet is a top-level Swing container, it is not descended from JComponent. Because JApplet is a top-level container, it contains all of the previously mentioned panes. This means that all components are added to the content pane of JApplet in the same way that they are introduced to the content pane of JFrame.
Init(), start(), stop(), and destroy() are the four life-cycle methods used by Swing applets. ( ). Of course, you should only alter the methods that your applet requires. In Swing, painting is done differently than in AWT, and a Swing applet will not generally override the paint() method.
One other point: In a Swing applet, all interaction with components must happen on the event dispatching thread, as explained in the preceding section. This threading problem can be found in all Swing programs.
An example of a Swing applet can be found here. It performs the same functions as the preceding application, but in the form of an applet. The program is seen in Figure when it is run with appletviewer.
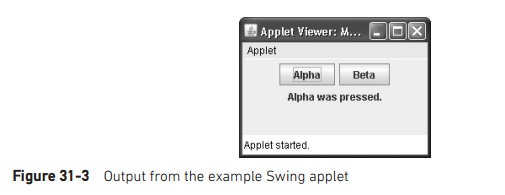
Fig 11: example output
// A simple Swing-based applet
Import javax.swing.*; import java.awt.*; import java.awt.event.*;
/*
This HTML can be used to launch the applet:
<applet code="MySwingApplet" width=220 height=90> </applet>
*/
Public class MySwingApplet extends JApplet { JButton jbtnAlpha;
JButton jbtnBeta;
JLabel jlab;
// Initialize the applet.
Public void init() {
Try {
SwingUtilities.invokeAndWait(new Runnable () { public void run() {
MakeGUI(); // initialize the GUI
}
});
} catch(Exception exc) {
System.out.println("Can’t create because of "+ exc);
}
}
//This applet does not need to override start(), stop(),
//or destroy().
//Set up and initialize the GUI.
Private void makeGUI() {
//Set the applet to use flow layout.
SetLayout(new FlowLayout());
//Make two buttons.
JbtnAlpha = new JButton("Alpha"); jbtnBeta = new JButton("Beta");
Add action listener for Alpha. JbtnAlpha.addActionListener(new ActionListener() {
Public void actionPerformed(ActionEvent le) { jlab.setText("Alpha was pressed.");
}
});
//Add action listener for Beta.
JbtnBeta.addActionListener(new ActionListener() {
Public void actionPerformed(ActionEvent le) { jlab.setText("Beta was pressed.");
}
});
//Add the buttons to the content pane.
Add(jbtnAlpha);
Add(jbtnBeta);
//Create a text-based label.
Jlab = new JLabel("Press a button.");
// Add the label to the content pane.
Add(jlab);
}
}
There are two things to keep in mind concerning this applet. To begin, MySwingApplet is a JApplet extension. All Swing-based applets extend JApplet rather than Applet, as previously stated. Second, the init() method sets up a call to makeGUI to initialize the Swing components on the event dispatching thread ( ). It's worth noting that invokeAndWait() is used instead of invokeLater() to accomplish this ( ). Because the init() method must not return until the full initialization procedure has done, applets must use invokeAndWait(). In essence, the start() method cannot be used until the GUI has been entirely created.
The two buttons and label are generated inside makeGUI(), and the action listeners are attached to the buttons. The components are then placed in the content window. Despite the simplicity of this example, the same general method must be followed when creating any Swing GUI that will be utilized by an applet.
Q20) Write about runnable, thread and thread group?
A20) Any class that will start a separate thread of operation must implement the Runnable interface. Runnable defines only one abstract method, run( ), which is the thread's entry point.
It is defined as follows:
Void run( )
This method must be implemented in all threads you create.
Thread
Thread starts a new execution thread. It implements Runnable and defines the following constructors that are often used:
Thread( )
Thread(Runnable threadOb)
Thread(Runnable threadOb, String threadName)
Thread(String threadName)
Thread(ThreadGroup groupOb, Runnable threadOb)
Thread(ThreadGroup groupOb, Runnable threadOb, String threadName)
Thread(ThreadGroup groupOb, String threadName)
ThreadOb is an instance of a class that implements the Runnable interface and specifies where the thread's execution starts. ThreadName is used to specify the thread's name. When a name isn't supplied, the Java Virtual Machine generates one. The thread group to which the new thread will belong is specified by groupOb. The new thread is assigned to the same group as the parent thread if no thread group is given.
Thread declares the following constants:
MAX_PRIORITY
MIN_PRIORITY
NORM_PRIORITY
The methods halt(), suspend(), and resume() were likewise included in Thread ( ). These, however, were deprecated because they were intrinsically unstable. CountStackFrames() and destroy() are also deprecated since they call suspend() and can create deadlock.
Thread Group
ThreadGroup is a function that generates a group of threads. It specifies the following two constructors:
ThreadGroup(String groupName)
ThreadGroup(ThreadGroup parentOb, String groupName)
The name of the thread group is specified in both forms by groupName. The first version establishes a new group whose parent is the current thread. The parent is indicated in the second form by parentOb. The non-deprecated ThreadGroup methods are listed in Table.
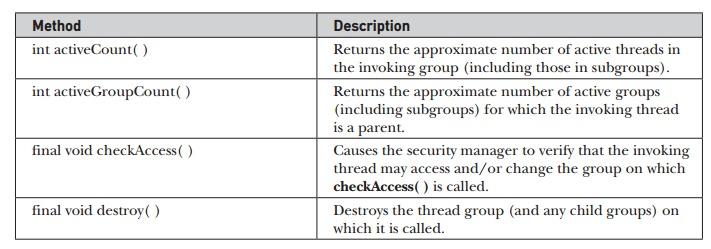
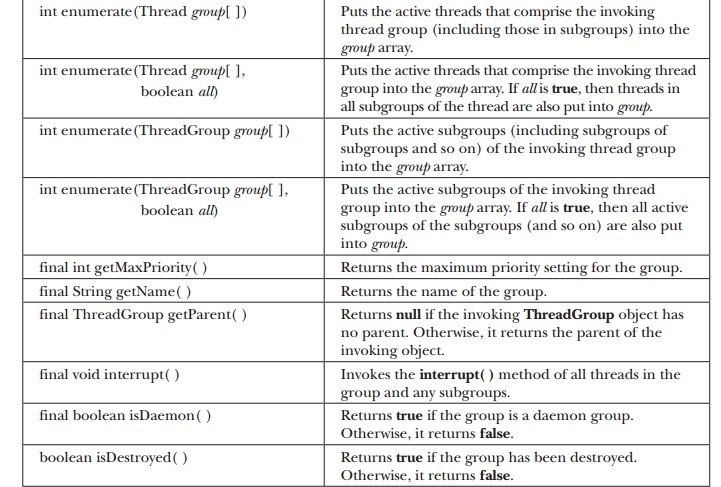
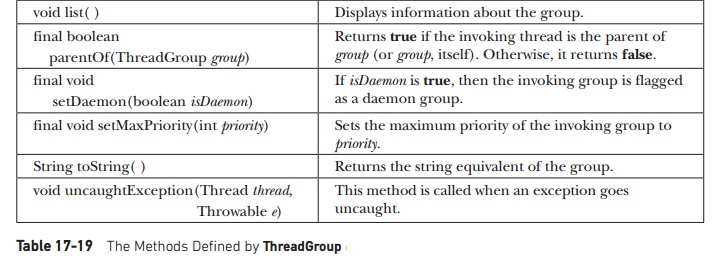
Thread groups make it easy to manage several threads as a single unit. This is very useful in circumstances where you need to suspend and restart a lot of connected threads. Consider a program that uses one set of threads to print a document, another set to show the document on the screen, and yet another set to save the document to a disk file. If printing is halted, you'll need a quick mechanism to shut off all linked threads. This is made possible by thread groups. This is demonstrated in the following program, which produces two thread groups of two threads each:
// Demonstrate thread groups.
Class NewThread extends Thread {
Boolean suspendFlag;
NewThread(String threadname, ThreadGroup tgOb) { super(tgOb, threadname); System.out.println("New thread: " + this); suspendFlag = false;
Start(); // Start the thread
}
// This is the entry point for thread.
Public void run() {
Try {
For(int i = 5; i > 0; i--) { System.out.println(getName() + ": " + i); Thread.sleep(1000);
Synchronized(this) { while(suspendFlag) {
Wait();
}
}
}
} catch (Exception e) { System.out.println("Exception in " + getName());
}
System.out.println(getName() + " exiting.");
}
Synchronized void mysuspend() { suspendFlag = true;
}
Synchronized void myresume() { suspendFlag = false; notify();
}
}
Class ThreadGroupDemo {
Public static void main(String args[]) { ThreadGroup groupA = new ThreadGroup("Group A"); ThreadGroup groupB = new ThreadGroup("Group B");
NewThread ob1 = new NewThread("One", groupA);
NewThread ob2 = new NewThread("Two", groupA);
NewThread ob3 = new NewThread("Three", groupB);
NewThread ob4 = new NewThread("Four", groupB);
System.out.println("\nHere is output from list():"); groupA.list();
GroupB.list();
System.out.println();
System.out.println("Suspending Group A");
Thread tga[] = new Thread[groupA.activeCount()]; groupA.enumerate(tga); // get threads in group
For(int i = 0; i < tga.length; i++) {
((NewThread)tga[i]).mysuspend(); // suspend each thread
}
Try { Thread.sleep(4000);
} catch (InterruptedException e) { System.out.println("Main thread interrupted.");
}
System.out.println("Resuming Group A"); for(int i = 0; i < tga.length; i++) {
((NewThread)tga[i]).myresume(); // resume threads in group
}
// wait for threads to finish
Try {
System.out.println("Waiting for threads to finish."); ob1.join();
Ob2.join();
Ob3.join();
Ob4.join();
} catch (Exception e) { System.out.println("Exception in Main thread");
}
System.out.println("Main thread exiting.");
}
}
Output
New thread: Thread[One,5,Group A] New thread: Thread[Two,5,Group A] New thread: Thread[Three,5,Group B] New thread: Thread[Four,5,Group B] Here is output from list():
Java.lang.ThreadGroup[name=Group A,maxpri=10] Thread[One,5,Group A]
Thread[Two,5,Group A]
Java.lang.ThreadGroup[name=Group B,maxpri=10] Thread[Three,5,Group B] Thread[Four,5,Group B]
Suspending Group A Three: 5
Four: 5
Three: 4
Four: 4
Three: 3
Four: 3
Three: 2
Four: 2 Resuming Group A
Waiting for threads to finish. One: 5
Two: 5
Three: 1
Four: 1
One: 4
Two: 4
Three exiting. Four exiting. One: 3
Two: 3
One: 2
Two: 2
One: 1
Two: 1
One exiting. Two exiting.
Main thread exiting.