UNIT 2
ENGG GRAPHICS
Q.1 What is Principle of Projection?
Ans:
If straight lines are drawn from various points on the contour of an object to meet a plane, the object is said to be projected on that plane. The figure formed by joining, in correct sequence, the points at which these lines meet the plane, is called the projection of the object. The lines from the object to the plane are called projectors.
Methods of Projection:
Following four methods of projection are commonly used,
1) Orthographic projection.
2) Isometric projection.
3) Oblique projection.
4) Perspective projection.
In the above methods 2, 3 and 4 represent the object by a pictorial view as eyes see it. In these methods of projection, a three-dimensional object is represented on a projection plane by one view only, while in the orthographic projection an object is represented by two or three views on the mutual perpendicular projection planes. Each projection view represents two dimensions of an object. For the complete description of the three-dimensional object at least two or three views are required.
Q.2 What is Orthographic Projection?
Ans:
Theory of orthographic projection:
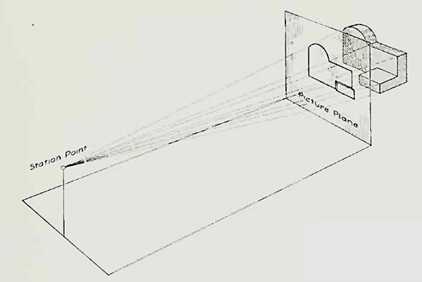
Let us suppose that a transparent plane has been set up between an object and the station point of an observer's eye (Fig. 1). The intersection of this plane with the rays formed by lines of sight from the eye to all points of the object would give a picture that is practically the same as the image formed in the eye of the observer. This is perspective projection.
Figure 1 Perspective projection. The rays of the projection converge at the station point from which the object is observed.
If the observer would then walk backward from the station point until he reached a theoretically infinite distance, the rays formed by lines of sight from his eye to the object would grow longer and finally become infinite in length, parallel to each other, and perpendicular to the picture plane. The image so formed on the picture plane is what is known as "orthographic projection." See Fig.
Basically, orthographic projections could be defined as any single projection made by dropping perpendiculars to a plane. However, it has been accepted through long usage to mean the combination of two or more such views, hence the following definition has been put forward: Orthographic projection is the method of representing the exact shape of an object by dropping perpendiculars from two or more sides of the object to planes, generally at right angles to each other; collectively, the views on these planes describe the object completely. (The term "orthogonal" is sometimes used for this system of drawing.)
Q.3 Projection of point situated in the first quadrant.
Ans:
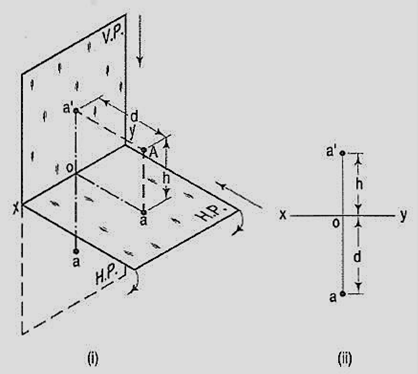
The pictorial view [fig. (i)] shows a point A situated above the H.P. And in front of the V.P., i.e. in the first quadrant. a' is its front view and the top view. After rotation of the plane, these projections will be shown in fig.
The front view a' is above xy and the top view a below it. The line joining a' and a (which also is called a projector), intersects xy at right angles at a point o. It is quite evident from the pictorial view that a'o = Aa, i.e. the distance of the front view from xy = the distance of A from the H.P. Viz. h. Similarly, ao = Aa',i.e. the distance of the top view from xy = the distance of A from the V.P. Viz. d.
Q.4 How is position of a straight line described with respect to the two reference planes?
Ans:
The position of a straight line may also be described with respect to the two reference planes. It may be:
1. Parallel to one or both the planes.
2. Contained by one or both the planes.
3. Perpendicular to one of the planes.
4. Inclined to one plane and parallel to the other.
5. Inclined to both the planes.
6. Projections of lines inclined to both the planes.
7. Line contained by a plane perpendicular to both the reference planes.
8. True length of a straight line and its inclinations with the reference planes.
9. Traces of a line.
10. Methods of determining traces of a line.
11. Traces of a line, the projections of which are perpendicular to xy.
12. Positions of traces of a line.
Q.5 How is projection pf line parallel to one or both the planes?
Ans:
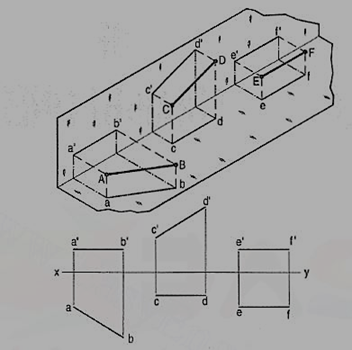
(a) Line AB is parallel to the H.P.
a and b are the top views of the ends A and B respectively. It can be clearly seen that the figure ABba is a rectangle. Hence, the top view ab is equal to AB.
a'b' is the front view of AB and is parallel to xy.
(b) Line CD is parallel to the V.P. The line c'd' is the front view and is equal to CD; the top view cd is parallel to xy.
(c) Line ff is parallel to the H.P. And the V.P. Ef is the top view and e'f' is the front view; both are equal to ff and parallel to xy.
Hence, when a line is parallel to a plane, its projection on that plane is equal to its true length; while its projection on the other plane is parallel to the reference line.
Q.6 List of methods to determine traces of lines.
Ans:

Method I:
Fig. (i) shows a line AB inclined to both the reference planes. Its end A is in the H.P. And 8 is in the V.P. a'b' and ab are the front view and the top view respectively [fig. (ii)].
The H.T. Of the line is on the projector through a' and coincides with a. The V.T. Is on the projector through b and coincides with b'
.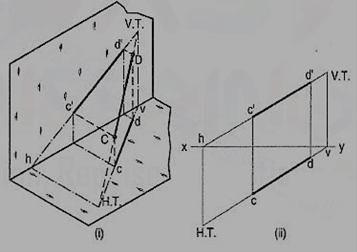
Let us now assume that AB is shortened from both its ends, its inclination with the planes remaining constant. The H.T. And V.T. Of the new line CD are still the same as can be seen clearly in fig. (i). c'd' and cd are the projections of CD [fig. (ii)]. Its traces may be determined as described below.
(i) Produce the front view c'd' to meet xy at a point h.
(ii) Through h, draw a projector to meet the top view cd-produced, at the H.T. Of the line.
(iii) Similarly, produce the top view cd to meet xy at a point v.
(iv) Through v, draw a projector to meet the front view c'd'-produced, at the V.T. Of the line.
Method II:

c'd' and cd are the projections of the line CD [fig. (ii)]. Determine the true length C1D1 from the front view c'd' by trapezoid method. The point of intersection between c'd'-produced and C1D1-produced is the V.T. Of the line.
Similarly, determine the true length C2D2 from the top view ed. Produce them to intersect at the H.T. Of the line.
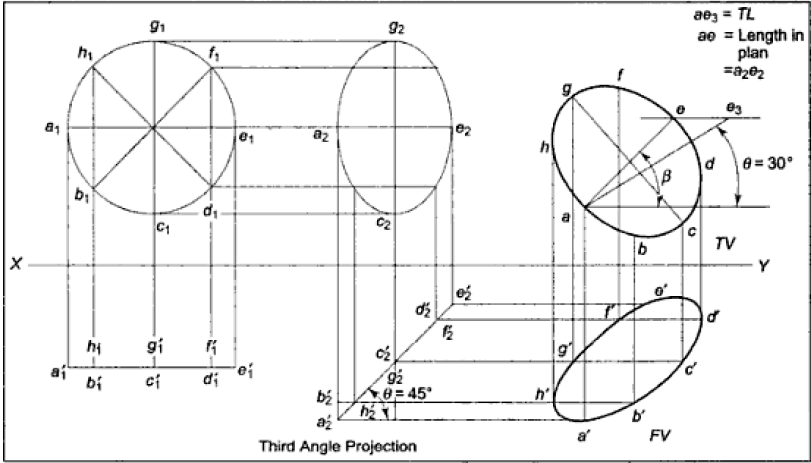
Q.7 Project a circle.
Ans:
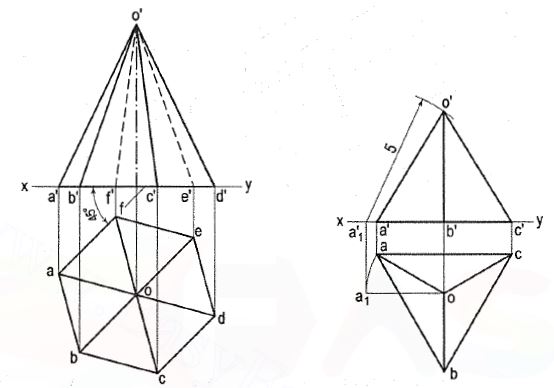
Q.8 Draw the projections of a hexagonal pyramid, base 30 mm side and axis 60 mm long, having its base on the H.P. And one of the edges of the base inclined at 45° to the V.P.
(i) In the top view, draw a line af 30 mm long and inclined at 45° to xy. Construct a regular hexagon on af. Mark its centre o and complete the top view by drawing lines joining it with the corners.
