EG
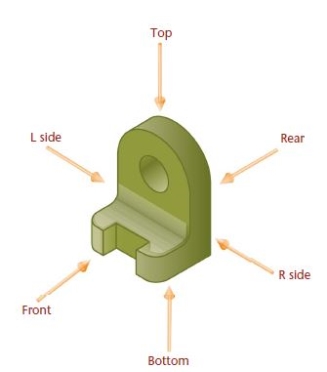
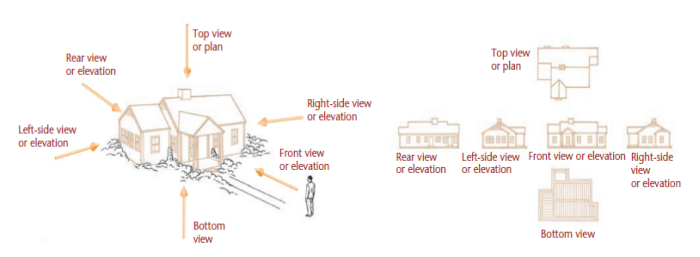
UNIT 4Orthographic projections Q1) List out six principle views for orthographic projections.Ans:
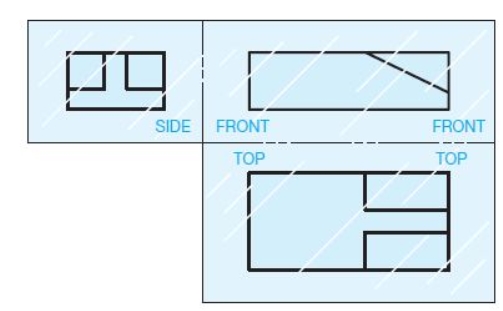
Q2) What is First – angle projection?Ans:First-angle projection is commonly used in countries other than the United States. First-angle projection places the glass box in the first quadrant of Figure 8.16. Views are established by projecting surfaces of the object onto the surface of the glass box. In this projection arrangement, the object is between your line of sight and the projection plane, as shown in Figure. When the glass box in the first-angle projection quadrant is unfolded, the result is the Multiview arrangement shown in Figure.
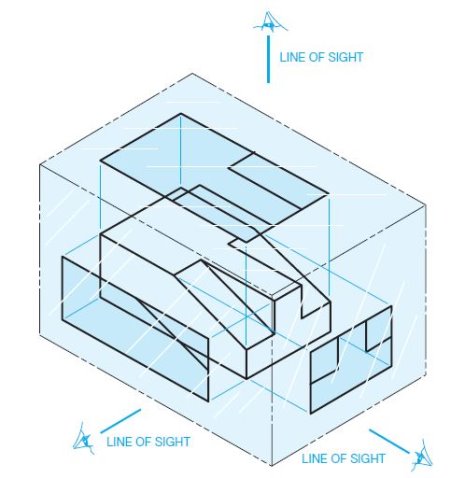
Q3) What is Third angle of projection?Ans:The primary method of multiview projection described in this chapter is known as third-angle projection. Third-angle projection is the method of view arrangement commonly used in the United States. In the previous discussion on multiview projection, the object was placed in a glass box so the sides of the glass box were parallel to the major surfaces of the object. Next, the object surfaces were projected onto the adjacent surfaces of the glass box. This gave the same effect as if your line of sight is perpendicular to the surface of the box and looking directly at the object, as shown in Figure 1. With the multiview concept in mind, assume an area of space is divided into four quadrants, as shown in Figure .
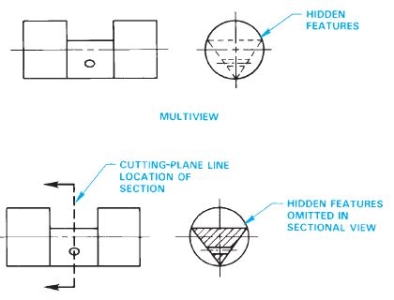
Q4) What are sectional views?Ans:Sectional views are also called sections, and the process of creating sections are referred to as sectioning. Sections are used to describe the interior portions of an object that are otherwise difficult to visualize. Interior features that are described using hidden lines are not as clear as if they are exposed for viewing as visible features. It is also a poor practice to dimension to hidden features. The sectional view allows you to expose the hidden features for dimensioning. Figure 5 shows an object in conventional multiview representation and using a sectional view. Notice how the hidden features are clarified in the sectional view.
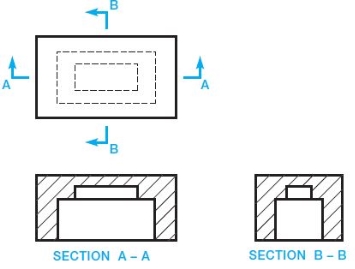
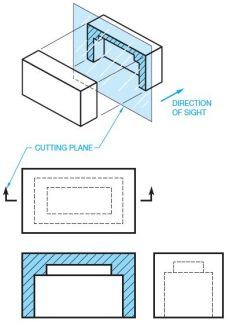
Q5) What is full sectional view?Ans:A full section is drawn when the cutting plane extends completely through the object, usually along a center plane as shown in Figure 6. The object shown in Figure 6 could have used two full sections to further clarify hidden features. In such a case, the cutting planes and related views are labelled (see Figure 7). The cutting-plane line can be omitted when the relationship between views is obvious. Confirm this practice with your instructor or employer. It is normally best to show the cutting-plane line for clarity.
Q6) What is half sectional view?Ans:A half section is used when a symmetrical object requires sectioning. The cutting-plane line of a half section removes one quarter of the object. The advantage of a half section is the sectional view shows half of the object in section and the other half of the object as it normally appears in multiview without section. The name half section comes from the idea that only half of the sectional view is sectioned (see Figure). Notice that a centerline is used in the sectional view to separate the sectioned portion from the un-sectioned portion. Hidden lines are generally omitted from sectional views unless their use improves clarity.
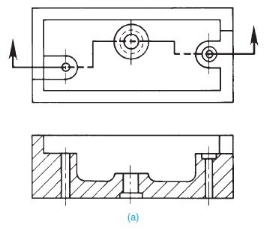
Q7) What is offset sectional view?Ans:Staggered interior features of an object are sectioned by allowing the cutting-plane line to offset through the features creating an offset section as shown in Figure 9. The cutting-plane line for an offset section is generally drawn using 908 turns where it offsets through the staggered features as shown in Figure 9a. Notice in Figure 9 that there is no line in the sectional view indicating a change in direction of the cutting-plane line. Normally, the cutting-plane line in an offset section extends completely through the object to display the location of the section clearly. A cutting plane line is always used when the cutting plane is bent or offset or when the sectional view is non-symmetrical. Figure 9b shows how the segments of an offset cutting plane project from and are aligned with the center when used on a circular-shaped object. The portion of the cutting-plane line between offsets is drawn as an arc, with the arc center at the center of the object.
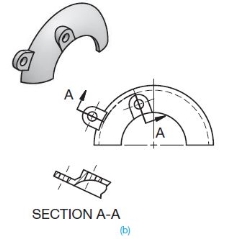
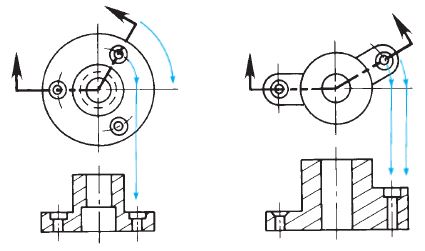
Q8) What is aligned sectional view?Ans:The aligned section cutting plane line staggers to pass through offset features of an object. Normally the change in direction of the cutting-plane line is less than 908 in an aligned section. When this section is taken, the sectional view is drawn as if the cutting plane is rotated to a plane perpendicular to the line of sight as shown in Figure. A cutting-plane line is always used when the cutting plane is bent or offset or when the sectional view is non-symmetrical.
|
|
|
|
|
|
|
|
0 matching results found
