MRSPTU
ENGINEERING GRAPHICS AND DESIGN
UNIT 7
Section of Solids
Question banks
- Define sectioning
- A section view is a view used on a drawing to show an area or hidden part of an object by cutting away or removing some of that object.
- The cut line is called a “cutting plane”, and can be done in several ways.
- The following slides will help show the several methods or types of “section views
2. Explain Sections of Solids?
Section planes
Section planes are generally perpendicular planes. They may be perpendicular to one of the reference planes and either perpendicular, parallel or inclined to the other plane. They are usually described by their traces. It is important to remember that the projection of a section plane, on the plane to which it is perpendicular, is a straight line. This line will be parallel, perpendicular or inclined to xy, depending upon the section plane being parallel, perpendicular or inclined respectively to the other reference
3. Define Sectional views ?
The projection of the section on the reference plane to which the section plane is perpendicular, will be a straight-line coinciding with the trace of the section plane on it. Its projection on the other plane to which it is inclined is called apparent section. This is obtained by
(i) projecting on the other plane, the points at which the trace of the section plane intersects the edges of the solid and
(ii) drawing lines joining these points in proper sequence.
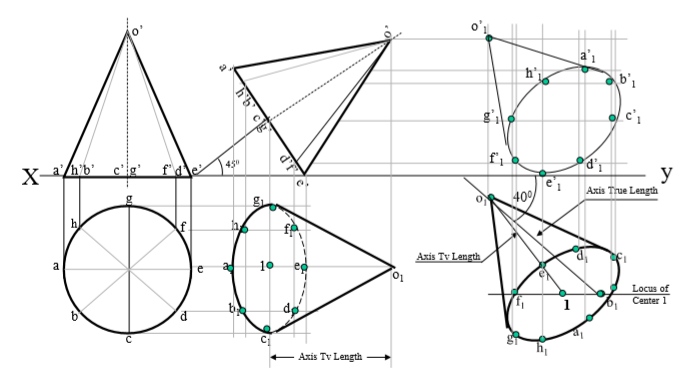
4. A right circular cone, 40 mm base diameter and 60 mm long axis is resting on Hp on one point of base circle such that it’s axis makes 45 inclination with Hp and 40 inclination with Vp. Draw it’s projections.

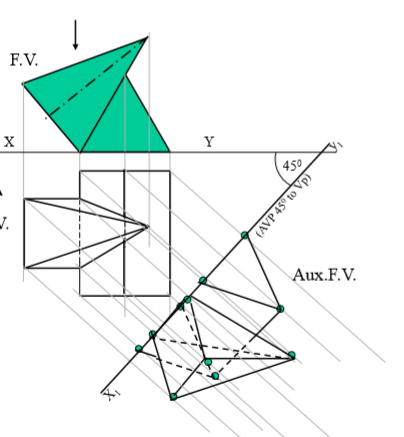
5. A triangular prism, 40 mm base side 60 mm axis is lying on Hp on one rectangular face with axis perpendicular to Vp. One square pyramid is leaning on it’s face centrally with axis // to vp. It’s base side is 30 mm & axis is 60 mm long resting on Hp on one edge of base.Draw FV & TV of both solids.Project another FV on an AVP 450 inclined to VP.
Steps :
Draw Fv of lying prism ( an equilateral Triangle) And Fv of a leaning pyramid. Project Tv of both solids.
Draw x1y1 45 inclined to xy and project aux.Fv on it.
Mark the distances of first FV from first xy for the distances of aux. Fv from x1y1 line.
Note the observer’s directions Shown by arrows and further steps carefully.

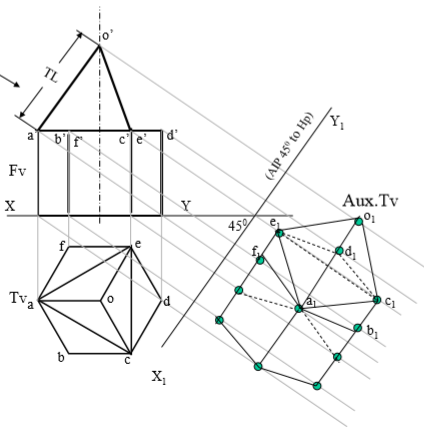
6. A hexagonal prism of base side 30 mm longand axis 40 mm long, is standing on Hp on it’s base with one base edge // to Vp. A tetrahedron is placed centrally on the top of it.The base of tetrahedron is a triangle formed by joining alternate corners of top of prism..Draw projections of both solids. Project an auxiliary Tv on AIP 45 inclined to Hp
STEPS:
Draw a regular hexagon as Tv of standing prism With one side // to xy and name the top points. Project it’s Fv – a rectangle and name it’s top.
Now join it’s alternate corners a-c-e and the triangle formed is base of a tetrahedron as said.
Locate center of this triangle & locate apex o
Extending it’s axis line upward mark apex o’
By cutting TL of edge of tetrahedron equal to a-c. And complete Fv of tetrahedron.
Draw an AIP ( x1y1) 45 inclined to xy And project Aux .Tv on it by using similar Steps like previous problem.

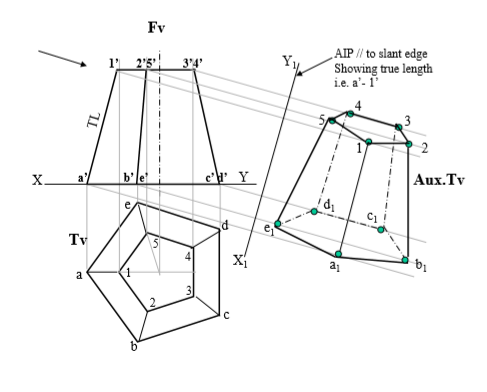
7. A frustum of regular hexagonal pyramid is standing on it’s larger base On Hp with one base side perpendicular to Vp.Draw it’s Fv & Tv. Project it’s Aux.Tv on an AIP parallel to one of the slant edges showing TL. Base side is 50 mm long , top side is 30 mm long and 50 mm is height of frustum.
