Unit – X
Microsoft PowerPoint (Presentation Package)
Q.1) How to create, save and open the presentations?
A1: Presentations are the name given to PowerPoint files. You must build a new presentation every time you start a new project in PowerPoint, which might be blank or based on a template.
Creating
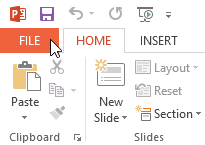
● Select the File tab to go to Backstage view.
● Select New on the left side of the window, then click Blank Presentation or choose a theme.
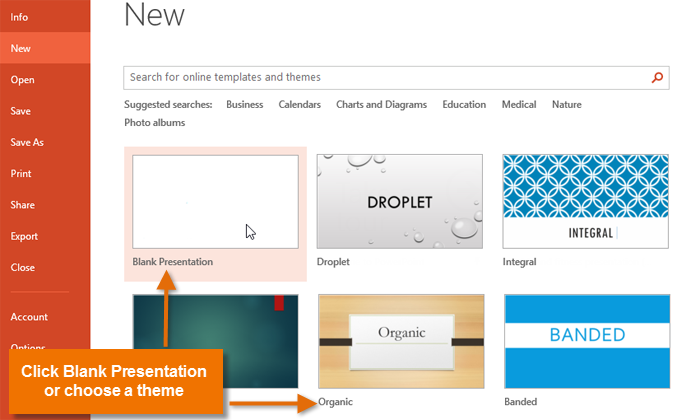
● A new presentation will appear.
Opening
● Select the File tab to go to Backstage view.
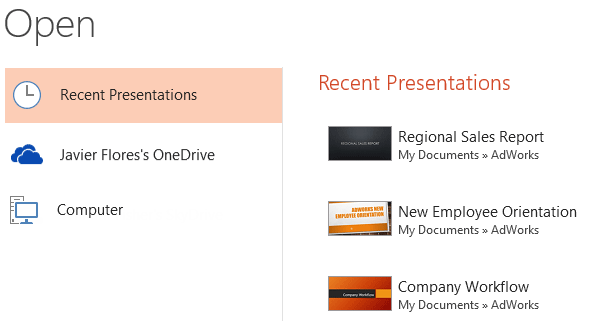
● Select Open.

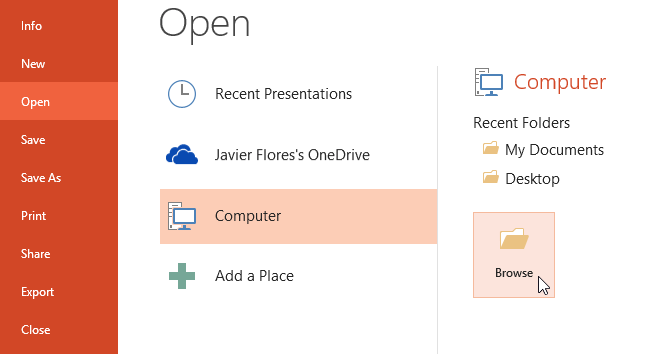
● Select Computer, then click Browse. Alternatively, you can choose OneDrive (previously known as SkyDrive) to open files stored on your OneDrive.
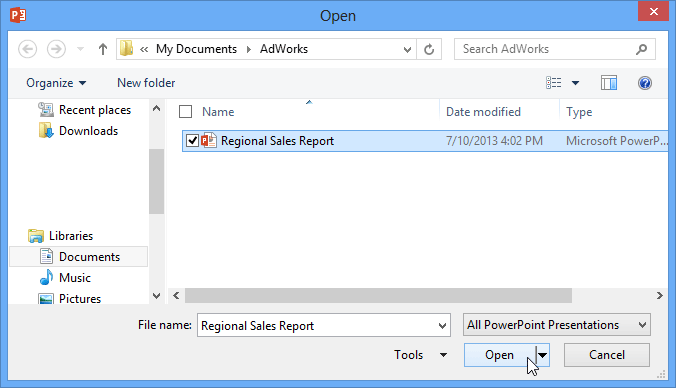
● The Open dialog box will appear. Locate and select your presentation, then click Open.
If you've opened the desired presentation recently, you can browse your Recent Presentations instead of searching for the file.
Saving
● Choose File > Save As (Ctrl+S), or click the Save button on the toolbar. With a new, untitled presentation, Save and Save As function the same.
The Save As dialog box appears.
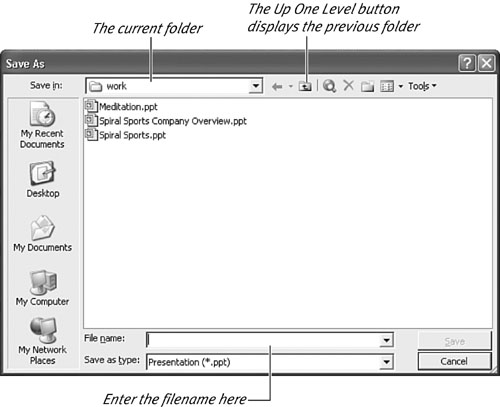
● Type a descriptive name in the File Name text box.
● If necessary, choose a different disk or folder by navigating the dialog box as you would any standard Windows file dialog.
● Click Save.
If you choose, you can perform the full operation using the keyboard (which is often faster). To open the Save As dialog box, use Ctrl+S; if necessary, specify the path (for example, c:my documents press), press Enter, type the filename, and then press Enter.
Q.2) Describe the different view?
A2: You can look at your PowerPoint presentation from six different perspectives, each with its own set of benefits. Normal view is PowerPoint's default view. This implies that when you start PowerPoint, you'll be working in Normal View as long as you don't change the view. The top of the left side panel and the bottom of the workspace to the right are both places where you can switch to a different perspective (next to the zoom slider). OK, make that three, because the presentation views are also available on the View tab!
PowerPoint allows you to enter, edit, and preview your data in a variety of ways.
● Normal view - There are three panes in normal view: the outline pane, the slide pane, and the notes pane. You can work on all components of the presentation in one spot thanks to the three panes.
● Outline view - While in outline mode, it is simple to rearrange individual line items, and we can collapse objects in this view so that only the heading or name of each slide is shown.
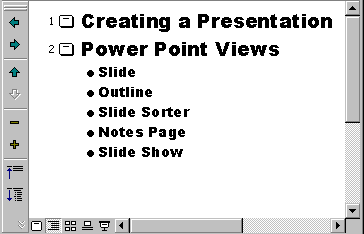
Fig 1: outline view
● Slide view - The slide view displays how your final slide will appear. You'll see several background colors or shades of gray, for example.
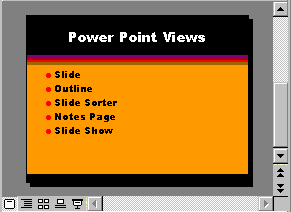
Fig 2: slide view
● Slide sorter view - You can see thumbnails (reduced-size slide images) in the slide sorter view, and you can drag slides to move them around.
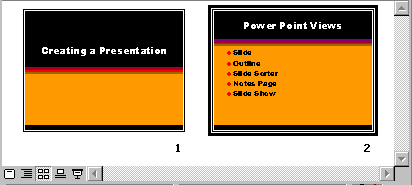
Fig 3: slide sorter view
● Note space view - Create and view notes to the presenter in the note space view. It displays a small slide image and has a text box for the presenter to write notes.
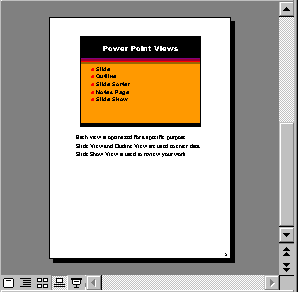
Fig 4: note space view
● Slide show view - When you switch to slide show mode, you'll see the slide you were working on in the preview view. To move forward, hit space bar, click the primary mouse button, or use the right arrow. To navigate backward, press space bar, click the primary mouse button, or use the left arrow.
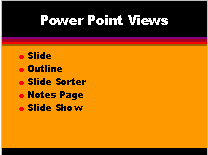
Fig 5: slide show view
Q.3) How to create the look of presentations?
A3: PowerPoint comes with a number of design themes, including color schemes, backdrops, font styles, and placeholder placement. You may instantly change the overall look of your presentation by using pre-designed themes.
Choose a theme when you open PowerPoint
● When you go to File > New to start a new presentation, choose a theme.
These pre-installed themes are ideal for presentations in widescreen (16:9) and standard screen (4:3) formats. See Change the size of your slides for further information.
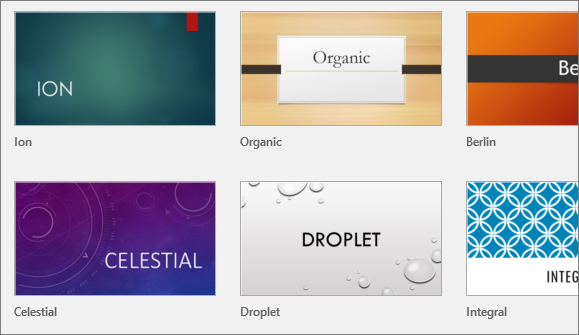
● After that, select a color variation and click Create.
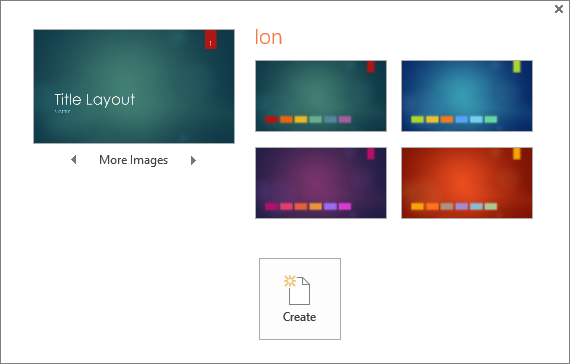
Apply a different theme or color variant to your presentation
You can always alter the theme or variant later on the Design tab if you change your mind.
● Select a theme with your preferred colors, fonts, and effects from the Design tab.
Rest your pointer over the thumbnail of each theme to see how it will look on the current slide.
● Select a version from the Variants group to apply a different color variation of a theme.
The Variants group displays to the right of the Themes group, with different options based on the theme you've chosen.
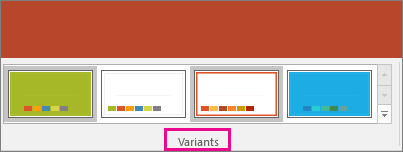
If you don't see any variants, it's possible that you're using a custom theme, an older theme created for earlier versions of PowerPoint, or that you imported slides from another presentation that used an older or custom theme.
Create and save a custom theme
You can either edit an existing theme or start from over with a blank presentation to create a custom theme.
● Select your first slide, then click the down arrow in the Variants group on the Design tab.
● Choose from built-in options or create your own by clicking Colors, Fonts, Effects, or Background Styles.
● When you're finished tweaking styles, go to the Themes group and click the down arrow, then Save Current Theme.
● Give your theme a name, then save it. It will be saved alongside your other PowerPoint themes and appear in the Themes category under a Custom header by default.
Q.4) How to work with slide?
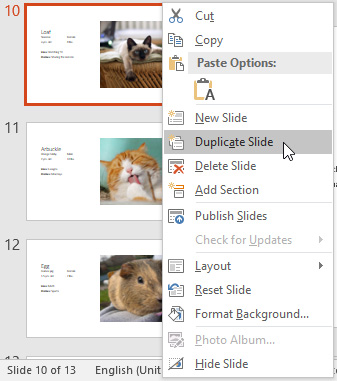
A4: Duplicate slides - You can duplicate a slide if you want to rapidly copy and paste it. To duplicate a slide, pick it with the mouse, right-click it, and select Duplicate Slide from the menu that displays. By choosing numerous slides first, you can replicate them all at once.
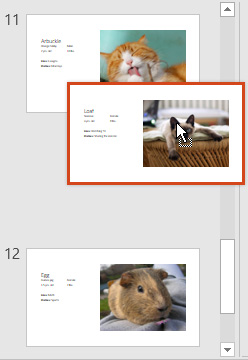
● Move slides - Changing the order of your slides is simple. Simply click and drag the desired slide to the desired position in the Slide Navigation pane.
● Delete slides - You can delete a slide from your presentation if you desire to do so. To delete a slide, simply select it and use the Delete or Backspace key on your keyboard.
Q.5) Add and format the text?
A5: To organize content in your presentation, add and format text.
● Choose a text placeholder or a text box.
● Fill up the blanks with the text you desire.
Formatting text
Click over a menu choice to see a live preview on your slide when you pick text and choose a format.
The following formats are available:
● Font color - For your text, select a font color.
● Numbering or Bullets - Use numbers or bullets to make a list.
● Add or Remove columns - In your text, you can add or remove columns.
● Text Direction - Change the text's direction.
● Align Text - Connect your text to a bounding box's top, middle, or bottom.
● Align Left, Center, Align Right, or Justify - You can align your text whichever you wish.
● Increase List Level or Decrease List Level - Increase or decrease the indent of a list.
Q.6) What do you mean by formatting paragraphs?
A6: In PowerPoint, you can quickly format paragraphs. To format all paragraphs in a text-containing object in PowerPoint, select it by clicking its border. This changes the text-containing object's mode to "object." This option applies your formatting to the entire object's text. In this mode, some paragraph formatting choices, such as "Increase Indent" and "Decrease Indent," are unavailable. Instead, click into the object's text to put it into "text edit" mode, which will show all paragraph formatting choices. Then format only the paragraphs included within the item.
After you've selected the paragraphs, go to the Ribbon's "Home" tab. Then, in the "Paragraph" button group, select the buttons you want to use. A screen tip appears when you hover your mouse pointer over each button in this button group. Each button's name and function are listed in the screen tip. Small drop-down arrows appear on some buttons, such as the "Bullets" button. When you click one of these, a drop-down menu will appear, allowing you to select an option. Other options, such as "Align Text Left" and "Increase Indent," require only a single click to apply or remove their formatting.
To use the "Paragraph" dialog box to format paragraphs in PowerPoint, click the "Paragraph" dialog box launcher button in the "Paragraph" button group's lower-right corner. The "Paragraph" dialog box allows you to customize all of the attributes of a group of paragraphs.
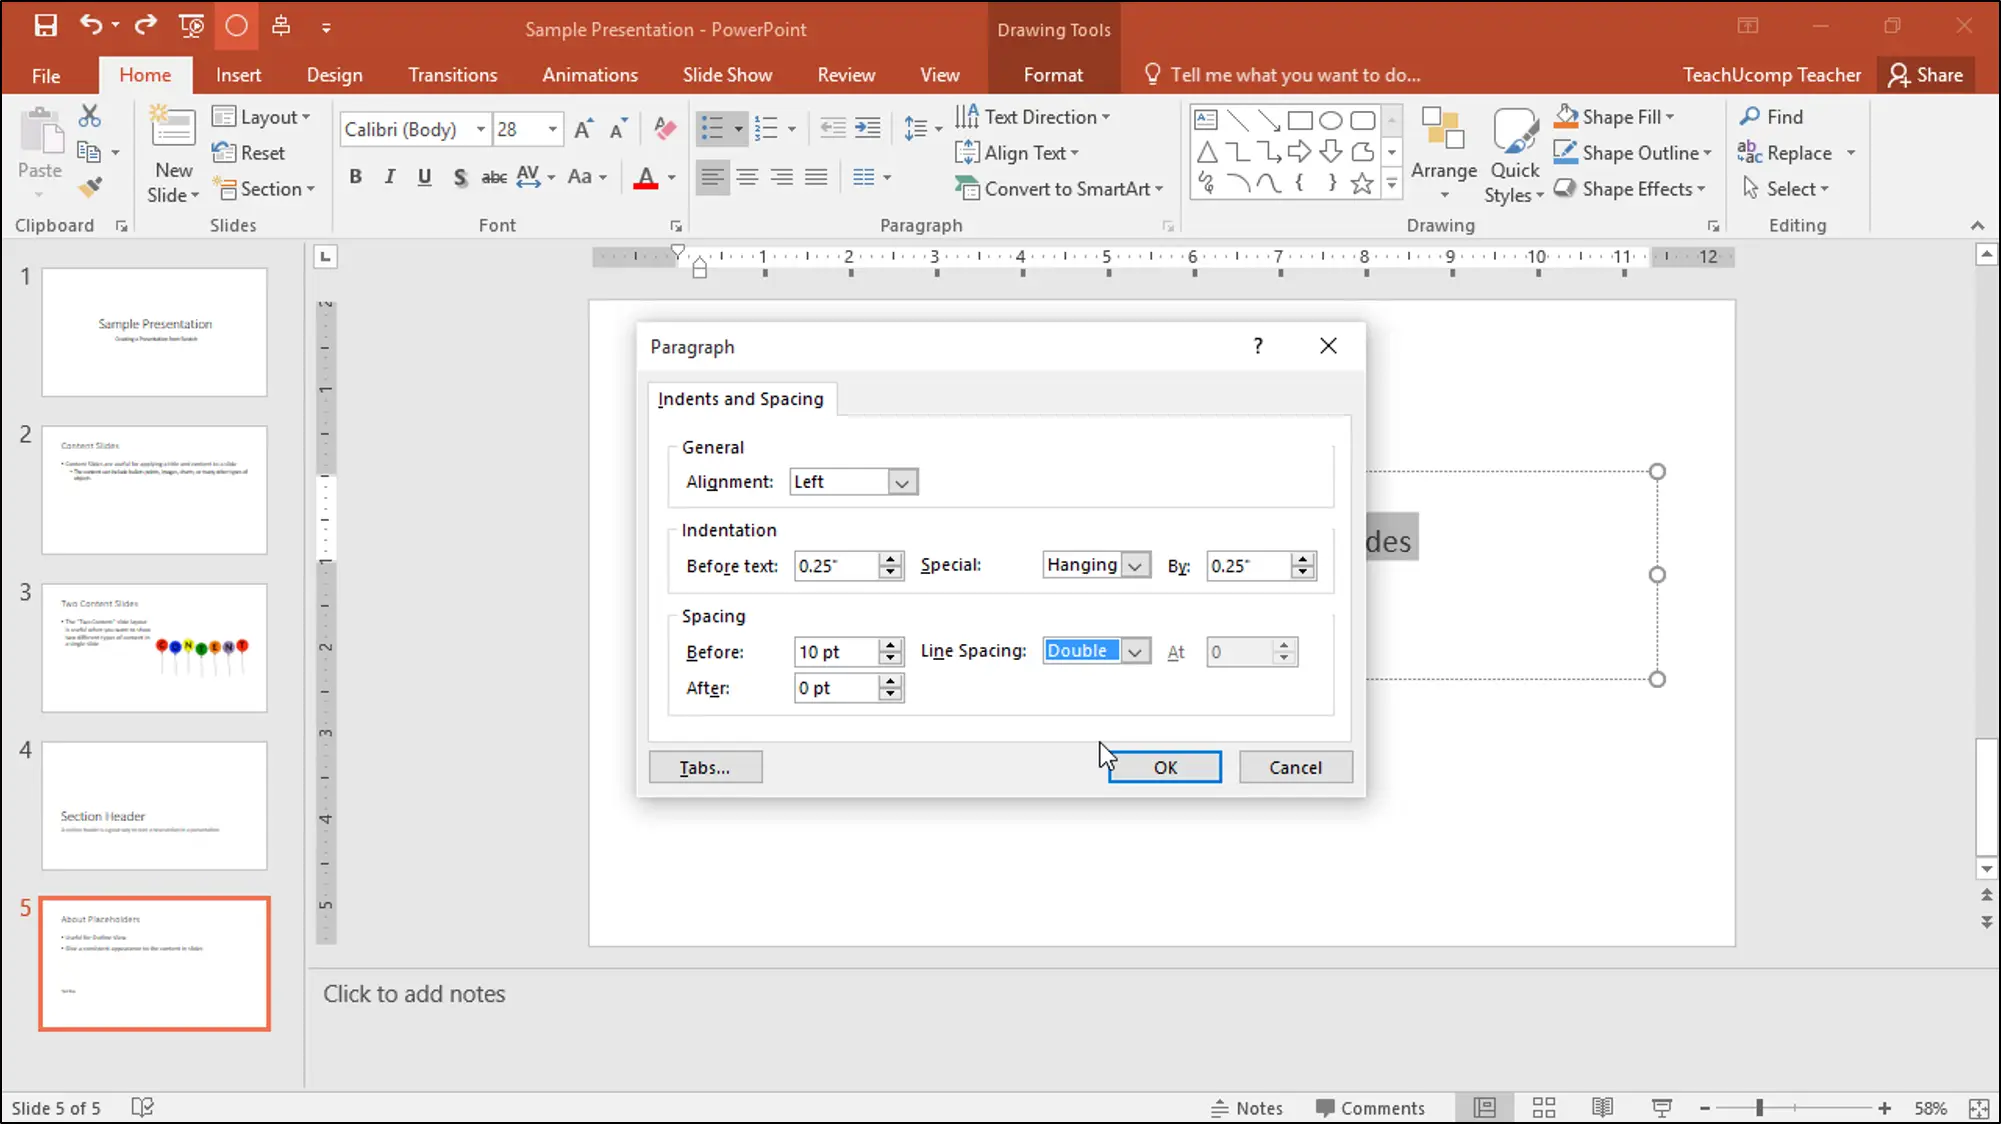
Fig 6: formatting paragraphs in PowerPoint using the “Paragraph” dialog box
Then, under the "General" section, choose a paragraph alignment from the drop-down menu. The “Indentation” feature allows you to adjust the indentation of all paragraphs. Set the complete paragraph indentation or set customized paragraph indentation, such as "First Line Indent" or "Hanging Indent," using the spinners and drop-downs.
You can adjust the amount of space applied before and after paragraphs in the "Spacing" section. The “Before:” and “After:” spinners are used to set this. Use the "Line Spacing:" drop-down and spinner to set line spacing for the chosen paragraphs. After using the "Paragraph" dialog box to format paragraphs in PowerPoint, click the "OK" button to apply the formatting.
Instructions
● To format all paragraphs within an object, place it in "object" mode by clicking the object's boundary.
● To make formatting changes to certain paragraphs only, click into the object and select "text edit" from the drop-down menu.
● Then use your mouse to pick only the paragraphs you want to format.
● After selecting the paragraphs, click the buttons in the "Paragraph" button group on the "Home" tab of the Ribbon to apply paragraph formatting.
● To use the "Paragraph" dialog box to format paragraphs in PowerPoint, click the "Paragraph" dialog box launcher button in the lower-right corner of the "Paragraph" button group.
● Use the drop-down in the "General" section to choose your preferred paragraph alignment.
● Use the spinners and drop-downs in the "Indentation" section to specify the complete paragraph indentation or customized paragraph indentation, such as a "First Line Indent" or a "Hanging Indent."
● Use the “Before:” and “After:” spinners in the “Spacing” section to specify the amount of spacing to apply before and after paragraphs.
● You may also set line spacing for selected paragraphs using the "Line Spacing:" drop-down and spinner.
● Then, in the dialog box, click the "OK" button to apply the paragraph formatting.
Q.7) How to draw and work with objects?
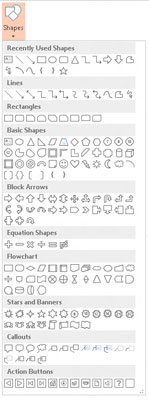
A7: To draw an object on a PowerPoint 2013 slide, go to the Insert tab on the Ribbon and select Object. Then, in the Illustrations group, click the Shapes icon to see a gallery of shapes to choose from. Finally, from the Shapes gallery, choose the shape you want to draw.
Any element that you can add to PowerPoint 2019 is referred to as an object. An object is a text label. A picture is a thing. Graphs and charts are both examples of objects. An object is any element in a slideshow. Before you can see these features, you must first add them to your presentation, but Microsoft PowerPoint makes it simple to insert objects to display bespoke slides. Because PowerPoint is a Microsoft Office application, you may effortlessly transfer images and objects into your slides by simply copying and pasting them. PowerPoint also provides an option to insert these objects, so you can just choose one from your computer's hard drive and drop it into your presentation.
Keep the following suggestions in mind:
● Choosing a location - Move to the slide where you want to draw the object before you start drawing. Display the Slide Master by selecting Slide Master from the Master Views section of the View tab on the Ribbon or Shift+clicking the Normal View button if you want the object to appear on every slide in the presentation.
● Fixing a mistake - If you make a mistake while drawing a shape, the Undo command on the Quick Access Toolbar may generally fix it.
● Holding down the shift key - PowerPoint forces a shape to be “regular” if you hold down the Shift key while drawing it. Rectangles are squares, ellipses are circles, and lines must be horizontal, vertical, or 45 degrees diagonal.
Draw straight line
The Line button may be used to draw straight lines on your slides. Here's how to do it:
● On the Insert tab, click the Line button in the Shapes category.
● Place your cursor where you want the line to begin.
● To finish the line, click and drag the cursor to the desired location.
● When you've arrived at your destination, release the mouse button.
The Drawing Tools tab appears on the Ribbon when you've finished drawing the shape. The fill, outline, and effects applied to the line can then be changed using the Shape Styles group's settings.

Draw rectangles, squares, ovals and circles
Follow these instructions to draw a rectangle:
● Click the Shape buttons (in the Illustrations category) on the Insert tab, then the Rectangle button.
● Place the cursor where you wish one of the rectangle's corners to be.
● Click and drag the opposite corner of the rectangle to the desired location.
● Allow the mouse button to be released.
The methods for drawing an oval are the same as for drawing a rectangle, except that instead of clicking the Rectangle button, you click the Oval button. Select the Rectangle or Oval buttons, but keep the Shift key pressed while drawing a square or perfectly round circle.
Insert object into slides
Before you place an item into a slide, you should know what type of object you wish to use. Any of the choices in the "Insert" Tab can be used as the object. Although an image object is used in this example, these commands can be used to add practically any item to a slide.
The "Home" tab is the default one that opens and appears in the interface window when you open a PowerPoint presentation. When you click the "Insert" tab, you'll see all of the possibilities for inserting items. We'll use a picture to insert onto a slide in this example. Right-click the left thumbnail panel and choose "New Slide" if you haven't yet added a new slide to the presentation. A new slide is added at the end of the ones you already have.
The things that you can add are represented by six icons in the center of the slide by PowerPoint. All possible objects are listed on the main "Insert" tab, however these six icons represent the majority of the items you'll use in your presentations.
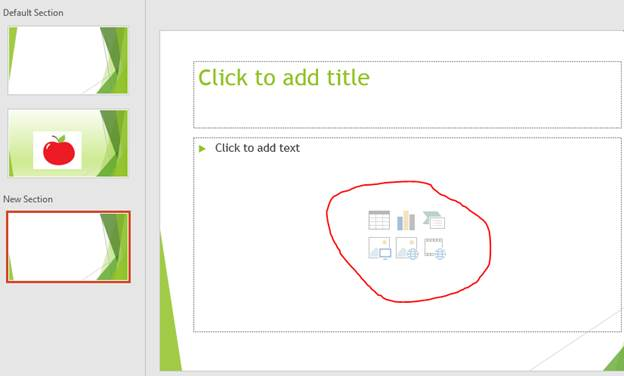
Insertable objects
When you select "Pictures" from the main menu, a Windows dialog box appears, requesting that you select a file from your local drive. Any image file on your computer will suffice. When you double-click an image to add to a slide, it is automatically resized and displayed.
Q.8) How to add clipart and pictures?
A9: Adding clipart
● Select Insert from the drop-down menu.
● Click the Clip Art button in the Illustrations group.
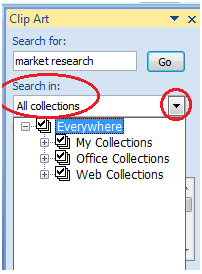
● On the right, the Clip Art task pane displays.
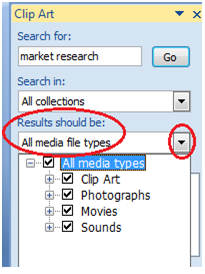
● Three fields are shown in the task pane: Search for, Search in, and Results should be.
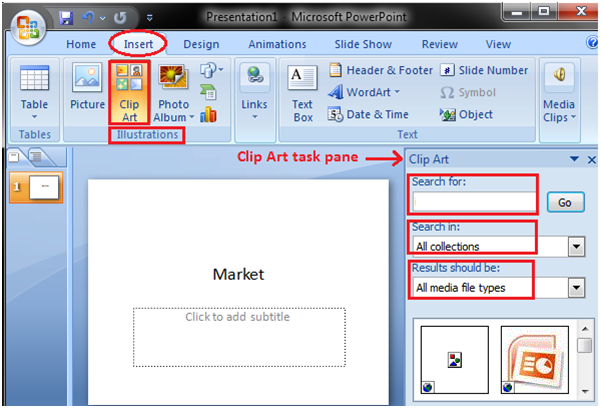
You can enter a keyword related to the clipart you want to insert in the "Search Field."
Click the drop-down arrow in "Collection Field." There are four alternatives available. Select the option that best meets your needs.
Click the drop-down arrow in the "Results should be" field to see five alternatives. Select the option that best meets your needs.
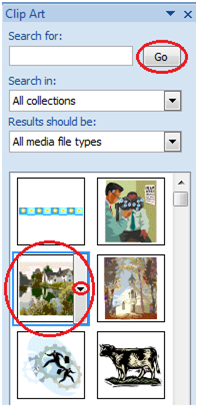
Now press the "Go" button. A menu with clip art will appear. Select the desired clip art or use the drop-down arrow next to it to bring up the Insert option, which will allow you to add the clip art.
Adding pictures
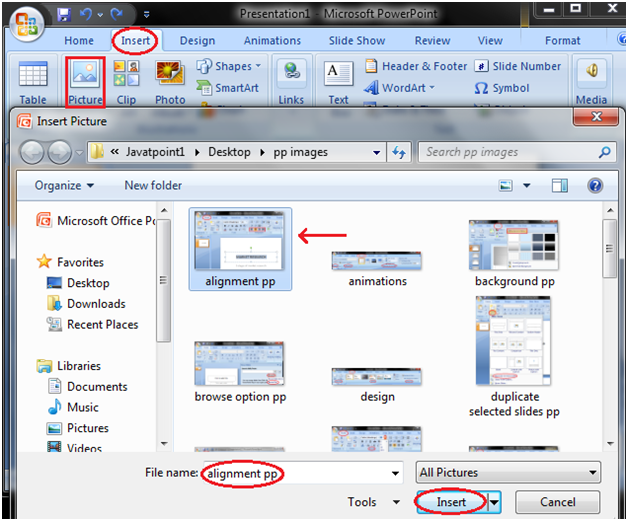
● Select Insert from the drop-down menu.
● Click the Picture button in the Illustrations group.
● The dialog window for inserting a picture appears.
● Select the desired image with a click.
● When you click Insert, the image will appear on the slide.
● To relocate the image, click and drag it to the appropriate area.
Q.9) How to design your slides?
A9: Choosing a color scheme
I want to discover a color scheme to base my entire design on before I even open Photoshop (yes, I design PowerPoint/Keynote slides in Photoshop and drop them in). I frequently start with Adobe Color CC when I need to rapidly identify multiple colors that go together. It's not only a great tool to create your own color schemes, but it's also a fantastic place to find schemes created by others that you can use straight away for your projects.
As luck would have it, the first color scheme I noticed when I opened Color appealed to me. This scheme was prominently displayed on the home page and appeared to be an excellent starting point for our presentation design.
Designing your cover slides
The design job will be considerably easier now that we have a color scheme. One of the most common tricks used by designers in presentations is to make use of the color scheme as much as possible. If you're new to design, you could think this is too simple, too plain, or perhaps cheating in some way, but trust me when I say it'll be far more appealing and professional than that dreadful Microsoft clipart library you adore.
To begin, select one of your colors from the scheme you've chosen and use it to fill the background of your slide. That's your background, good job. Don't be alarmed. It'll look fantastic.
Choosing a font
For non-designers, font selection is a huge challenge. The natural impulse is to dismiss most fonts as “boring” and seek out something new and intriguing. This invariably results in the use of Comic Sans or some similarly obnoxious typeface.
Your presentations should never look like this unless you're an elementary school teacher. Instead, see if you can come up with something you enjoy using one of those "boring" fonts.
Combining fonts is a difficult undertaking that requires a trained eye to master. Fortunately, font designers have already established collections that work well together, making it simple to achieve outstanding typography even if you aren't a designer. The trick is to just stay in a family. Again, I know this sounds lame, but it works really well if you make sure the two styles you choose are very different.
Alignment and layout
There are a few things to note about how I set up this slide. First, the text was aligned strongly to the left. Center alignment should be a last resort, not a first, as I say in almost every design article I write. Although it is the weakest text alignment option, having a firm edge greatly improves reading (note that book pages are not center-aligned).
Also, take note of the large amount of whitespace I used. Keep in mind that you don't have to take up every square inch of available space. Allowing your text to breathe greatly aids your layout and offers the design a clean appearance.
Adding an image
You might be asking why you spent so much time reading so that I could give you such straightforward advice. The truth is that most people who do presentations could improve them by a factor of a hundred if they followed the suggestions above. However, I recognize that minimalism may be too harsh for certain people, so let's add an image to spice things up.
Because our text is on the left, I wanted something on the right that was a little heavier. If I had to give an architecture or city-centric presentation, the overall topic I'll go with is "City photographs." You'll have to choose images that are pertinent to your own theme once more.
If we simply used this image as our background, the text would become unreadable, and we'd have to abandon our color scheme. Instead, we'll place it on top of the colorful slide and change the blending mode to Overlay. Then reduce the density to about 45 percent.
Adding content slides
Although the cover may appear to be a minor aspect of the battle, you've already established the tone for the entire presentation. You've already decided on a theme, color scheme, and fonts. Now all you have to do is create a few different content layouts.
Keep in mind that everything should be kept as simple as possible, including the amount of content you include. These are just good presentation skills that you'll learn in any public speaking class, aside from design. Filling your slides with everything you'll say will make you appear ineffective. You could just email the slides to everyone and be done with it.
The slides are just intended to serve as a visual help. Show a slide with your overarching topic or major point, then speak for the remainder of the presentation without reading. Nothing is worse than watching a guy read his note cards word-for-word for thirty minutes, except perhaps watching a guy turn his back to the audience so he can actually read his slides out loud to you the whole time! You may laugh, but I’ve seen it happen folks.
Q.10) How to run and control the slideshow?
A10: The huge number of PowerPoint presentations are designed to be played as a slideshow. Given all of PowerPoint 2010's advanced features, it's no surprise that many features connected to operating the slideshow have also been incorporated in this program. The majority of these features are designed to assist you in creating a good slideshow without having to re-create the complete presentation after every slight update. Under the Slideshow ribbon, you'll find features relevant to operating the slideshow.
With PowerPoint open and the slide show file open, the presenter can execute the presentation manually as follows:
- The slide presentation can be started in at least five different ways. With the first slide, the first two will begin the slide presentation. The slide show will begin with the currently shown slide if you choose one of the last three selections (this allows you to start the show with any slide).
● Click the From Beginning button in the Start Slide Show section of the Slide Show tab of the ribbon.
● At the top of the keyboard, press the F5 function key. The slide presentation will also begin at the beginning.
● Click the From Current Slide button in the Start Slide Show section of the Slide Show tab of the ribbon.
● Type the F5 function key at the top of the keyboard while holding down the shift key (i.e., Shift-F5). The slide presentation will also begin with the current slide.
● In the lower right corner of the window, select the fourth of the four icons (just to the left of the zoom controls). Slide Show will be the tool tip. The slide presentation will also begin with the current slide.
2. Use any of the following to navigate through the slides and animation effects:
● Use the left mouse button to make a selection.
● Use the space bar to move the cursor.
● Enter by pressing the ENTER key.
● To use the right arrow cursor, press the right arrow cursor key.
● Use the down arrow cursor key to move the pointer down.
3. Following the completion of the last slide, the next mouse click, space bar, enter key, or right/down arrow cursor key will bring up a black screen with the words "End of slide show, click to exit." at the top. The objective of this black screen is to keep your viewers from being visually distracted by returning to PowerPoint creation mode. It also allows you to restore the slide presentation to the previous slide without having to restart it.
4. Use any of these actions to return to the PowerPoint development mode when the black slide at the end of the show appears.
While the slide show is playing, you can use the following manual controls:
● P key or BACKSPACE key or Left Arrow cursor key or Up Arrow cursor key = return to the previous slide or previous step of an animation (remember: P for previous)
● type a number and then press the ENTER key = go to that slide number
● B key = blank (all black) the screen. Press any key or click the mouse to return to the slide show.
● W key = blank (all white) the screen. Press any key or click the mouse to return to the slide show.
● ESC key = end the slide show (returns to the development mode)
● Right Mouse Button = displays a menu of options.
Q.11) How to print the presentations?
A11: It's occasionally important to hand out printed copies of your slides to your audience before you begin presenting them so they may take notes. Other times, you may wish to provide your audience with handouts that include extra information.
To print slides, go to the Backstage view and select the Print menu from the File tab.
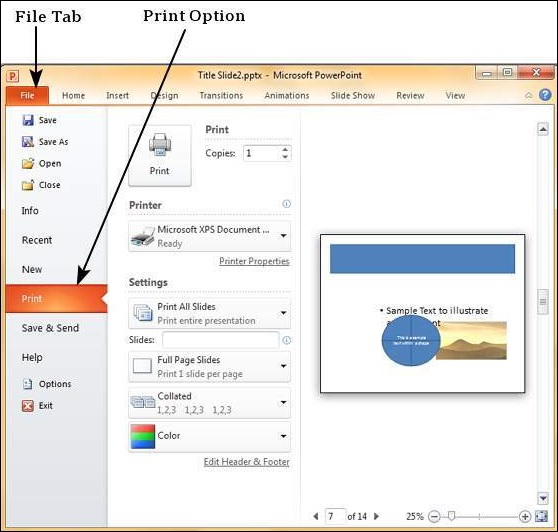
The table below lists the many printing choices available in PowerPoint.
Main Settings | Options | Description |
Printing Slides | Print All Slides | All of the slides in the presentation are printed. |
Print Selection | Prints only the objects you've chosen. | |
Print Current Slide | Only prints the specified slide. | |
Custom Range | This option specifies which slides should be printed. | |
Slides | The Custom Range is the same as this. | |
Print Layout | Full Page Slides | One slide per page. |
Notes Page | Every slide and its remarks are printed one after the other, one slide per page. | |
Outline | Print Slide outline. | |
Handouts | Prints one, two, three, four, six, or nine slides per page, vertically or horizontally aligned. When you print handouts with three slides, the slide and the notes are printed side by side. | |
Collation | Collating Options | Slides are printed in order, or numerous copies of each slide are printed one after the other. |
Printing Color | Color | Color, greyscale, or black-and-white printing options are available. Despite the fact that you can choose any color settings, the outcome will be determined by the printer you use. Color slides cannot be printed on a non-color printer. |
Q.12) How to create an album?
A12: You may use PowerPoint to create a photo album presentation by importing a collection of images. You can pick, rearrange, alter, and add text to your photos using the photo book tool. Each slide will have one image by default, but you may change the slide layout to add more images if you desire.
- The Insert tab should be selected.
- Select New Photo Album from the Photo Album command in the Images group.
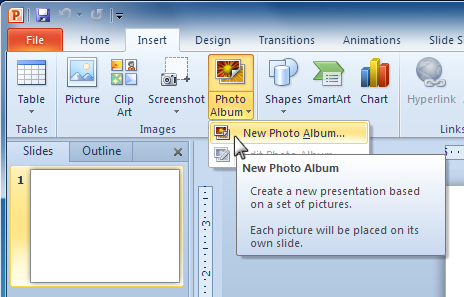
3. The dialog window for the Photo Album appears. Locate the File/Disk... Button and click it.
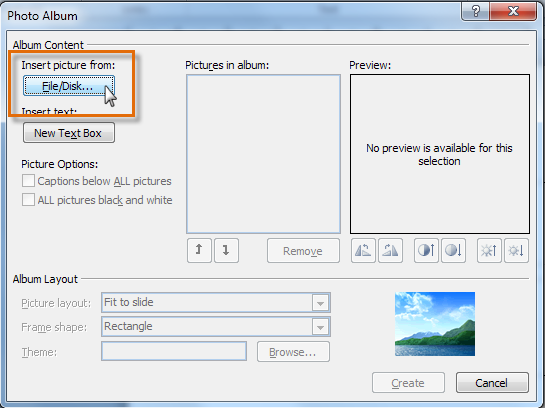
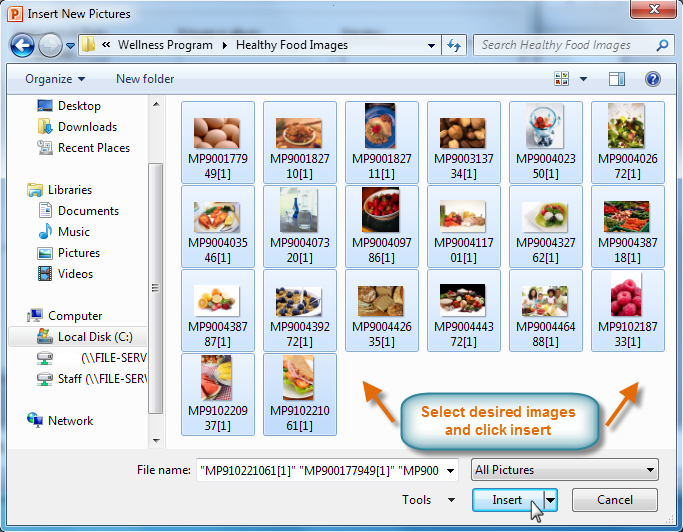
4. Choose the image file you want (s). Insert should be selected.
Click the first image in your folder, then press and hold the Shift key to select the last image.
Press and hold the Control key while clicking the required images to choose several nonadjacent images.
5. Several choices for moving, modifying, and changing the layout of photographs are available in the Photo Album dialog box. After making any necessary changes, click Create to begin adding photos to the photo album.
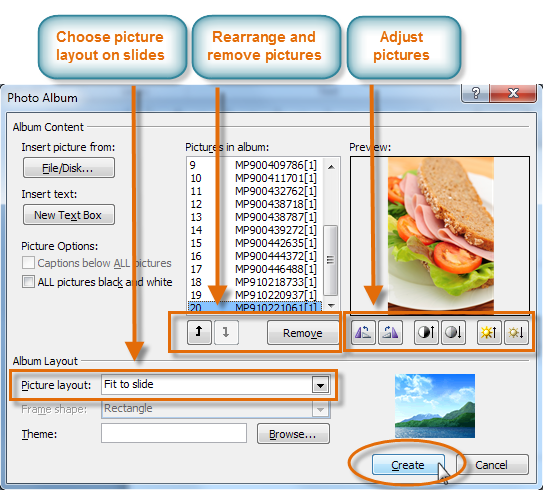
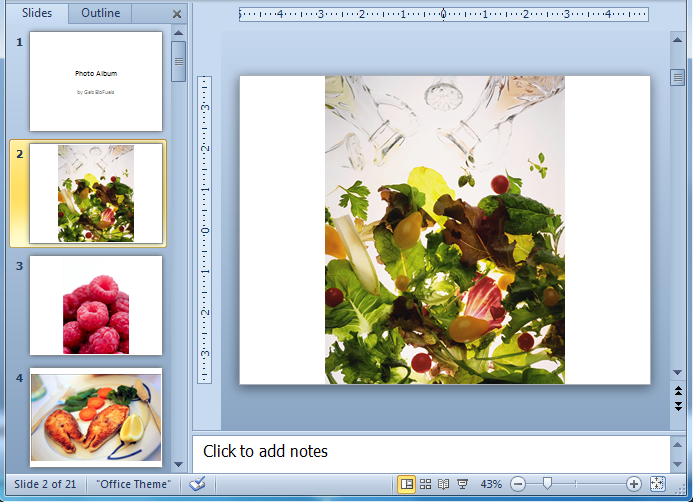
6. For the photo album, a separate presentation will be made. It will come with a title page and one picture each slide by default.
Q.13) Explain master slides?
A13: Slide master is a quick and easy approach to make adjustments to the entire slide. There is at least one slide master in every presentation, but there can be more. You can make modifications to different areas of the presentation using techniques like copy/paste and format painting to make them look similar, but if you want to use a theme and backdrop across the slide, using the slide master is an easier and more graceful method to do it.
The processes for customizing your slide master are outlined below.
- Under the View ribbon, select the Master Views group.
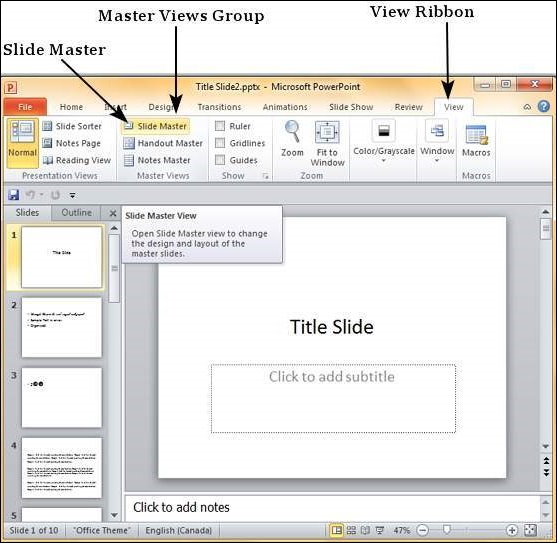
2. To access the Slide Master Ribbon, click on it. The Master slide is the topmost slide on the left sidebar. The settings you add on this master slide will be applied to all of the slides in this master template.
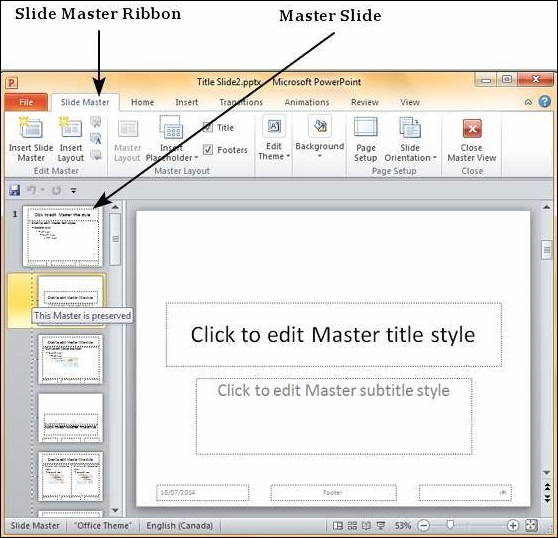
3. Using the remaining ribbons that are still accessible, you can make adjustments to the master slide's theme, design, font attributes, title position and size, and other content.
4. While PowerPoint has some preset slide layouts, you may design your own by going to the Edit Master area of the Slide Master ribbon and clicking "Insert Layout."
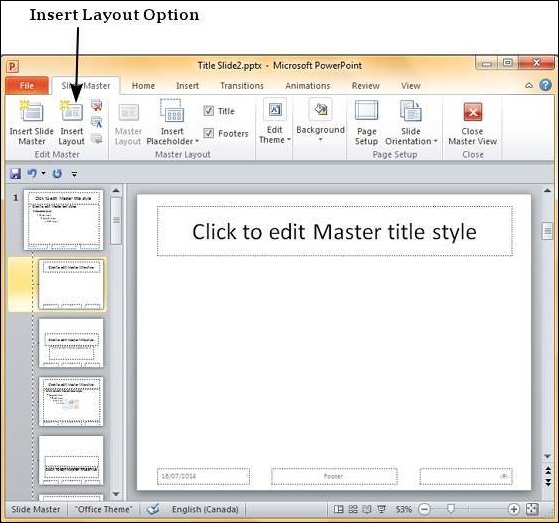
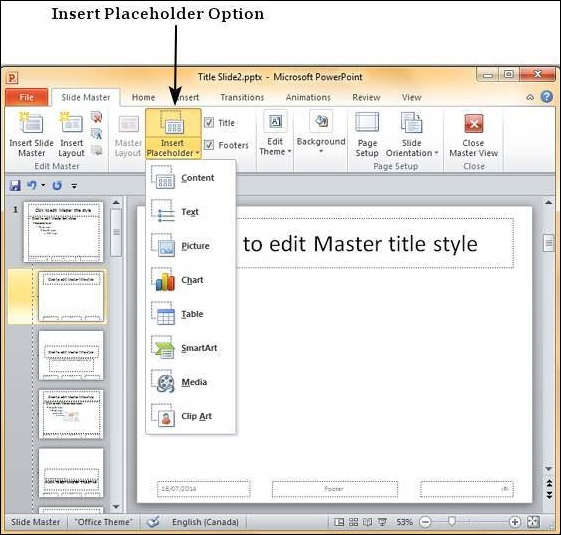
5. The "Insert Placeholder" command in the Master Layout group of the Slide Master ribbon can be used to insert content placeholders into slide layouts. You can either create a generic content placeholder or define the type of content you want in that placeholder using the Placeholder option.
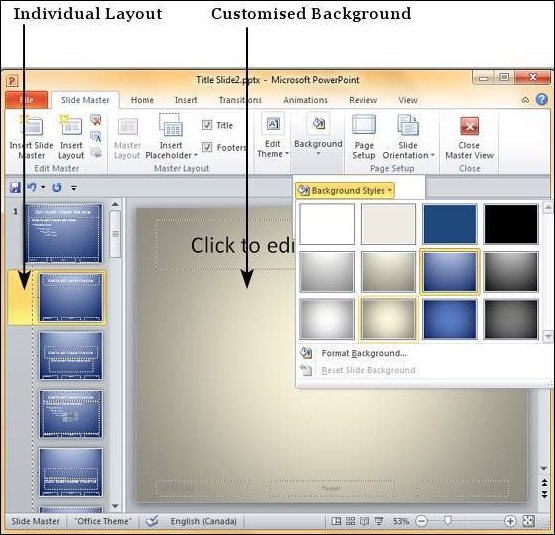
6. From the master slide, you may apply alternative themes, backgrounds, and page setup settings to all of the slides.
7. Individual slide layouts can also be customized to be distinct from the master slide utilizing the menu options provided with the layouts.
Q.14) What do you mean by rehearse timing?
A14: Rehearse timing
● Select Slide Show > Rehearse Timings from the menu bar.
● To advance to the next slide, select Next, then click the mouse or press the Right Arrow key.
● The current slide's time is displayed to the right of the Pause symbol. The time to the right of it is the total presentation time.
● To pause the recording, select Pause. To resume recording, select Resume Recording.
● If you choose Yes, the slide timings will be saved; if you choose No, they will be discarded.
You can also stop the recording and exit the presentation by pressing Esc.
View the timing
Select View > Slide Sorter from the View menu. The time given to a slide is displayed in the bottom-right corner of the slide.
Turn off recorded slide timings before you give a presentation
Use the recorded slide timings as follows to prevent slides from automatically advancing:
● Select Set Up > Slide Show.
● Remove the check box for Using Timings or Using Rehearsed Timings.
Select Use Timings to reactivate the slide timings.
Q.15) How can you record a slide show in power point?
A15: To record a slide show in power point
● Locate the Set-Up group by clicking the slide show tab.
● Select Record Slide Show from the drop-down menu. “Start recording from current slide” or “Start recording from the beginning” are the options.
● Select the desired options from a dialog box that appears. “Select and animation timings” is the first choice, followed by “Narration and laser pointer” and finally “Start Recording.”
● Your presentation will open in full screen as soon as you click "Start Recording."
● When you're ready to go on to the next slide, click the "Next" button on the "Recording Toolbar," which is symbolized by an arrow mark.
Q.16) How you can copy slide master from one presentation to another in PowerPoint 2013?
A16:
● Open the presentation you want to duplicate as well as the location where you want to copy it.
● On the view tab of the presentation that contains the slide master that you wish to replicate, select Slide Master.
● Right-click the slide master in the slide thumbnail window, then select Copy.
● Select Slide Master from the View tab.
● Right-click the slide master in the thumbnail panel and then do one.
● When you're finished, click Close Master View on the Slider Master tab.
Q.17) How you can rehearse the slide show timing in PowerPoint 2013?
A17: To prepare or practice the PowerPoint show
● After that, go to the Slide Show tab and look for the Set-Up group.
● The complete screen of your presentation will appear when you click the Rehearse Timing icon on the ribbon.
● You can begin rehearsing your PowerPoint presentation, and rehearsing time will be used to track your presentation's timing.
● To advance to the next slide, click the next arrow on the Recording Toolbar.
● When your presentation is over, PowerPoint will shut the full screen view and display the total presentation time.
Q.18) How you can protect your presentation in PowerPoint 2013?
A18: To secure your PowerPoint 2013 presentation, follow these steps.
● Backstage View can be accessed by clicking the File icon.
● Click the Protect Presentation command in the Info window.
● Choose the one that best meets your needs from the drop-down menu.
● If you mark it as final, for example, a pop-up box will appear requesting you to save the document.
● After you click OK, a new pop-up box appears, verifying that the document has been saved as final.
Q.19) How you can convert text to shapes in PowerPoint 2013?
A19: transforming text into forms
● Insert a text box on your slide and fill it with text.
● On a slide, select the text box.
● Insert a shape that entirely covers your text box by overlapping it.
● Re-order the rectangle shape by sending it behind the existing text box once it has been put.
● After selecting the text box and then the rectangle shape, go to Drawing Tools Format and click the Merge Shapes button.
● Select Intersect from the Merge Shapes drop-down gallery.
● Text will be transformed into forms.
● To guarantee that the text is transformed into shape, right-click on the text and select Edit Point from the context menu.
● If there is no modify points option, your text has not been transformed into a shape.
● When you select Edit Points, you'll see a list of all the edit points on the text.
Q.20) How to merge shapes in PowerPoint 2013?
A20: In PowerPoint 2013, you can combine two shapes.
● Select the Insert tab.
● The “Shapes” button will appear; click it.
● Choose the desired shape.
● To add a second form to the slide, repeat the previous steps.
● Choose one of the two shapes.
● Navigate to the Format tab.
● Select your options by clicking on the small icons accessible, such as Union, Combine, and so on. To blend forms, we use the Combine option.