UNIT - 2
Material Testing and Characterization Technique
Q1) Explain izod and charpy test with diagram?
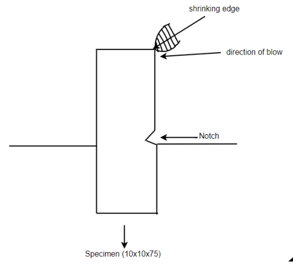
A1) Izod Test:- This test uses a cantilever test piece. Let’s consider lox lox 75mm sections specimen having standard 45 degree notch 2 mm deep. This is broken by means of a swinging pendulum which is allowed to fall from a certain height to cause an impact load on the specimen. the angle rise of the pendulum after
rupture of the specimen or energy to rupture the specimen indicated on the graduated scale.
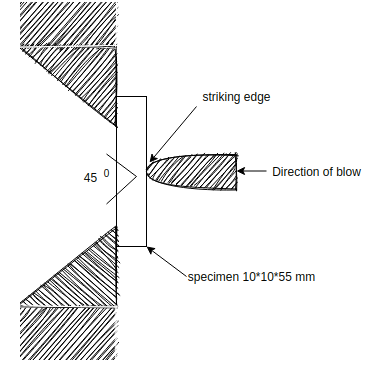
Charpy impact test:- this test is more common than Izod test and it uses simply supported test piece of 10mm × 10 × 55 mm section. The specimen is placed on the support so that the blue of striker is opposite to the notch.
Q2) What are different types of hardness test?
A2) Hardness test:- Hardness test are generally of three types. They are described below:
Brinell Hardness test:-
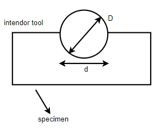

Where, P = load
D = diameter of spherical ball (mm)
d = diameter of impression indentation (mm)
P = 3000 kg for iron alloys
P = 500kg for non iron alloys
a) Vicker's hardness test:-

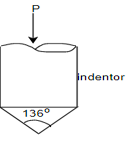

Load exerted is 1 to 120 kg.
Time taken 10 to 30 seconds.
It can't be used for powder metallurgy materials.
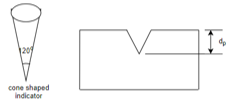
b) Rockwell hardness test:-

Or, 
Q3) Explain non destructive testing and its types?
A3) There are various types of NDT methods which are described below
1) Eddy Current test:- it is based on the principle of generating circular electric current (Eddy current) in a conductive materials. This can be achieved by the help of which is connected to alternating current generator driving an alternating magnetic field.
It is used to detect surface flaws to measure thin walls from one surface only.
It is used to measure thin coating and in some applications to measure depth.
Crack detection, corrosion monitoring, material thickness, conductivity as some of the conditions which we can detect through this test conductive materials can be inspected. Surface finish and roughness may interfere, depth of penetration is limited. There are some limitations of Eddy current testing.
2) Ultrasonic testing:- The basic principle of ultrasonic testing is defined as when the sound energy propagate who are the material in the form of waves generated by the transducer during the travelling of waves, gender is this continuity in the wave path, part of the energy will be reflected back from the flaw surface.
Application:-
3) X ray radiography testing:- Radiographic testing use X-rays or Gamma rays to examine the internal structure of manufactured components identifying any defects. it is based on the principle that radiation is absorbed and scattered as it passes through an object. If there are variations in thickness or density (due to defects) in an object, some radiation will passes through and affects the film exposure. X rays and gamma radiation has shortest wavelength and also have a photochemical effect therefore they can produce an image on film.
Application:-
Q4) Why do we use ultrasonic testing for rods and tubes?
A4) The basic principle of ultrasonic testing is defined as when the sound energy propagate who are the material in the form of waves generated by the transducer during the travelling of waves, gender is this continuity in the wave path, part of the energy will be reflected back from the flaw surface. And in tubes and rods are evenn larger in length and its very hard to determine flaws at each and every point thats why we use ultrasonic testing where sounds travels to entire cross sections at both ends of the tubes and rods
Q5) Explain principle of X ray radiography testing?
A5) X ray radiography testing:- Radiographic testing use X-rays or Gamma rays to examine the internal structure of manufactured components identifying any defects. it is based on the principle that radiation is absorbed and scattered as it passes through an object. If there are variations in thickness or density (due to defects) in an object, some radiation will passes through and affects the film exposure. X rays and gamma radiation has shortest wavelength and also have a photochemical effect therefore they can produce an image on film.
Q6. what is destructive and non destructive testing?
A6) Destructive testing:-
Destructive tests are generally carried out on the materials to understand its behavior or performance under different loads. These tests are much easier to carry out and yield more information.
Impact test, cupping test, hardness test are some of the testing which comes under destructive testing.
(B)Non destructive testing:- Non destructive testing (NDT) is used in industries to evaluate the properties of a material, component or system without causing damage.
Eddy current, XRay radiography and ultrasonic testing are some of non destructive testing methods.
Q7) Describe electronic microscopy and its types?
A7) 1) Electronic microscopy:- Electrons are such small particles that like photons in light, the act as waves. A beam of electrons passes through the specimen then through a series of lenses that magnifies the image. It is generally of three types:
a) Scanning electron microscopy (SEM):- scanning electron microscopy electrons to illuminate a specimen and create an enlarged image. Magnification power and resolution power is very high as compared to light microscope. It is used to determine the morphology and chemical composition of the specimen. we generally used scanning electron microscope to study about the surface of the material.
b) Transmission electron microscopy (TEM):- Composed of the light microscope and electronic microscope, light microscope has higher wavelength i.e. 500 mm and 0.2 mm of electron microscopy. That is why we get better magnified image.
c) X-ray diffraction:- It is a phenomenon in which the atoms of crystal by virtue of there uniform spacing, cause an interference pattern of the waves present in an incident beam of X rays. The atomic planes of the crystal act on X rays is exactly the same manner as does a uniformly ruled grading on a beam of light.
x-ray diffraction is a standard method of determining the presence or absence of crystallographic order in materials. It is often used to obtain a variety of other structural information regarding internal stress and defects in crystal for multiple crystallographic phases in composite materials.
Q8) How different materials react when we apply spark test on them?
A8) Spark test:- It is a method of determining the general classification of ferrous materials. it normally done by taking a scrap or piece of metal for grinding in order to sparks emitted.
Spark characteristics:-
a) Wrought iron sparks flow at in straight line.
b) Mild steel are similar to wrought iron except they will have tiny forks and their length will vary more.
c) High carbon Steel has bushy park pattern. The sparks are not as bright as medium carbon steel ones.
d) Cast iron has very short sparks that begin at the grinding wheel.
Q9) Define terms isotropic and anisotropic?
A9) 1) Anisotropic:- Variation of Mechanical properties in one direction as the force exerted only on one direction.
2) if fracture is in circular shape than sheet will be isotropic. it means Mechanical properties does not change while applying force in one direction.
If fracture is off flat shape then sheet will anisotropic that is mechanical properties get changed.
Q10) Why do we use eddy current test?
A10) 1) Eddy Current test:- it is based on the principle of generating circular electric current (Eddy current) in a conductive materials. This can be achieved by the help of of which is connected to alternating current generator driving an alternating magnetic field.
It is used to detect surface flaws to measure thin walls from one surface only.
It is used to measure thin coating and in some applications to measure depth.
Crack detection, corrosion monitoring, material thickness, conductivity as some of the conditions which we can detect through this test conductive materials can be inspected. Surface finish and roughness may interfere, depth of penetration is limited. There are some limitations of Eddy current testing.