UNIT I
Word Processing
Q1) How do we connect to a cloud service in Word?
A1) To connect to the cloud service in Word 2013, you need to go to the main menu. Open one drive, click the sign-in option and enter your email address to connect to the cloud service.
Q2) How do we insert a video into Microsoft Word?
A2) To insert a video into a Word document, you need to go to:
Insert Online Video Media Enter the keyword or video you are looking for Press Enter Click the video you want to add Click Insert to add or download the video
When the download is complete, the video will appear as an image in Word. Click the play button to play the video.
Q3) How can we collapse or unfold part of a document?
A3) This feature is very useful because you can read and see only the part you are interested in. To do this, you must first headline the topic as Heading 1 and Heading 2 from the Home menu. When this is done, you will see a small icon in the corner of the heading. Click this icon to merge the content, and click it again to expand the content to its normal location.
Q4) How to edit a PDF document?
A4) To edit a PDF document in 2013-
Q5) How do we add footnotes and endnotes in Word?
A5) To add a footnote, place the cursor at the end of the page where you want to add the footnote, go to the main menu, click Browse Options, and click Insert Footnote. Similarly, you can add an endnote by clicking Insert Endnote.
Q6) What are the shortcut keys for creating hyperlinks?
A6) Create hyperlink Cntrl + K
Q7) How can we insert a column break in Word 2013?
A7) To insert a column break, first move the cursor where you want to break the column, then move the cursor.
Go to page layout options Select a column break from the column breakdown options and select an option (2, 3, 4)
Q8) How do I remove a column break?
A8) To remove column breaks you no longer need-
Q9) How do we insert a caption in an image?
A9) To insert a caption for an image, right-click on the image to see the Insert Caption option. And you can enter the details, the other way to enter the caption
Select an image or table, click the Browse menu below the Browse menu, and click the Insert Caption option.
A caption box appears where you can select captions for figures, tables, or formulas.
Q10) What is the use of the Xml mapping panel in Ms Word?
A10) If you added the Developer tab to the main menu, there is an XML Mapping Panel option below this tab. This option helps you map the contents of the xml to a Word document.
Q11) How do we create a macro in Word?
A11) Follow the specified steps to create a macro
Q12) How do we create a cross-reference in Word?
A12) To create a cross-reference, follow the steps below:
Q13) How can we limit someone's editing in Word?
A13) To limit editing, follow the menu below:
Q14) How to insert an online image into a Word document in Word ?
A14) You can use this feature to insert an image online, such as if you have an image on Facebook or Flickr and want to insert it into a Word document.
Q15) How can we customize the quantity of indentation?
A15) To customize the quantity of indentation, you would like to pick the text to indent. you'll then set the indent to left or right within the Page Layout section of the paragraph section.
Q16) What's the shortcut to maneuver the insertion points to the start of the document?
A16) Shortcut key used for + to maneuver the insertion points to the start of the document.
Q17) What's the right procedure for creating a dangling indent?
A17) You can create a dangling indent by opening the Paragraph panel. Select the Special list. within the By box, specify the quantity and choose Hanging.
Q18) How do we create a custom watermark?
A18) To create your own watermark, attend the Page Layout tab within the Page Background group, click Watermark, and choose Custom Watermark. Select the Image Watermark or Text Watermark option and make changes accordingly.
Q19) What's the shortcut key for inserting a page break?
A19) The shortcut key for inserting a page break is to press +.
Q20) What's the simplest thanks to save a graph to be used in another document?
A20) You can save the graph as a graph template. this enables you to reuse graph formats and designs while modifying your data.
Q21) How to enter text in an Ms Word document?
A21)
Q22) How do we include an image in my Ms Word document?
A22)
Q23) Explain - Speller doesn't check my spelling.
A23) If all or part of the document is flagged as a language that does not have a dictionary installed, Speller will skip those parts. Word also seems to flag documents created by other programs as "no proofreading". If Word doesn't check spelling, make sure Speller uses an English diploma and that there is no unflagged (or no) text for proofreading in other languages.
Q24) How do we tell Speller to skip parts of a non-English document in Ms Word?
A24)
Q25) How can we change settings, turn features off or on, or change the behavior of Word in MS Word?
A25) Most of these settings are in the Tools menu. The Options command displays a screen with several tabs that allow you to make any kind of changes that affect the behavior of Word. You can use the Customize command to change Word menus and toolbars. The View menu has several options for changing the look of your Word screen.
The rest of the answers in the Word Annoyance section and the Word Screens section describe different ways to customize Word and change its behavior.
Q26) How can we create a table of contents in Ms Word?
A26) Word has the ability to generate a table of contents for a document. However, chapter or section headings must be formatted with the specific "heading style" that Word uses to determine the text of the table of contents entry and the page number where the section or chapter begins. To mark a chapter or section heading so that it appears in the table of contents:
Note: When you update the table of contents, you will lose any text or format you add to the completed index or table.
Q27) Can we see what the document will look like if accepted or deleted the changes in Ms Word?
A27) Yes, the Review Toolbar has several options for previewing your clothes.
Select an option from the drop-down menu in the Show for review box.
Q28) How can we share a document with someone who doesn't have my version of MS Word?
A28) Select Save As from the File menu.
In the File Type box, select the file type you want to use.
If you're not sure which file type works (for example, if you're sending a document to someone else), choose Rich Text Format (* .rtf) or WordPerfect 5.1 for DOS (* .doc). All modern word processing programs for Windows or Macintosh can read any of these formats. However, the conversion may not be complete and any formats that Word cannot convert will be discarded. Can Word open WordPerfect files? Please refer to. For some relevant information.
Q29) Define Word Processing.
A29) The act of using a machine to build, edit, save, and print documents is referred to as word processing. Specialized software (known as a Word Processor) is used to perform word processing. Microsoft Word is an example of a word processor, but other word processing programmes are still commonly used. Microsoft Works, Open Office Writer, Word Perfect, and Google Drive are only a few examples.
Meaning and Role of Word Processing in Creating of Document:
To manipulate a text document, such as a resume or a journal, word processing software is used. Typing is the most common method of entering text, and the app has facilities for copying, deleting, and formatting. The below are some of the features of word processing software:
To format your pages, you can use a variety of methods in word processing. You can, for example, divide the text into columns, add page numbers, and insert illustrations. Word processing, on the other hand, does not allow you full control over the appearance and sound of your text. You may need to use desktop publishing software to allow you more control over the style of your pages when design becomes necessary.
Word processing software usually has tools that make doing routine tasks simpler. Let's presume you need to deliver a letter to all of your clients informing them of a new strategy. Except for the name and address at the end of the message, the letter is the same for all clients. A mail merge feature allows you to create all of the letters from a single template document and a single template document.
Text editors shouldn't be confused with word processing software. While they do also allow you to create, edit and save text documents, they only work on plain text. Text editors don't use any formatting, such as underlined text or different fonts. Text editors serve a very different purpose from word processing software. They are used to work with files in plain text format, such as source code of computer programs or configuration files of an operating system. An example of a text editor would be Notepad on the Windows platform.
Q30) Explain the concept of Word Processing.
A30) Word processing refers to the act of using a computer to create, edit, save, and print a document. Dedicated software (called a word processor) is required to perform word processing. Microsoft Word is an example of a word processor, but other word processing applications are also widely used. Examples include Microsoft Works word processors, Open Office Writer, Word Perfect, and Google Drive Docs.
These programs allow users to create a variety of documents, including, but not limited to, reports, letters, notes, newsletters, pamphlets, and more. In addition to entering text, you can use a word processor to add content such as images, tables, and graphs, and decorative items such as borders and clip art to your documents.
The word processor's editing and formatting capabilities show the true power of the application. Text can be inserted, edited, moved, copied, or deleted within a document, and the appearance of the text can be changed in a variety of ways. Most word processors also have the ability to check spelling and grammar, and often have built-in dictionaries and other tools to help you write sentences.
The rest of this lesson will introduce you to some of the basic concepts and features of word processing and help you extend your skills using Microsoft Word, Bloom Community College's standard word processing software application.
Q32) How to Create a New Template?
A32) You can create a new template based on your requirements, or you can modify an existing template to save it and use it later as a template. Microsoft Word template files have a .dotx extension. The following steps will assist you create a replacement template.
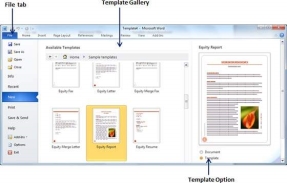
Step 1-To create a new template using an existing template, click the File tab, then click the New option. This will show you the Available Templates to choose from. Select one of the Available Templates and turn on the template option to open it.
Step 2-You can change the open template to suit your needs. When you're done, you can save this template with the .dotx extension, which is the standard extension for Microsoft Word templates.
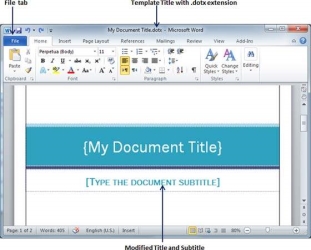
You can also create a template from a replacement document. Click the File button and click the New option to open a new document. Under Available Templates, double-click Blank Document to make a replacement document template. Save the template with a singular name and .dotx extension.
You can save the created template to the location you clicked. Whenever you use this template, simply Double-Click the template file to open a new template-based document.
Q33) Write short note on File Tab and Quick Access Toolbar.
A33) The File tab replaces the Office button from Word 2007. You can click it to check the Backstage view. This is where you come when you need to open or save files, create new documents, print a document, and do other file-related operations.
Quick Access Toolbar
This you will find just above the File tab. This is a convenient resting place for the most frequently used commands in Word. You can customize this toolbar based on your comfort.
Q34) What is View Buttons?
A34) The group of five buttons located to the left of the Zoom control, near the bottom of the screen, lets you switch through the Word's various document views.
Q35) What is Dialog Box Launcher?
A35) This appears as very small arrow in the lower-right corner of many groups on the Ribbon. Clicking this button opens a dialog box or task pane that provides more options about the group.
The Backstage view was introduced in Word 2010. This acts as the central place for managing your documents. The backstage view helps in creating new documents, saving and opening documents, printing and sharing documents, and so on.
Getting to the Backstage View is easy: Just click the File tab, located in the upper-left corner of the Word Ribbon. If you already do not have any opened document, then you will see a window listing down all the recently opened documents as follows −
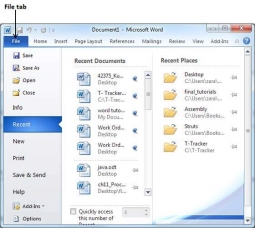
If you already have an opened document, then it will display a window showing detail about the opened document as shown below. Backstage view shows three columns when you select most of the available options in the first column.
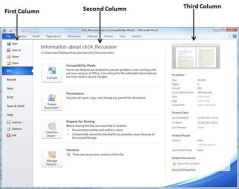
The first column of the backstage view will have following options −
S. No | Option & Description |
1 | Save If an existing document is opened, it will be saved as is, otherwise it will display a dialogue box asking for the document name. |
2 | Save As A dialogue box will be displayed asking for document name and document type, by default it will save in word 2010 format with extension .docx. |
3 | Open This option is used to open an existing word document. |
4 | Close This option is used to close an open document. |
5 | Info This option displays information about the opened document. |
6 | Recent This option lists down all the recently opened documents |
7 | New This option is used to open a new document. |
8 | This option is used to print an open document. |
9 | Save & Send This option will save an open document and will display options to send the document using email, etc. |
10 | Help This option is used to get the required help about Word 2010. |
11 | Options This option is used to set various option related to Word 2010. |
12 | Exit Use this option to close the document and exit. |
Q36) Write note on Document Information.
A36) When you click the Info option available in the first column, it displays the following information in the second column of the backstage view −
Document Properties
When you click the Info option available in the first column, it displays various properties in the third column of the backstage view. These properties include the document size, the number of pages in the document, the total number of words in the document, the name of the author etc.
You can also edit various properties by clicking on the property value and if the property is editable, then it will display a text box where you can add your text like title, tags, comments, Author.
Q37) How do we Opening New Document?
A37) A new, blank document always opens when you start Microsoft Word. Suppose you want to start another new document while you are working on another document, or you closed an already opened document and want to start a new document. Here are the steps to open a new document −
Step 1 − Click the File tab and select the New option.
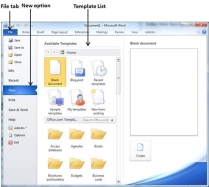
Step 2 − When you select the New option from the first column, it will display a list of templates in the second column. Double-click on the Blank document; this is the first option in the template list. We will discuss the other templates available in the list in the following chapters.
You should have your blank document as shown below. The document is now ready for you to start typing your text.
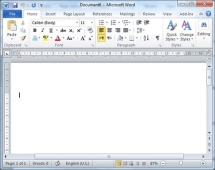
You can use a shortcut to open a blank document anytime. Try using the Ctrl + N keys and you will see a new blank document similar to the one in the above screenshot.
Q38) Explain the steps of Closing a Document.
A38) Closing a document removes it from your computer screen and if you had other documents open, Word displays the last document you used otherwise, you see a blank Word window. Here are simple steps to close an opened document −
Step 1 − Click the File tab and select the Close option.
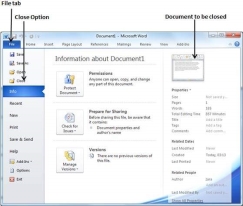
Step 2 − When you select the Close option and if the document is not saved before closing, it will display the following Warning box asking whether the document should be saved or not.
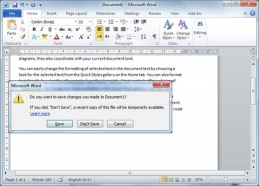
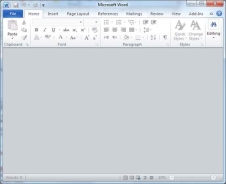
Step 3 − To save the changes, click Save, otherwise click Don't Save. To go back to the document, click Cancel. This will close the document and if you have other documents open, Word displays the last document you used, otherwise, you see a blank Word window as shown below −
Insert and Add Text
First, we will see how inserted text will be added into the existing content without replacing any existing content.
Step 1 − Click the location where you wish to insert text; you can also use the keyboard arrows to locate the place where the text needs to be inserted.
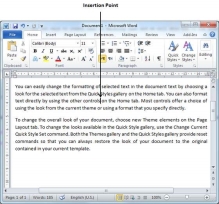
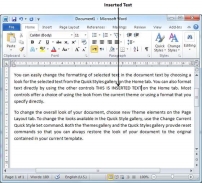
Step 2 − Start typing the text that needs to be inserted. Word inserts the text to the left of the insertion point, moving the existing text to the right
Q39) How do we Insert and Replace Text?
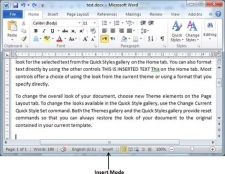
A39) In the Insertion mode, text will be added into the existing content but same time it will over write all the content which comes in its way.
Step 1 − Right-click the status bar and select the Overtype option from the displayed menu.
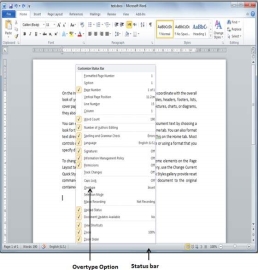
When you select the Overtype option, the status bar will show the insert mode as shown below −
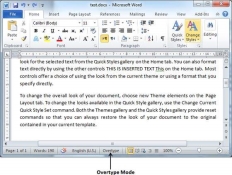
Step 2 − Click on the Insert text available at the status bar and it will switch to the Overtype mode as shown below −
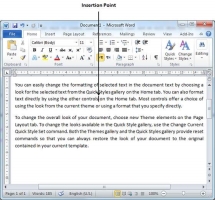
Step 3 − Now click the location where the text needs to be inserted or you can use the keyboard arrows to locate the place where the text needs to be inserted.
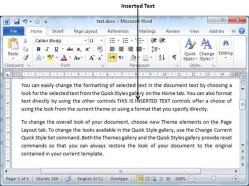
Step 4 − Start typing the text that needs to be inserted. Word will replace the existing text with the newly typed text without moving the position of the exiting test.
Note − Microsoft Word 2010 disabled the functionality of the Insert key and it does nothing, so you will have to follow-up with the above-mentioned procedure to turn-on or turn-off the Insert mode.
Q40) Explain Backspace & Delete Keys.
A40) The most basic deletion technique is to delete characters one at a time by pressing either the backspace key or the delete key. Following table describes how you can delete single character or a whole word by using either of these two keys −
S. No | Keys & Deletion Methods |
1 | Backspace Keep the insertion point just after the character you want to delete and press the Backspace key. Word deletes the character immediately to the left of the insertion point. |
2 | Ctrl + Backspace Keep the insertion point just after the word you want to delete and press Ctrl + Backspace key. Word deletes the whole word immediately to the left of the insertion point. |
3 | Delete Keep the insertion point just before the character you want to delete and press the Delete key. Word deletes the character immediately to the right of the insertion point. |
4 | Ctrl + Delete Keep the insertion point just before the word you want to delete and press Ctrl + Delete key. Word deletes the word immediately to the right of the insertion point. |