UNIT 1
Introduction to Computer Aided Sketching
- Give a brief description on Computer Aided Sketching?
Engineering drawing is a two-dimensional representation of three dimensional objects. In general, it provides necessary information about the shape, size, surface quality, material, manufacturing process, etc., of the object. It is the graphic language from which a trained person can visualize objects.
Drawings prepared in one country may be utilised in any other country irrespective of the language spoken. Hence, engineering drawing is called the universal language of engineers. Any language to be communicative, should follow certain rules so that it conveys the same meaning to everyone. Similarly, drawing practice must follow certain rules, if it is to serve as a means of communication. For this purpose, Bureau of Indian Standards (BIS) adapted the International Standards on code of practice for drawing. The other foreign standards are: DIN of Germany, BS of Britain and ANSI of America.
Role of Engineering Drawing
The ability to read drawing is the most important requirement of all technical people in any profession. As compared to verbal or written description, this method is brief and clearer. Some of the applications are: building drawing for civil engineers, machine drawing for mechanical engineers, circuit diagrams for electrical and electronics engineers, computer graphics for one and all.
The subject in general is designed to impart the following skills.
1. Ability to read and prepare engineering drawings.
2. Ability to make free - hand sketching of objects.
3. Power to imagine, analyze and communicate, and
4. Capacity to understand other subjects.
2. What type of drawing instrument is used in Computer Aided Sketching?
To record information on paper (or another surface), instruments and equipment are required. Even for drawings made freehand, pencils, erasers, and sometimes coordinate paper or other special items are used. The lines made on drawings are straight or curved (including circles and arcs). They are made with drawing instruments, which are the necessary tools for laying down lines on a drawing in an accurate and efficient manner. To position the lines, a measuring device, a scale, is needed.
The various instruments will be described in detail later, but the opening of this chapter will serve as an introduction. To draw straight lines, the T square, with its straight blade and perpendicular head, or a triangle is used to support the stroke of the pencil. To draw circles, a compass is needed. In addition to the compass, the draftsman needs dividers for spacing distances and a small bow compass for drawing small circles. To draw curved lines other than circles, a French curve is required. A scale is used for making measurements.
- Drawing Paper
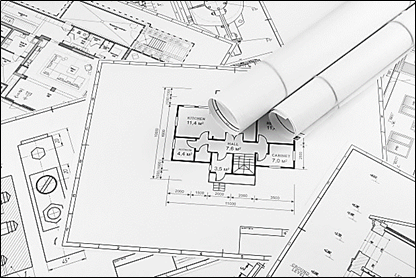
Drawing paper is made up of variety of qualities and manufactured in sheets or rolls. White drawing papers that will not turn yellow with age or exposure are used for finished drawings, maps, charts, and drawings for photographic reproduction. For pencil layouts and working drawings buff detail papers are preferred as they are easier on the eyes compared to white papers.
- Tracing Paper
Tracing papers are thin papers, natural or transparent, on which drawings are traced, in pencil or ink, and from which blueprints or similar contact prints can be made. In most drafting rooms original drawings are penciled on tracing papers, and blueprints are made directly from these drawings, a practice increasingly successful because of improvements both in papers and in printing.
- Thumbtacks
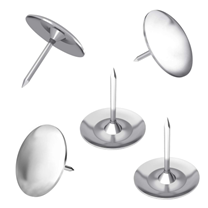
The best thumbtacks are made with thin heads and steel points screwed into them. Cheaper ones are made by stamping. Use tacks with tapering pins of small diameter and avoid flat-headed (often colored) map pins, as the heads are too thick and the pins rather large.
- Pencils
The basic instrument is the graphite lead pencil, made in various hardness’s. Each manufacturer has special methods of processing design to make the lead strong and yet give a smooth clear line.
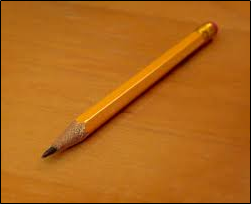
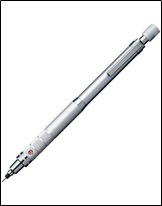
In the left there is an ordinary pencil, with the lead set in wood and the other is a semi-automatic pencil with thinner leads. Both are fine but have the disadvantage that in use, the wood must be cut away to expose the lead (a time-consuming job), and the pencil becomes shorter and shorter until the last portion of it is to be discarded. Whereassemiautomatic pencils, with a chuck to clamp and hold the lead, are more convenient, has a plastic handle and changeable tip (for indicating the grade of lead).
Drawing pencils are graded by numbers and letters from 6B which is very soft and black, to 5B, 4B, 3B, 2B, B, and HB to F, the medium grade; then H, 2H, 3H, 4H, 5H, 6H, 7H, and 8H to 9H, the hardest. The soft (B) grades are used primarily for sketching and rendered drawings and the hard (H) grades for instrument drawings.
- Pencil Pointer
After the wood of the ordinary pencil is cut away with a pocketknife or mechanical sharpener, the lead must be formed to a long, conic point.

A pencil pointer is a tool for sharpening a pencil’s writing point by shaving away its worn surface.
- Erasers
The Ruby pencil eraser, large size with bevelled ends, is the standard. This eraser not only removes pencil lines effectively but is better for ink, as it removes ink without seriously damaging the surface of paper or cloth.
Artgum or a soft-rubber eraser, is useful for cleaning paper and cloth of finger marks and smears that spoil the appearance of the completed drawing.
- Penholders and Pens
The penholder should have a grip of medium size, small enough to enter the mouth of a drawing-inkbottle easily yet not so small as to cramp the fingers while in use. A size slightly larger than the diameter of a pencil is good.
- Triangles
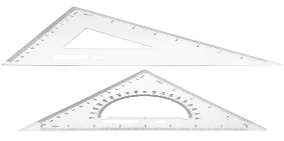
Triangles, are made of transparent hard or other plastic material. Through internal strains they sometimes lose their accuracy. Triangles should be kept flat to prevent warping. For ordinary work, a 6- or 8-in. 45° and a 10-in. 30-60° are good sizes.
- The T Squares
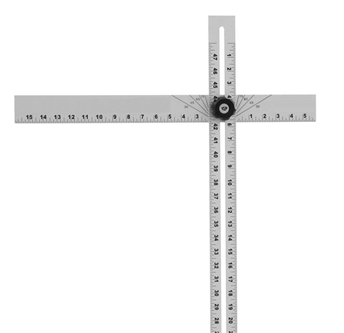
The fixed-head T square, is used for all ordinary work. It should be of hardwood, and the blade should be perfectly straight. The transparent-edged blade is much the best. A draftsman will have severalfixed-head squares of different lengths and will findan adjustable-head square of occasional use.
- Scales
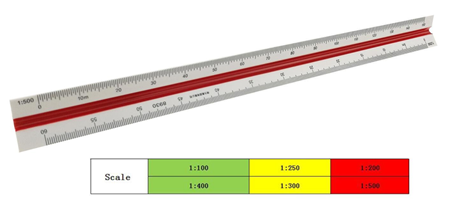
Scales, are made in various number of graduations to meet the requirements of many kinds of work. For convenience, scales are classified according to their most-common uses.
Mechanical Engineer’s Scale
These are divided and numbered in such a way that fractions of inches represent inches. The most common ranges are 1/8, 1/4, 1/2, and 1 in. To the inch. These scales are known as the size scales because the reduced size also represents the ratio of size, as for example one-eighth size.
Mechanical engineer's scales are almost always "full divided"; that is, the smallest divisions run throughout the entire length.
They are generally graduated with the marked divisions numbered from right to left, as well as from left to right, as shown in Figure Mechanical engineer's scales are used mostly for drawings of machine parts and small structures where the drawing size is more than one-eighth the size of the actual object.
Civil Engineer’s Scale
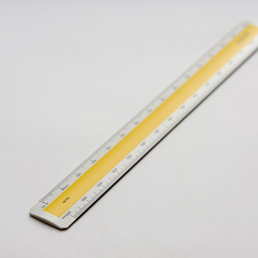
These are divided into decimals with divisions ranging from 10, 20, 30, 40, 50, 60, and 80 to the inch. Such a scale is usually full divided and is sometimes numbered both from left to right and right to left. Civil engineer's scales are most used for plotting and drawing maps, although they are convenient for any work where divisions of the inch in tenths is required.
Metric Scales
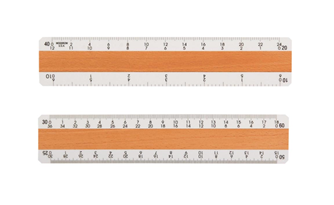
Metric scales are supplied in all the styles and sizes and materials of other scales. They are usually full-divided and are numbered in meters, centimetres, or millimetres depending upon the reduction in size. Typical size reductions are: 1:1, 1:2, 1:5, 1:10, 1:20, 1:25, 1:33.3, 1:50, 1:75, 1:80, 1: 100, 1: 150. Also available are metric equivalent scales for direct conversion of English scales.
- Curves
Curve rulers, called "irregular curves" or "French curves," are used to draw curved lines other than circular arcs. The patterns for these curves are laid out in parts of ellipse and spirals or other mathematical curves in various combinations. For the student, one ellipse curve of the general shape or one spiral, either a logarithmic spiral is a useful small curve.

- Case Instruments
We have so far, except for curves considered only the instruments needed for drawing straight lines. A major portion of any drawing is likely to be circles and circle arcs, and the so called “case” instruments are used for these.
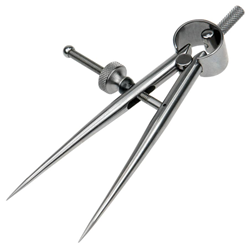
Divider:
It is used for laying off or transferring measurements.
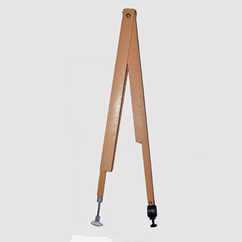
Next is the large compass with lengthening bar and pen attachment. The three “bow” instruments are for smaller work. They are almost always made without the conversion feature.
The ruling pen is used for inking straight lines.
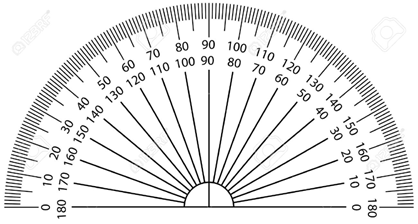
Protractor is used to measure angles upto 180°.
- Cautions in the use of Instruments
- Scales are not to be used as a ruler for drawing lines.
- Horizontal lines with the lower edge should not be drawn with a T square.
- The lower edge of T square should not be used as a base for drawing triangles.
- T square is not to be used as hammer.
- Never put either end of a pencil into the mouth.
- Never sharpen a pencil over a drawing board.
- Never oil the joints of compasses.
- Never begin work without wiping off the table and instruments.
- Never work on a table cluttered with unneeded instruments or equipment’s.
- Never fold a drawing or a tracing.
3. Write a short note on lettering?
Lettering
Graphic representation of the shape of a part, machine, or structure gives one aspect of the information needed for its construction. To this must be added, to complete the description, figured dimensions, notes on material and finish, and a descriptive title—all lettered, freehand, in a style that is perfectly legible, uniform, and capable of rapid execution. As far as the appearance of a drawing is concerned, the lettering is the most important part. But the usefulness of a drawing, too, can be ruined by lettering done ignorantly or carelessly, because illegible figures are apt to cause mistakes in the work.
By far the greatest amount of lettering on drawings is done in a rapid single-stroke letter, either vertical or inclined, and every engineer must have absolute command of these styles.
The term "single-stroke," or "one-stroke," does not mean that the entire letter is made without lifting the pencil or pen but that the width of the stroke of the pencil or pen is the width of the stem of the letter.
Single Stroke lettering
By far the greatest amount of lettering on drawings is done in a rapid single-stroke letter, either vertical or inclined, and every engineer must have absolute command of these styles.
The term "single-stroke," or "one-stroke," does not mean that the entire letter is made without lifting the pencil or pen but that the width of the stroke of the pencil or pen is the width of the stem of the letter.
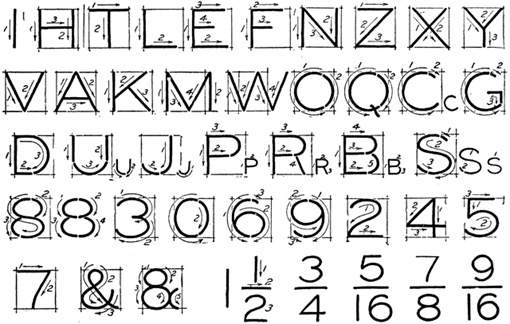
Guidelines
Always draw light guide lines for both tops and bottoms of letters, using a sharp pencil. Figure 1 shows a method of laying off several equally spaced lines. Draw the first base line; then set the bow spacers to the distance wanted between base lines and step off the required number of base lines. Above the last line mark the desired height of the letters.
Lettering in Pencil
Good technique is as essential in lettering as in drawing. The quality of the lettering is important whether it appears on finished work to be reproduced by one of the printing processes or as part of a pencil drawing to be inked. In the first case, the penciling must be clean, firm, and opaque; in the second, it may be lighter.
Single - stroke Vertical Capitals:
The vertical, single-stroke, commercial Gothic letter is a standard for titles, reference letters, etc. As for the proportion of width to height, the general rule is that the smaller the letters are, the more extended they should be in width.
A low extended letter is more legible than a high compressed one and at the same time makes a better appearance.
Vertical lower-case letters:
The single-stroke, vertical lower-case letter is not commonly used on machine drawings but is used extensively in map drawing. It is the standard letter for hypsography in government topographic drawing. The bodies are made two-thirds the height of the capitals with the ascenders extending to the capital line and the descenders dropping the same distance below.
Single strokes Inclined capitals:
Many draftsmen use the inclined, or slant, letter in preference to the upright. The order and direction of strokes are the same as in the vertical form.
Single stroke, Inclined lower-case letters:
The inclined lower-case letters have bodies two-thirds the height of the capitals with the ascenders extending to the capital line and the descanters dropping the same distance below the base line. The lower-case letter is suitable for notes and statements on drawings because it is much more easily read than all capitals.
The loop letters are made with an ellipse whose long axis is inclined about 45° in combination with a straight line.
4. What do you understand by Line Conventions and Dimensioning?
Just as in English textbook the correct words are used for making correct sentences; in Engineering Graphics, the details of various objects are drawn by different types of lines. Each line has a definite meaning and sense to convey.
IS 10714 (Pint 20): 2001 (General principles of presentation on technical drawings) and SP 46:2003specify the following types of lines and their applications:
1. Visible Outlines, Visible Edges: (Continuous wide lines) The lines drawn to represent the visible outlines/ visible edges / surface boundary lines of objects should be outstanding in appearance.
2. Dimension Lines: (Continuous narrow Lines) Dimension Lines are drawn to mark dimension.
3. Extension Lines: (Continuous narrow Lines)There are extended slightly beyond the respective dimension lines.
4. Construction Lines: (Continuous narrow Lines)Construction Lines are drawn for constructing drawings and should not be erased after completion of the drawing.
5. Hatching / Section Lines: (Continuous Narrow Lines)
Hatching Lines are drawn for the sectioned portion of an object. These are drawn inclined at an angle of 45° to the axis or to the main outline of the section.
6. Guide Lines: (Continuous Narrow Lines)
Guide Lines are drawn for lettering and should not be erased after lettering.
7. Break Lines: (Continuous Narrow Freehand Lines)
Wavy continuous narrow line drawn freehand is used to represent break of an object.
8. Break Lines: (Continuous Narrow Lines with Zigzags)
Straight continuous arrow line with zigzags is used to represent break of an object.
9. Dashed Narrow Lines: (Dashed Narrow Lines)
Hidden edges / Hidden outlines of objects are shown by dashed lines of short dashes ofequal lengths of about 3 mm, spaced at equal distances of about 1 mm. The points of intersection of these lines with the outlines / another hidden line should be clearly shown.
10. Center Lines: (Long-Dashed Dotted Narrow Lines)
Center Lines are drawn at the center of the drawings symmetrical about an axis or both the axes. These are extended by a short distance beyond the outline of the drawing.
11. Cutting Plane Lines:
Cutting Plane Line is drawn to show the location of a cutting plane. It is long-dashed dotted narrow line, made wide at the ends, bends and change of direction. The direction of viewing is shown by means of arrows resting on the cutting plane line.
12. Border Lines
Border Lines are continuous wide lines of minimum thickness 0.7 mm.
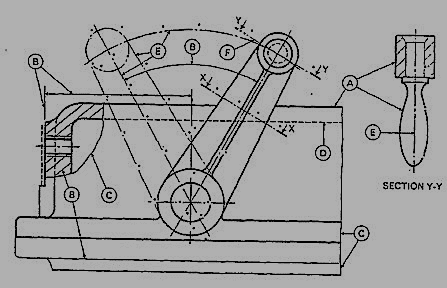
Figure 6 Types of lines
Table 2 Types of lines and their applications
Line | Description | General application |
| Continuous thick or continuous wide | Visible outlines, visible edges, main representation in diagrams, maps; system lines |
| Continuous thin (narrow) (straight or curved) | Imaginary lines of intersection; grid, dimension. Extension, projection, reference lines and hatching. |
| Continuous thin (narrow) freehand. | Limits of partial or interrupted views and sections, if the limit is not a chain thin line. |
| Continuous thin (narrow) with zigzags (straight) | Long break line |
 | Dashed thick (wide) | Line showing permissible of surface treatment. |
 | Dashed thin (narrow) | Hidden outline; hidden edges |
 | Chain thin Long-dashed dotted (narrow) | Centre line; lines of symmetry; trajectories; pitch circle of gears, pitch circle of holes. |
 | Chain thick or long - dashed (dotted) wide | Indication of lines or surfaces to which a special requirement applies. |
Line widths:
Line width means line thickness
Choose line widths according to the size of the drawing from the following range: 0.13,0.18,0.25, 0.35, 0.5, 0.7 and 1 mm.
Precedence of Lines
1. When a Visible Line coincide with a Hidden Line or Center Line, draw the Visible Line. Also, extend the Center Line beyond the outlines of the view.
2. When a Hidden Line coincides with a Center Line, draw the Hidden Line.
3. When a Visible Line coincides with a Cutting Plane, draw the Visible Line.
4. When a Center line coincides with a Cutting Plane, draw the Center Line and show the
Cutting Plane line outside the outlines of the view at the ends of the Center Line by thickdashes.
Dimensioning:
Drawing of a component, in addition to providing complete shape description, must also furnish information regarding the size description. These are provided through the distances between the surfaces, location of holes, nature of surface finish, type of material, etc. The expression of these features on a drawing, using lines, symbols, figures and notes is called dimensioning.
Principles of Dimensioning
Some of the basic principles of dimensioning are given below.
1. All dimensional information necessary to describe a component clearly and completely shallbe written directly on a drawing.
2. Each feature shall be dimensioned once only on a drawing, i.e., dimension marked in oneview need not be repeated in another view.
3. Dimension should be placed on the view where the shape is best seen (Fig.7)
4. As far as possible, dimensions should be expressed in one unit only preferably in millimeters,without showing the unit symbol (mm).
5. As far as possible dimensions should be placed outside the view (Fig. 8).
6. Dimensions should be taken from visible outlines rather than from hidden lines (Fig. 9).
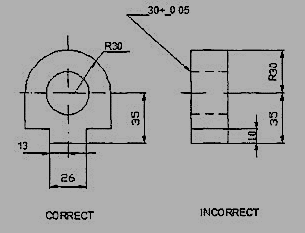
Figure 7
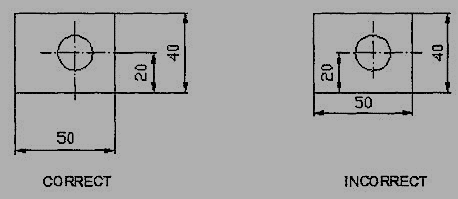
Figure 8
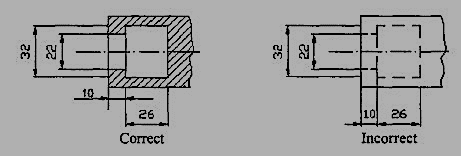
Figure 9
7. No gap should be left between the feature and the start of the extension line (Fig.10).
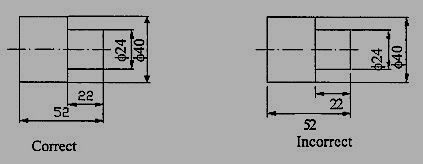
Figure 10 Marking of Extension lines
8. Crossing of center lines should be done by a long dash and not a short dash (Fig.11).
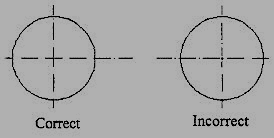
Figure 11 Crossing of Centre lines
Execution of dimensions:
1. Projection and dimension lines should be drawn as thin continuous lines. Projection linesshould extend slightly beyond the respective dimension line.Projection lines should be drawnperpendicular to the feature being dimensioned. If the space for dimensioning is insufficient,the arrow heads may be reversed, and the adjacent arrow heads may be replaced by a dot(Fig.12). However, they may be drawn obliquely, but parallel to each other in special cases,such as on tapered feature (Fig.13).
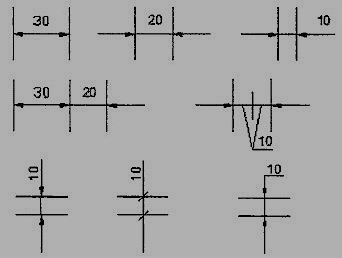
Figure 12 Dimensioning in narrow spaces

Figure 13 Dimensioning a tapered feature
2. A leader line is a line referring to a feature (object, outline, dimension). Leader lines should be inclined to the horizontal at an angle greater than 30°. Leader line should terminate,
(a) with a dot, if they end within the outline ofan object (Fig.2.21a).
(b) with an arrow head, if they end on outside of the object (Fig.2.21b).
(c) without a dot or arrow head, if they end on dimension line (Fig.2.21c).

Figure 14 Termination of leader lines
Dimension Termination and Origin Indication
Dimension lines should show distinct termination in the form of arrow heads or oblique strokes or where applicable an origin indication (Fig.15). The arrow head included angle is 15°. The origin indication is drawn as a small open circle of approximately 3 mm in diameter. The proportion length to depth 3: 1 of arrow head is shown in Fig.16.
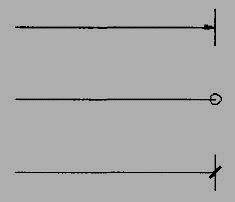
Figure 15 Termination of dimension lines
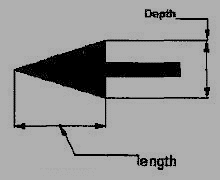
Figure 16 Proportions of an arrow head
Methods of Indicating Dimensions
The dimensions are indicated on the drawings according to one of the following two methods.
Method I (Aligned method)
Dimensions should be placed parallel to and above their dimension lines and preferably at the middle, and clear of the line. (Fig. 17).
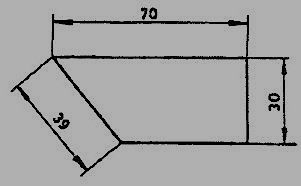
Figure 17
Dimensions may be written so that they can be read from the bottom or from the right side of the drawing. Dimensions on oblique dimension lines should be oriented as shown in Fig.18a and except where unavoidable, they shall not be placed in the 30° zone. Angular dimensions are oriented as shown in Fig.18b.
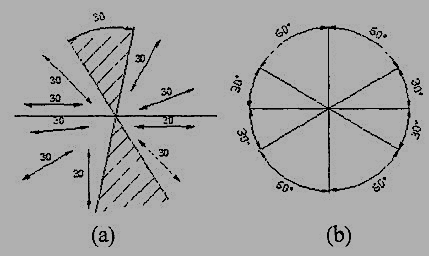
Figure 18 Angular dimensioning
Method 2(Uni-directional method)
Dimensions should be indicated so that they can be read from the bottom of the drawing only. On-horizontal dimension lines are interrupted, preferably in the middle for insertion of the dimension (Fig.19a).
Angular dimensions may be oriented as in Fig.19b

Figure 19 Uni-directional method
Simple Geometrical constructions
Engineering drawing consists of many geometrical constructions. A few methods are illustrated here without mathematical proofs.
1. To divide a straight line into a given number of equal parts say 5.
Construction (Fig. 20)
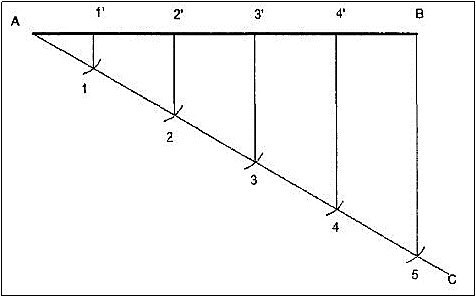
Figure 20 Dividing a line
i. Draw AC at any angle θ to AB.
Ii. Construct the required number of equal parts of convenient length on AC like 1,2,3.
Iii. Join the last point 5 to B
Iv. Through 4, 3, 2, 1 draw lines parallel to 5B to intersect AB at 4',3',2' and 1'.
5. Write the function of Computer Screen and Layout of the Software?
AutoCad
AutoCAD (a product and registered trademark of Autodesk Inc., USA) is a low cost yet very effective computer aided design and drafting software. AutoCAD is accepted as the industry standard and it is preferred by a large community of CAD users in the world. Although AutoCAD is available for a variety of computer systems, majority of AutoCAD implementations are available on IBM or compatible personal computers with various operating systems. AutoCAD comes with a very large number of user-selectable options to support a great variety of commercially available display devices, digitizers, mouse, printers and plotters. AutoCAD supports 2D drafting and 3D modelling.
The basic drawing entities are lines, polylines [refer to art. 26-5-4 of any width, circles, arcs, ellipses and solids. There are many ways of defining a drawing entity, and the software always prompts the user for all options. Each drawing entity has an associated line-type, colour, layer [refer to art. 26-5-5(2)] and thickness. The thickness is a property associated with 3D entities.
Before any drawing is started, the AutoCAD environment must be prepared for proper units of measurement, line-type, drawing size, layer, etc. In AutoCAD the drawings are always prepared at full scale, and the drawing size can be changed at any instant of time by using LIMITS command.
Classic screen layout of AutoCad:
The default AutoCAD 2010 drawing screen can be divided into four areas such as drawing area, command area, menu bar area and tool bar area. The various component of Graphical User Interface (GUI) of AutoCAD 2010 is shown in fig. 26-3.
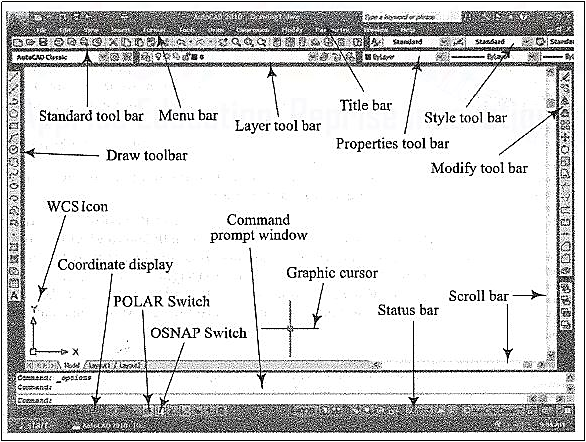
Figure 3 Classic AutoCad layout
Function Keys:
F1Online Help
F2Toggles between Drawing screen to text screen
F3Toggles between OSNAP- On and Off
F4Toggles between Tablet- On and Off
F5Switches among lso planes Top, Right and Left
F6Toggles between Coordinates- On and Off
F7Toggles between Grid- On and Off
F8Toggles between Ortho Mode- On and Off
F9Toggles between Snap Mode- On and Off
F10 Toggles between Polar Tracking- On and Off
F11 Toggles between Objects Snap Tracking- On and Off
8. Give a short description on Coordinate system and reference planes?
Let us suppose that a transparent plane has been set up between an object and the station point of an observer's eye (Fig. ). The intersection of this plane with the rays formed by lines of sight from the eye to all points of the object would give a picture that is practically the same as the image formed in the eye of the observer. This is perspective projection.
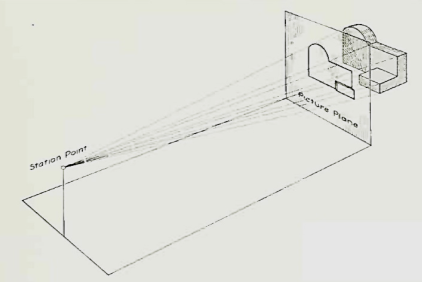
Figure Perspective projection. The rays of the projection converge at the station point from which the object is observed.
If the observer would then walk backward from the station point until he reached a theoretically infinite distance, the rays formed by lines of sight from his eye to the object would grow longer and finally become infinite in length, parallel to each other, and perpendicular to the picture plane. The image so formed on the picture plane is what is known as "orthographic projection." See Fig.
2.
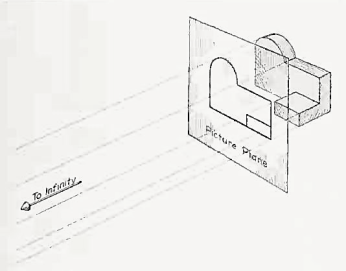
Figure Orthographic projection.
Basically, orthographic projections could be defined as any single projection made by dropping perpendiculars to a plane. However, it has been accepted through long usage to mean the combination of two or more such views, hence the following definition has been put forward: Orthographic projection is the method of representing the exact shape of an object by dropping perpendiculars from two or more sides of the object to planes, generally at right angles to each other; collectively, the views on these planes describe the object completely. (The term "orthogonal" is sometimes used for this system of drawing.)
Orthographic views:
The rays from the picture plane to infinity may be discarded and the picture, or "view," thought of as being found by extending perpendiculars to the plane from all points of the object, as in Fig. 3. This picture, or projection on a frontal plane, shows the shape of the object when viewed from the front, but it does not tell the shape or distance from front to rear. Accordingly, more than one projection are required to describe the object.
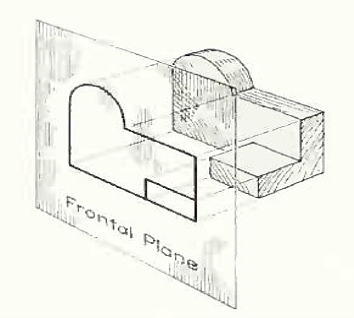
Figure The frontal plane of projection. This produces the front view of the object.
In addition to the frontal plane, imagine another transparent plane placed horizontally above the object, as in Fig. 4. The projection on this plane, found by extending perpendiculars to it from the object, will give the appearance of the object as if viewed from directly above and will show the distance from front to rear.
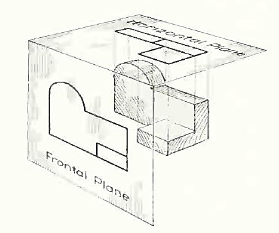
Figure The frontal and horizontal planes of projections. Projection on the horizontal plane produces the top view of the object.
If this horizontal plane is now rotated into coincidence with the frontal plane, as in Fig. 5, the two views of the object will be in the same plane, as if on a sheet of paper.
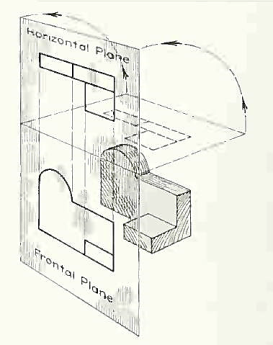
Figure The horizontal plane rotated into the same plane as the frontal plane.
Now imagine a third plane, perpendicular to the first two (Fig. 6). This plane is called a "profile plane," and a third view can be projected on it. This view shows the shape of the object when viewed from the side and the distance from bottom to top and front to rear.
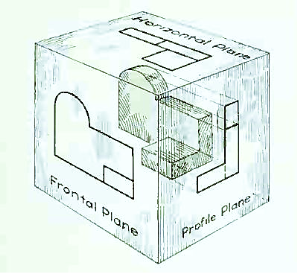
Figure The three planes of projection: frontal, horizontal and profile. Each is perpendicular to other two.
The horizontal and profile planes are shown rotated into the same plane as the frontal plane (again thought of as the plane of the drawing paper) in Fig. 7. Thus, related in the same plane, they give correctly the three-dimensional shape of the object.
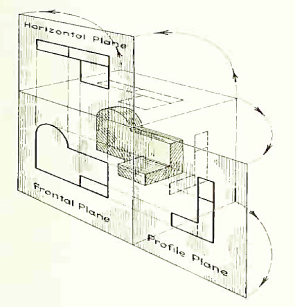
Figure The horizontal and profile planes rotated into the same plane as the frontal plane. This makes it possible to draw three views of the object.
In orthographic projection the picture planes are called "planes of projection"; and the perpendiculars, "projecting lines" or "projectors."
9. Write a brief description on Selection of drawing sheet size and scale?
Engineering drawings are prepared on standard size drawing sheets. The correct shape and size of the object can be visualized from the understanding of not only its views but also from the various types of lines used, dimensions, notes, scale etc. For uniformity, the drawings must be drawn as per certain standard practice.
Drawing Sheet
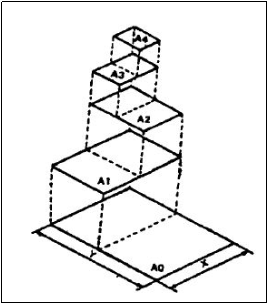
The standard drawing sheet sizes are arrived at on the basic Principal of x: y = 1: and xy = 1 where x and yare the sides of the sheet. For example, A0, having a surface area of 1 Sq. m; x = 841 mm and y = 1189 mm. The successive sizes are obtained by either by halving along the length or doubling the width, the area being in the ratio 1: 2. Designation of sizes is given in Fig.l and their sizes are given in Table 1. For class work use of A2 size drawing sheet is preferred.
Table 1
Designation | Dimension, mm (Trimmed size) |
A0 | 841 × 1189 |
A1 | 594 × 841 |
A2 | 420 × 594 |
A3 | 297 × 420 |
A4 | 210 × 297 |
Figure
Title block
The title block should lie within the drawing space at the bottom right hand comer of the sheet. The title block can have a maximum length of 170 mm providing the following information.
1. Title of the drawing.
2. Drawing number.
3. Scale.
4. Symbol denoting the method of projection.
5. Name of the firm, and
6. Initials of staff who have designed, checked and approved.
The title block used on shop floor and one suggested for student’s class work are shown inFig.2& Fig. 3.
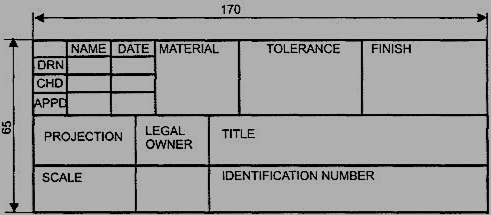
Figure Shop floor drawing sheet layout
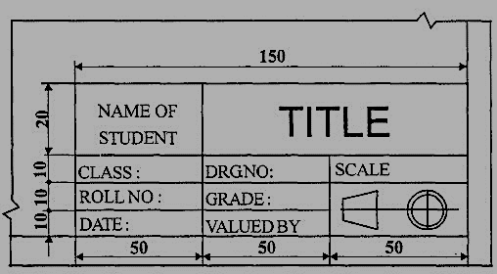
Figure Students class work
Drawing sheet layout
The layout of a drawing sheet used on the shop floor is shown in Fig.2.3a. The layout suggested to students is shown in Fig.2.3b.
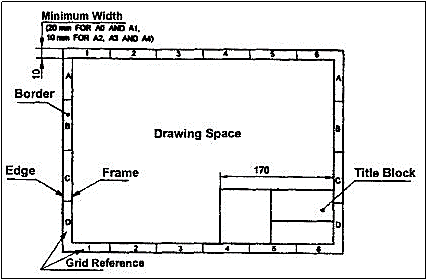
Figure General features of a drawing sheet
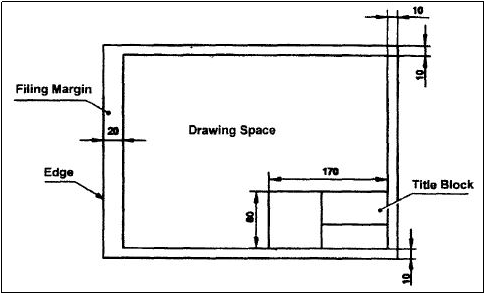
Figure Layout of sheet for a class work
10. Explain about the Commands and creation of various lines?
Drawing entities (Draw commands)

Figure 4
(1) Line: A line is specified by giving its two endpoints. The LINE command can be used to draw a single line or a series of lines with the end-point of one being the start point of the next. When a series of such lines is created, each line is treated as a separate entity. To create a closed polygon, the user has to type in C (close option) for the To point: prompt. This causes the last and the first points to be joined by a line and thus creating a closed boundary.
(2) Pline: Polylines are interesting drawing entities. Polylines can include both lines and arcs connected at end-points. Thus, a polyline is a single entity with multiple segments. The polylines can be straight or curved, can be wide (like a TRACE) or tapered. Fillets and chamfers can be added where needed on a polyline. Curve fitting and hatching can easily be performed on a polyline.
(3) Polygon (fig. 5): A polygon also a polyline with equal length of sides. The regular polygon can either be inscribed in a circle or circumscribed about the circle. The polygon may also be constructed by specifying the length of one side and the number of sides of polygon (called edges). In this method a polygon is constructed in anti-clockwise direction from the two-edge end-points that have been specified.
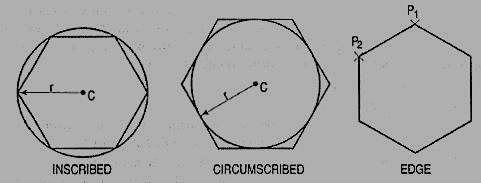
Figure 5 Polygon
(5) Arc (fig. 6): This command is used to draw an arc accurately. Usually there are three parameters required for drawing an arc.
Different ways of drawing circular arcs are:
(i) 3-point arc: The arc is drawn by specifying three points on the chord of arc. The first and third points define the start and end-points of an arc respectively.
(ii) Start, Center: This option needs start points and center point of an arc. The third parameter may either be an end-point, included angle, or length of chord.
(iii) Start, End: This option asks the user to enter the start and end-points of an arc. The arc is completed by either specifying radius or included angle or center point.
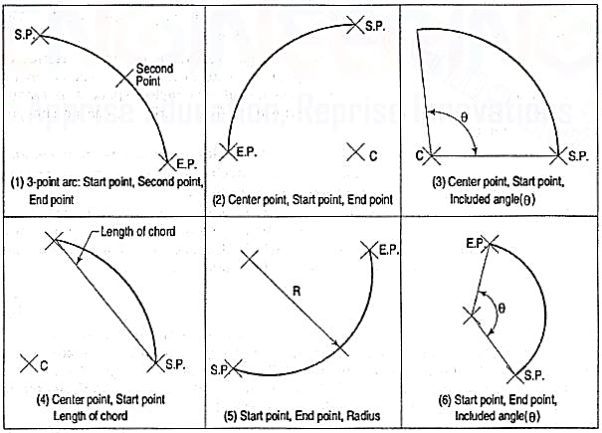
Figure 6 Arcs
Drafting Aids:
(1) limits: In AutoCAD, drawings are drawn in full scale therefore limits are needed to size up a drawing area. The limits are set by specifying X and Y co-ordinates of Lower Left Corner (L.L.C.) and Upper Right Corner (U.R.C.) of drawing area. By default, L.L.C. Is set to (0, 0) and U.R.C. Is set to (12, 9) for imperial file and (420, 210) for metric file.
Note: By changing limits, the drawing display area does not change. It is required to use all option of the zoom command to display the limits inside the drawing area.
(2) layer: A layer can be thought of as a transparent sheet on which drawings can be prepared. Drawings can be logically divided into different layers, and layers can be selectively displayed either individually or in any combination. Each layer is identified by a name. If the drawing becomes too dense or complicated, some layers can be turned off so that they do not interfere with the work. The drawing can be edited on any one layer at a time, called current layer. The colour, line type and line weight are the properties associated with a layer. This controls an entity's colour, line type and line weight drawn on that layer.
(3) Dimensioning: The manufacturing drawing must be dimensioned for size and tolerances so that the right information can be conveyed. The appearance and size of dimension arrows, size and style of dimension text with or without tolerances, and the layer on which dimensions are placed can be controlled by setting dimension variables.
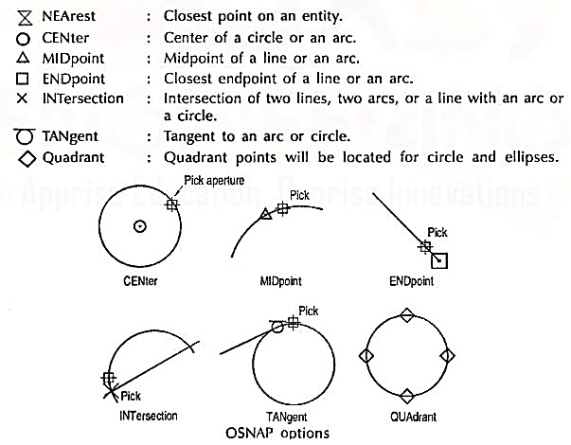
(4) Object snap (fig.7): A very useful drawing aid, the OSNAP identifies the points on drawing entities that are visible on the screen. For example, the start point of an arc can be the endpoint of an existing line. This option allows the user to pick-up the points very accurately with respect to drawing displayed. Some of the OSNAP modes are:
Figure
(5) Zoom: This is the most common method of magnifying a portion of current drawing on the screen. The portion of drawing to be zoomed is usually selected by a window. A window is identified by picking up the diagonal corners of a rectangle around the area of interest.
Editing of a drawing:

Figure
The fundamental commands to edit a drawing are:
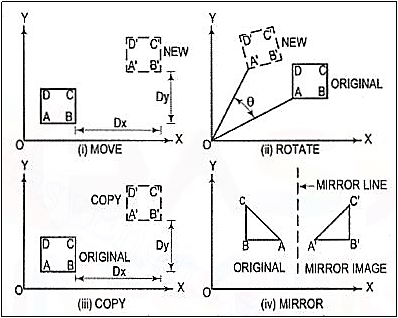
(1) Move [fig. 9 (i)]: Moves selected objects to another location about a base point.
(2) Rotate [fig. 9 (ii)]: Rotates selected objects through a specified angle about a base point.
(3) Copy [fig. 9 (iii)]: Creates one or more copies of selected objects at another location. The function of COPY command is like the MOVE command except that it preserves a copy of the objects selected at the original location.
(4) Mirror [fig. 9 (iv)]: Creates a mirror image of the selected objects about a specified line.
Figure
(5) Array: This command creates multiple copies of selected objects in rectangular or polar form. This is a form of COPY command.
(6) Erase: This command deletes the selected entities. A record of entities erased is always maintained. The most recent entity can be unerased by OOPS command.
(7) Oops: This command retrieves all objects erased by the last Erase and after executing Block or Wblock command.
(8) Break: This command erases a portion of line, arc, circle or a 20 polyline between two selected points.
(9) fillet (Refermodule26-5, 26-13): This command is used to create around corner between two lines. The lines are shortened or extended to fit a tangent arc of specified radius. FILLET works on any combination of two lines, arcs, circles, non-parallel lines, or a single polyline.
(10) Chamfer (Refer module 26-8): This command works on two lines or a single polyline to create a bevelled edge.
(11) Extend: This command extends the lines, polylines and arcs to a boundary edge which can be a line, polyline, arc or circle. A closed polygon cannot be extended. When you invoke this command, you will be prompted to select the boundary edges. These edges can be lines, polylines, circles, arcs, ellipse, rays, splines etc. After the boundary edges are selected, you must select each object to be extended. An object can be both a boundary edge and an object to be extended.
(12) Offset: This command creates a parallel single copy of line, arc, circle, rectangle, polygon, or 20 polylines at a given offset distance. Each offset creates a new entity with the same linetype, color and layer settings.
(13) Stretch: The STRETCH command can either lengthen entities or shorten them, and thus alter their shapes. The centre points of arcs or polyline arcs are adjusted accordingly.
(14) Trim: This command trims the objects that extend beyond a required point of intersection. When you invoke this command, you will be prompted to select the cutting edges. These edges can be lines, polylines, circles, arcs, ellipse, rays, splines, text, blocks or even viewports. After the cutting edges are selected, you must select each object to be trimmed. An object can be both a cutting edge and an object to be trimmed.
(15) Scale: The SCALE command allows to shrink or enlarge the already existing drawing objects about a base point by specifying a scale factor.
(16) Pedit: A polyline is a single entity which is made up of a continuous series of line and arc segments. The PEDIT command is exclusively used for editing of polyline properties. The selected line, arc and polyline can be added to an existing polyline by a JOIN option. A smooth curve passing through all vertices of a polyline can be created by using FIT option. Similarly, a spline can also be constructed by using SPLINE option.
(17) Explode: This command breaks a polyline into its individual segments. These segments can then individually be edited, and rejoined again to form an edited polyline.
The advanced features of AutoCAD are:
(1) Built-in programming language AutoLISP provides programming environment so that AutoCAD commands can be called along with programs written for computations. This is very useful for parametric design and drawing.
(2) Drawing Exchange Files (DXF) and script files can be used to interface AutoCAD with programs written in any other higher-level language such as C. DXF and IGES file formats allow the exchange of drawing files among various drafting software’s.
(3) AutoCAD provides techniques to define and extract attributes of entities. This feature is used in extracting information from a drawing for processing by other programs or to transfer it to a database.


