UNIT 5
Isometric Projection
Question and answer
- Write a brief description on Isometric projection?
Isometric projection is a type of pictorial projection in which the three dimensions of a solid are not only shown in one view, but their actual sizes can be measured directly from it.
If a cube is placed on one of its corners on the ground with a solid diagonal perpendicular to the V.P., the front view is the isometric projection of the cube. The step-by-step construction is shown in fig. 1.
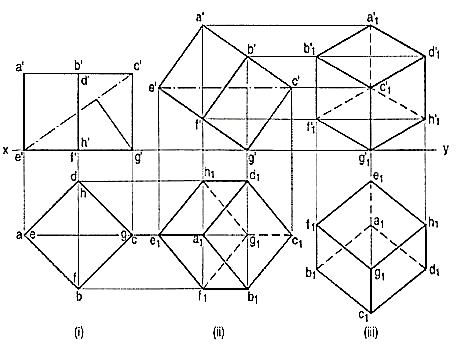
Figure 1
To draw the projections of a cube of 25 mm long edges resting on the ground on one of its corners with a solid diagonal perpendicular to the V.P., assume the cube to be resting on one of its faces on the ground with a solid diagonal parallel to the V.P.
(i) Draw a square abed in the top view with its sides inclined at 45° to xy. The line ac representing the solid diagonals AG and CE is parallel to xy. Project the front view.
(ii) Tilt the front view about the corner g' so that the line e' c' becomes parallel to xy. Project the second top view. The solid diagonal CE is now parallel to both the H.P. And the V.P.
(iii) Reproduce the second top view so that the top view of the solid diagonal, viz. e1 c1 is perpendicular to xy. Project the required front view.
Fig. 2 shows the front view of the cube in the above position, with the corners named in capital letters. Its careful study will show that
(a) All the faces of the cube are equally inclined to the V.P. And hence, they are seen as similar and equal rhombuses instead of squares.
(b) The three lines CB, CD and CG meeting at C and representing the three edges of the solid right-angle are also equally inclined to the V.P. And are therefore, equally foreshortened. They make equal angles of 120° with each other. The line CG being vertical, the other two lines CB and CD make 30° angle each, with the horizontal.

Figure 2
(c) All the other lines representing the edges of the cube are parallel to one or the other of the above three lines and are also equally foreshortened.
(d) The diagonal BO of the top face is parallel to the V.P. And hence, retains its true length.
2. Define isometric scale and its derivation.
As all the edges of the cube are equally foreshortened, the square faces are rhombuses. The rhombus ABCD (fig. 2) shows the isometric projection of the top square face of the cube in which BO is the true length of the diagonal.
Construct a square BQDP around BO as a diagonal. Then BP shows the true length of BA.
In triangle ABO, 
In triangle PBO, 

The ratio,  .
.
Thus, the isometric projection is reduced in the ratio  , i.e. the isometric lengths are 0.815 of the true lengths.
Therefore, while drawing an isometric projection, it is necessary to convert true lengths into isometric lengths for measuring and marking the sizes. This is conveniently done by constructing and making use of an isometric scale as shown below.
a) Draw a horizontal line BO of any length (fig. 3). At the end B, draw lines BA and BP, such that L OBA = 30° and L OBP = 45°. Mark divisions of true length on the line BP and from each division-point, draw verticals to BO meeting BA at respective points. The divisions thus obtained on BA give lengths on isometric scale.
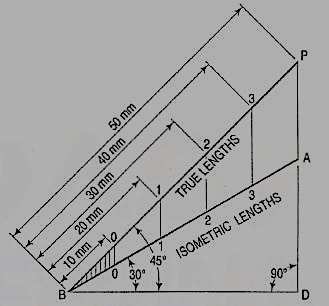
Figure 3
(b) The same scale may also be drawn with divisions of natural scale on a horizontal line AB (fig. 4). At the ends A and B, draw lines AC and BC making 15° and 45° angles with AB respectively, and intersecting each other at C.
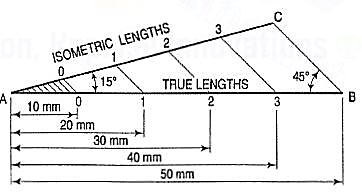
Figure 4
From division-points of true lengths on AB, draw lines parallel to BC and meeting AC at respective points. The divisions along AC give lengths to isometric scale.
The lines BO and AC (fig. 2) represent equal diagonals of a square face of the cube, but are not equally shortened in isometric projection. BO retains its true length, while AC is considerably shortened. Thus, it is seen that lines which are not parallel to the isometric axes are not reduced according to any fixed ratio. Such lines are called non-isometric lines. The measurements should, therefore, be made on isometric axes and isometric lines only. The non-isometric lines are drawn by locating positions of their ends on isometric planes and then joining them.
3. Write the process of projection of simple plain figures briefly?
If the foreshortening of the isometric lines in an isometric projection is disregarded and instead, the true lengths are marked, the view obtained [fig. 5(iii)] will be exactly of the same shape but larger in proportion (about 22.5%) than that obtained using the isometric scale [fig. 5(ii)]. Due to the ease in construction and the advantage of measuring the dimensions directly from the drawing, it has become a general practice to use the true scale instead of the isometric scale.
To avoid confusion, the view drawn with the true scale is called isometric drawing or isometric view, while that drawn with the use of isometric scale is called isometric projection.

Referring again to fig. 2, the axes BC and CD represent the sides of a right angle in horizontal position. Each of them together with the vertical axis CG, represents the right angle in vertical position. Hence, in isometric view of any rectangular solid resting on a face on the ground, each horizontal face will have its sides parallel to the two sloping axes; each vertical face will have its vertical sides parallel to the vertical axis and the other sides parallel to one of the sloping axes.
In other words, the vertical edges are shown by vertical lines, while the horizontal edges are represented by lines, making 30° angles with the horizontal. These lines are very conveniently drawn with the T-square and a 30°-60° set-square or drafter.
Isometric Graph:
An isometric graph as shown in fig. 6 facilitates the drawing of isometric view of an object. Students are advised to make practice for drawing of isometric view using such graphs.

4. The front view of a square is given in fig. 7 (i). Draw its isometric view.
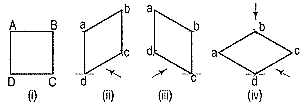
As the top view is a square, the surface of the square is horizontal. In isometric view, all the sides will be drawn inclined at 30° to the horizontal.
(i) From any point d [fig. 7(iv)], draw two lines da and dc inclined at 30° to the horizontal and making 120° angle between themselves.
(ii) Complete the rhombus abed which is the required isometric view.
2. Fig. 8 (i) shows the front view of a circle whose surface is parallel to the V.P. Draw the isometric view of the circle.
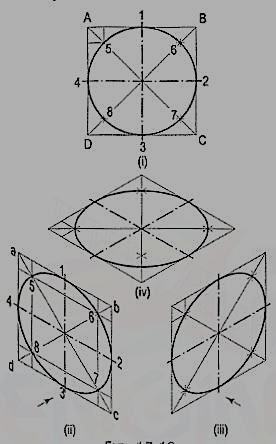
I. Method of points:
(i) Enclose the circle in a square, touching it in points 1, 2, 3 and 4. Draw the diagonals of the square cutting the circle in points 5, 6, 7 and 8.
(ii) Draw the isometric view of the square [fig. 8 (ii) and [fig. 8 (iii)] and on it mark the mid-points 1, 2, 3 and 4 of its sides. Obtain points 5, 6, 7 and 8 on the diagonals.
If the view given in fig. 8 (i) is the top view of a circle whose surface is horizontal, its isometric view will be as shown in fig. 8 (iv).
As the isometric views have been drawn with the true scale, the major axis of the ellipse is longer than the diameter of the circle.

Fig. 9 (ii), fig. 9 (iii) and fig. 9 (iv) show the isometric projection of the circle drawn with isometric scale. Note that when the length of the side of the rhombus is equal to the isometric diameter of the circle, the length of the major axis of the ellipse is equal to the true diameter of the circle.
5. Shows the front view of a semi-circle whose surface is para1lel to the V.P. Draw its isometric view.
(i) Enclose the semi-circle in a rectangle. Draw the isometric view of the rectangle [fig. 11 (ii) and [fig. 11 (iii)].
(ii) Using the four-centre method, draw the half-ellipse in it which is the required view. The centre for the longer arc may be obtained as shown or by completing the rhombus.
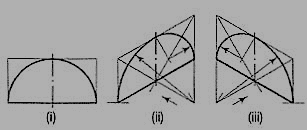
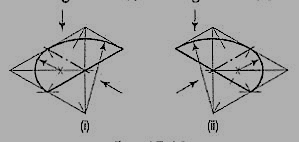
If the view given in fig. 11 (i) is the top view of a horizontal semi-circle, its isometric view would be drawn as shown in fig. 12 (i) and fig. 12 (ii).
(i) shows the front view of a plane parallel to the V.P. Draw its isometric view.

(i) The upper two corners of the plane are rounded with quarter circles. Enclose the plane in a rectangle.
(ii) Draw the isometric view of the rectangle. From the upper two corners of the parallelogram, mark points on the sides at a distance equal to R, the radius of the arcs. At these points erect perpendiculars to the respective sides to intersect each other at points p and q. With p and q as centres, and radii p1 and q3, draw the arcs and complete the required view.
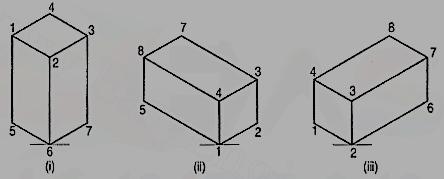
6. Draw the isometric view of a square prism, side of the base 20 mm long and the axis 40 mm long, when its axis is (i) vertical and (ii) horizontal.
(i) When the axis is vertical, the ends of the prism will be horizontal. Draw the isometric view (the rhombus 1-2-3-4) of the top end [fig. 14 (i)]. Its sides will make 30°-angles with the horizontal. The length of the prism will be drawn in the third direction, i.e. vertical. Hence, from the corners of the rhombus, draw vertical lines 1-5, 2-6 and 3-7 of length equal to the length of the axis. The line 4-8 should not be drawn, as that edge will not be visible. Draw lines 5-6 and 6-7, thus completing the required isometric view. Lines 7-8 and 8-5 also should not be drawn. Beginning may also be made by drawing lines from the point 6 on the horizontal line and then proceeding upwards.
(ii) When the axis is horizontal, the ends will be vertical. The ends can be drawn in two ways as shown in fig. 14 (ii) and fig. 14 (iii). In each case, the length is shown in the direction of the third isometric axis.
2. Three views of a block are given in fig. 15 (i). Draw its isometric view.
The block is in the form of a rectangular prism. Its shortest edges are vertical. Lines for these edges will be drawn vertical. Lines for all other edges which are horizontal, will be drawn inclined at 30° to the horizontal in direction of the two sloping axes as shown in fig. 15 (ii).
The orthographic view of a sphere seen from any direction is a circle of diameter equal to the diameter of the sphere. Hence, the isometric projection of a sphere is also a circle of the same diameter as explained below.
The front view and the top view of a sphere resting on the ground are shown in fig. 25 (i). C is its centre, D is the diameter and P is the point of its contact with the ground.
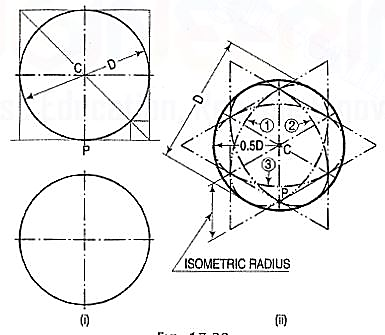
Assume a vertical section through the centre of the sphere. Its shape will be a circle of diameter D. The isometric projection of this circle is shown in fig. 25 (ii) by ellipses 1 and 2, drawn in two different vertical positions around the same centre C. The length of the major axis in each case is equal to D. The distance of the point P from the centre C is equal to the isometric radius of the sphere.
Again, assume a horizontal section through the centre of the sphere. The isometric projection of this circle is shown by the ellipse 3, drawn in a horizontal position around the same centre C. In this case also, the distance of the outermost points on the ellipse from the centre C is equal to O.5D.
Thus, in an isometric projection, the distances of all the points on the surface of a sphere from its centre, are equal to the radius of the sphere.
Hence, the isometric projection of a sphere is a circle whose diameter is equal to the true diameter of the sphere.
Also, the distance of the centre of the sphere from its point of contact with the ground is equal to the isometric radius of the sphere, viz. CP.
It is, therefore, of the utmost importance to note that, isometric scale must invariably be used, while drawing isometric projections of solids in conjunction with spheres or having spherical parts.
7. Draw the isometric projection of a sphere resting centrally on the top of a square prism, the front view of which is shown in fig. 26 (i).
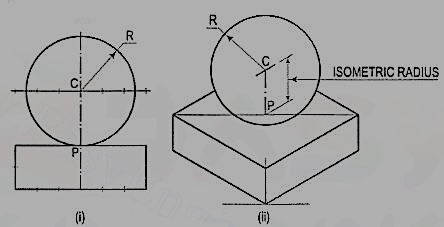
(i) Draw the isometric projection (using isometric scale) of the square prism and locate the centre P of its top surface [fig. 26 (ii)].
(ii) Draw a vertical at P and mark a point C on it, such that PC = the isometric radius of the sphere.
(iii) With C as centre and radius equal to the radius of the sphere, draw a circle which will be the isometric projection of the sphere
8.Describe in brief the for Conversion Isometric projection to Orthographic Projection?
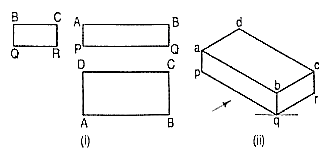
Conversion of a pictorial view into orthographic views requires sound knowledge of the principles of pictorial projection and some imagination. A pictorial view may have been drawn according to the principles of isometric or oblique projection. In either case, it shows the object as it appears to the eye from one direction only. It does not show the real shapes of its surfaces or the contour. Hidden parts and constructional details are also not clearly shown. All these must be imagined.
For converting a pictorial view of an object into orthographic views, the direction from which the object is to be viewed for its front view is generally indicated by means of an arrow. When this is not done, the arrow may be assumed to be parallel to a sloping axis. Other views are obtained by looking in directions parallel to each of the other two axes and placed in correct relationship with the front view.
When looking at the object in the direction of any one of the three axes, only two of the three overall dimensions (viz. Length, height and depth or thickness) will be visible. Dimensions which are parallel to the direction of vision will not be seen. Lines which are parallel to the direction of vision will be points, while surfaces which are parallel to it will be lines.
While studying a pictorial view, it should be remembered that, unless otherwise specified:
(i) A hidden part of a symmetrical object should be assumed to be like the corresponding visible part.
(ii) All holes, grooves etc. should be assumed to be drilled or cut right through.
(iii) Suitable radii should be assumed for small curves of fillets etc. An object in its pictorial view may sometimes be shown with a portion cut and removed, to clarify some internal constructional details. While preparing its orthographic views, such object should be assumed to be whole, and the views should then be drawn as required.